
Thank you! Your comment has been submitted successfully. You should be able to view your question/comment here within a few days.
Error submitting comment. Please try again momentarily.
In-stock alternatives that can ship today
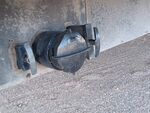
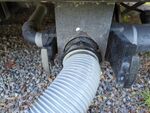
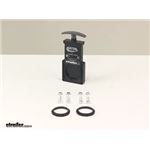
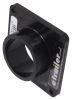
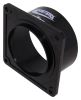
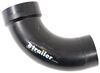
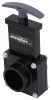
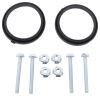
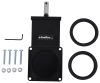
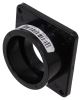
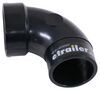
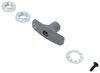
Replaces the valve for your RV's gray-water tank. 1-1/2" Diameter passage allows wastewater to travel freely when valve is open. Valve body, seals, nuts, and bolts included.
Features:
To install, remove the broken waste valve and seals from your gray-water tank. Then place the included seals on the flange fittings and position the new valve body. Tighten the provided hardware to complete installation.
Videos are provided as a guide only. Refer to manufacturer installation instructions and specs for complete information.
Adam : Hi, how are you everybody. Adam here with etrailer. Today, we're going to be taking a look at the Valterra gray water valve. So you could be replacing just your seals, maybe just the hardware, but today we're actually replacing the whole thing. So we're going to have new hardware because ours was rusting out. And also, new seals because we we're having a little bit of leaks.
So if that's something that you guys are having problems with, this is the video for you. We're going to go over the whole entire swap together.So this right here is going to be your replacement, gray water valve. It's going to have a diameter of an inch and a half, so make sure that it is the right size for your setup. We have other different sizes here at etrailer. So if it is a different size, we got you.
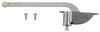
We got all the parts you need. And even if you don't need to replace the whole entire thing, we have replacement parts for everything you see here. And that's always a plus.We have a nice little handle, which is going to engage and disengage the valve to shut off or turn on that water flow to let it flow out. So if you get the whole entire replacement, it's all going to be made of plastic. We are going to get our nuts and bolts with it.
And of course, we're going to get the seals too. And that's always a plus. These are going to fit the Blatt X Valterra Bristol and Ananda valves. So don't really have to worry about cross-compating different brands. This works just as good as all the other ones.There's a couple of different reasons why I'm changing out this valve.
One, Jake told me that it was leaking and the seals weren't really holding up. So instead of just replacing just the seals and the screws, we did the whole entire thing. And we're going to go over that with you now.So first things first, we need to remove our valve. And to do that, we're just going to need a three eighths inch wrench and socket to loosen these up. So We had a little bit of an issue and another reason why we're kind of switching this out, all of our heads on our bolts snapped off. But what I'm going go ahead and do is just take a little punch. You can take anything that's going to fit in that hole and just give it a little good, a little tap, and it's going to break loose real easy ideally. Look at that. Look at that. Oh yeah. So I'm going to do that for all of them and then go ahead and take this valve out.So while we're going to be replacing our seals, the nice thing about it is, when we do get the seals, we don't have to drive these back in. Obviously, these are completely unusable because they're all seized up and stuff. So I'm going to get those out later. But now, the nice thing is our seals are bad, but we can replace them really easily and it does come with hardware. So we can replace both of them all in one go round, which is nice.So all you really need to do is take the new seals, and just put them in there. I mean, it's really, really that easy and it's going to be the same exact thing for the front and the back and check that out. Pretty much done deal. So everything's really working fine. I didn't have any leakage or anything like that. So I can just go ahead and use the new hardware to re-install this valve. So now with all of our new stuff, shouldn't have any leaks or anything like that, line it all up. Oh yeah. And put our hardware through just how it was before, just new stuff. And what I like to do is put them all in, get them all lined up and then I like to go through there and tighten them all down separately, but kind of going from one to the other.So meaning, I put this nut on here. I'll kind of tighten it down almost to the bracket there, and then I'll do like a star pattern. So I'll tighten this one down and this one down then this one and this one, that way, we're not going to be putting that seal under any weird angles. It's not going to get smushed. It'll just help everything go nice and smooth. So with the new hardware, we are going to have to have an eight mill and a 10 mill, whichever kind of tools you need to get it done. I'm just using a wrench and socket, but go ahead and tighten one up, not all the way. And then tighten the one back here up in that star pattern, kind of like the lug nuts on your truck, car, motor home. Now that everything is all secured down, the levers, moving there's a little bit more of a seal there and we don't have any drippage coming out from underneath.So everything's nice and sealed up and now we're good. Well, everyone, I hope this video kind of just helped you with the installation process, whether you just wanted to get a closer look at the valve itself, or if you wanted to stick around a little bit longer, I actually go and answer a couple of my coworkers questions about the valve. So definitely check that out. Did you know right away that this was where it was leaking I mean, I would assume that this is going to be the culprit of, the most common points of leakage or did you have to actually look around to figure it all out Adam : Oh no. You'll know. You'll know whether it's down here, where the two pipes smash that valve, that'll be one. Or if it starts coming out right here, and usually it doesn't, it's not that difficult. I mean, obviously do it on a dry day. You know what I mean You don't want to have to go over there, just sniff everything around to see if it's paint or not. You know what I mean So do it on a dry day or when everything's dry, but yeah, you'll be able to see obviously piping and stuff.There's a bunch of fittings all around here. There's one, two, three, and four different seal pieces together on the pipe. And then there's the seams for the valve. So you'll be able to see that. I didn't have to search around to answer your question. The handle on that valve, is it going to break off I know that's a dumb question because who knows And I guess it could. Adam : They will. I've seen it. I've seen it all the time. So that is why, if that happens to you, especially if you're in, let's say you don't have a cover and your valve's like this, so it's exposed and sees a lot of sun. And then it also sees a lot of cold. You know what I mean It's eventually going to crack and it will eventually break. I'm not saying, it might not. The one that comes with it, it will eventually break. Speaker 3: Yeah. The one we took off, it was looking pretty harsh. And I think that kind of lends to the whole thing of just replacing it all at one time, because yeah, your seals may be bad now, and it may be like half and half for the full thing. So why wouldn't you just do it all at one time and then have a fresh new setup for the valves Adam : I agree. But if you have a brand new valve, let's just say, Jake comes over here, just breaks it. Grab this. So this is a metal one. Can't really hear it, but it's metal. Trust me. This will solve that problem. And then the rod is metal too. But one thing I have seen, what you have to do is, it's kind of difficult. So on the ones that I took off, I couldn't even get the knob turn because it was just as old as the hardware, and the hardware was rusted away. So it was really, really seized up. If you're really dead set on keeping that valve and you don't want to spend the extra couple bucks to get the whole assembly, go for it. But this was a little bit easier, but you have to get a tool, I use vice channel locks to just hold it in place and then twist it off.So on all the replacement knobs, they're going to be threaded on the inside. And the nice thing about this is, these are all plastic, so all the threads are plastic. On the other one though, for some reason, it looked like it had a little metal insert in there, but that was, I'm not sure what brand that one was that we took off. It was pretty old, but they're all standard. You don't really have to worry about matching up the right pitch or whatever. They just thread right on and come right off. That's just an accessory part that we sell or replacement part, that handle Adam : Yeah. So if you do have the problem with this breaking, we have a solution. It's this, which won't break. I'm 100% positive I would break the plastic one. Adam : I'm with you. We almost broke it. Adam : And, the gray water valve has the gray handle and the black water has the black handle, right You can replace it with whatever you want. crosstalk 00:09:52. Functionally or anything. Adam : No, not really. I would suggest though, getting the metal one for the black water, because this seal is so much more intense than the other one, so much tighter, which is good. Speaker 4: It's holding back the flood gates. Adam : So we have a bunch of different, we have a bunch of different replacement knobs. So yeah, if you're knob breaks, we have replacements for exactly what it is. But then you have, also these kind, which is actually what was on the other ones where it has the little fitting on the inside. So this will rust out, and it did on the ones that are replaced. So that is, you just get the, spend the extra, a little bit of money to redo the whole entire valve. I mean, you're taking it off anyway, so just replace it. But we have all sorts of different little knobs. So some of them are plastic. The ones that come with them are plastic. These have the little inserts in them with threads. And then the metal ones, obviously just metal doesn't have an insert in it, just metal. So that's cool. When you get in there to replace the valve, is it typical that you're going to find other things that maybe mean maintenance as well, or is this just kind of a one and done thing Adam : It's one and done. It really is. So for instance, if you guys go over here, I mean, you got, you basically have this curved pipe, which goes outside, and then it has that plate. And that's one piece. So that's all sealed up, leading up to there and then it just is in, then there's the valve. And then on the other side we have the little plate converter piece and then the pipe. So basically, it's just two of the pipes just clamping down over this. So this is literally all that's in there. And then of course, within that, the valve there's just these two rubber seals. That's the only thing on the inside of there.So no, not really. I mean, unless you have a cracked tube or something like that, but then you've got a lot bigger problems. You know what I mean The valve's not going to do anything for you. So this is probably the easiest maintenance that you can do for this anyway. You don't have to cut any pipe and reseal or anything like that. It's just bolt in and you're good. Adam : That's why I'm just saying do all four. It's like if you're doing brakes on your truck, are you just going to do the back brakes or all you going to do all of them You know what I mean It's like, if you're in there do it. Speaker 5: You can tell and see whenever there's a problem. And you can tell and see whenever any of the bolts are corroded or it's starting to look grody. I think that's one of the good things about it is, you'll definitely be able to tell when you need to change it. Adam : Yeah. Stuff will be on your driveway. Speaker 6: I guess one, one thing that, it's kind of simple. It's a pretty, it's pretty smooth. It doesn't wiggle around. You don't have to give it a lot of force to push and pull it. Adam : Yeah. Here, let me grab something real quick. I mean, it's not, there's not a whole lot to it. I mean, this is the valve. I mean, you just have your seals that go in the ring here and there. I mean, it's just in and out. It's very, very simple, very simple gate. But yeah, it's easy. It's just like a little door, that's basically all it is. It just stands straight out, that's it So not a whole lot to it. It's not very, very mechanically advanced. It;s not difficult at all. It's just a valve. You have, there's the valves that are like a ball with holes and you have to twist it. Or then you got this kind of a valve, and that's what we're using. Speaker 7: Do you think there's any easier products to install or is this, there's not something that's easier than this Adam : If there's something that's easier than this, someone needs to bring it to me, because I don't really think it's possible. I mean, that's just me. I mean, if it is simpler and it works just as well then kudos. But I don't see that even being a possibility, just because it's four bolts, you know Okay. Well if you guys have any other questions, you guys can always email me. We're going to be doing this stuff all day. So I will talk to you guys later. Thanks for coming out. And that's going to do it for our look at the Valterra RV waste valve and I'm Adam with each trailer.
Average Customer Rating: 4.8 out of 5 stars (588 Customer Reviews)
Replaces the valve for your RV's gray-water tank. 1-1/2" Diameter passage allows wastewater to travel freely when valve is open. Valve body, seals, nuts, and bolts included.
Installation was slightly challenging as the gasket kept moving around taking several attempts to fasten it without losing the alignment of the gasket to the piping. These types of valves seem prone to allow slight leakage through the part whenever the smallest interference is met. I have to hose the inside of the tube and part every time in order to make certain that the raw sewage didn't cause a leak in the valve. But, once the seal's made with the piping, it worked better but still leaks a little at the valve due to the nature of these types of valves.
Another quality part from etrailer fast service And the part fit perfectly install it within minutes of receiving it
Very quick turn around. Thank you
Replaced because handle was broken. Easy install. Sold trailer after installing
Very easy replacement, works like a cha rm
Great product -- it is what came with the unit when purchased and this is an exact replacement. Haven't install these last two waste valves, but did install the waste valve operated via cable system. It too was a Valterra; an exact replacement -- works perfectly. Very much appreciated the friendly and knowledgeable people at E Trailer for helping me with this project.
No more leaky valve. Arrived quick and just as described
Easy install. Works great.
The Valterra waste water valves are well built and work effectively. The most important part of installation is to resist the temptation to over tighten them. Close the valve; place the rubber gasket in place and tighten the mounting hardware until just over hand tight. Test the valve for leaks. If there are any tighten each bolt/nut about 1/2 turn and try again. If still no joy, make sure the gasket is in place and try again. There is no need for excessive pressure on the valve structure to achieve a water tight seal.
just what I needed, when I needed it!
Great product great price. Directions were a little fuzzy as the seal nearest to the trailer need to be completely seated before nuts are tightened. I ended up breaking a seal but one of my old seals was still good which gave me a second go at aligning the seal. End result was no leaks and product works flawlessly.
Very good replacement valve comes with new gaskets and installation screws. Great value!

Phillip L.

7/19/2020
Replacement valve installed easily and works great.
It is a pleasure ordering from trailer.com. Products are always in stock, no back orders, no excuses, no b.s..
Pleasant communication, products are shipped quickly and arrive on time. It is very refreshing to deal with
these professionals. I heartily recommend these folks for all your trailering needs.
Ordering from etrailer was extremely easy. Good friendly service with quality parts at a reasonable price. Along with fast delivery. I will definitely recommend them and order from them in the future! Now if the weather warms up we can go camping!!
The valve still works great. Makes me a happy camper!

James B.
1/21/2022
Still works great. No leaks and smooth opening and closing. What more could I ask? The valve both still work great. No leaks and smooth opening and closing. Wha more could I ask?
Easy to install and worked well last summer. It was a replacement for a broken handle
The products were super easy to order thanks to the videos and descriptions of what I was looking at. etrailer shipped the order the next day with lightening speed. I am looking forward to finishing my project and will gladly do business with etrailer again.
An exact replacement for my 33 year old valve. Great quality and price. Good for another 30 years.
I haven't installed the valves yet, but the order was processed and arrived very promptly. The price was better than any other I could find, and the valves were complete with installation hardware and seemed to be the "real deal".
The product is great but the install has been very difficult. There just is no slack in the plumbing to slide the replacement back in. A problem with the RV, not the product.
I installed in in my shower gray tank drain to replace a broken unit, so far it has worked as advertised. I am very happy with it.
This unit fit perfectly. Very easy to remove old unit (cracked), new unit slid right in, the bolts and nuts included fit perfectly into existing plumbing. Have used several times to date: seals perfectly - no leaks!
Thanks!
Very fast service. Will use them again..
I still have install it but it is identical to the old one so I do not see any issues. As usual very satisfied with Etrailer!
Perfect fit for my 96 Roadtrek. Unscrew handle and screw original extension to it.
Do you have a question about this RV Waste Valve?
Info for this part was:
At etrailer.com we provide the best information available about the products we sell. We take the quality of our information seriously so that you can get the right part the first time. Let us know if anything is missing or if you have any questions.


Rick
8/12/2018
Love everything i have gotten from Etrailer. And everything is quality parts. Highly recommend them for all your camper parts.