
Add this LED braking monitor to another RV to use with your Roadmaster 9700 or InvisiBrake supplemental braking system.
Features:

Videos are provided as a guide only. Refer to manufacturer installation instructions and specs for complete information.
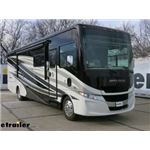
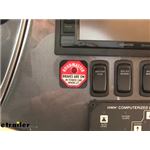
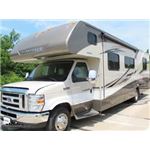
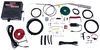
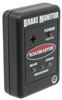
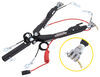
Today on our 2018 Tiffin Allegro RED Motorhome, we're going to be taking a look at and showing you how to install the Roadmaster 2nd Motorhome Monitor/Alarm Kit, part number RM-98850. And to help us with our installation, we're going to be using the Tekonsha plugin wiring adapter for electric brake controllers for Ford Lincoln and Mercury, part number 3035-P.So here's what our monitor alarm kit looks like once we have it installed. It's going to sit nice and flush against the dash and have this sticker here so we know exactly what that light means. Our monitor alarm is going to allow us to monitor the braking action in our towed vehicle, so when we're going down the road and we apply the brakes in our motorhome and our supplemental braking system applies the brakes in our towed vehicle, we can see when they come on, and when the light goes out, making sure they release.Our monitor is even going to have an audible alert whenever the brakes have been on for too long. Typically, it's about 15, 20 seconds, and it realizes that the brakes haven't been released, so it's going to have a beeping sound to let you know in case anything fell on the brake pedal or if the brakes locked up.Our monitor alarm is designed to work with the Roadmaster 9700 portable braking system, as well as the InvisiBrake supplemental braking system. However, you can use it with any supplemental braking system so long as you have a brake signal that can be sent to the monitor.
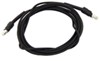
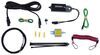
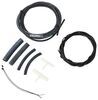
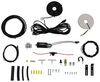
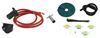
Our monitor alarm is going to allow us to see exactly what's going on in our towed vehicles.Even though most supplemental braking systems have some kind of monitor light that comes on when the brakes are applied, most of the time, they're attached to the rear view mirror or the dash on our towed vehicle, and we have to watch our rear view monitor while we're going down the road. Well sometimes when we have really bright lights or a bad angle, we can't really see the light on the monitor. Since ours is going to be mounted on the dash here, it's going to be a lot easier to see, so whether you've got a new motorhome or you're upgrading your supplemental braking system so you can monitor it from the inside of the cab on your motorhome, this is going to be a great addition to any flat tow setup.Now that we've seen what our monitor alarm looks like and gone over some of the features, lets show you what all comes with it and how to get it installed. So, here's everything that's going to come with our kit. We'll get a 50 foot cable along with our audio signal and our light, a few butt connectors and some zip ties.Now depending on how you have your braking system wired on your towed vehicle is going to depend on how you put this in.
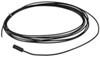
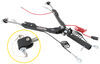
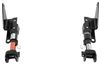
If you have the cable out the front that's going to connect to the jumper that hooks up to your motorhome, then we're going to have to run this 50 foot cable from the back of the motorhome all of the way up into the dash. However if you have it ran through your umbilical like ours does, we're going to be using the brake signal from our motorhome to send the wire. So, we're also going to be using this plugin brake controller adapter, that way we can simply plug it in under the dash and it'll give us the wires we need at the back.Now, the tools you're going to need to get everything installed is going to be a drill, a 5/16ths drill bit, some wire strippers, and crimpers to make your electrical connections.The first thing we're going to want to do is find a spot where we want to mount our light. We're going to be mounting ours on this dash panel right underneath the radio. So to make sure we're not going to do any damage, I'm going to loosen this panel up so we can pull it out and see what's behind it.We're going to have several Phillips head screws going around the perimeter, so we'll go ahead and take a Phillips bit and pull those out.
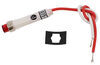
So with the screws out, we're going to loosely pull the panel away. You don't want to pull too much because there are a lot of electronics attached here. We'll pull it away. And double check that there's not going to be any kind of interference for putting our light here.So, we can take our sticker now and there is going to be a small perforated section in the middle with the round hole. You want to pop that out first.
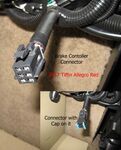
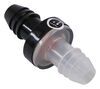
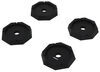
That's where our lights going to be going through. Then, we can take the rest of the sticker off completely, and we'll line it up with where we want it to be on our dash. Now, we can use the sticker as a template to drill right through the hole there so that we can get our light in.I'll take a 5/16ths drill bit, and I'm going to drill through the dash.Now, we'll take our monitor lights and the two wires and from the front, we're going to feed them into the dash and push the light in until it's nice and snug. And we'll pull our dash out a little bit so we can get access to it, and we're going to take this speed nut and we're going to press it up against so it kind of locks the light into place and it won't come out.With our light mounted in the dash, we'll have a red wire and a white wire coming off the back. Going to want to grab our audio alarm, and I'll have a red and white wire with pre-stripped ends, so we can go ahead and pull of the installation. We're going to go ahead and take the red wire from our speaker and the red wire from the light and we're going to combine them together. And we'll take the yellow butt connector from our kit, slide it over the end of both wires and crimp it in place. And we'll do the same thing for the white wire, combing them both into one side of the butt connector. However, you're probably going to want to use another yellow butt connector, because the one that comes in the kit is going to be slightly smaller. And you can pick up some butt connectors here at etrailer.com.So, the two wires here, our white wire is going to be the ground and our red wire is going to be our power signal. So, the white wire is going to need to have another lead that's going to be grounded somewhere, and the red wire is going to need to get power whenever the towed vehicle's brakes come on. So since ours is wired up through the umbilical and goes to the brake output signal for the tow package, we're going to be using the plugin adapter, but we're only going to be focusing on the white wire and the blue wire.So, we'll find the end that plugs into the brake controller and we're going to cut really close to the plug the blue wire and the white wire. Now, you can leave this on, you can cut these off and put some caps on it, but for us, we're just gonna go ahead and leave it on and throw some tape on it whenever we're done.So, we'll strip back the end of our white and blue wires. Our white wire's going to go directly into the butt connector with the two white wires attached. Our blue wire is going to go into the butt connector with the two red wires attached. So we're going to make sure you get a solid connection and you crimp it down well.We just dropped our wire, fed everything back into the panel behind here, and we can go ahead and re-secure this panel down.Now if we come underneath our dash on the driver's side extremely close to our emergency brake pedal, we'll find our factory tow package plug. It's going to have four pins on the inside and be a gray connector.So, you're going to want to route the plug that we routed from the monitor light over towards our factory tow package plug. Now, this is going to plug directly into it, so you want to make sure that you route is so that it's not going to interfere with your steering, braking, or any other components under the dash. And we can take a few zip ties, tie up any excess wires.So now that everything is plugged in, let's go ahead and grab our towed vehicle and make sure that the circuits are working properly.Now, the easiest way to make sure that the pin is working without having to fully hook up and drive around with your motorhome is if we pull the breakaway pin on our towed vehicle once we're hooked up. Then we can see that the light comes on, so we know all of our circuits are working properly.That'll finish up your look at the Roadmaster 2nd Motorhome Monitor/Alarm Kit, part number RM-98850 on our 2018 Tiffin Allegro RED Motorhome.
Average Customer Rating: 4.9 out of 5 stars (48 Customer Reviews)
Add this LED braking monitor to another RV to use with your Roadmaster 9700 or InvisiBrake supplemental braking system.Fast service, right parts as always with etrailer
Great service! Best price and best delivery. Thanks to Ed
P.s. Got to have this part in order for your Invisibrake System to operate!!!
worked great, easy install

Products and service were outstanding! I got my base plate, tow bar, braking system and wiring done quickly. When I traded in my old motorhome on a new one, they wired up my new motorhome to interface with my toad. I've since sent my friends to etrailer and they were very pleased with installations. One friend even had two vehicles set up with base plates and braking systems. I highly recommend etrailer service and products.
After watching etrailer videos to determine what parts I would need for a second vehicle invisibrake install, I placed a call to etrailer. I made contact with Amy, a rep with etrailer. Amy assisted me in getting the right parts and removed any doubt that I had about me just placing an order without assistance.
I placed my order and to my surprise, within a couple of days the parts were setting at my front door. After opening the box to do an inventory, I was amazed at the proper labeling of all items, and everything I had ordered was there.
I am extremely pleased with the professionalism and knowledge of Amy. I will definitely use etrailer for my future needs.
Way to go, and Thank You for making this purchase such a positive experience!
Needed this to complete the install for my used invisibrake system. The two wires from the LED could be about 6 inches longer in my opinion. The shortness made for a harder install. I should have extended the wires myself instead of fighting it so long.
Arrived on time, in excellent condition and exactly what I expected - always great service by etrailer
I have not been able to install the kit, yet. I got another motorhome and your web site was the only place that I was able to find the parts I needed. I think that etrailer.com is an excellent place to find the parts a person might need for a RV of any type. And the service was excellent. Thank you very much.
Easy installation and reliable monitor for proper brake assist on towed vehicle when engaging main brake on towing vehicle.
eTrailer is my "go to" place for ALL things towing. They not only have the best prices, they have easy-to-access instructions, etc. Their support system is terrific.
Looks good. New product delivered on time. Happy
Got a new coach and need to wire it to tow my car using Roadmaster Invisibrake - this is the full kit needed!
Purchased new motorhome & the wiring went with it. The Roadmaster replacement monitor was an exact replacement.
Great product at a great price from eTrailer. The installation video that they have on the eTrailer site was very helpful and saved me a lot of time when I was installing the cable. You can't go wrong with buying from eTrailer!
I needed the Roadmaster 2nd Motorhome Monitor/alarm Kit quickly as I was purchasing a new RV and the dealer agreed to install it. I shopped the Internet and etrailer had the best price and reasonable shipping. Order mid day Monday and it arrive the next morning. Very happy with product and service.
My third order from etrailer. Each time the part arrives on or before the expected date. The support pages on each product are invaluable and live, friendly people answer the phone for any questions.
Everything was great very easy installation. You had a you tube video that really made it simple. It was shipped quick n arrived rt when I needed it m. I’ll definitely be using e trailer again.
Package arrived on time and in excellent condition. This works as expected, I have not been disappointed when I purchase any items from this company.
The pictures of the items I ordered were very helpful in confirming that the parts I ordered were the correct parts needed. I ordered the parts on Sunday and they were delivered on Tuesday. I am very impressed by the service and will continue to order my parts from Etrailer!
Good product, but extremely over-priced by Roadmaster.
Strainer has become my go-to company for All my RV and towing needs.
Exactly what I ordered, delivered in a timely manner, just like every other time I have ordered from etrailer.
Great service. Thanks
Prompt service and delivery on parts.
Wonderful service always with ETRAILER.


Do you have a question about this Accessories and Part?
Info for this part was:
At etrailer.com we provide the best information available about the products we sell. We take the quality of our information seriously so that you can get the right part the first time. Let us know if anything is missing or if you have any questions.


Thank you! Your comment has been submitted successfully. You should be able to view your question/comment here within a few days.
Error submitting comment. Please try again momentarily.