
Thank you! Your comment has been submitted successfully. You should be able to view your question/comment here within a few days.
Error submitting comment. Please try again momentarily.
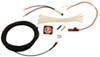
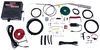
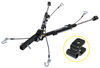
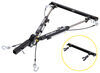
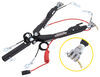
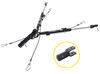
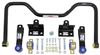
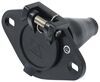
Adds the components needed to use your Roadmaster 9700 braking system in a second towed vehicle.
Features:

Videos are provided as a guide only. Refer to manufacturer installation instructions and specs for complete information.
Hi there, Escape owners. Today in your 2009 Ford Escape, we're going to be taking a look at and showing you how to install Roadmasters Second Vehicle Kit for the 9700 Series Supplemental Braking System.There's five main components you'll need when flat towing your Escape behind your motor home. You'll need your tow bar, which is the connection between your motor home and your vehicle. You'll need your base plate, which provides the connection point for your tow bar to attach to your vehicle. You'll need your diode wiring, which takes all the lighting signals from your motor home and transfers them back to the lights at the back of your vehicle, so people behind you know your intentions when going down the road. And you'll need your supplemental braking system, which will apply the brakes in your vehicle when you hit the brakes in your motor home.
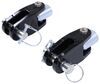
The last thing you'll need is just some safety cables, which acts as a supplemental connection in addition to your tow bar.Now I do want to make you aware that you should verify in your vehicle's owner's manual and check with your dealer before flat-towing your Escape, because there are going to be some restrictions, particularly with speed when flat towing your Escape as is. This kit is specifically designed for Roadmasters portable braking system, the 9700 models, and it provides you with everything that you'll need to be able to use this supplemental portable system in another vehicle. Now it only comes with the side that you'll need for your vehicle. So the motor home section of parts you will not get with this kit, but you shouldn't need them because if you're using the same motor home and you're just trying to tow a different car, you've got everything you need for that other car. And that's mainly the stuff you'll need just to get this unit operating.We'll get everything we need in our kit for the vehicle side.
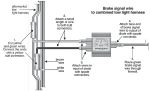
And there's two main connectors you'll have on your 9700 Series that we'll need to plug in. Both of these connectors come provided with our kit. And you'll see here, we've got a green wire that has a single bullet connector that plugs in, and this is the wire that is the brake signal from the motor home so the system knows when we're hitting the brakes. You'll receive the bullet connector that you'll plug this into, as well as a length of wire. And that'll go to a set of diodes where it taps into your diode wiring to allow you to intercept those lighting signals from your motor home and send them to your 9700 Series braking system here.
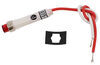
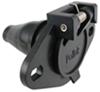
This allows it to know when the brake pedal's being depressed so it knows how to properly apply the brakes.Next to that, we have a two wire connector, and this is for the breakaway switch that comes included with our kit that we'll install on the front of our vehicle. And this is an important safety component, because in the event of a catastrophic disconnect, the 9700 Series here will be able to see that the pin was pulled on the breakaway switch, because it will complete the context between them. And that will allow our 9700 Series here to kick in and apply the brakes to help our vehicle come to a safe stop.Here outside the vehicle, you can see the monitor light wire. This is also a single bullet connector, but it's going to be a black wire. And this will route from here in the front inside the vehicle and connect to the stoplight switch in the vehicle.
So that way, whenever the braking system applies the brakes, the stoplight switch that's connected to the brake pedal in our Escape here is going to then send an output down this wire, which we can then plug into the back of our motor home. And that'll go to the monitor light inside the motor home and illuminate it so we know for certain that the brake pedal was depressed inside of our Escape here.You can also see the breakaway switch located right below that. It comes with a pin and it also comes with a new breakaway switch cable in case your old one is damaged or if you want to keep that one with your other vehicles, since this is the second vehicle kit.Just to show you that everything's working properly, we're going to pull the pin here and you're going to see the braking system apply on the inside.We'll begin our installation by mounting the major components. Now one of the things you'll notice here is that we had the fascia off because we just got done putting our base plate on not too long ago. And while you get the fascia off when you're putting your base plate on, before putting the fascia back on, that's the best time to do the rest of your flat two install, like installing your braking system and your diode wiring, because it just makes it easier to get everything hooked up.Your wiring bracket is often a good place for mounting components too, especially if you've got nothing but plastic on your fascia. You don't want to mount your breakaway switch or things that's going to potentially get pulled on something plastic. So we're able to mount it directly to the bracket for our electrical connector. This is included with your diode wiring in most cases, and it will attach directly to your base plate in most cases. We've got a Blue Ox base plate installed here, but if you had a Roadmaster base plate, they also provide similar mounting options just like this.To get the breakaway switch mounted, simply held it up to the bracket and then marked the hole, and then just drilled out where I've marked and then used the included nut and bolt to attach it to the bracket here. You'll need a 10 millimeter wrench for the bolt and an 11 millimeter for the nut. You'll also want to get your monitor wire mounted up, because that's going to go right here next to your electrical connectors. And this is going to send the brake signal from the stoplight switch on your vehicle up to the connector here. So that way the monitor side on your RV when it's plugged in will illuminates the light inside your motor home. So we just put it next to our electrical connector and just routed it through the bracket. Depending on the bracket you have and the wiring you chose, you may have to choose a slightly different option. You can always zip tie it to it. It just happened to fit through very well on this particular bracket.And from here, we can just start routing some wiring. So the rest of this wire we need to route inside the vehicle, and our breakaway switch here has a connector on it that you'll see here. And we're going to take the harness that comes in our kit. We're going to plug that in, and then we're going to route both of these wires inside. So we just routed our wires down our base plate. We came up here following factory wiring and then poked through the hole underneath the headlight. They come out here behind the headlight. We stay underneath our battery tray, just go forward following that factory wiring until we get back here to the firewall next to our brake booster.Now this grommet is only going to be present on automatic transmission vehicles. This is where the clutch cylinder would go there, the reservoir for it. So since we have an automatic, we we're able to go right through the grommet that's located here. We just took our razor knife and just cut a little slit in it and poked the wires through.Now if you had a manual transmission, there's another grommet located near here. If you just go towards the outside of the vehicle on the driver's side, you'll see there's another wire harness here. You can go through the grommet that this one's passing through. We just chose this one, because it's much easier if you've got an automatic to go through here than it is through this grommet. And here you can see on the inside where we've got our wires running through our grommet.At this point, we're going to head back outside now because we've got a couple more wires we need to hook up and then run inside. You can actually see the green wire that I've got dangling down there. This one needs to get hooked up outside and routed inside. I've already got it routed inside, but we still need to hook it up.We're now back at the front because we need to tap into our diode wiring so we can get our brake signal from our lighting circuits here sent inside to our box. So here's our diode wiring. Yours may look a little bit different. Yours might have a white wire on there as well, depending on the wiring kit that you chose. But our main concern here is the green and the yellow wire. We need both the green and the yellow to tap in to get our brake signal. So we're going to take our wire cutters and we're just going to cut in between the wires to separate those out. And once we've got those separated, we can go ahead and cut the green wire in half as well as the yellow wire. The brown wire we don't want to cut.Now that we've got all of these separated out, I just pulled them apart to give myself a little more room to work. We'll need to strip back each wire. And I know we're working here at the front, but you can do this really at any point, as long as your wires are going to be long enough to route them inside. And now that we've got each one stripped, we're just going to reconnect them. But we have a small length of yellow and green wire that comes with our kit. And we're going to strip this back as well and make sure we have this connected in with those. This is going to be the little taps that we're using to get our signal out. We're just going to strip that back. We're going to choose one of our yellow wires here, and we're going to add our additional yellow wire to it. Just want to twist those two together.We can then take our butt connector that comes in our kit and crimp them together. Or you can do like we're doing, and we're going to upgrade from the butt connectors that come into our kit with a heat shrink butt connector, which is very similar, but we can shrink it down to keep out any moisture, to ensure that we have a long lasting connection. Now that we've got our extra yellow wire crimped to the yellow there, the other end of our butt connector is just going to recrimp our yellow wire back together. Pull those back just a little bit more, just so you can have the flexibility you need on your wire to get wrapped around the crimp back on. Once we get this done on the yellow wire, we're going to do the exact same process with our green wire using the small extra bit of green wire that comes in our kit. Once you've got them all connected, we can shrink down our heat shrink butt connectors with a heat gun.Next we're going to need to hook up our diode to the wires. So the yellow and the green here, we're going to strip those back and we're going to crimp on the spade terminals that come in our kit. And here's the green wire that I had routed inside. It was really easy to do it, so I just pulled it back out. So you could see the end here, this is the end that goes inside. And the bare end is going to get a spade terminal as well. Find it easiest if you just strip them back first and you can peel off your spade terminals from the diode, they just pull right off and then we'll just slide our wires in, crimp them down. We'll do the same thing with that lighter green colored wire that I just showed you.I'm just routing the yellow and green wires through the firewall there. So we're next to our battery. It doesn't matter which of the prongs we hook to, but we're going to make sure we hook the yellow and the green that we connected to our diodes to the side labeled in. The light green wire that's going to be routed inside the vehicle to connect to our braking system is going to connect to the out. I'm just going to reroute this wire back inside. It only takes a moment to just run it underneath the battery tray, push it through the grommet there.We're then going to take the diode and it has an adhesive backing on it. We're just going to stick it in place right here on this metal surface. Using a little bit of alcohol on a cloth will help prep the surface to make sure that it sticks, just going to clean it all up with that. Then we just peeled off the backing and now we're just going to stick it into place.Now the monitor wire we routed in just needs to connect to the cold side of your brake switch. But one of the things that you'll likely need to have installed for your diodes to work properly for the lighting at the back of your vehicle is a brake light relay. So we've already got this brake light relay installed. So simply just take the monitor wire and you can tie it into one of the butt connectors for the brake signal wire, or you could purchase quick splices here from etrailer.com. Then you can just quick splice it on. I've chose to go ahead and just butt connector it since we get plenty of butt connectors in the kit, but the quick splices can save you some time.The cold side of your brake switch on your Escape here is going to be pin number four, which is a violet wire with a white stripe. So you'll want to make sure that you tap into this for your monitor wire. And if you we're installing your brake light relay at this time, this is the wire that you would want to interrupt with your brake light relay.Now that we've got all of our wiring and everything hooked up, the installation is basically complete. All we need to do now is just use the included zip ties to clean up some of our wiring and get everything up out of the way so it all looks nice. So I'm going to go ahead and zip tie everything up now. One of the things that I do recommend is that your dual prong connector here and the green wire here, you need to leave these accessible because this is what's going to plug into your supplemental braking system. So I'm going to probably put them in a place where they hang down here next to this pedal, to where they can easily get to. Got all the wires cleaned up and ended up putting them over on the right side, because that's where the wire comes out of the portable braking system we're using. So I wanted to make sure we had enough lengths from the braking system to our wires. And it keeps it nice and clean and out of the way here tucked up on this right side.You're now ready to take your old braking system that you we're using in your previous vehicle and hook it up to this new one.Now with all of our components installed, we can reinstall our fascia. One of the things you will notice is that I did take the electrical connector back off because we do need to have it off to get our fascia back on so we can slide it through and then we can reinstall it once the fascia's back on. So we're just going to take our fascia, bring it up. We're going to slide this through the opening that's towards the center, but slightly towards the driver's side. And then we can just line everything up and start snapping it back in place.And here you can see why I had to remove the wiring. The center pillar here would hit the wiring while it's installed, so you just got to take it off. You don't need to cut it, because since it's offset just a little bit here, that our wiring will sit right next to it when we go to put it back on. Now with our fascia and our wiring back installed, we're all set, ready to go hook up to our motor home and enjoy flat towing.And that completes our look at Roadmasters Second Vehicle Kit for the 9700 Series Supplemental Braking System on our 2009 Ford Escape.
Average Customer Rating: 4.9 out of 5 stars (22 Customer Reviews)
Adds the components needed to use your Roadmaster 9700 braking system in a second towed vehicle.Support was excellent in my purchase, parts are good quality, came with everything I was expecting..
Exactly what I needed!
As advertised, this kit contains everything necessary to utilize the 9700 Braking System in another vehicle. In my case I installed this in a recently acquired Jeep Cherokee with no issues. Good installation instructions too. A good price and very fast shipping make the whole package a winner.
It's all the parts and pieces to hook-up a second vehicle for towing with the Roadmaster 9700 portable braking system.

Kevin

7/28/2016
Still working good.
Fast shipping and very good communication thank you
I bought the Roadmaster Second Vehicle Kit which was cheaper elsewhere but not after applying the shipping charge which was cheaper here. It was well packed so no shipping damage occurred. Another big factor was being able to use Paypal here so I don't expose a credit card to the internet.
Very satisfied with this shipment, it arrived on time I just needed to replace my breakaway switch and dios wiring harness
Got my shipment in great condition. Looking forward to hooking it all up so I'll be able to tow my jeep with no problem. Soon as my tech is able to hook up the whole kit I'll send a picture. The split deliverry worked out for me and am looking forward to getting the camera.
this was a update to a older setup, worked good. the brake away plunger is a little hard to pull out.
Product worked like a champ. Easy to use
!
There about as good as chains

As advertised
Roadmaster is always excellent in the way the provide what is needed to complete the job with Quality parts!!
Great product. Worked flawlessly on my Liberty.
Just what I needed. Fast delivery and continued great service.
Great fit and on time
Thanks!
Great service. Really fast.will use aga in.thanks
Just what I needed


Do you have a question about this Accessories and Part?
Info for this part was:
At etrailer.com we provide the best information available about the products we sell. We take the quality of our information seriously so that you can get the right part the first time. Let us know if anything is missing or if you have any questions.


Kim P.
1/26/2016
The parts are working perfectly. Thank you.