
Summer Starts Here - Save up to 70%
Thank you! Your comment has been submitted successfully. You should be able to view your question/comment here within a few days.
Error submitting comment. Please try again momentarily.


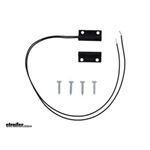
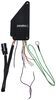
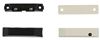
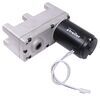
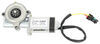
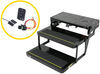
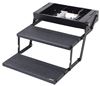
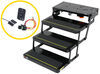
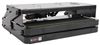
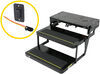
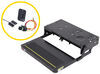
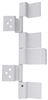
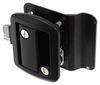
Replace the damaged door switch that came with your single, double, or triple electric Lippert Coach Step or Stromberg Carlson sliding step. This 2-piece switch installs on your RV's door and its frame with the included hardware.
Features:
Videos are provided as a guide only. Refer to manufacturer installation instructions and specs for complete information.
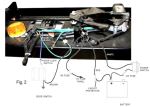
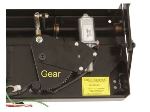
Speaker 1: Today, we're going to be taking a look at the replacement door switch from Lippert Electric Coach Steps, part number LC301694.Now whether your switch is starting to go out or completely broke, our door switch is going to allow our stairs to come out and retract when we close the door automatically. Then, we won't have to worry about tripping or stepping up too far when we're getting in or out of our RV. One side of our switch is going to mount right here against the door. Then, the other side, we mounted ours right at the bottom of our screen door. That way whenever the screen door closes, the two sensors will meet and it'll cause the stairs to retract.Now, our switch is going to replace the door switch that came standard on the single, double or triple electric Lippert Coach Steps, or your Stromba Colson 00:00:50 sliding steps. If you're tired of the stairs not extending out or not retracting back in when you close or open the door, our door switch is going to be a great solution to get your motorized stairs working again.To begin our installation, we're going to have to make sure that our steps are working properly and that the problem is our switch.
Right now, I'm going to go ahead and switch the steps on. As you can see, the steps do come out. We can go ahead and close the door, and we can see that they're not retracting. We can tell that the motor is working perfectly fine, but the sensor or the switch right here on the door is not.The first step of our installation is going to be removing the old switch. Now, the one that's attached to the inside of the doorframe here, this one was broken off.
The wires are still attached, but the glue had let go a long time ago. To make it a little bit easier on myself, I'm going to cut my wires right here. If we follow the wires down, it'll lead to the floor and they're going to come out right here. I can go ahead and pull my wires out. One of them is going to be attached to the frame here with a self-tapping screw for our ground.
The other one's going to be connected into our harness that connects to the motor for our steps.We can take our new switch. We're going to find the end of the wires, and we're going to feed them down through the same hole that we got the other ones out. Once the wires come through, we're going to pull the excess out and get about how much we need for our switch. Now where my old wire went into my connector here, I'm going to go ahead and cut that wire back just right behind the connector. I'm going to strip it back.Now, on the end of the wire, I'm going to take a heat shrink butt connector inaudible 00:02:43 staying on the outside of the vehicle at all times.
I'm going to crimp it into place. Now, if you need some of these, you can pick some up on our website. These are just going to help from corrosion building up and moisture getting inside the connector.Now, we're going to take the longer of the two wires from our switch. I'm going to bring it towards the butt connector, and I'm going to insert it into the end and crimp it in place. Now, as far as the original ground goes, I'm going to go ahead and get rid of that bolt and pull my wire out and start afresh.I'm going to take a ring terminal, it's not in the kit but you can pick some up on our website, couple of different sizes that we carry. I'm going to take my wire, I'm actually going to fold it a couple of times to make it a little bit thicker, so I can crimp on my ring terminal. I'm going to take a self-tapping screw. Again, these aren't provided in the kit, but I'm going to attach it to the inside of the frame right here.We can go ahead and mount half our switch now. Now, there's two different ways that we can mount it. On the back, we have some double-sided tape. Just peel the backing off, and we can apply it directly to whatever surface we want. We also have two spots where we can put a couple of screws into place. I'm going to take mine and I'm just going to use the double-sided tape for now. I'm going to put it right against the door here so that when the other door closes, the other magnet will be right here next to it.Now, the other half of our sensor is going to be going on our screen door in our application. It's going to mount the same way. We're going to have some double-sided tape on the back. We're just going to adhere it to the bottom of the door so that when I close it, it'll line up with the other magnet. Now, they do provide us with some screws in our kit, but they are just a tad bit longer than the ones we took out. I'm going to be replacing the screws with the same ones that I took out.Now, as I mentioned before, the connector I was using is a heat shrink connector. I'm going to be using a heat gun to shrink it down. Now where that hole we had, where it came out to the floor in the entryway there, I'm going to take a little bit of silicone. I'm going to fill it up. We won't have to worry about any moisture building up or water leaking in there.With all the connections made and everything tidied up, we can go ahead and test out our steps. We can close the door and see that they go back up. Now if we open the door, they're going to extend out. Looks like that switch went ahead and fixed the problem. That'll finish up our look at the replacement door switch for Lippert Electric Coach Steps, part number LC301694.
Average Customer Rating: 4.9 out of 5 stars (49 Customer Reviews)
Replace the damaged door switch that came with your single, double, or triple electric Lippert Coach Step or Stromberg Carlson sliding step. This 2-piece switch installs on your RV's door and its frame with the included hardware.Worked good excellent replacement
Just like the original. Steps are working as advertised.
Exactly part needed after carpet installer broke the original.
Service from etrailer.com was excellent.

Could not locate the replacement switch locally. etrailer came through with the correct switch and installation was a breeze.

Reuben

11/10/2021
The switch has worked perfectly.
The Part arrived very quickly and was exactly what I needed. The switch is the correct one for my steps and now I can keep the steps out when the door is closed and the power switch is turned off. The switch that I replaced was for the other manufacturers steps. The two switches work opposite. Door closed, switch open. the other one is door closed, switch closed.
I have heard about other people with the same issue. You have to make sure you have the right switch for you manufactures steps.
Thanks for the right part that helped me fix my steps.
I placed an order for a magnet door switch for my motet home, with a three day delevery. Item was at my door on the third day. I was called by John to confirm my shipping address.
I was vary pleased with the service.
Ron L.
4/8/2018
Just like it is made to do, no problems with product.
Great product, perfect fit, with easy installation, and helped solve my issues.

Bruce L.
10/9/2021
a year later the steps still work properly. Thank you etrailer!
Love etrailer! You take the guess work out of ordering some very complex equipment. Christian is great!
I ordered the wrong step switch. RV tech had the right one,i did not try to return it because it was 3 month before RV tech worked on my coach. I am good with the service and will use you again. Thank you
Easy fix! Step wouldn't deploy/retract w/the door opening/closing. Turns out, the wire to the door sensor has been snagged. This kit fixed it after just a few minutes of install time.
Tried other RV door switches from other dealers that did not work. Because etrailer had the actual brand of my switch, it worked perfectly. Wish I had bought from them in the first place; would have saved me a lot of time and money.
Exactly what I needed
Worked perfectly fine as a replacement.

Stephen
4/29/2019
Still working.
Great service, the etrailer representative was able to tell me exactly what I needed with my description.
Received item in good time. Had no trouble installing the switch. One great thing with entrailer is the how to install videos. This is the second item I have bought and will buy from this company again if I need another part. Thanks again Jim B
Works just like the original. Great price and quick delivery.
Will buy all my RV parts here.
Good communication and service. Switch a perfect replacement
The magnetic switch worked perfectly!!! The salesman did a perfect job finding something that would work!!
Received the item very quickly. Have not installed it yet as the temperature here in No is in the teens with wind chill in single digits.
Worked well. Never have any problems with etrailer.
As described on internet
Installation went smoothly, steps open and close just like new.
Replacement part worked great. Received it quickly.
Exactly what I need to replace on my 2007 RV

Pierre P.
1/25/2021
Perfectly
Works exactly as listed. Shipped and received as promised.
Do you have a question about this Accessories and Part?
Info for this part was:
At etrailer.com we provide the best information available about the products we sell. We take the quality of our information seriously so that you can get the right part the first time. Let us know if anything is missing or if you have any questions.


Jo A.
3/16/2019
One year latter, no issues