
Thank you! Your comment has been submitted successfully. You should be able to view your question/comment here within a few days.
Error submitting comment. Please try again momentarily.
Features:
Specs:
California residents: click here
Videos are provided as a guide only. Refer to manufacturer installation instructions and specs for complete information.
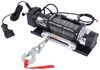
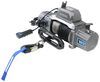
Speaker 1: Today on our 2018 GMC Sierra 2500 we're gonna be taking a look at and showing you how to install the Bulldog Winch 500 Amp Shut-Off Switch with the metal housing, part number BDW20248.Here's what our cut off switch is gonna look like. Now I do want to mention that the bracket and all the cables are not included, it is just gonna be the switch. Our switch is gonna have a nice metal housing on it, so it's gonna be extra durable and the red handle is gonna make it extra easy to find even in low light situations.Now in our application we're using two, one for each battery on our truck. Now even though we're using ours in a flat tow set up to cut the batteries out these switches are idea for any heavy duty application where you need to cut the power off to whatever accessory you're sending it to such as a winch that's hooked up to your trailer or even a winch on your truck. Our switch is gonna work with a 12 or 24 volt system and it can handle up to 500 amps.Now that we've taken a look at our switches let's show you how to get them installed. To begin our installation the first thing you're gonna want to do is you're gonna want to take the negative cable off of both of your batteries.
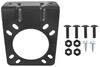
Now since it is a diesel it is gonna have two batteries. Over here on the drivers side we already went ahead and disconnected the negative cable, we're just gonna push it out of the way for right now, making sure it doesn't come back in contact.Now I do want mention that we already have our mounting bracket mounted up and we're using a seven way mounting bracket that normally would hold an electrical socket because our switch fits perfectly right inside the opening and the holes line up to mount up our hardware. Now if you want to pick one up from our website go ahead and use part number PK12711U.We're gonna come to the positive side of our battery and we're gonna have this cover right here. We can go ahead and remove the cover and set it aside and we're gonna be disconnecting the cable coming off of the positive side of our battery. You're gonna want to grab a 14 millimeter socket and remove the nut holding that cable on.
We're gonna hold onto the nut because we are gonna have to reinstall another cable later on. We can pull the cable off and we're gonna start routing it towards our bracket, just want to make sure that you're not getting caught on anything and go around our negative cable and should go right around the fuse box right here. You may have some clips that are holding it in place along the fender well here, but once you have the clips undone and you just pull the cable up and around that way we have plenty of slack to get to our switch which is gonna be mounted right at that bracket.On the bottom of our switch we're gonna have two terminals with a couple nuts on them holding them in place as well as lock washers. On one of the sides we're gonna go ahead and remove the nut and lock washer and we're gonna get our cable put in place. We'll put the lock washer and nut back in place and thread it on hand tight for right now.
Now the other side we are gonna have to pick up a battery cable or have one made. Now you can go to a lock auto parts store and I would assume about the length of cable you're gonna need is about three feet and it should be plenty of cable to get from this switch routing behind the same way, behind the fuse box, and go to the battery.You can remove the nut and lock washer and we're gonna put our other cable on that end as well. We're gonna leave our cables a little loose, just wanna put them hand tight that way you can still move them around, position them where you need them to be, and we're gonna loosely kind of test fit our switch just to get an idea of where we're gonna have everything. We're gonna be coming from the bottom but I just want to get an idea before I tighten everything down of how I'm gonna have my switch sitting. Then we can come back now that we know where our cables generally need to sit and we can come back and tighten those two nuts.
You want to grab a 17 millimeter wrench and you're gonna tighten up that nut, we'll tighten up the other one as well.Once you have them nice and snug we're gonna make sure that we don't get any kind of arching or sparks going on, so we're gonna take a little bit of electrical tape and we're gonna wrap it around the bottom in case anything we're to happen or anything we're to break or fall and touch this, there'll be some tape protecting it from shorting everything out. What I like to do is I like to wrap each one of the terminals individually just with a little bit and then since we do have a little bit of metal exposed we're gonna wrap around the cables and then the entire bottom of the terminal itself as well. Just want to make sure you cover any metal components with some electrical tape or heat shrink or something in case, like I said, something we're to break, somebody forgets a wrench underneath the hood, or anything like that we're not gonna have to worry about any shorts or any kind of electrical issues.We're gonna slide our switch up from the bottom that way we know we have enough clearance because it's gonna meet up right here in that threshold to where that hood's not gonna come in contact. Then we can take the hardware from our bracket and secure it down. I'm just gonna get it started hand tight that way the switch will support itself. If we get one started hand tight that way the switch won't fall out on us and we can get the other one started afterwards. We can come back with a flathead screwdriver and tighten up those screws.Now we're gonna connect the cable that we routed on the other side of our switch back to the battery terminal that we took the original one off of. We're gonna go the same path that we took the cable off of, going underneath and around while the cables and everything else ran on the side here, making sure we have enough room and go right back to the battery post and reinstall that nut. Again grabbing that 14 millimeter socket and snugging it up. We can replace the cover and then we can start putting our negative cables back and both of our batteries.With both of our switches in the off position we can double check to make sure that we're not getting any kind of power to the vehicle by taking the key and turning the accessories on. As you can see the radio, the dash, nothing's lighting up so we know that we don't have any power. Now if we go ahead and turn our switch on we can go back in and double check that we do have power, just make sure to turn on both switches.We can already see that we have a light on our dash but just to make sure we'll go ahead and put the key in it and turn the accessories on. It looks like we're getting power and everything's good. We can turn our truck on we're not gonna have any kind if lights or any error messages on the dash so everything's still gonna work like normal.That'll finish up your look at the Bulldog Winch 500 Amp Shut-Off Switch with the metal housing, part number BDW20248 on our 2018 GMC Sierra 2500.
Average Customer Rating: 4.5 out of 5 stars (16 Customer Reviews)

The switch is an excellent product I’ve got it wired into the batteries on my car hauler trailer so I can turn power off and on to my plug for my winch so it’s not energized all the time it was easy to install just cut a hole through the handle to come up through and then bought it from the bottom to a plate that you can buy that fits the switch highly recommended and an excellent product
Installed this disconnect on my Jeep second time I used it thw switch failed open. I need to replace it and will not buy this again.
Something broke inside of the switch within about a month of installing it. It is just not made for trail life. Will not do that again.
Everything on this part is heavy duty and works very well. You can tell this switch is going to last a long time.
Exactly what I was looking for. I didn’t want or need a switch under the instrument panel. This one beneath the hood is perfect.
Seems very well made. Will be used as a cutoff switch for the winch on the front of my Jeep. 500 amp rating is nice too, not that I plan on throwing it under load.
Product did what it was supposed to do
Great service
Very nice looking switch all metal body heavy-duty.
Not plastic, will last a long time I'm sure
Heavy duty switch
Do you have a question about this Accessories and Part?
Info for this part was:
At etrailer.com we provide the best information available about the products we sell. We take the quality of our information seriously so that you can get the right part the first time. Let us know if anything is missing or if you have any questions.


Jenny N.
2/1/2022
I will have our customer service team reach out to you. This switch is intended for off road applications.