
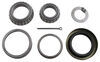
Marine 2-Position Battery Switch
(20 reviews)
Price: $25.73
In Stock
Thank you! Your comment has been submitted successfully. You should be able to view your question/comment here within a few days.
Error submitting comment. Please try again momentarily.


Need help with installation?
Locate installers near me- All Info
- Reviews (20)
- Q & A (0)
- Videos (1)
- Photos
Patrick Distribution Accessories and Parts - 277-000403
- Battery Boxes
- Switches and Solenoids
- Patrick Distribution
- Patrick Distribution marine 2-position battery switch
- 4 Wire outlet directions
- Includes:
- 2 Copper tinned wire screws for connection
- 4 Bronze tinned wire nuts for connection
- Black and red PBT plastic construction
- Overall dimensions: 2-3/4" long x 2-3/4" wide x 2-15/16" tall
- IP rating: IP54
- Continuous rating: 300A 12-50V DC
- Intermittent rating: 500A
- Cranking rating: 1000A
- Dielectric strength:
- 2000V DC per minute
- 1000V AC per minute
- 1-Year Warranty
96285 Patrick Distribution Marine Dual Position Battery Switch


Video of Marine 2-Position Battery Switch


Videos are provided as a guide only. Refer to manufacturer installation instructions and specs for complete information.

Video Transcript for Patrick Distribution Marine 2-Position Battery Switch Review
Hey, everyone, Ryan here at etrailer. Today we're gonna be checking out the Patrick Distribution battery disconnect switch. So when it comes to, you know, different types of vehicles, whether it be a boat, camper, RV, things that tend to kind of sit for periods of time, it's not a bad idea to use a battery disconnect switch. That way you can essentially turn the battery off or disconnect it from the rest of the system. And one of the main reasons for that is to prevent what's called a phantom draw. So for example, maybe you had had experiences before, you put something away in storage and maybe a month or two later, you come back and your battery has run down.
And when things are just left hooked up, even if they're not turned on and they're just sitting, what tends to happen is you get that phantom draw, right There's something using the battery just a little bit at a time. And so by using a disconnect switch, you know, you can disconnect it from that circuit, and you're not gonna have to worry about that. Today we have ours set up on a boat, but it can work with just about any application. You know, whether you have the RV or camper, you know, if you got something special set up on your trailer, whatever the case may be, you should be in pretty good shape there. And with that said, it's super easy to operate.
So you got the on position. Everything's indicated pretty clearly there, and, you know, right now all of our accessories would work as they normally would if it was just hooked up directly to the battery. But whenever you're ready to turn it off and store it or even work on it for that matter, you can kind of push in on the knob a little bit, rotate it over, and it clicks into place into that off position. So now, whatever you have hooked up to this would no longer have power, you know, after the switch. And then there's an actuator out position too.
So, if you rotate it down even more, it's gonna keep everything turned off, but when you click it into that position, you can actually pull the knob out, which I think is pretty convenient. So for example, if you're working on something or even I guess in a sense somewhat of a security measure as well, you know, no one could come in here and accidentally turn this back on and power everything up. So you got a couple options there on what you can actually do with this switch. So I've got another switch on hand here, that way we can just kind of check it out a little closer. So the back, you can remove like that.
It just snaps off. And then of course, once you bolt everything down, the screws go through there and keep everything in place. But if we take a look at the back of it, so this is gonna be able to handle up to 50 volts. So if your standard 12 volt system, you'll be good there. If you have your batteries wired in series, so maybe, you know, a trolling motor or something like that, that is a 24, even a 36 volt system, you know it'll be good. And as far as the amperage goes, that's something you'll have to check and see what, you know, whatever accessory you got draws. It has a continuous rating of 300 amps, which is really high. Hardly anything will exceed that. Intermittent rating of 500 amps, and then 1,000 amp crank rating. So let's say if you had this hooked up in a manner so for like an outboard engine, if you had it hooked up to this, you'd probably be okay. You'd have to check with the manufacturer and see how many amps it draws whenever you actually go to turn the key and start the motor up. One of the things that I like is the case, right So it's a plastic case, and it has these little panels in it that you can pop out and kind of rearrange to best suit your installation needs. So for example, if you wanted to mount this like this and you want the wires to come in from the bottom, you know, you slide them around, keeps that side protected. Now you can run your wires up through there and vice versa. If you want it mounted like this, but the wires come in from this way, you just switch that around. And so it does a pretty good job of keeping everything as closed as possible and giving you a clean install look. You know, it just opens up your options on where and how you can actually mount this up. Even if you don't keep your boat or camper in storage really for long periods of time enough to not really have to worry about disconnecting the battery, there's still a good use for it, and that's kind of exactly why I installed this today. So this is my actual personal boat, and I make it out quite a bit. Never really have to worry about the battery getting run down too much from sitting, especially if you practice proper maintenance, but one of the things that would drive me absolutely crazy, I had a couple small kids, I keep this in the garage, and we'd be out there playing around, working, and they'd climb up in here and push every single one of my buttons and I'd have the pumps running, running dry, and everything else and I'd really have to stand on top of 'em. So that's why I did this actually today. So having to deal with that, you know, they can't figure out how to get in here and mess with any of this stuff. So, instead of having to deal with that, I'll turn it off, and now they can come in here and push every single button that they want to and I'm not gonna have to worry about burning anything up. As far as where you're gonna be able to mount this, it is relatively compact for what it is, especially being that it's pretty much all enclosed for the most part. So you should definitely be able to have a pretty easy spot to mount this up, but in case you're wondering on the size of it, it's going to be a perfect square at two and three quarters of an inch. So two and three quarter wide, two and three quarter long. And as far as how tall it is, so from the base to the top here with the switch in place, it's gonna be two and 15 sixteens of an inch. The studs on the back of it, they're gonna be tinned, as well as the hardware, and that's just to essentially help prevent any corrosion and things of that nature. And the diameter of the studs are gonna be three eights of an inch. So you are gonna need ring terminals large enough to allow you to, you know, have your wire hooked up to the ring terminal and actually fit over that stud. So there's a bunch of 'em available if you don't have any. And you can even grab some right here at etrailer if you need to. Essentially this switch is gonna be designed to work with one circuit, but if you have, let's say, two batteries on different circuits that you want to be able to disconnect, there's a another version of this. It's for that purpose. It's a dual battery isolator switch, and I actually used it several years ago. I had an old jet boat, so, you know, in that case, I had a starting battery, and so I just wanted the motor to be on that battery and then another accessory battery essentially. And you're able to have both of those hooked up to one switch essentially and turn 'em off and on and do what whatever it is that you're trying to do. So that's always an option too. And by using something like that, it will, you know, prevent you from having to actually install and pick up two single switches like this one here. Just to compare this switch to another one, I have one here that's made by SEAFLO, and they're pretty similar, you know, no crazy differences really, especially in terms of the quality of construction. They both seem like they're well-built. This one has some nice posts on it. The knob there turns like you'd want it to, you know, with some resistance and then kind of clicks into place. This one, though, you can't pull the knob off, so I do kinda like the idea about of being able to do that with this one here. But with that said, if you want to mount the SEAFLO one up like we have this one here, it is a little bit bigger, I mean, not a considerable amount but definitely worth noting. So it's gonna take up a little more space, and the actual case, one side has a cutout, so you could kind of rotate it how you wanted to get your wires a good clean straight shot going up in there, but with this case, you know, being able to remove it, you could also flush mount this too if your application would allow you to do so or you feel comfortable doing so. So, you know, you could drill a hole in where you're trying to put this and have it mounted up flush too. So you got a couple options as far as that goes, and, honestly, what one's gonna be best for you I really feel like just depends on your situation. Honestly, I wouldn't hesitate to use either one of these. The switch is not going to come included with any mounting hardware, which is pretty normal. I just use some stainless steel screws to secure it to this compartment side here, and if you do happen to use stainless hardware, it's a good idea to put some anti-seize on the threads. That way it doesn't gall, or even, you know, stainless to aluminum, different types of metals, it'll help protect it against corrosion and things like that. And you know, it's essentially just bolt it to the surface that you're trying to mount it to. And that's it as far as getting it mounted goes. As far as getting this hooked up, you know, everyone's scenario is gonna be a little bit different, but the concept is going to remain the same. So, essentially what you're gonna do on the back of this, you know, you can remove the hardware and you'll have a cable coming from your battery terminal. You would put it on one of the posts, and then whatever that cable was originally going to, you know, let's say, your accessories, for example, you would have to, you know, cut that cable, put a new terminal on it, and put it here. And so essentially this is just interrupting that circuit, and that's really all there is to it. With that said, you know, if you wanna put it on the positive or interrupt the positive side of the battery system, that's fine. That's how I have mine set up. You can do the negative or ground side as well. It kind of just depends on your preference. So, you know, on a boat, nothing is really frame grounded. You know, it all comes back to the battery, and so that's why I did the positive side. On a vehicle or something, whenever, you know, stuff is frame mounted or I'm sorry frame grounded, you could always do it that way too and completely disconnect that side of the circuit. So it's really up to you and the particular application that you plan on installing this on. Other than that, at the end of the day, this could be a quick and easy way to turn off that electrical circuit and help preserve the life of your battery. But with that said, I think that'll about do it for our look at of the Patrick Distribution battery disconnect switch.
Customer Reviews
Marine 2-Position Battery Switch - 277-000403
Average Customer Rating: 4.9 out of 5 stars (20 Customer Reviews)
by: Mark 04/29/2024
great product, good pricing & fast serv ice
by: Daniel 03/15/2024
very quick from order to delivery
by: Mike01/23/2024
JUST WHAT I EXPECTED
by: Jorge10/15/2022
The new isolation switch has on the front face of the knob "Push to Turn" that alerts anyone how to turn it without damaging the switch.


by: Theresa 09/06/2020
Have not installed it as yet, ut appears to be the exact part we need. Appreciate the timely shipping. Have ordered from etrailer in the past. Always very helpful with any questions or problems. Highly recommend.
by: Paul12/06/2020
The battery switch worked great to disconnect my negative terminal on my 2021 Colorado. Chevrolet requires disconnecting in order to flat tow this vehicle.
by: Don07/23/2019
Easy installation, works as advertised. Don't have to keep disconnecting battery terminal when storing rv.
by: Terry A J06/27/2019
Very good quality battery shutoff / disconnect. Mounts and wires up easily.
by: Cliff08/14/2020
Good for new trailer
by: Grant 06/07/2020
It works just like it is suppose to. What a relief that something works and I don't have to worry. It's great.
by: Matt S04/03/2020
Works great, easy install
by: Michael 02/08/2024
by: David a.06/25/2018
looks good. Thanks
by: Paul 07/27/2023
by: Michael 07/21/2023
by: Jeffrey 10/23/2022
by: Scott 05/11/2023
by: Mark03/30/2021
by: Gary11/25/2022
by: Sam 01/06/2023
20
20
See what our Experts say about this Patrick Distribution Accessories and Parts
- Switch Operation of Marine 2-Position Battery Switch # 277-000403The Marine 2-Position Battery Switch # 277-000403 only has two positions. On and Off. The knob should not need to be pushed down to turn either. It really shouldn't be coming off either. The actuator out position should be just a momentary switch function that activates but then goes back to off when you release.
view full answer... - How Does the Marine 2-Position Battery Switch # 277-000403 InstallBasically you use install the Marine 2-Position Battery Switch # 277-000403 by cutting the wire for the circuit you want to install it on and wire one end of the wiring to either post underneath the switch. When the switch is "on" the circuit is completed and when it's "off" the circuit is deactivated. I attached a picture that shows the underneath side of the switch with the posts visible.
view full answer...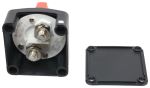
- Can a Battery Disconnect Switch Be Mounted Outside a TrailerThe most weather resistant battery disconnect switch we offer is the Marine 2-Position Battery Switch part # 277-000403 which as the title states is a marine grade battery disconnect that holds an IP54 rating. That said, a battery disconnect switch is not designed to be mounted out in the open, subjected to water so you really need to find a way to mount the battery disconnect switch inside. The most common location is inside a battery box but I am not aware of one that will work on the...
view full answer... - Switch Recommendation for Main Power on a Class C RVHey Roger, thanks for reaching out! The Single Rocker Switch # 37212225 will work as long as your power draws don't exceed the following specs: - SPST, 16 amps at 125V - 250V AC, 3/4 hp at 125V - 250V AC, 10 amps at 14V (T), 3 amps at 125V (L) Since you're talking about a switch for your main battery I recommend using something with a higher rating like the Marine 2-Position Battery Switch # 277-000403 which has a 300A 12-50V DC continuous rating.
view full answer... - Installing the Marine 2-Position Battery Switch on Batteries Wired In SeriesBecause your batteries are wired in series, you'll just wire the Marine 2-Position Battery Switch # 277-000403 between the batteries and your power distribution box. You can start by cutting the wire from the batteries to the main line of the power distribution box and then wire one end of the wiring to either post underneath the switch. When the switch is "on" the circuit is completed and when it's "off" the circuit is deactivated. I've linked a photo of the bottom of this switch so you...
view full answer...
- Battery Disconnect Switch for Use on Travel TrailerYou can use the Marine Battery Switch # 277-000403 for your application but since this item is not rated for outdoor use I recommend using a junction box like # 3375601100 to provide a degree of protection from moisture. The switch housing (not including the knob) is about 1-1/4-inches deep so you'd want to use hardware that is about 2-inches long. If space is available in your battery box you might be able to mount the switch there. In this case a better choice might be the Epicord Battery...
view full answer... - Troubleshooting Propane Detector Beeping When Battery Is Switched Off and Generator Not StartingIt sounds like your PROtechTOR 2001 propane detector is in need of replacement. Typically a Propane Detector # RS64FR will only have a 5 year lifespan before it should be replaced. Do note that even with a battery switched off by a Disconnect # 277-000403 the propane, carbon dioxide and smoke detectors are still required to have power. This is a safety regulation and the only way to cut them off is by disconnecting the battery cables and any backup batteries in the unit. As for your battery...
view full answer... - Amp Ratings of Marine 2-Position Battery SwitchI went to take a look for myself at the Marine 2-Position Battery Switch # 277-000403 and found it does indeed have a 300A continuous rating and 500A intermittent rating at up to 50V DC. I measured the screws with a digital caliper for you and they are 0.37 inches in diameter.
view full answer...
Do you have a question about this Accessories and Part?
Info for this part was:

Edited by:
Leah B

Expert Research:
Jameson C

Expert Research:
Adam R

Video Edited:
Dustin K

Written by:
Mary K

Updated by:
Wilson B

Updated by:
Isabelle B

Installed by:
Ryan G

Video by:
Ethan H
At etrailer.com we provide the best information available about the products we sell. We take the quality of our information seriously so that you can get the right part the first time. Let us know if anything is missing or if you have any questions.
Product Experts Available Now!
Call 1-800-940-8924
Theresa R.
9/6/2021
Product has consistently worked as it was described.