
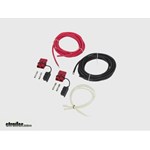
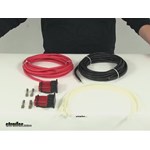
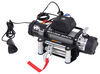
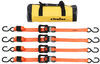
Bulldog Winch Rear Wiring Kit - Quick Connect to Terminal End - 3 Gauge - 24' Long
(9 reviews)
Price: $232.99
In Stock
Bulldog Winch Rear Wiring Kit - Quick Connect to Terminal End - 3 Gauge - 24' Long
Retail:$315.86
Our Price: $232.99
You Save: $82.87
In Stock


Need help with installation?
Locate installers near meCustomers prefer these similar products
22% prefer this

20% prefer this


8% prefer this


- All Info
- Reviews (9)
- Q & A (0)
- Videos (2)
- Photos
Bulldog Winch Accessories and Parts
- Electric Winch
- Wiring
- Wiring Kits
- Bulldog Winch
- 3 Gauge Wire
- 24 Feet Long
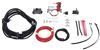
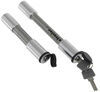
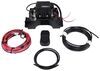
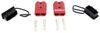
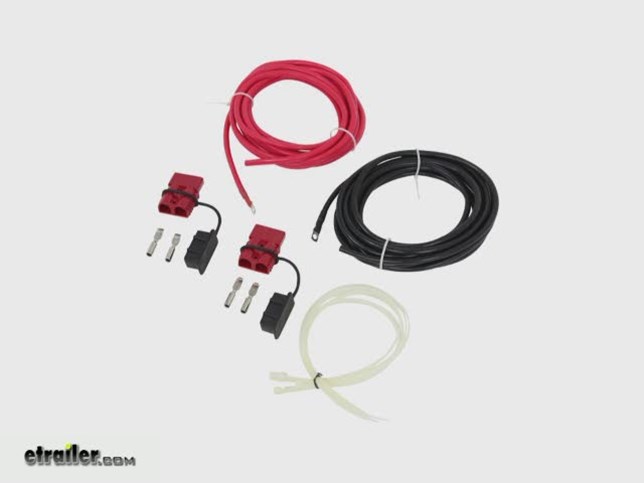
- Wiring kit provides power connection at rear of vehicle for winch or booster cables
- Quick connect to terminal end
- Double power/ground wire with loop ends on battery side
- Includes dust cover for vehicle side
- 24' Long
- 3 Gauge wires
20026 Bulldog Winch Wiring Kit - Quick Connect to Terminal End - 3 Gauge - 24' Long - Rear
Item # BDW20026
California residents: click here


Video of Bulldog Winch Rear Wiring Kit - Quick Connect to Terminal End - 3 Gauge - 24' Long

Videos are provided as a guide only. Refer to manufacturer installation instructions and specs for complete information.


Video Transcript for Bulldog Universal Wiring Kit Installation
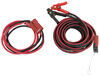
Today we're going to review and install the Bulldog universal wiring kit, part number BDW20026. To begin your install, you want to take the pre-attached ring terminals here at the end of our power cables, red being power and black being ground, that are going to ultimately get secured to the battery power supply. For this application, we're going to run our power and ground up between the wheel well and the firewall. To make it easier to route, we're going to use a pull wire, which can be a stiff piece of wire, or in this case a piece of air tubing. We're going to route it into position, down underneath the vehicle. Now that we have access to our pull wire here underneath the vehicle, we'll take our two cables and attach them to the pull wire. To attach them to the pull wire we're just going to use some black electrical tape. All right, now with the cables attached to our pull wire, pull them up here through the battery.
We have them up to the top of the end of your compartment we can go ahead and remove the pull wire. Now once we have our pull wire removed we'll go ahead and route the cable into the area where it will ultimately get attached to the battery. We will not make our connection at this time because we don't want our live wires to possibly arc or short out the vehicle. There's our ground side, and the power side. Now we'll move back underneath the vehicle and continue routing our power and ground down the frame rail and ultimately to the back of the vehicle where we'll mount our plug. Keep in mind when routing any of your wires stay away from moving components, steering or suspension, or excessive heat, such as exhaust.
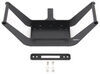
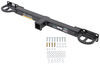
We'll secure our wiring with zip ties as we route it. Now we've got the power and ground run here to the back, we need to create a mount that we can secure our plug to. For this application we're going to use the tow ready mounting bracket part number 18140. The mounting bracket will attach here to the hitch using the worm gear clamp provided. Once we have our mount in place we'll go ahead and tighten it down. Now that the mount's secure, I'm going to hold my plug in position, bring our cables to it, and we can mark the length on the cables that'll need to be trimmed. Now we've marked it, cut off the excess length, we need to strip the wire back so that we can install our pins that will go inside our connector.
I like to hold my pin right up next to the wire, get an idea of the length it'll need to be stripped. Mark it here with my utility knife. Now when stripping back the wire, I'm just going to use a utility knife to gently cut the outside sheathing, being careful not to cut the wires underneath. Then if we split the sheathing down the middle we'll just peel it off of the wire. Now with my power side done, go ahead and repeat the same process here for the ground side. Now to attach your terminals to the end of the cables you could use a crimp tool, or it's highly recommended that you solder the connectors on.
As we slide our terminal here onto our wire you can see we've cut back enough that we'll be able to get our solder in around the connector so it will adhere to our wire and the terminal itself. Now in soldering it's best to have a third hand to help hold the connector on nice and tight while you put you solder in around the wiring connector. Note, it's highly recommended that you'll use a pair of pliers or something to hold the terminal, as it will get hot while warming it up an putting the solder in. Now with one side done we can go ahead and repeat the same process on the other side. All right, now once we've got it soldered up I'm just going to use some electrical tape to cover up the last 3 or 4 inches. Help prevent any moisture from getting into the wiring harness. Once we have one done, we'll repeat the same process with the other one. Now our wires are ready to install into our connector. Two things we're going to look for when installing the wires, we've got a positive side for our red cable, and a negative side for the black cable. As we feed the terminal into the connector, the little notch there, in our terminal, will hook onto the metal blade inside the connector. Once we have them both locked into the connector, we can mount the connector to our bracket that we installed on the hitch. We'll use the pre-drilled hole here on our connector and a self tapping screw and attach it directly to our mount. Keep in mind before you permanently attach it to put your connector cover on. Now we've got a nice and secure mount for our connector, we can install our cap and go back to the front where we'll make our connections with the battery. I'm going to go ahead and cut the zip tie, make it a little easier to get my connection made. On a note for this application we're attaching to a breaker. Depending on the load for your application, whether it be a recovery winch or a snow plow, possibly even a salt spreader, will determine what size breakers will be needed so you protect not only your equipment, but the vehicles electrical system. Now we'll switch over to the ground side or our negative battery terminal, install the ring terminal and re-secure the nut on the stud. Now we'll go ahead and finish secure our wires as necessary and we'll just use some zip ties to secure the wire. And to clean up your install I recommend to cut off the excess from the zip ties, all 8 of them make for a cleaner installation, but it gets those pieces out of the way. And that'll do it for our review and install of the Bulldog universal wiring kit, part number BDW20026. .
Customer Satisfaction Score:
94% were satisfied with this product
6% of customers were not satisfied
- Arrived Damaged
- Wrong item was ordered
Customer Reviews
Bulldog Winch Rear Wiring Kit - Quick Connect to Terminal End - 3 Gauge - 24' Long - BDW20026
Average Customer Rating: 4.8 out of 5 stars (9 Customer Reviews)
by: KC02/11/2016
Outfitting a 2015 Frontier for 9000# winch and had to run power to the rear of the vehicle. 24 foot kit had enough wire to run to the rear and a little extra to play with. Plan to make a splice and put a 2nd plug in the bed.
Only thing that didn't work were the 24" plastic zip ties that were provided. They were white, indicating indoor/non UV rating. Most broke when trying to cinch up tight around the frame. Replaced with my own black exterior use ties.
Both wires came with 5/16" hole lug already attached to one end. Would have saved time & trouble if ends were raw, had to cut and attach larger lugs for my application.
by: Mike w.04/07/2016
Excellent products They were just as discribed the curt winch mount plate is the perfect way to mount a winch and the bulldog cables work great
by: Charles01/11/2019
Purchased these items to make a portable wench connection at the rear of my truck. Worked out like a charm giving me full access to exactly what I needed. Very durable, easy to install. Will do it again with any new truck I purchase. Highly recommend if you need power delivered to the right spot.
by: Stanley03/13/2020
excellent service from christopher N. appears to be very well built and in excellent
condition however I have not used it yet. I will order future parts from etrailer
arrived on time
by: Andrew 12/24/2020
All three items that I ordered arrived sooner than anticipated and in perfect condition. Very seldom does an on-line purchase exceed my expectations like this order with etrailer.com! Thanks!
by: Gavet02/28/2017
Just got my trailer wiring in today can't wait to put it in looks really well put together
by: Ted 08/24/2021
Good quality fast delivery
by: Darrel 02/11/2021
by: Greg 01/20/2022
9
9
See what our Experts say about this Bulldog Winch Accessories and Parts
- Recommended Wiring for Hooking up a 3,000 lb. Winch 25' From the BatteryWith the distance you are needing to go and the draw of your 3,000 lb. winch, I recommend using the Bulldog Winch Rear Wiring Kit # BDW20026 which is 3 gauge wire that is 24' long. I have included a video that demonstrates an installation of this product.
view full answer... - Recommended Winch Wiring Kit for Truck With Trailer WinchThe Bulldog Winch Rear Wiring Kit part # BDW20026 is a great option for using the truck's battery to power a winch on the trailer. The wire leads are 24' long and 3 gauge. The kit comes with the wire leads and quick connect plugs that go between the truck and trailer for easy hook-up. Please note, if you don't know your wire gauge requirements you'll need to refer to the winch specifications in the manual. If you need another wire size please just let me know what that is, you go larger...
view full answer... - Recommended Quick Connect Winch Wiring To Power Warn Winch On Trailer With Vehicles BatteryTo power you Warn 8000lb Winch on your trailer with your 2018 Ram 3500 Diesel Dually I recommend using the Bulldog Winch Rear Wiring Kit - Quick Connect to Terminal End # BDW20026 which has the quick disconnects you are looking for. When we installed this kit we used the No-Drill Mount for Electrical Mounting Bracket # 18140 to mount the quick connect to the trailer hitch receiver. I included a video of the Bulldog # BDW20026 being installed for you to take a look at.
view full answer... - Parts Needed to Wire Bulldog Winch 15017 to Vehicle BatteryTo wire up the Bulldog Winch 1.5 hp Trailer Winch part # BDW15017 to your tow vehicle you would want the part # BDW20026. This will give you 24 feet of 3 gauge wire that you will run up to the vehicle battery and also includes quick disconnects for the rear of your vehicle that will allow the connection of the winch's wiring to the vehicle easy. I attached an install video for the # BDW20026 for you to check out as well.
view full answer... - Will Bulldog Winch Universal Wiring Kit # BDW20026 Work with 4.4K Winch BDW15019Bulldog Winch Universal Wiring Kit # BDW20026 can be used with winch # BDW15019 or pretty much any winch. It is not a winch-specific kit. I have linked a video featuring this set for you.
view full answer... - How to Power an Electric Trailer Winch from a Tow VehicleThere are a few different ways that you could wire up an electric winch to your truck, even if the winch is mounted on a trailer. I do not recommend wiring it to the trailer connector wiring because winches draw a lot of power and trailer wiring is too small to handle that kind of current. Take a look at the help article I have linked for you. The second half covers methods of wiring up a trailer mounted winch. Option 1: Wiring the Winch with Trailer and Vehicle Winch Wiring Kit, is the...
view full answer... - Wire Gauge to Connect Superwinch LT2000 ATV Winch to Battery 25 Feet AwayI contacted Superwinch for their thoughts on installing a Superwinch LT2000 ATV Winch such a long distance from the battery and they suggest using 6 gauge wire. We have a winch wiring kit with 6 gauge wire, part # BDW20307, that is 10 feet long. We also have a part # BDW20026 that has 24 feet of 3 gauge wire.
view full answer... - Correct Wire Gauge For Trailer To Power Bulldog WinchWhen it comes to wiring up your Bulldog winch we do have a few different wiring options that you could run depending on how heavy duty your winch is. If you have a heavier duty winch you can use The Bulldog Winch Rear Wiring Kit # BDW20026 which uses 3 gauge wires. I attached a review video link below.
view full answer... - How to Power Two 12 Volt Trailer Batteries with 2012 GMC SierraThe Solenoid # PK5231201 is designed to allow you to keep your trailer connected to your truck, with the truck's ignition off, without draining the truck's battery. It connects between the truck's battery and the 12 volt pin on the 7-way at the rear of your truck. The alternator of your 2012 GMC 1500 supplies power to both batteries and maintains a charge. However, due to the distance needed to cover to get that much power back to your trailer you won't get enough power to charge them...
view full answer... - Recovery Winch to Pull 2019 Nissan Frontier Pro4x I have a solution for your, but it looks like your 2019 Nissan Frontier Pro4x has a weight between 4,414 and 4,567 lbs and the ComeUp Off-Road Winch # CU854768 is only recommended for recovery use on vehicles with a GVWR of up to 4000-lbs. I would instead recommend using something like the Bulldog # BDW10044 which is recommended for recovery use with vehicles up to 5333-lbs GVWR. Since this winch does not come with a mounting plate, you'll want to use the Bulldog Winch Receiver Mounting...
view full answer... - Inline Fuse for Bulldog # BDW15019 Winch Connected with Bulldog # BDW20026 Wiring KitThe Bulldog # BDW15019 winch has a maximum operating DC Amperage of 340 Amps. The Bulldog # BDW20026 Wiring Kit has 3 gauge wire. You will need a Bulldog # BDW203547 – 400 Amp inline fuse which is designed for 0 to 4 gauge wiring. This fuse will blow before your wiring is damaged. The battery cable is connected to the fuse holder with a M5 hex key. If you do not have one you can order the Thule # 853-0930 replacement hex key. I have included links to all of these products plus links...
view full answer... - Recommended Electric Winch, Winch Receiver Mount, and Quick Connect Wiring for Complete SystemFor an electric winch like the Bulldog Winch Standard Series Off-Road Winch # BDW10043, you can use a receiver mount like the Bulldog Winch Receiver Mount Kit - 2" x 2" # BDW20155. This makes location easy and you can absolutely add the quick connect wiring like you mentioned. For a 7-1/2 foot long option, use # BDW20205. For a 16 foot long option, use # BDW20043. For a 24 foot long option, use # BDW20026. You may also want the mounting bracket # 18140 to secure the connection to like...
view full answer... - Recommended Winch To Load 2000-lb Raft On 14 X 8 TrailerThe winch you came from, part # BDW15020 would work great for the raft and trailer you said you have. The line pull for this winch is 10.6-ft per minute when pulling 2,000-lbs. This has a 7/32-inch wire rope that is 55.7 ft long and this winch has a 1.8-hp motor. If you want a wireless remote you can use up to 45-ft away I recommend part # BDW20212. Another winch I recommend for your trailer and raft is the Bulldog utility Winch, part # BDW15013. This winch has a 3,500-lb capacity. This...
view full answer... - Is There a Way to Make A Quick Disconnect Power Wire for Winch on Boat TrailerIf you wanted to use a 4-way as a 12 volt jumper wire it would be possible, but you should note that due to the small gauge of the wires used in 4-ways you really won't have much amperage to work with...especially for a winch which will draw a decent amount of current to operate. If you wanted to come up with a winch wiring kit from your vehicle battery you'd need something like the Bulldog part # BDW20026 which gives you a long length of 3 gauge wire you could run from your vehicle battery...
view full answer... - Recommended Trailer Battery Charger Located on Trailer for Battery Bank with Solar PanelsThe Redarc In-Vehicle BCDC Battery Charger - Dual Input - DC to DC - 12V/24V - 25 Amp # 331-BCDC1225D is not only a vehicle side mounted charger. It can be mounted in a motorhome, but most of the time it is a trailer mounted charger that would need to be mounted on the trailer side to be close to your trailer battery bank connection. The vehicle side of the 7-way will have a 12V power line at the 1 o'clock pin when facing the connector. This will provide 12V power to your trailer battery...
view full answer...
- Can The Wagan Power Inverter # WC3720 Be Mounted In The Bed Of A 2020 Ram 2500 The Power Inverter 1000 Watts with Three AC Receptacles # WC3720 can be mounted to the bed or bedrail of your vehicle but you will definitely want to ensure that your 2020 Ram 2500 has a good tonneau cover to prevent the inverter from getting wet. This inverter is designed to be within a foot of your vehicle's battery so your in-bed 7-way is not going to be enough to power the inverter so you'll need to run the wiring directly to the battery using 3 gauge wire to prevent voltage drop...
view full answer... - Recommended Wiring and Battery Isolator for Auxiliary Winch BatteryUsing quick connect like the Bulldog Winch Rear Wiring Kit - Quick Connect to Terminal End - 3 Gauge - 24' Long # BDW20026 you will simply connect the ends to the auxiliary battery for your winch. I recommend using a battery isolator like # DW08771 to keep the aux battery from draining the starter battery. This will allow you to charge and maintain your battery while still protecting it. If you will only be running the winch off the auxiliary battery, then you can use # 10-1-1 and circuit...
view full answer...
- Redarc BCDC Battery Charger Compatibility for 2019 F-350 Chassis Class CThe Redarc In-Vehicle BCDC Battery Charger - Dual Input - DC to DC - 12V/24V - 40 Amp # 331-BCDC1240D will work well on a Class C vehicle. The unit will charge your secondary battery and allow you to use solar panels for charging as well. It works on a wide variety of battery styles and the installation instructions will help you with installation. I do recommend using the 60-Amp MIDI Fuse Kit for Redarc In-Vehicle 40-Amp BCDC Battery Charger # 331-FK60. Redarc does recommend using...
view full answer... - How To Charge AGM Batteries In An Enclosed TrailerI do have a battery charger for the batteries in your enclosed trailer but I am not aware of a device that uses energy from the rotation of the trailer's wheels for this. The best option we can offer you is the Redarc In-Vehicle BCDC Battery Charger part # 331-BCDC1225D for a 75 to 200 amp hour battery bank or part # 331-BCDC1240D for a 200+ amp hour battery bank. The Redarc In-Vehicle BCDC Battery Charger uses power from the vehicle's alternator to charge your trailer batteries which...
view full answer... - How To Keep Trailer Battery That Powers Winch Charged While Its Being TowedI would be happy to help! If the maintenance charge is enough for your battery, then running the # 10-1-1 from the 12v accessory circuit of your 7-way connector to the positive terminal of your trailer's battery using a ring terminal # DW05705-1. Keep in mind that this will not keep the battery from draining while using a winch or tongue jack, as this circuit does not offer much power. To keep the battery from going dead a better option would be running the Bulldog Winch Rear Wiring...
view full answer... - Parts Needed to Charger Lithium Batteries on Trailer While TravelingThere is a way to accomplish what you are needing to do. But the 7-way isn't going to play a role in charging your battery and doesn't care if the battery is lithium or not. The hot wire coming from your 7-way would only ever be enough to trickle charge your battery. If you are wanting to charge your battery while under way you will need a DC-DC charger like the Redarc In-Vehicle BCDC Battery Charger # 331-BCDC1225D. You would also want a battery isolator like the Redarc Smart Start Battery...
view full answer... - Does The Manager30 Replace Solar Panel ControllerYes, the The Manager30 Battery Management System with Lithium Profile # RED88FR takes place of the solar controller for your current solar panel system. Solar panel controllers are used to help manage the power coming in from the panels and since The Manager30 does the same thing it actually can't be installed with a solar panel controller. The Manager30 is definitely an upgrade though as it pulls power from the solar panels and your vehicle start batter (via the alternator). It prioritizes...
view full answer...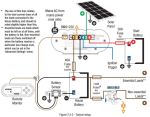
Do you have a question about this Accessories and Part?
Info for this part was:

Edited by:
Tyler C

Expert Research:
Michael H

Video Edited:
Joshua S

Test Fit:
Nicholas E

Written by:
Lisa S

Updated by:
Matthew S
At etrailer.com we provide the best information available about the products we sell. We take the quality of our information seriously so that you can get the right part the first time. Let us know if anything is missing or if you have any questions.
Product Experts Available Now!
Call 1-800-940-8924
Thank you! Your comment has been submitted successfully. You should be able to view your question/comment here within a few days.
Error submitting comment. Please try again momentarily.