
Summer Starts Here - Save up to 70%
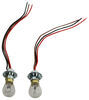
7-15/16" x 2-7/8" Rectangle. Waterproof LED trailer tail light with 10 diodes provides stop, tail, side marker, and turn signal functions. Surface mounts to trailer with included bolts.
Features:
Specs:
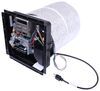
The waterproof construction of this light makes it ideal for use on trailers that may be submerged, like a boat trailer. The circuit board is sealed, which means that water will not damage the diodes or circuit board.
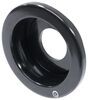
Surface-mount trailer lights install using a flange or bracket with mounting holes. These lights lay flat against the trailer surface and only require a small, often pre-existing hole, for wiring. Mounting hardware is used to secure the light to the trailer.
Videos are provided as a guide only. Refer to manufacturer installation instructions and specs for complete information.
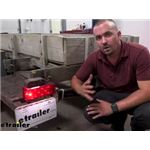
Hello neighbors. It's Brad here at Etrailer, And today we're taking a look at installing the Peterson Trailer Taillights. These are gonna be completely submersible and LED. Now they're gonna be available in two different configurations. You're gonna have your driver's side with that integrated license plate light and also the passenger side. So as you can see, we have a taillight that's out on our driver's side.
And so it's a good excuse to not only replace this, but also upgrade in the process. So as we go over to our brake lights, you'll see kind of about the difference of LED verses incandescent. And not only is the light better, but there's also multiple benefits including a longer lifespan, a brighter light, no bulb to go bad, and just overall a more efficient light. Might as well move with the times and upgrade your lighting system. Now, these are gonna have 14 led diodes* in there.
And the great part about LEDs in general is not only do you get better light but you also get a longer lifespan. In fact, these are rated for a hundred thousand hours and there's no bulbs to replace. So trailers tend to bounce around especially something small like this and those filaments in the bulb are no different. So they tend to kind of go out quite often and not having taillights on your trailer can be a safety issue. And these are DOT compliant.
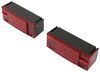
And you're never gonna have to worry about those bulbs going out. Now, these are gonna be rectangular and come in right at about eight by three inches. So they have a nice design to 'em but definitely still a lot of surface area to see those brake lights turn signals as well as running lights. Being completely submersible means that it's gonna be great for your boat trailers but also you'll have the peace of mind knowing that if your trailer's out in elements, it's not gonna harm it by having a little bit of rain or snow on it. Installation is very easy.
You're just gonna be tying into your existing wiring that you probably had with your taillights. And it actually comes with mounting hardware. So let's head over to the installation and get yours installed. Now I've already gone ahead and replaced our passenger side. So let's go ahead and knock out the driver's side. And the first step is going to be removing your old light. So a lot of times they'll just have hardware with some nuts on the backside here. So I'll get these loosened up and our tail light out. And once you get your old tail light off you can actually go ahead and get those wire separated. And you'll probably notice on the driver's side to get our license plate light here we have the Browns put together so pretty easy here. Brown is gonna go to the two Browns there. Yellow's going to go to the yellow for our turn signal. And then we just have a ground. Now, in order to route your wire you might have a hole that you can pass them through but it's pretty cool here. You can see this system that has places to run your wire. So if you wanna run 'em up and through here you can actually snap those in place. And that way you'll have a nice clean path that's gonna be flush. So that way you don't have to worry if you want your wires coming out here that what you tighten, it's gonna crimp them down. You can just simply route them over. Now, what we'll need to do is grab our hardware and you're gonna have these carriage bolts here and these are just gonna slide up. And then once you push a little bit extra they're gonna kind of pop in place and you can see it holds it there, which is nice. And it does allow for just enough room to kind of be able to adjust it if you need to on your trailer. So with those in place, pretty much determine that I'm gonna run my wires kind of over to this side. So what I'll do is just simply take our wires and run these up and then you can kind of just lightly push them into the channels here, and that's gonna hold that in place. So once you have your wires routed nice and clean to the side that you want we'll simply just line up our carriage bolts here. Now we're gonna be using our existing holes, but if your trailer doesn't have those same holes, that line up then you're gonna want to drill those out just large enough to get your carriage bolt studs passed through and then we'll be following it up with a flat washer. And then we have a rated flange not here. So nice part about that carriage bolt is it's gonna stay in place in that plastic. So you can actually hand tighten this on here. We get our other one in place as well. So using an 11 millimeter sock, I'm gonna go ahead and just make sure that this is aligned properly. Like I mentioned before, you do have a little bit of wiggle room to be able to kind of move this around as necessary, but get it nice and level. And once you're happy with that you can go ahead and tighten these down. And obviously you don't wanna get too crazy here because it is mounting into plastic. So I'm gonna just tighten this by hand and then just kind of give it one quarter turn just to make sure that it's nice and snug. Now, at this point, you want to determine the proper amount of wiring that you need to cut off. And ours is pretty close already. So I just pulled back some of the existing wire loom and where I cut. I'm gonna go ahead and just strip these back. I'm gonna do the same for our yellow as well. And the light comes pretty strip. So that's pretty nice, just a little added benefit there. And as I mentioned before our two Browns are gonna go together. So we'll get these twisted. And then as far as connecting I'm gonna be using a heat shrink butt connector. And these are really good for wiring that kind of lives out in the elements. And basically once you crimp this down and heat it up it's gonna create a nice seal around it keeping it water tight. And the reason we're putting our two Browns together is because these actually jumper between the driver and passenger side. And that way, when we have our tail markers on they're gonna be working in unison. So you may have a junction somewhere else in your trailer but you're gonna wanna make sure that those are jumped together. We're gonna go ahead and also use a heat shrink butt connector for our yellow wires. And once the heat shrink butt connectors are on there we'll go ahead and take our heat gun to it. If you don't have a heat gun you can use a lighter to kind of cinch this up. As we put heat to it it's gonna shrink down around the edges. Again, creating that water tight seal and gonna protect the connection of the wires. Now we're gonna Mount up our ground wire and just using a self tapping screw. It's not included in the kit but this is gonna be a nice, easy way to mount this up against some frame that's raw metal. So you can see here, I've kind of sanded this down to get a nice clean contact spot and then it's gonna be have these little teeth that are gonna bite into it. So you want that facing the metal and we'll just take our self Tapper and run it in. Just make sure you don't have any wiring behind where you're drilling. And when tightening that down just make sure the ring terminal's not free spinning around and it should be good. I'm going ahead and just taking our wire and clean it up with some new wire loom and some zip ties and both of which you can get here at Etrailer to kind of just give those wires a little added protection. So now all that's left to do is test to make sure it's working. So first we'll start with our running lights and then we can try our turn signal out. As well as our brake lights. And that was a look at Peterson LED Trailer Taillights..
Average Customer Rating: 5.0 out of 5 stars (9 Customer Reviews)
7-15/16" x 2-7/8" Rectangle. Waterproof LED trailer tail light with 10 diodes provides stop, tail, side marker, and turn signal functions. Surface mounts to trailer with included bolts.Wasn't able to find anywhere else
Lights worked perfectly for our application. etrailer has been great at delivery and follow up. We have and will continue to do business with etrailer.
Always reliable and accountable folks to work with.
Items were well packaged and protected well in the box , received in a timely manner. Product works excellent ! Ed was very helpful on my phone order! Would recommend to all to give this company a try !!!

All good, I received the parts that I ordered they were of fine quality. No complaints.
Excellent customer service communication and fast delivery
Info for this part was:
At etrailer.com we provide the best information available about the products we sell. We take the quality of our information seriously so that you can get the right part the first time. Let us know if anything is missing or if you have any questions.


Thank you! Your comment has been submitted successfully. You should be able to view your question/comment here within a few days.
Error submitting comment. Please try again momentarily.