
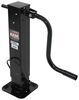
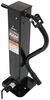
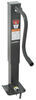
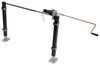
Replacement Sidewind Crank for etrailer and Ram Square, Direct Weld Jacks - 10,000 lbs
(27 reviews)
Price: $24.01
In Stock
Replacement Sidewind Crank for etrailer and Ram Square, Direct Weld Jacks - 10,000 lbs
Item # TJD-12000-HD
Our Price: $24.01
In Stock


- All Info
- Reviews (27)
- Q & A (0)
- Videos (3)
- Photos
etrailer Accessories and Parts - TJD-12000-HD
- Camper Jacks
- Trailer Jack
- Handles and Cranks
- Sidewind
- etrailer
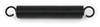
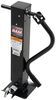
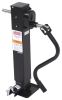
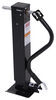
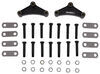
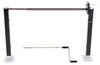
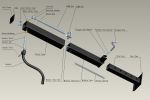
Replaces the crank from your etrailer or Ram square, direct-weld jack with a 10,000-lb lift capacity. Handle allows you to manually crank the jack. Mounting hardware included. Designed for TJD-12000 Series jacks.
Features:
- Replaces the sidewind crank handle from your etrailer or Ram square, direct-weld jack with a 10,000-lb lift capacity
- Designed for TJD-12000 Series jacks
- Durable steel construction with black powder coat finish
- Mounting hardware included
TJD-12000-HD-CTN Replacement Sidewind Crank for Ram Direct Weld Jacks - 12,000 lbs


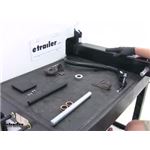
Video of Replacement Sidewind Crank for etrailer and Ram Square, Direct Weld Jacks - 10,000 lbs


Videos are provided as a guide only. Refer to manufacturer installation instructions and specs for complete information.


Video Transcript for Rebuilding of an etrailer or Ram Square Jack
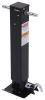
Today we're going to be showing you the rebuild process on the large, square-style, weld-on, twelve thousand pound jacks. This is part number TJD-12000SP-F2. Typically these jacks are going to be welded on your trailer. The last thing you want to do is cut them off, grind it down, and weld a new one on. Here at Etrailer we have the full assortment of replacement parts. This in particular is the Ram, brand or the Etrailer brand jack.
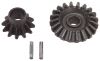
A few of the different replacement parts that are available are going to be the cap, that's going to fit on top of the jack, keeps out the moisture, keeps out the dirt. This is part number TJD-12000-CP. We also have the gear kit. This is part number TJD-12000-GR. We've got our bearing replacement. This sits in there and reduces the friction so we don't have all of that weight riding metal on metal.
You can see the inside portion of our bearing spins while the outside portion spins freely. This part number is TJD-12000-BR. We're also going to have the return spring. This is going to draw that drop-leg back up. That's what causes it to spring back up.
This is part number TJD-12000-RSP. Even have the clip for the handle. Now, this is going to come unfinished. These need to be welded on in a location of your choice, however you want to store your handle. This is part number TJD-12000-CLIP. We're going to have the replacement shaft.
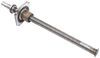
This is the handle shaft so our handle can connect on either side here. It's also going to come with the bushings that fit in the side of the jack. This is part number TJD-12000-SHABUS. Lastly, we're going to have the replacement handle. This handle can be mounted on either side. It has the vertical clevis. It's part number is TJD-12000-HD. Now, to remove our cap, we've got the two bolts that hold it in place. There's going to be one here, and catty-corner there'll be another one. Small socket, in our case it's going to be an eight-millimeter we're going to use to remove that. Get that one out of the way and do the same thing for the other one. If it's just the cap you're replacing, at this point you'll grab your new cap, and we'll just thread those bolts right into that same location, but go a little bit further into it. The next thing we're going to do is get our handle removed. Now, you really only need to remove the handle if you plan on replacing it. If you don't plan on replacing it, you can get this shaft out without removal. We're going to show you how to replace it, so it's coming off as well. To do that, use a fourteen millimeter. Now, your bolt's not going to be very tight here. You want it to be able to slide, you want the handle to be able to slide in and out there. It's going to be a washer on each side there. Then the handle, just set it to the side. Now, if we look at the internals of our jack, you can see the smaller gear, it's going to fit on the handle shank, or handle shaft. That larger, the base gear, it's going to sit down on the bottom. Now to see what we're doing here, give you a little bit better look, we're going to get all this grease out of here. You want to be sure you've got some grease on hand during your rebuild, so you can get it replaced with some nice, fresh grease. Doesn't necessarily need to be a high-temp grease, or anything like that. Let's get it all wiped off there. All right, that gives you a good look. You can see right where that pin's going to go through the gear, here. It comes out of the other side. You just need to drive that out. Going to use a punch for that. Small hammer and a flat tip punch is going to be your best bet. You want it to be up on a solid surface, or of course if it's on your trailer it's all ready going to be on a solid surface, you won't have to worry too much about it. Now, once we get that partially started, we don't want to knock it out of there too far, or it's going to get captured in that lower gear. Just want to be sure we've got enough room as we do that, so we can still rotate it. Get in here from the outside, just grab with with a pair of pliers. Just kind of wiggle and pull, and we'll get it pulled out. Now, the pin for the handle is going to be the one that's got the splines in it, and then the other pin that comes with your gear kit's for that base pin, we're going to show you that in just a minute. Now, of course since this is a brand new jack, we're going to be reusing all of the parts that we are going to be removing in the process, but this will give you a step-by-step on how to get yours replaced. Once that pin's out, the handle shaft should be pretty free to move side-to-side. We're going to pull that out, just like that. Your little spacer tube that's there, get it pulled out. Get our gear pulled out, a little recess there, that's going to go towards the outside, so you just want to keep that in mind when you put it back together. With our replacement shaft for the handle, you have these bushings. That just spreads out the amount of area in which we crank that handle on, rather than it just riding on that thin piece of metal on the outer tube of the jack. We'll get both of those popped out of the way. Now, we'll be able to reach in and simply pull out on that larger gear. See, there's a slot in there, you can see the pin. That pin is just a free-floating pin, and the gear keeps it in position, kind of captures that pin in there. This we'll set aside, and that base pin we'll just pull out. At this point, the only two components we haven't seen are going to be the bearing and the return spring. To get to those we have to lift the outer housing for the outer tube of the jack, off of the inner tube, so we'll stand it up. Grab it at the bottom, lift straight up on it. Now you'll see our bearing. That's what reduces that friction and prevents metal-on-metal contact. Now we're going to remove the four lock-nuts. At that point we can lift out our screw. That's going to be what really drives our jack up and down. As we rotate that, that increases the distance between this inner tube and our outer tube which sits on top. As that expands, our jack leg goes down, and those are extremely hard to damage. As long as you keep grease inside of it they should last a lifetime. This typically isn't something that you ever replace, going to be that screw. We'll get that lifted up and out, we can set it aside. Right inside here, we can get the grease off of it, you'll be able to see it a little better. You can see there's a small tab there that our return spring, or that our rebound spring, or drop-leg return spring is connected to, so we want to unhook it right there. We just kind of want to bend that open just a little bit there. Once we open that up a little bit we should be able to use a hook pick, pull up on that spring, it's going to be caught right in there. Now, we are going to be releasing a little bit of spring tension, so as I pop it off of that catch, it's probably going to pop down towards the bottom of the jack. Now that we've got that removed, we'll stand our jack inner leg back up. Now we'll rotate our pin, and then lift it up, and then just engage it in one of those higher holes, that's going to give us access right in here to the bottom where that spring is connected. You'll see right inside here, the spring's going to be connected to a small catch that's on the bottom foot-plate of the jack. Locate exactly which corner of the square tube that that's on. You're going to have a little notch in the bottom of the foot-plate. Once you unhook the end of the spring to it, bring in your new spring, hook it back on, and then we'll lower our jack back down, then we'll want to reattach it at the top. Now, we'll reach back down in there with our pick, or whatever you decide. We want to bring that up and get it reattached into that small hole in our tab on the top. Now we'll get our spring pulled out a little bit here, and we may need to flex that open a little bit more to get it engaged. Then we'll have it reconnected to our tab. Now, with our spring back in place, we can drop our screw assembly back in. We'll want to replace our four lock-nuts. These weren't fully tightened down. We'll just run all of these down until they come to their stopping point. The studs that they stick on are not fully threaded. It gives you a good reference point for where you'll stop. We can slide our bearing back down into place. With that in, now we'll slide the outer tube back over that inner tube. Lay this assembly back down, and we can see where the screw comes out, right there in the middle. Now, we'll take the smooth pin, which is our base pin. It's going to slide through the hole in the screw. We want it about centered. It doesn't have to be perfect but we want it pretty close to centered in that screw. We'll align the groove in our gear up with that pin, and slide it into position. As it seats it should be about flush with the top of the screw. It's not going to be exactly flush, but it should be pretty close. Now, our bushings, these are going to go from the inside out on each side. These, if you need replacements, are going to come with the handle-shaft replacement. We'll bring our handle-shaft and our gear. That gear's going to engage the lower gear there, that's important. Then, our shaft is going to slide right through that. Put our spacer pipe in place. Slide right through that, and then on through. As we slide this in, we just need to line up the hole for our pin in the gear with the hole for our pin in the shank. We'll take the pin that has the grooves in it. We need to get that in to where it's nice and flush. Just like that. We do have grease inaudible 00:13:05. One located here on the bottom, and then one located a little bit lower. You can decide to use those to grease it after you've got it reassembled, or you can take a few minutes now and kind of fill this area in with grease. That way you can visually see it and make sure that you get it fully engaged into the gears. You can see we're right back, nice, operating smoothly. It's time to bring our cap back into position, and replace the bolts that we removed earlier. Your new cap does come with new hardware, so if it's completely missing it's not a big deal. We'll want to get those re-secured, just like that. Then, we can replace our handle. Bring our bolt up through the bottom, or the top, doesn't matter. Make sure that we've got our flat washer on both sides. One there, one here. Then, we're just going to tighten that up enough so that we fully engage that locking portion of the nylon lock-nut. We've got a little bit of slack there still to take out. That's going to be too tight, you want that to be able to slide. We'll back it off just a touch. That's where we'll want it, just to where that handle can slide easily in and out, that way we can tip it down and connect it into our clip, whether we weld that onto our jack, whether we want it on our trailer, wherever we decide to put it. That's going to complete our rebuild of the twelve thousand pound, weld-on jack. I hope this will show you how with just a few parts and a little bit of time, you can rebuild your existing jack rather than having to buy a complete new one, and get it re-welded to the trailer.
Customer Satisfaction Score:
100% were satisfied with this product
0% of customers were not satisfied
- Wrong item was ordered
Customer Reviews
Replacement Sidewind Crank for etrailer and Ram Square, Direct Weld Jacks - 10,000 lbs - TJD-12000-HD
Average Customer Rating: 4.7 out of 5 stars (27 Customer Reviews)
Replaces the crank from your etrailer or Ram square, direct-weld jack with a 10,000-lb lift capacity. Handle allows you to manually crank the jack. Mounting hardware included. Designed for TJD-12000 Series jacks.by: Paul09/05/2023
Fitment is not perfect. I am assuming the previous handle was correct. It didn't fit the storage hanger. Had to modify to make work for my application.
by: Mark 10/11/2023
I received my parts right on time and exactly what I ordered
by: Nathan 10/29/2023
Worked perfectly
by: Carolyn L05/02/2019
Quality of product- excellent
Only problem was the forks that attach to the running gear was wrong. Hubby had to cut off and reweld so it would lay in slot on SIDE of our 4 Star aluminum horse trailer.
Never thought of that when ordering but did when I tried to install the control arm.
Shipped quickly.
Priced well.
by: George 01/23/2023
Easy to install. Good, heavy quality. Nice packaging.
by: Jose L01/02/2023
Good handle
by: Nathan08/22/2017
Item was great quality and suited the purpose intended. Service was great as well and shipping prompt. Rarely due I note the name/website of an online store for future use but I will this one. Thank you very much!
by: Charles03/07/2019
Thanks
by: Eric06/03/2019
As advertised and worked perfectly.
by: Allen 06/08/2023
by: Gary 10/12/2023
by: Yvonne10/25/2018
Product was as advertised
by: Scott 01/13/2024
by: Gary 04/26/2024
by: Mark 03/15/2024
by: Rich 03/27/2020
good as usual
by: Josh 11/17/2023
by: Kirk H03/01/2017
Excellent!
by: Alfredo 09/25/2023
by: Tina 12/22/2020
by: John 12/01/2023
by: Jim 08/20/2023
by: Max 03/24/2023
by: Herb 08/03/2022
by: Joe 03/10/2023
25
27
Show More Reviews
See what our Experts say about this etrailer Accessories and Parts
- Parts Needed to Operate 25K etrailer Landing Gear Jack on a TopHat TrailerTo use the 25K etrailer Square Gooseneck Companion Jack # TJD-25100 at the front of your TopHat trailer you just need the following parts: - Connecting Rod # LG-XTB - Sidewind Crank # TJD-12000-HD We don't have a bracket for the connecting rod but since you have a welder in-house you should be able to weld a bracket onto your trailer to help support the connecting rod.
view full answer...
- Replacement Parts for the Square Direct Weld JacksI went ahead and linked the video you are referencing about rebuilding a square jack like the Square Direct Weld Jack # TJD-12000SP-F2 from our website to this answer. We have a number of replacement parts in that video and some that were not included in the video, I have listed them all for you below. Replacement Cap # TJD-12000-CP Replacement Return Spring # TJD-12000-RSP Replacement Sidewind Gear Kit # TJD-12000-GR Replacement Plunger Pin Assembly # TJD-12000-PPN Replacement Bearing...
view full answer... - Replacement for Pro Series 12,000 lb Trailer Jack Needing New ScrewTo get your Diamond C dump trailer back in working condition you'll need to swap out the entire jack as that internal drive screw isn't available as a replacement. For a replacement jack I recommend going with our etrailer Trailer Jack # TJD-12000SP-R2NH along with the Handle # TJD-12000-HD because we still have replacement parts for our trailer jacks in case you end up needing them. Also, the parent company of Pro Series is in a transition phase right now so there's no guarantee this...
view full answer...
- Handle Needed For Sidewind etrailer Square Direct Weld 10K JackThe handle that you need for the Square Direct Weld Jack - Drop Leg w/ Spring Return part # TJD-12000SP-R2NH is part # TJD-12000-HD. This handle replaces the handle on all of the TJD-12000 Series square jacks. It comes with the bolt and hardware needed to install.
view full answer... - Replacement Gear Kit for Ram Jack With 12,000 lb CapacityThe # BD500212 is specifically made for Bulldog jacks. Based on the 12,000 lb capacity and 10,000 lb lift on your Ram jack it sounds like you have a TJD-12000 series jack like the # TJD-12000SP-F2. The correct gear kit would be the # TJD-12000-GR. If you need additional replacement parts we have the following: -Replacement Sidewind Crank for etrailer and Ram Square, Direct Weld Jacks - 10,000 lbs # TJD-12000-HD -Replacement Handle Shaft for etrailer and Ram Square, Direct Weld Jacks -...
view full answer... - Availability Of A Drill Adapter For The TJD-12000SP-R2NH Square JackUnfortunately we do not offer a drill adapter for the square jack # TJD-12000SP-R2NH. The only way to raise and lower the jack will be with the manual crank handle # TJD-12000-HD. Bulldog used to make a powered drive kit that worked with these jacks, but that has not been available for quite some time.
view full answer... - Replacement Parts For Ram 12K Support Capacity Jack # TJD-12000SP-F2Here is a list of the replacement parts we have for the Ram 12K Support Capacity Jack # TJD-12000SP-F2 you found. Replacement Sidewind Crank # TJD-12000-HD Replacement Plunger Pin Assembly # TJD-12000-PPN Replacement Cap # TJD-12000-CP Replacement Return Spring # TJD-12000-RSP Replacement Handle Clip # TJD-12000-CLIP Replacement Handle Shaft # TJD-12000-SHABUS Replacement Rod and Nut # TJD-12000-RODNUT Replacement Bearing # TJD-12000-BR Replacement Sidewind Gear Kit # TJD-12000-GR
view full answer... - How to Replace Interior Ram Jack Rod and Nut # TJD-12000-RODNUT on 12000 Series JacksGood news! I was able to get a exploded diagram as well as a set of instructions on how to replace the rod and gears # TJD-12000-RODNUT in the # 12000 Series Ram Jacks made after 2012. I have attached them to this page for your convenience. Basically, you will not need to remove or cut the steel plate inside the top of the jack to do this. You will want to remove the cap, then the roll pin that holds the cross shaft into the leg, this will free up the smaller gear that will be removed...
view full answer...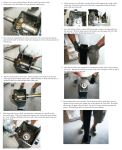
- Is There a Drill Adapter Which Is Compatible With 1 Shaft On a Square Trailer Jack?While there is not a drill adapter for the Handle Shaft # TJD-12000-SHABUS on a Square Jack # TJD-12000SP-R2 I do have some ideas for you. First you can have the handle shaft machined down to accept the Ultra-Fab Speed Socket # UF48-979005. This includes a 12 point 3/4" socket which will also fit a standard 6 point head. Another option would be to cut the end off a Crank Handle # TJD-12000-HD and weld on a drill end. This means you do not have to modify the shaft on the jack.
view full answer... - Length and Radius of Ram Jack Handle # TJD-12000-HDWe spoke with our contacts at RAM jacks and they informed us that the length of the # TJD-12000-HD is 14-1/2 inches and the radius is 13 inches.
view full answer... - Ram Square Jack Replacement Screw AssemblyWe have several replacement parts for the internals of a Ram brand square jack. The Replacement Rod and Nut # TJD-12000-RODNUT will fit the following Ram jacks: # TJD-12000SP-F2 10K Sidewind with 12-3/8 inches of travel w/handle # TJD-12000SP-R2NH 10K Sidewind with 12-1/4 inches of travel w/o handle # TJD-12000SP-R2 10K Sidewind with 12-1/4 inches of travel w/handle Some other replacement parts for these Series jacks are: # TJD-12000-GR Replacement Gear Kit # TJD-12000-BR Replacement...
view full answer...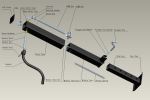
- Replacement Sidewind Crank for a Ram 12000 Series JackI have an option for you, but the Replacement Handle for Buyers Products Heavy Duty Square Jacks # 3370091405H is the correct replacement handle for Buyers Products jacks 3370091410H and 3370091415H. We have the Replacement Sidewind Crank for etrailer and Ram Square, Direct Weld Jacks # TJD-12000-HD which is designed to replace the Sidewind Crank for Ram Direct Weld Jacks - 12,000 lbs (TJD-12000 Series jacks). The Buyers Products Heavy Duty Square Jacks # 3370091405H would not have been...
view full answer... - What are the Dimensions of the Mounting Bracket of the Replacement Sidewind Crank HandleI went out to our warehouse and measured the end of the Sidewind Crank, # TJD-12000-HD. The inside width of the opening measured 1-1/2 inches. The outside measured 1-7/8 inches and the tangs measured 1-3/4 of an inch. In case you want to know, the bolt slot measured 1/2 inch.
view full answer... - Replacement Handle For Ram 12000lb Top Wind Square JackI reached out to my contact at Ram and he mentioned that based on the description of your jack you either have the # TJD-12000TW-R with no return spring on the lower leg, or the # TJD-12000TWSP-F which has the return spring on the lower leg. Both of these jack use the same replacement handle as the side wind jacks which is the Replacement Sidewind Crank for etrailer and Ram Square, Direct Weld Jacks # TJD-12000-HD. I included a video of the TJD-12000-HD for you to take a look at.
view full answer...
Do you have a question about this Accessories and Part?
Info for this part was:

Expert Research:
Jameson C

Video Edited:
Joshua S

Video Edited:
Jacob T

Video by:
Kathleen M

Installed by:
Randy B

Installed by:
Andy C

Updated by:
Wilson B

Updated by:
Mike S

Written by:
Amanda M
At etrailer.com we provide the best information available about the products we sell. We take the quality of our information seriously so that you can get the right part the first time. Let us know if anything is missing or if you have any questions.
Product Experts Available Now!
Call 1-800-940-8924
Thank you! Your comment has been submitted successfully. You should be able to view your question/comment here within a few days.
Error submitting comment. Please try again momentarily.