
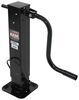
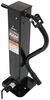
Add a handle keeper clip to your Bulldog trailer jack to keep your handle out of the way when not in use. Works with all Bulldog square tube trailer jacks. Welds on to the outer tube of your square tube jack. Includes 1 handle keeper clip.
Features:
Fits:
Videos are provided as a guide only. Refer to manufacturer installation instructions and specs for complete information.
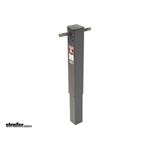
Today we're going to be taking a look at the rebuild process of the bulldog square 10,000 pound lift, 12,000 pound static capacity jacks. Now these you'll most often see on the front of very large utility trailers and even some fifth wheel campers. There are several kits available to help you along with your rebuild process. Here we'll have our internal screw, thrust washer, bearing, and pens. This is part number BD500217. Just the bearing itself is part number BD001015.
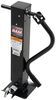
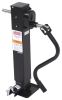
And we're also gonna have our gear, bushing, and spring replacement kit. Now that gear kit is part number BD500212. There are also two types of handles available, one being the vertical, which you see here. This part number is BD015181. We also have a horizontal option available, I'll explain to you the difference in those in just a minute. That part number is BD800090. The first thing we need to do is remove the cap located here on top.
That's gonna be a five sixteenths inch socket or bit driver. So it's just gonna come out, and we'll have one of those on each side. Once we pull that off, you'll see inside we're gonna have a lot of grease and hidden in there will be a few gears. At this point we need to get in here and just get this grease out. We're gonna be replacing it.
You just need basically a universal grease, it doesn't have to be anything high-temp or anything like that. Just get as much of it out as we can. It's gonna give us a good look inside. What we'll need to do is slide the spring over just like that, and you see how that pin slides out That's the pin that holds the shaft in place side to side. So we'll remove that and set it aside. It's gonna allow us to pull the shaft out and we'll just kind of compress our spring a little bit, be able to pull that out.
With that out of the way, you see that gear's gonna come out. Set it aside, inside out each outside tube there you're gonna have the bushes. Pull those out. Then the main gear on the bottom, we should just be able to lift straight up on that and we can remove it. You also see the pin for that right below it. And here we'll see washer, we can take out. Now that's gonna be all the components that're in the gear and spring kit, so if that's all you need to replace, you just put those back in at this point and your job's gonna be done. If you need to go further that, if you need to get to the bearing or if you need to get to the screw, now we need to separate the outer tube from the inner tube of our jack. So lift up on that, it's gonna give us access here. Here you see the bearing, again that's the part that is available individually or as the entire screw kit, so we'll set that aside. Here's our thrust bearing, now our pins. These are just gonna slide out by hand. All of this comes apart really without too many tools. And at that point, we're able to lift that screw mechanism right up and out. Now we would bring in a replacement, as you would see put a little bit of grease on it, our replacement would drop right down in. Then we'll need to place our pins back in. Then you can take your replacement thrust bush and put that down on there, our bearing's gonna sit on top. Now it's important to position the bearing so that this opening is facing downward. That's gonna help protect it from any moisture and help any rain that might get in there run off. Once we've got this in place, it's time to put our outer tube right back on. And as we do it, we'll see the screw come through the top. Now your washer that you took off the bottom of the other thrust bearing, that goes on. Now the larger of the pins that're included in the gear and spring kit needs to slide through the whole that we've got in the top of the screw. You just kind of want to center that on your screw and then you'll be positioning your large gear right down on top of that. You want that pin to sit in those two slots. Now we'll be bringing the handle bushings through each side just like that. Now our gear for this side is gonna sit down in there, gonna make sure those teeth line up. And then we need to slide in the crossbar where the main handle is. And you just want to make sure the hole, see that smaller hole It's gonna be offset to one side. Make sure that's on the same side as your gear. Now before this fully passes through, we want to get our spring in place, so you bring your new spring in. And we need to kind of get that compressed so it'll slide over the end of that gear and then line up with our handle bushing on the other side. Then we just push this clear through. Now if we compress our spring, we just want to line up that hole with the hole in our gear, place our pin in, and then you see how that spring kind of goes along that bottom side All we'll have to do is push this down until the top side clicks in. Just like that. And you can see at that point, we're back fully operational, it's just time to fill this up with some grease. Now you can do that now since you have access, or you also have the two grease circs on the side, definitely recommend doing it beforehand though. Now we'll just take again a little bit of all-purpose grease, this is a high-temp grease, it doesn't have to be. Want to make sure we get plenty in our gears there. The good news is, you're not gonna be able to over grease it so get plenty in there and that should keep everything lubricated. At this point, we can put our cap back on. Now depending on your situation, you may have a pair of these with a bar running between. You'll want to put your bar on going over to the slave jack. We do have two different handle replacements available. This one's a vertical handle replacement, which means the connection point here is gonna be vertical. It's gonna be up and down. So to replace the handle, that's gonna be placed on there. So we've got a bolt with a flat washer, we want to slide that through. Flat washer on the other side, and then this lock nut, you just want to get it down so it makes contact with the outside. So that's gonna allow us to rotate our jack up and down, and then to store it, since what happens is you're gonna pull out and then allow that to rotate down. Now a vertical handle position is going to allow us to bring the handle over to the front side of our jack, and we can use a handle keeper part number BD500312. You can weld it on. Now if you want this to be on the side of the jack rather than in front, we need to switch over to the horizontal handle. Instead of these begin up and down, they're gonna be side to side which would then allow us to tuck our handle alongside of the jack. And that'll complete our rebuild of the bulldog 10,000 pound lift capacity jack. We hope this'll show you that with just a few parts and a few tools, you can rebuild your bulldog jack rather than having to do a complete replacement.
Average Customer Rating: 5.0 out of 5 stars (3 Customer Reviews)
Add a handle keeper clip to your Bulldog trailer jack to keep your handle out of the way when not in use. Works with all Bulldog square tube trailer jacks. Welds on to the outer tube of your square tube jack. Includes 1 handle keeper clip.Order came 2 days early. What else could I be asking for? Awesome!
product is excellent/service is outstanding/easy to order!
Package arrived quickly
Info for this part was:
At etrailer.com we provide the best information available about the products we sell. We take the quality of our information seriously so that you can get the right part the first time. Let us know if anything is missing or if you have any questions.


Thank you! Your comment has been submitted successfully. You should be able to view your question/comment here within a few days.
Error submitting comment. Please try again momentarily.