
Thank you! Your comment has been submitted successfully. You should be able to view your question/comment here within a few days.
Error submitting comment. Please try again momentarily.
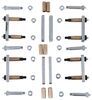
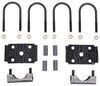
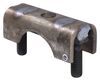
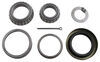
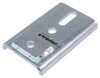
Moves your trailer's leaf springs to the top of your axle. Works with 3" diameter axles and double-eye leaf springs only.
Features:

Videos are provided as a guide only. Refer to manufacturer installation instructions and specs for complete information.
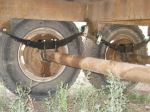
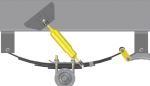
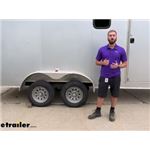
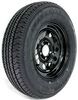
Hey guys, Kevin here with "etrailer" and today we're gonna be taking a look at the Dexter Trailer Springs Over-Under Conversion kit. One of the common questions we get here at "etrailer" is how can I raise the height of my trailer so that it can ride more level with my tow vehicle or so that I can add on some bigger tires Dexter's come up with a solution for this depending on the size of your axle and that is their over-under conversion kit which is going to swap your axle and your leaf springs so that you can lift up that trailer just a little bit. So here it is, our completed setup. We have our U bolts going through holding our axle to our leaf spring that is now on top sitting on our new spring seat. One other thing to keep in mind when you are trying to swap up to get those bigger tires is that you're gonna also need to double check the space you have with your fender and then also the body of the trailer itself. So as you see here, if we tried to really size up we really couldn't go with anything that's wider, we'd only be able to go with something that's just a little bit taller wheel wise.
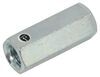
And then on top of that you also are gonna be changing the center of gravity for the trailer. So as you start raising that trailer up it's gonna be a little bit less stable. So you're gonna wanna make sure that you go ahead and pick up one of more rides cross members which is going to mount on the center hangar and it's just gonna kind of give you some extra support, it's gonna run straight across. They also have ones that come with equalizers as well if you decide you wanna upgrade your suspension. So what this kit basically does is just flips your leaf springs up above your axle and what that's gonna give you is the diameter of your axle plus the height of your spring stack.
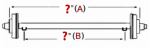
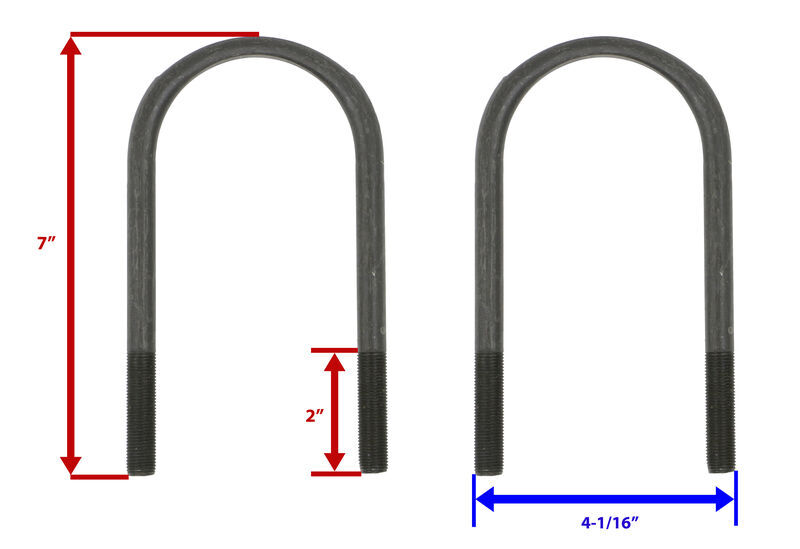
So you can look anywhere from three to five inches usually with one of these kits just based on what your axle is and then also the springs stack. So before picking out your kit, you're gonna wanna make sure that you measure the diameter of your axles. You can use a caliper to get 100% for sure measurement on it or you could really just take your tape measure up to it. It's really quite a difference between two and three eighths and three inches. So if you look at it, you can kind of really just eyeball it with your tape measure, that way you make sure you get the correct kit.
As far as installation goes, it is very messy. Your suspension, your leaf springs, your axles, all that is can be collecting all kinds of road rhymes. So definitely wear some gloves wear some eye protection if you get under here to hammer out those bolts or really do anything under 'cause there's a lot of mud and stuff that just gets up on there and it's gonna fall down and get in your face, it's gonna get all over your hands. But other than that it really just requires just a little bit of patience and a lot of planning to make sure that when you lift up your trailer that you're properly supporting the weight of the load. So the first step in our installation we're gonna have to remove our wheels.
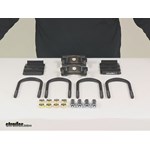
I already have our trailer lifted up so I'm gonna use an impact gun if you want to go ahead and break off those lug nuts before you lift the trailer up just to make it a little bit easier 'cause then you don't have to worry about the tire kind of moving on you. So the next step is going to be lifting up your trailer. That way you have enough room so you can kind of drop your axles down a little bit because we are gonna have to take off our leaf springs so that we can flip them up to the top of the axle. Now when you do this you wanna make sure that you're looking by the frame and that you also have a bottle jack or maybe a floor jack, something like that that you can easily kind of slip in under the axle 'cause you are gonna wanna have to move that up and down just a little bit to kind of play around with the leaf springs and getting everything into place. So I find the forward jack usually the better option, but we're gonna go ahead and get this supported and then we can start taking out our leaf spring. So now that we have our axle supported, we can go ahead and start taking apart our suspension here, pulling out our leaf spring. And while we're doing this we're going to want to pull from our nut side. We don't want to try and spin the bolt side because that bolt actually has teeth in it and it bites into the shackles strap. And especially on this kit Dexter already has this kind of pressed into that shackles strap. So it's not gonna wanna move at all, it's gonna really fight you and we don't want to grind that out. We wanna make sure that those teeth stay bit into that shackles strap. So we're gonna make sure that we put our breaker bar on the bolt side so it doesn't move at all and we'll try and back that nut off. Now this isn't always easy, the suspension is gonna wanna move on you. This equalizers really just gonna wanna try and bend so you may have to really kind of fight it. There you go. All right, now I can. So typically you could have just pulled off just that one bolt if it wasn't already bit into that shackle strap in the back, but because it is we have to pull off both, we'll pull off this strap here and then we can just pop the whole assembly right out and take off our leaf spring. All right, now that I got those two nuts off I'm gonna go ahead and start breaking down our old U bolts. So we're gonna pull those nuts off, pull our U bolts outta the way while it's all attached just to make it a little bit easier. And then we can move up to that front hanger and pull off that last nut and start pulling out our leaf springs. Now it's definitely a good time to have on some safety goggles and some gloves with your suspension as you can see right here, pretty dirty. Definitely looks like they kind of went through some mud. Don't wanna get any of that on you. I'm just gonna break each of these off kind of evenly, that way it doesn't start leaning one way and make it too hard to get onto. All right, now we can go ahead and just throw our old U bolts and our plate away. We're not gonna be reusing any of this 'cause our kit is gonna come with everything that we need. All right, same thing again, we're gonna break off our front hanger now. All right, so now we can go ahead and pop off our shackle strap. Now would be a great time to replace your shackle straps and your bolts. Maybe switch over to a kit that has wet bolts so that you can easily grease them, keep your suspension running nice and smooth. But also more importantly just to kind of check that shackles strap. You don't want any play in the strap itself right now. This one is in decent shape. You know, it's fitting right up with our bolts, there's no real spacing in there, but over time especially in here, I've seen quite a few where the bolt starts to kind of round it out, make it an oblong hole in there instead or the shackle strap itself just kind of gets bent over time or just kind of rusted out. So now would be a great time to replace it if you plan to do that just because you got it all taken apart. But we can go ahead, pop out shackle strap and bolts and we'll come over to the other side with our hanger. Now we're over at the front hanger, this one you are gonna have to hammer out it does have those teeth in that bolt, I can show you once we get out and it's kind of biting into the metal on our hanger. So we'll just take our hammer. Love taps and we can slip it out. So right there's those teeth that I was talking about and since we're gonna be reusing this bolt instead of replacing it, I wanna make sure that when I put this back in, I kind of line those teeth up with the teeth marks that are in my hanger as well. That way I don't worry about grinding out the hole and then having that bolt slide around inside of our hanger. So now we can take a look at our kit. We're gonna have these new spring seats and that's what's actually gonna sit on the axle and then your leaf springs will sit on top of, it's gonna come with these bump stops. And what that does is it's just gonna screw on here and I wouldn't go too far into it just because we are gonna have to kind of back these back off 'cause this is gonna sit against the spring seat that's already welded onto your axle. And what that does is it just allows it to sit straight on there, it's not gonna start to kind of turn as the suspension kind of puts pressure on it so you won't have to worry about it moving back and forth and throwing anything off. But like I said, we'll only put it up just a little bit on here 'cause we do have to back it all the way back down to have it sit inside that spring seat. So now I'm gonna go ahead and I'm gonna drop my axle down just a bit because I have to get my spring up above it. So I'll just be real careful, go nice and slow. You don't want to go too much and have your axle drop and touch the ground, there's plenty of space. All right, we'll try right about there. So now I'm gonna go ahead, I'm gonna take my spring seat I'm gonna set it down on here and we can kind of start hand tightening down those bump stops, don't use a wrench yet, we wanna make sure that we have this sitting correctly first, but I'm just gonna getting it started there. And then we can drop on our leaf spring and there's a little knot right there in the center of your leaf spring that's gonna sit right into that hole on the springs stack. Set that up in there and we're going to take our plate and it's got these little tabs we're gonna have those facing up. So we'll set that right on top and we'll have it going long wise along with our leaf spring and we'll take two of our U bolts, we're gonna pop those right on the axle and have them slip right up through our plate and take our included nuts and we'll just hand tighten those down for right now just to get it started and like to keep all the nuts real even on here that way you don't have to worry about it starting to turn one way and get kind of cockeyed on here. All right, I get that all hand tightened down and come back with our Torque wrench and torque these down to the specs that are also listed in your instructions that came with your kit. So we'll just keep going around like I said, just try to make it even as you go. Like I only went up like 10 to 20 pounds each as I wind and then just kind of worked it between each bolt just to keep everything even. Now I'm just gonna lower this a little bit trying to get these eyelets on our leaf spring lined up with our hanger and with our equalizer. Now I'm gonna go ahead and I'm gonna hammer that bolt on our hanger here just to get that seated back into the hangar. I wanna make sure that we get that so the bolt head is nice and flush up against our hangar. Now that I got that on, I'm gonna go ahead and I'm just gonna hand tighten that on as much as I can and we're gonna switch back over and get our leaf spring attached to our equalizer. So one thing before we go ahead and stick in our bolts and our shackle straps. If you look at the equalizer right here there is no longer a bushing in there. So it probably had a nylon bushing in it and that completely wore away. And if you look at the bolt you can see the difference it made. This side was sitting in an equalizer and it was just rubbing metal on metal and getting rusted out versus this one where it still had that nylon bushing. So I'm gonna go ahead and order another bushing and we'll get that in place and put our bolts back in. All right, so now I get my replacement nylon bushing. Now when you're doing that all you need to do is measure the diameter in here. Typically it's gonna be 11 16ths and then a nine 16ths inner diameter for your bushings. And then you're just gonna wanna measure the length. So I already measured this, it's about an inch and three quarters so got exactly what I need and I can pop that in. This one's sliding in super easy, but typically I do run into issues where it doesn't wanna move. And what you can do is you can just take a bolt and kind of slide it on there and then kind of hammer it in gently so that you don't tear up the bushing as you're pushing it in or beat it down on the edge of it with a hammer 'cause you'd be hitting it with the bolt instead. But now that that's in, I can go ahead, and slide in our bolts and our shackle strap, put our shackle strap back in place. You may have to kind of, like just a little bit with this even back out just because our axle is kind leaning a little bit right now with my lift. Yep. So now I'm gonna jack this up just a tiny bit just to give a little bit of easier play in here. I may have to just kind of hammer that in a little. Yeah, I think I might want to comb down just a tiny bit. Well, this does take a little bit of just playing back and forth, it's not an exact science here. Now I've got it seated on the bolt, we don't want it sitting on those threads, we want it sitting on the actual bolt itself. And then we can go ahead and put on our nuts again and when we tighten these down we are just gonna get them snug 'cause the suspension does have to roll. If we over tighten this, these shackle straps are gonna stick and your suspension's not gonna move. And now it'd also be a good time to maybe replace your nuts if they're kinda rusted out like these ones are or just at least clean them up a little bit. I think I'm gonna come back with some spray and kind of get these little better looking. Now with all of our hardware tightened down and our nuts on our new over-under kit nice and torque down, we can go ahead and just keep doing this same process on each side of our axles. One other thing, just tech tip wise is if you have your brake lines in the way, so especially like electric brakes like what we have on here, this side has the brakes kind of running through the wires are running through the axle. So they're not really in the way, but on the other side they are kind of hanging down. I did have to just cut that just because the line was so tight they didn't really leave any slack at all. But if you have to do that you can cut it and then just hook it back up together with some heat treat bug connectors. All right, the last thing to do is just fully tighten up our bomb stops here. I'm using a 11 16th wrench and we're really just gonna get this kind of hand tight with our wrench. Don't need to go any further than that we aren't trying to really push that hard against this, but like I said before this is really just to kind of control any travel. We don't want to have our spring seat kind of roll on here at all. Now that we have each of our sides done we can go ahead and slap our tires back on. Now we have this install complete, we we're gonna wanna take this over to a weld shop and get that new spring seat tack welded onto the axle itself just to double check, make sure that it does not slide at all and that we don't have any issues. Well, I think that about does it for today's look at the Dexter Trailer Springs Over-Under Conversion kit. My name's Kevin. Thanks for watching..
Average Customer Rating: 4.8 out of 5 stars (189 Customer Reviews)
Moves your trailer's leaf springs to the top of your axle. Works with 3" diameter axles and double-eye leaf springs only.
The lift worked out perfectly,I had the place where I bought the trailer install them because I didn't have a welder to weld the saddle mounts to the axle and that's a must for a safe installation,also I had the place where I bought the trailer do it because they had the capability to align the axle perfect to the trailer after the installation.
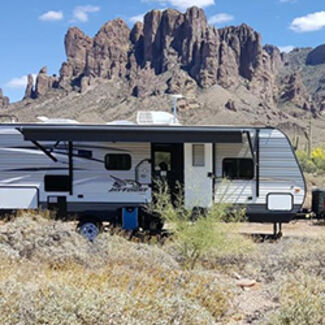
The lift added approximately 5 inches to the trailer hight so I could install the off road wheels and tires.The lift didn't affect the handling of the trailer at all.
Jaime at ETrailer was extremely helpful and got my order sent up ups ground since I was having issues using a P.O. Box.
My parts arrived quickly and fit perfectly. I installed them last week and my trailer looks so much better and won’t be scraping on my driveway anymore!
Used this kit before and love it.
Very simple to install and does the trick!
The folks at etrailer are amazing. Always eager to answer my questions and solve any issues I run into.
Used two kits on a 10k equipment trailer, with 2, 6k lbs axles. The trailer is an Appalachian 16ft with drop down axles and scrapes coming in and out of my driveway badly. It’s used from equipment hauling to mulch and stone. I had to reuse the old plates. The ones provided were’nt wide enough to accommodate the springs by about 1/4- 1/2inch, although they seemed slightly more robust. I also added washers to the u-bolt nuts. Otherwise I would’ve rated it a 5. I followed the instructions and tack welded the new spring seats in place. Each trailer is different, so as a general kit, this worked very well and I would recommend it. This one actually gave me more clearance than I wanted. I didn’t actually measure spring seat to spring, but I estimate on a 3 inch axle it gave me 5-6 inches of lift. All said and done I feel comfortable that it will safely handle a 10k lbs load.
Product was just as described, went together easy. Took about 4 hrs. by myself. Only negative thing i can say is it took longer to ship then stated but im assuming this was do to the shipping carrier. Also the price increased $[XX] per kit within a week of viewing and purchasing.
I am another customer that has a duel axle trailer and failed to order two kits. Be aware that these kits take care of one axle.
This over-under kit made it extremely easy to move the axles on my Camper. The spring seats with the adjusting nuts made it easy to keep them aligned for welding. I reused my old tie plates because of my shocks I uses a price of 3x3x1/4 angle to bolt the shock to the tie plate. I had read that some people had problems if the had shocks. This gave my camper the extra ground clearance I needed.
Very fast shipping! Excellent service. Dexter needs to check their quality control, one coupling nut was not threaded.
Received the package on Friday afternoon. Reviewed the instructions and postings @ E-Trailer. Pulled the trailer up in front of the house at 0930 Saturday morning and drove it away about 4pm. The biggest time killeer was as others have mentioned getting the 11,000 pound trailer up high enough and safe enough to do the job. Thanks for checking up on me.
I replaced my RV's axles to 6000# and used the conversion kit as part of that upgrade. I am very pleased with the product including the shipping and the installation.
The U-bolts were too short for the new leaf springs I installed. I had the U-bolts custom made at a suspension shop to replace the stock bolts.
Nick

11/11/2022
Working as expected - very well.
Great product! Great company! Gave me the extra clearance I needed to take my cargo trailer offroad in the mountains.
Very easy online ordering, good prices and they were shipped and received in a few days. Can't beat good service.
Very easy to install. Be sure to weld the top of the axle as stated.
Works great. Easy install and gave me the height change that I wanted. Great product and fast service. Thank you.
Great kit, raised my trailer about 5 in ches.
Product is of very good quality, it fit well and did exactly what it was supposed to do, well designed and fairly easy to install, I use my trailer more than most people do and I have been totally satisfied with the parts that I purchased, flipping the axles leveled the trailer right up & it pulls great
Have not built a trailer in 30 years. This is apicture of the one i built for good friend. This turn out very nice, heavy duty . All suspension and lights came from E-Trailer . This is the best place to buy and get information. Thank you, Ed.
Kit was good quality and packaging, arrived on time.
Very easy to install, work perfectly and fit precisely!
Box intact delivered on time haven’t installed yet though
It will fine
All parts fit with just minor grinding. Which was to be expected. But the part that I liked the most was the costumer service. I can’t remember the girls name. But it was the kit that I wanted and needed. But everything on the specs wasn’t exactly what I needed according to your website. And dexsters website directly. According to the website the u bolts were going to be to small for what I needed. Nothing was adding up. It was bothering the girl that was helping me on the phone that it wasn’t making sense. So she had a tech go into the warehouse and cut a box open to verify if the manufacturer was correct or not. Which it turns out that the manufacturer was wrong on the u bolts. They were the bigger ones that I needed. Once again I can’t remember her name. But thank u again for going out of your way to help me out. Great customer service.
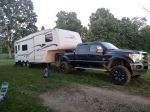
We had this kit professionally installed on our 5th wheel by a local shop that builds lifted "monster trucks". It came out great and we love the kit. We are now level. We regularly tow on rough rocky roads and have excellent ground clearance.
Quality product - fast shipping.

Jack
10/28/2023
Conversion was straightforward and results were completely satisfactory.

Works well..I now have all the clearance I need between my pickup box and camper. Camper now rides level.
Do you have a question about this Trailer Leaf Spring Suspension?
Info for this part was:
At etrailer.com we provide the best information available about the products we sell. We take the quality of our information seriously so that you can get the right part the first time. Let us know if anything is missing or if you have any questions.


Thomas
6/14/2023
After a year the lift kit is working out perfectly.