
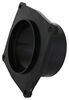
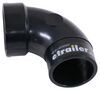
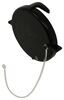
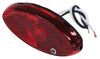
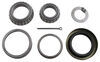
LaSalle Bristol Waste Valve Body for RV Black Water with Seals and Hardware - 3" Diameter
(55 reviews)
Price: $20.90
In Stock
LaSalle Bristol Waste Valve Body for RV Black Water with Seals and Hardware - 3" Diameter
Item # 34439240
Retail:$38.22
Our Price: $20.90
You Save: 45%
In Stock
Thank you! Your comment has been submitted successfully. You should be able to view your question/comment here within a few days.
Error submitting comment. Please try again momentarily.


Need help with installation?
Locate installers near me- All Info
- Reviews (55)
- Q & A (0)
- Videos (4)
- Photos
LaSalle Bristol RV Waste Valves - 34439240
- Single Waste Valve - Manual
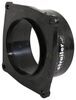
- 3 Inch Valve Body
- Straight Valve
- LaSalle Bristol
- Stationary Valve
Features:
- Replacement valve for your RV's black-water tank
- 3" Diameter passage allows wastewater to travel freely when valve is open
- ABS plastic valve with stainless steel shaft
- Valve body, seals, and hardware included
- Made in the USA
39240 LaSalle Bristol Waste Valve Body for RV Black Water w/ Coupler, Seals, and Hardware - Termination Valve - 3" Diameter


Video of LaSalle Bristol Waste Valve Body for RV Black Water with Seals and Hardware - 3" Diameter


Videos are provided as a guide only. Refer to manufacturer installation instructions and specs for complete information.


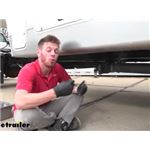
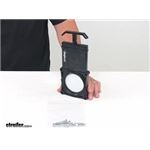
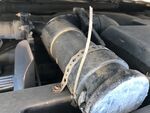
Video Transcript for LaSalle Bristol RV Black Water Waste Valve Body Installation - 2017 Jayco Seneca Motorhome
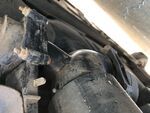
Hey guys, it's Jake here with etrailer. Today we're gonna be taking a look at, go over a few details and we're gonna show you how to replace the LaSalle Bristol RV waste valve. Now, there's a couple of different reasons of why you would need to replace your RV waste valve. The most common being that it's leaking or it's not working properly. One of the biggest reasons of why it leaks is because the pipe or the valve itself has a crack in it. These valves are very, very finicky.
If you pull too hard on 'em, you can break the handles off. The inside flap that actually closes off the pipe is just plastic. So if you pull too hard during the winter you may risk breaking it 'cause it's more brittle. Another reason is that the way that the valve is positioned if you close it premature, say you pull the wrong valve and you try to close it premature, the valve actually being or the tank actually being emptied what can happen is there's a slot that that valve shuts off into. What you can do is you can take some tissue paper and end up shoving it up into that slot.
This is gonna cause that valve to never properly close again. 'Cause what'll happen is that tissue paper will turn rock solid and you'll never be able to close the valve all the way. So if you're having trouble getting your valve closed all the way up, that's probably your issue. So let's go ahead and jump into the insulation. Most of your valves are gonna have four bolts and nut combos on the four corners and it's most likely going to be a 11 millimeter bolt and nut.
So we'll just remove these. It is a good idea to drain your tanks if you have the ability drain your tanks and leave them open the night before. That way your pipes have a little bit of time to dry out so that when you pull this valve out you don't have anything leaking on you. Now depending on your setup, this may differ for you. For us, this pipe goes straight back.
So we will have a little bit of wiggle room here. We just replaced this valve and there's not much room to move at all. So I actually had a friend of mine hold this pipe back while I slid the new valve up into place. We pull the valve out. This is what we're talking about. This is just the gray water. So no worries. That is the groove I was referring to that you can get stuff suck in. We're replacing these because they're just too hard to pull. But this is what I was talking about that you could smash stuff up in there and you'll never get it out. So pull this out. Make sure you take your seals out. If they're been on there for a while, they're probably stuck. They'll look like this and you'll have two of them and we'll pop the other one out. We can grab our new valve. Hey, notice our new valve is gonna be nice and smooth. There's nothing in the way. Our gaskets are gonna be pre pressed in here. Just make sure they stay in there when you're putting it up in place. But we can close it and we we'll pull back on our pipe here wide enough to go around our gaskets, slide it over, make sure both of the fittings are getting lined up there. Nothing. You just wanna make sure that your gaskets aren't folding over themselves and you should. A pretty good judge of that is that this if you have this style of bracket it won't go up flush to it. It may be cocked like that a little bit but you can see here it's nice and flush. So we'll take your new hardware and put it in place. Now you wanna make sure you're putting even pressure on these. So give each one a few turns and then go back around and snug everything up and we'll go ahead and test it out. It works just as it should, If it seems a little tight at first, that is just because the rubber is new on the inside. That's actually a good thing that it means you have a good tight seal as you get, you know, more use out of it and some more liquid comes on through here it will get a little looser. Well guys, hopefully this video helped you to install your new RV waste valve.
Customer Reviews
LaSalle Bristol Waste Valve Body for RV Black Water with Seals and Hardware - 3" Diameter - 34439240
Average Customer Rating: 4.8 out of 5 stars (55 Customer Reviews)
by: Tomas12/31/2022
Item was exactly what I expected, perfect replacement for my broken valve body. No need to replace the rest of the plumbing.
by: Dean 05/01/2024
Have had excellent experience with e-trailer good job
by: Tish02/06/2024
After searching the web for an RV part I found E-Trailer! Kelly was so helpful, making sure I ordered the correct part, I did. Showed up just in time!
Appreciate the help and if needed will definitely use your store again.
Thank you!
by: Mark 02/02/2024
I spent most of my life in customer service running an auto parts store. I would have hired Helen without meeting her in person. If that tells you anything.
by: Ron 03/09/2024
Etrailer is top notch always. USPS not so much!
by: Ronald03/03/2024
The valve was an exact replacement. It arrived in a short time.
by: Richard04/03/2024
It’s working properly and seems to be made of quality materials.
by: Rubin03/19/2024
thank you as allways
by: Fred T.12/15/2019
Exact replacement, easy installation. Lubricated seals with o-ring grease, worked perfectly.


by: James 12/27/2023
Great product.
by: Charles03/05/2022
Exact replacement for our old leaking valve. Fit perfectly and work well. We have not yet checked them for leaks since it is still winter. No reason to expect an issue though.

Charles

3/5/2023
Great replacement valve. No issues
by: Mike 08/28/2023
Have not had the time to install, so can't say anything about it. Order was delayed slightly due to stock, but I was kept informed the whole time.
by: Vaughn09/06/2023
Very quick delivery and pricing. Very informative about part that is back ordered and some alternatives options if I choose.
by: Ron08/15/2019
My RV black water tank drain began leaking so I searched for a replacement. I've purchased other products from etrailer before and have been satisfied. This product was delivered promptly, and it fit as advertised. Always check the return policy of vendors before ordering!

Ronald S.
8/16/2020
One year later and the tank is worki
by: William11/18/2022
Got the Bristol valve body, due to manufacturing delays, took several months. It arrived well packed, no damage. I know have an extra for standby in my backup kit for the road.
by: Joseph 01/13/2023
Fantastic them girls did me good.I’ll b back
by: Freddiefreeloader10/05/2018
Fit my 1990 HiLo camper trailer perfectly. Had to take it back off on first try and lubricate the seals on the sides that touch the valve. Without the lubricant the seal grabs the slider inside the valve so tightly that it was too hard to open and close. No instructions on package but I should have known. Not that much problem putting on or taking off. Another great buy. Have been ordering from this company for all my parts while I have been reworking this trailer I just recently purchased. etrailer.com is now the only supply company stored in my favorites on my desktop.
by: Bruce L03/19/2020
It worked, not much else to say about it. Oh, I should mention it’s easier to install when you put the seals on the inside of the mating parts, then you can slide the valve into place and not worry about rolling or crimping the seals.
by: Norman 06/02/2023
Great Service and response
by: David 04/03/2023
You guys are the BEST!!!!!! I can find what I need
and you ship it out FAST!!!!!!
by: Dick A.09/23/2020
They are still working great after one year of normal use. They were replacements for the original gate valves that were standard on my new RV. Those original valves only worked properly for about 9 months.
by: Russ 02/23/2023
Quick delivery and correct product.
by: Dean10/16/2021
It's great that you can buy just the part that needs to be replaced rather than the entire valve.
by: David03/26/2019
Ordered many products from etrailer and always get quality parts at good price and this purchase is no exception.
by: Doug06/12/2019
etrailer ordering and delivery was excellent.
Product was as described.
25
55
Show More Reviews
See what our Experts say about this LaSalle Bristol RV Waste Valves
- Replacement Valves For The Bristol Double RV Waste Valves Part # 34466ND14AARYes, you can replace the 3" and 1-1/2" valves on your Bristol Double RV Waste Valves - Elbow - Rotating - 3" and 1.5" Hubs to 3" Spigot # 34466ND14AAR with the Bristol Waste Valve Body for RV Gray Water w/ Coupler, Seals, and Hardware - 1-1/2" Diameter # 34439241 and the Bristol Waste Valve Body for RV Black Water with Seals and Hardware - 3" Diameter # 34439240.
view full answer...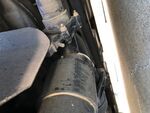
- 3 Inch Waste Valve for Black Water Tanks with a Removable HandleWe do have a 3 inch diameter black water waste valve with a handle that unscrews but part # T1003VPM doesn't have a removable handle. Instead use part # 34439240 from LaSalle Bristol. Additionally, use part # 34466SP1112 for a 12 inch extension.
view full answer... - Will The Valterra T80 Doublke Waste Valve Replace A LaSalle Bristol V93B1 Double Waste ValveI'm not able to find a good picture of the V93B1 to see exactly what type of connections it has (spigot or hub) so the # T80 could possibly work with your setup. The # T80 comes with hubs on both sides, which will slip over the existing straight pipes you have and can bond to them with ABS Cement # A05-0303. If you plan on cutting the V93B1 off and connecting the pipe into a new double waste valve then the # T80 would be a great choice. If the flanges where your VB93B1 connect are still...
view full answer... - Replacement Black Water Tank Outlet Valve for 2008 Keystone Cougar RVAccording to my LaSalle/Bristol representative, neither the valve size itself nor the spacing of the holes for the mounting hardware have changed over the years. The mounting holes are 3.73 inches apart center to center, which is right between 2-5/8 and 2-3/4 inches which is industry standard. The Assuming that your current valve body is for a 3 inch line, the # 34439240 you referred to will work great.
view full answer...
- Will Valterra 3" Waste Valve Body Work with LaSalle Bristol Waste ValveYes, you can interchange the Bristol Waste Valve Body for RV Black Water part # 34439240 with the Valterra Bladex Waste Valve Body for RV Black Water Tank part # T1003VP. The mounting pattern and valve size are both industry standards so you can choose between the two as they are interchangeable.
view full answer... - Replacement Valves for LaSalle Bristol Double RV Waste Valves 34466NDHR19AAAYou can replace just the valves of your # 34466NDHR19AAA with the part # 34439240 which will also work with your valve extensions as well.
view full answer... - Replacing Valves Only On Bristol Double RV Waste Valves 34466ND13AARIn regards to the Bristol Double RV Waste Valves part # 34466ND13AAR, you can replace both the black valve section using the Bristol Waste Valve Body for RV Black Water part # 34439240 and the grey valve section using the Bristol Waste Valve Body for RV Gray Water part # 34439241.
view full answer... - How Far Apart Are the Mounting Holes on the Bristol Waste ValvesThe four bolt pattern of the flange on the waste water valves is an industry standard so you don't really have to worry about measuring the bolt hole spacing. However, to address your specific question the bolt holes are spaced 3.73" apart but depending on how exact you were measuring, you could get anywhere from 2-5/8" to 2-3/4" as its hard to get the exact center of each hole. Therefore, the Bristol Waste Valve Body for RV Black Water part # 34439240 will work for you just fine. The only...
view full answer... - Is There a Black Water Tank Waste Valve Body The waste valve bodies alone without a hub or spigot connection are something you can get. You would need something like the Valterra Waste Valve Bodies w/ Flexible Cables for RV Black Water and Gray Water Tanks - 72" # TC1372 for both tanks or the Valterra Waste Valve Body w/ Flexible Cable for RV Black Water Tank - 72" # TC372 for the black water tank only. There is also the Bristol Waste Valve Body for RV Black Water with Seals and Hardware - 3" Diameter # 34439240 which does not have...
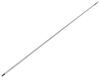
view full answer... - Can Handle of Bristol Waste Valve Body 34439240 be ExtendedYes, you can install an extension handle to the Bristol Waste Valve part # 34439240 you referenced. For that we have the part # 34466SP1112 for a 12 inch extension, # 34466SP1106 for 6 inch as well as a few others you can find at the attached link on this page.
view full answer... - Replacement RV Black Tank Waste Valve for 2021 Forest River Arctic Wolfe 287BHLook on the valve and see if you can see a brand on it. With that we can see if we have a valve body replacement you could use that would allow for an easier replacement. For example if its a Valterra Bladex you would want the part # T1003VP. Or if it was a LaSalle Bristol you'd want the part # 34439240.
view full answer... - Are Valterra And LaSalle Bristol RV Waste Gate Valves Interchangeable In my experience Valterra has been MUCH easier to get in contact with and get parts from than LaSalle Bristol. Dometic is the parent company for Valterra and typically has pretty good customer service every time I've called them. It's a bit of a wait on the phone usually, but LaSalle Bristol typically doesn't get back to me unless I email them. That being said both companies model their gate valves (Valterra # T1003VP) (LaSalle Bristol # 34439240) to fit standard dimensions, so they are...
view full answer...
Do you have a question about this RV Waste Valve?
Info for this part was:

Expert Research:
Mike L

Expert Research:
Jameson C

Video Edited:
Jacob T

Video Edited:
Chris R

Video by:
Dustin K

Video by:
John S

Video by:
Thomas T

Installed by:
Cole B

Installed by:
David F

Edited by:
Amanda M

Written by:
Halie H

Test Fit:
Jacob H

Test Fit:
Adam E

Updated by:
Matthew E

Updated by:
Cody B
At etrailer.com we provide the best information available about the products we sell. We take the quality of our information seriously so that you can get the right part the first time. Let us know if anything is missing or if you have any questions.
Product Experts Available Now!
Call 1-800-940-8924
Tomas
1/1/2024
Still working as when newly installed, no issues at all.