
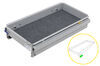
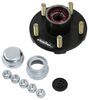
Seaflo Battery Selector Switch for Boats and RVs - 6V, 12V, 24V, and 32V
(0 reviews)
Price: $29.99
In Stock
Seaflo Battery Selector Switch for Boats and RVs - 6V, 12V, 24V, and 32V
Item # SE56VR
Our Price: $29.99
In Stock


- All Info
- Q & A (0)
- Videos (2)
- Photos
Seaflo Accessories and Parts - SE56VR
- Battery
- Disconnect Switch
- Seaflo
Reduce your odds of a dead battery with this switch. Easily toggle from your start battery to an auxiliary battery to run accessories and equipment without draining your main power source. Switch lets you pull from both batteries in an emergency.
Features:
- Selector switch lets you choose which battery to pull power from on your boat or RV
- Prevents battery drain between outings and during recreational activities by letting you run lights or appliances off your auxiliary or house battery
- 4 Toggle options to choose from
- Setting 1 pulls power from your ignition battery to start up your engine
- Setting 2 pulls from the auxiliary battery so you can run accessories or equipment
- "Off" switches off power to prevent any usage during storage
- "Both" lets you pull from both batteries in parallel for emergency use
- Low profile allows for easy installation in any position
- Tin-plated, corrosion-resistant copper studs provide maximum conductivity
- Compatible with 6V, 12V, 24V, and 32V DC systems
Specs:
- Overall dimensions: 5-1/4" long x 5-1/4" wide x 3" thick
- Power draw at 12V:
- Continuous duty: 175 amps
- Intermittent duty: 300 amps
- 4-Year limited warranty
SFCBS-300-402 Sea Flow Battery Selector Switch for Boats and RVs - 6V, 12V, 24V, and 32V
Replaces Seaflo SFCBS-175-402


Video of Seaflo Battery Selector Switch for Boats and RVs - 6V, 12V, 24V, and 32V


Videos are provided as a guide only. Refer to manufacturer installation instructions and specs for complete information.


Video Transcript for Seaflo Boats and RV Battery Selector Switch Review
Hey guys, Kevin here with etrailer and today we'll be showing you how to install the Seaflo Battery Disconnect Switch here on our 2018 Forest River Gray Wolf travel trailer. If you find every now and then when you go to pick your trailer up out of the storage lot that your battery's been completely drained because your jack, or maybe in your lights or something else we're left on and just kind of drain the battery and then you can't operate your jack to lift it up and actually hook up to your tow vehicle. A battery disconnect switch like this one is gonna be the right solution for you. This selector switch is going to allow you to not only pull from one battery, but also a second battery in parallel without having to actually wire it in parallel. Cause it's going to accept power wires from each of those batteries and put it in parallel before sending it out to your trailer. As far as installation goes, the hardest part is really just getting that base kind of set up just because the four mounting spots are pretty tight inside of here.
So getting that screwdriver or screw gun in there or socket whatever you need to do to get it in there and get it mounted up to your frame or whatever else you're installing it on, can be quite a challenge. Other than that, it is super easy to install and then use. So on our particular neighbor's trailer today, they only have one battery, but they are planning on upgrading the two batteries and placing it right in here. We're kind of tight on space so I think the best option is going to be surface mounting it right here and just kinda keeping it as close as I can over to our weight distribution bracket, sitting here so that he has plenty of room for that second battery. We don't wanna make it hard to try and turn the knob and shut our batteries on or off.
When we're trying to screw this in, we're gonna have to place our screws down inside of these little bracket holes here, which are pretty hard to get to. So I'm not a huge fan of those, but this bracket does make installation super easy so that's what we're gonna have to just do but I'm just using some small thin self-tapping screws. I'm gonna drop that in there and then I have a socket that I'm gonna stick down in there to shoot these into our frame. So as I'm shooting this in I'm gonna be super careful because this is plastic, it could break if I try to push it in a little bit too hard so we're just gonna go a little bit at a time and then make sure that we're sitting right. The second we heard that I can kinda let off got a little bit more room to go so I'm gonna keep tightening that down.
And I got nice and tight up against the frame we can go ahead and start doing the top ones. Like I said, this can be a little bit challenging just getting it in there, but once you do just take it nice and slow, make sure that you don't drill all the way through and ruin your bracket. If you need to, you can kind of pull up and make sure that the screw's actually coming through that mounting hole, does take just a little bit of playing around to start though. The main power wire coming from our battery, this is what's going into our trailer. I removed from our battery, I'm gonna have that hook up to our battery disconnect switch as our output.
Now I have to run a new wire, running from the battery over to our switch. So, had a scrap piece of four gauge wire. I'm gonna go ahead and try and just gauge exactly how much I need. I'm gonna leave a little bit of extra slack as well just in case we ever have to do anything else or move anything, maybe down the road. Whenever we add that second battery in I have to kind of readjust. I think probably right about there, there's more than enough slack and I'll go ahead and just trim this wire down of it. Then also sometimes our ring terminals they have kind of a wider mouth on it but doesn't always get over that casing so I may have to trim down that casing just a bit. So very carefully, I'm just gonna go ahead and kind of try and shave just the tip. I wanna cut all the way through I just want kind of round that down. So now I'm using my hydraulic crimping tool, crimp on that ring terminal. I kind of turn to my ring terminal so that it's gonna sit straight while it's hooked up to my disconnect switch just because as that wire sits there, it kind of wants to only go one way so I don't want the wire trying to fight against me. Now that we have that crimp down, we wanna make sure that we seal this up. I'm just gonna use some electrical tape. If you had one of the shrinking sleeves, you could go ahead and slide one of those on and then just heat it up to kind of shrink it down, that way you make sure you're not getting any water in there and corroding anything. Position this, so it's gonna actually shoot out of there without interfering with the post that bracketed on. And get that threaded. I'll tighten that down with my wrench. Now we can look up our output which is on there pretty tight, let's pop that off. And same thing, I'm gonna have to pop that tab. And, route it like that. Put our nut back on. Put that place, we can go ahead and pop our disconnect on and then we can hook up our battery side and put on our nut. Now, as you can see we have our line right here showing that we're up on the off position something hooked at the battery one I'm gonna switch over to one and then we can test our jack and just see if we have power. With the power on battery one as you can see our light's working and if I wanted to go ahead and disconnected it again, switch it off and it cuts off our power. Well, I think that about does it for today's installation of the Seaflo Battery Selector Switch here on our 2018 Forest River Gray Wolf travel trailer. My name's Kevin, thanks for watching..
0
0
See what our Experts say about this Seaflo Accessories and Parts
- Is It Normal For 12v Power To Be On The Trailer Side 7-Way Plug When Disconnected Hey Phil, It's ok to see 12 volts on one specific pin (pictured below). It means that whoever wired it ran a line to the battery so that the 12v hot pin on your tow vehicle's 7-way can charge the trailer battery a bit while you tow. Power sitting in the wire can drain the battery but it's such a low amount that it would take a long time to really drain the battery. Typically on trailers there's a lot of other appliances (lights, monitors, etc.) that have a small drain which all together...
view full answer...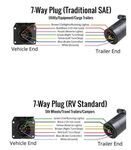
- Does The SeaFlo Battery Switch Have A Continuity When It Is Switched OFFI spoke to SeaFlo and they explained to me that the battery selector switch # SE56VR acts as a sort of diverter for electricity. Off is self explanatory. 1 allows power to go from the alternator to battery or bank 1 ONLY. 2 allows power to battery or bank 2 ONLY. Both allows both banks to be charged with incoming electricity. This would be the only time both circuits are live.
view full answer...
Do you have a question about this Accessories and Part?
Info for this part was:

Edited by:
Lindsey S

Video Edited:
Chris R

Video by:
Jonathan Y

Installed by:
Andy C

Test Fit:
Kevin C

Written by:
Sabrina W
At etrailer.com we provide the best information available about the products we sell. We take the quality of our information seriously so that you can get the right part the first time. Let us know if anything is missing or if you have any questions.
Product Experts Available Now!
Call 1-800-940-8924
Thank you! Your comment has been submitted successfully. You should be able to view your question/comment here within a few days.
Error submitting comment. Please try again momentarily.