
To see if this custom-fit item will work for you please tell us what vehicle you'll use it with.
Thank you! Your comment has been submitted successfully. You should be able to view your question/comment here within a few days.
Error submitting comment. Please try again momentarily.


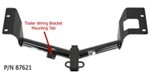
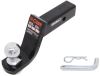
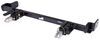
This fully welded trailer hitch receiver bolts onto your vehicle's frame with no welding required. Powder coated steel is sturdy and corrosion resistant.
Features:
Specs:
At etrailer.com we're committed to the products we sell, and to our customers. Our experienced and knowledgeable staff are available via both phone and email to address your questions and concerns for the lifetime of your hitch. The technicians at etrailer perform hitch installations on a daily basis, making them a valuable resource for do-it-yourselfers. The one-on-one, personal service you'll receive comes straight from an expert in the towing and automotive field. We've installed it, we've wired it and we've towed with it, so whatever your question, we can answer it.

Average Customer Rating: 4.9 out of 5 stars (781 Customer Reviews)
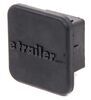
This fully welded trailer hitch receiver bolts onto your vehicle's frame with no welding required. Powder coated steel is sturdy and corrosion resistant.Missing is the filler plug that goes into the hitch receiver. Last curtis hitch had a rubber plug with the word curtis on it.
I ordered the Curt C13119 hitch in October when I decided to buy a 2015 CRV Touring model. I must have ordered it at the right time of day, I received the hitch the next afternoon. However, I ended up having to order my CRV. I had the hitch for three months before I could install it.
I left the plastic panel in place and cut the hole with a utility knife. I started with just cutting three sides to make a flap rather than a whole. I wanted to replace as much of the cutout as I could after the install. Bending the flap to 90 degrees, I had enough room to work. After the hitch was in place, I cut a smaller piece from the flap to fit around the hitch. I then used JB KwikWeld to glue the flap in place.
The hardest part for me wast getting the bolt directly above the muffler torqued down in the limited space. Thank you for the videos showing the installation. It made the process easier to watch it happen first.
The quality of the Curt hitch is excellent, well made with thick paint. Much better than the U-Haul hitch I had on my last vehicle.
I have referred several people to use eTrailer.com based on my experice with their website and products.

Caroline
5/7/2015
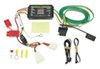
Could you tell me where you found the wiring harness hookup on your 2015. Was it behind the drivers side rear panel? Thanks in advance.
Curt 13119 trailer hitch
Product arrive in 5 days in excellent condition. Packaging was good, accessories order were taped to the hitch packing so there was no possibility of getting lost. Hardware was taped inside the receiver, so secure location and easy to find.
Gloss black finish was perfect.
Installation:
Read the instructions, watch the etrailer videos, and read the reviews! You can pick up some great tips in the reviews.
Definitely lubricate the exhaust hangers. It makes a world of difference going on or off, especially if you don’t have a special tool for that.
A wire brush WILL be necessary to clean the weld nuts on the exhaust (passenger) side. A tap or thread chaser is probably overkill except in extreme cases. Run all four bolts in and out of the nuts prior to lifting the hitch to make sure they will start as easily as possible.
I did not cut the plastic so there was the standard gaping hole. I removed the plastic underbody panel and used the cutout dimensions in the instructions as a starting point. I measured the prescribed 16.5” plus 1/4” from the edge of the toe hook slot, drilled two 1/2” holes about 7” apart and made straight cuts with a sharp utility knife to connect them.
I then slipped the panel over the driver-side hitch flange prior to moving the hitch under the vehicle.
Since I was installing mine solo, I attached the u-bolt nuts first as they were the easiest to get to. (There is no need to do the most difficult bolts - the front ones on both sides - first, because they become easier when the others are already installed.)
I had a bit of a problem getting the plastic panel to seat correctly, which turned out not to be my measuring and cutting, but rather the panel being slightly pinched by the hitch. A firm tug toward the front of the vehicle using both hands and work gloves, of course, made it pop right into place.
After this, it was just a matter of tightening all bolts to spec and replacing all the pins, bolts, and screws that were removed for the install.
One more note: Safety First! An awful lot of road debris can be caught in that panel and some of it WILL drop on your face. Always wear safely glasses and gloves when performing automotive work!
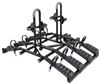
Purchased the Curt C13119 hitch from etrailer for a new 2014 Honda CR-V after going over the wealth of product information available on the site that reassured that I'd be getting the right product. I have a Thule bike rack that we used on our previous car and 2" hitches are not available from Honda dealer installation. I'm not a big DIY guy so had our local shop install it. We only use it for a bike/ski rack, not towing, so I know I won't be overloading it. Also purchased the stabilizer strap for the rack (see photos bellow) as per Curt and Etrailer.com's recommendations to preserve warranty. It's not much extra effort to install and adds piece of mind that it's relieving some of the stress on the hitch. We got all this just days before going on a long trip to the Rocky Mountains. The hitch worked great with all four bikes on the rack!
C13119

8/17/2015
Thanks for the follow up email. You picked a great time to check in since the hitch has been great and we just used it to load up 3 mountain bikes for a trip to the mountains. It worked great in the winter to hitch up a ski rack. It looks great and I like the added assurance from the support strap.Thanks!
Another great hitch. Shipping was on-time and the hitch was exactly what I ordered. Finish was even but there was slight damage probably in shipping but it looked like it was struck with a ball-peen hammer. A little filing and some spray paint and it was good to go. Instructions were clear and the cutting of the plastic body panel on the underside was much easier than I thought. Definitely measure and use a straight edge when cutting. Dremel with a rotary cutter worked great. Cutting the insulation was simple, really good shears made easy work of it. Prior to mounting run the bolts all the way in and out a few times to clear any debris from the threads you can't get with the brush. Getting the exhaust clear is a little challenging but manageable. I installed the hitch by myself and it went smoothly. Total time was about 90 minutes. I spent a lot of time on the measuring and also added a rubber barrier around the hole I cut. Very pleased with the fit and look of the finished hitch.

Kraig S.
8/11/2017
Love the hitch. 3rd product I have purchased from Etrailer and they have never let me down.
Hitch was processed quickly. Received hitch 2 days before scheduled delivery, thank you FedEx.
I highly recommend watching the installation video. If I had not watched it, I would not have thought you needed to put lower cover panel on the hitch at the same time when you bolt the hitch on. This can be tricky. I zipped tied the panel to the hitch on the passenger side. Plus I used utility knife to cut the plastic. Much cleaner than using a dremel.
Besides the panel covering, the installation is straight forward. My hitch lined up perfect to the Honda mounting points. Luckily I am a Honda tech, so I had all the tools needed and the availability of a vehicle hoist. Still needed help holding the hitch up to start a couple bolts. More power to those that installed theirs at home with the vehicle on the ground.
Hitch looks great installed. I just wished receiver was tucked a little more.

Sam
6/27/2021
Hitch has been great. Just wish my bike rack had less play. No fault of the hitch.
On the first delivery, after unboxing and trying to install the hitch, it turned out the hitch was bent on one side. There was no outward damage to the box, so I don't know how that happened. The second issue were that the flanges on the flange nuts were too wide, meaning they would overlap as they are supposed to be side by side.
I called eTrailer during the weekend, explained the situation, sent them pics, and they issued a return label for UPS drop off, and sent a new hitch within one week. I kept the hardware from the first delivery just in case something was missing from the new delivery.
The installation went well and they sent the correct flange nuts on the second delivery. Now it's time to put on my bike rack and get to the trails. Overall great service. Will need more time to comment on performance, but I think it will be fine if the welds hold.
Was meticulous about taking picures, but for some reason I could not upload the most important ones.

Jenny N.
12/6/2021
It sounds like that the side brackets were knocked out of alignment which can happen while in transit to our facility or to you. We do have a FAQ that can assist with moving the side brackets of the hitch back into alignment.
Helpful Links
Installation was very easy. Hardest part was the rubber hangers on the muffler. Decided to cut the rear panel with a rotozip instead of removing it, so I took my time measuring. I used a floor jack with a piece of wood and had my wife stabilize it. After cutting the hole, everything went smoothly. Place the bolts, tighten and torque them and your done. The videos were really helpful. Total time about 1 hour. Price and service from E-Trailer were outstanding.

Mel
10/13/2013
I removed the appearance panel, so that I would not slip and cut any wires above it that I could not see-now that I have done it that way, I discovered there is nothing to injure if you cut the piece in place on the car....the landmarks are obvious for marking the cut out, and a sheet rock knife does a quick easy cutout...my muffler hangers came off with moderate encouragement, and slipped back on with a squirt of silicone spray...all in all, a quick and easy install...oh, if you do it with one person, it is easiest to have a floor jack to raise and hold the hitch in place while you mount the bolts...etrailer is a great company to do business with....Mel

Mark A.
2/20/2015
Everything works perfectly.
Trailer arrived fine, except there where two gouges where paint was flaking off. Fortunately I had some gray primer and black spray paint which I used to cover the chips. They were on opposite sides of the trailer. The box was in good shape so not sure where it happened. The instructions were very clear and the hitch fit like it was supposed to. All the holes lined up just fine and the videos on line were very helpful. I would have given this product one more mark closer to Excellent except that one thing that I didn't like at all was the way the paint crinkled at the spot where the u shaped bolt gets bolted on with the provided nuts. I was tightening the hitch to the u shaped bolt and as the nuts tightened against the painted hitch I could actually hear and see the paint crinkle. It was as if the paint coat wasn't adhering to the metal. If it had adhered properly, I would have just expected the bolts to scrape some of the paint away not cause it to crinkle. So I took my black can of spay paint and coated the area really well to protect against corrosion. Here in Florida, that is a big problem.

Brian W.
10/2/2014
I had the same issue with the u bolt nuts. is the paint supposed to crack like this?

Yes, 1 year out I am still very thankful for and proud of my purchase/installation of this hitch. I 'm also thankful for saving $1000 (what my dealer wanted to charge for the equivalent product and installation)!! I would not have had the confidence to install this myself without the incredibly helpful how-to video showing installation of the hitch on the very same make/model/year as my car. Thank you etrailer.com!!
Suzanne
10/10/2017
Wonderfully!
This is my second Kurt hitch I’ve installed . I did both by myself with no problem ! I went from a class one to a class III hitch . That’s why did it twice. Great product.

Jim M.
5/9/2021
Just fine
Purchased 2 inch Curt hitch primarily to mount bike rack. Used all summer, hauling road and mountain bikes without problems. The hitch was easy to install fitting my CRV bolt pattern perfectly. Saves my back and rear bike rack did not cut gas mileage. Cut rectangular piece from plastic undercover following instructed metrics and bolted in place. Did it myself in short order. I'm 68 years old. Price was half local cost. Customer service and delivery was exceptional.
My husband and I installed this hitch on my 2012 CRV together. He just turned 71 and I am 65. It probably took 90 minutes as we aren't as strong as we used to be. Lol looking forward to getting out there and riding my bike on the trails around Pocatello, Idaho.
Susan L.
5/27/2020
It is perfect. Looks good.
Hitch went on as billed. I did the flap technique as mentioned by other reviews for the black plastic underneath instead of cutting out the entire piece for the driver's side of the hitch (just my preference). Fit perfectly. Struggled a bit getting the exhaust hanger off but with some tugging and wiggling and liquid soap spray, it came loose. Here are some pics of the finished result. One note for our etrailer folks is that you might want to use some bubble wrap to cover each end of the trailer hitch that attaches to the car frame as one end had broken through the box (see pic).
Installed Hitch On 6/23/20, on a 2014 Honda CR V, I modified the installation instructions,
I cut the access hole and backing, with the under side panel in place, I'm a 78 year old DIYer,
worked the installation alone, when cutting the hole with a utility knife, I left the front
uncut, bent the plastic panel down and taped out of the way, after the hitch was installed I put the cut piece of panel back in place, by trimming another 1/4" off the side with the hitch mount, fit good, and gorilla taped taped the back edge to hold in place.
This is a very nicely built and finished trailer hitch. While I know the CRV does not have the capacity this hitch does, I like the flexibility it provides, and the piece of mind that it will not come apart while towing something. It fits correctly, all the holes lined up exactly and the bolts went in easily. The plastic bottom cover cut very easily and smoothly with a sharp utility knife. Doing it alone, I used a floor jack to lift and hold it in place so I could attach the center U bolt. (see photo) I didn't like leaving the big hole in the under-body panel. It's necessary to install the hitch though. With the cut-out piece, a piece of galvanized steel and some screws I made an access cover door to close up the hole. See photos. Using a bent coat hanger I held the door down while it put the screws through it. I feel better with the hole closed up, and it looks correct.
The finish on the hitch is excellent..The round tube design looks more modern or at least i so believe.This is the hitch to buy if you do not have access to a lift as there is no drilling required to install.The instructions included are spot on and if you are somewhat mechanically inclined and have the required tools or can borrow or rent , you should be able to properly install the hitch. My only headache was related to not being able to install the bolts on the muffler side as there was excessive rust on these two weldnuts.I ended up getting a tap to chase the threads and then was able to bolt right up.It is possible a wire brush would have cleaned it up but this was really stubborn stuff.I was concerned with having to cut the underbody trim panel but again the location on the instructions are correct.I did use a dremel and a regular reinforced cutoff wheel as that is what I already had and cut clean as long as you keep the RPM`s high. due to having to get the tap the next day as all the parts stores close on Thanksgiving I could not finish it on the day I started so check those threads as they are exposed.The other side was fine as they are covered by the underbody panel.
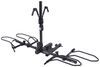
I bought this to accommodate a bike rack (Thule) and it works perfectly--easy attachment, easy locking mechanism. I'm very happy with this hitch and would definitely get it for another vehicle if needed.
Bolted right onto our Honda 2013 CRV AWD:) Was easy to install, took me about an hour. etrailer video was excellent! I also wired the CRV for the trailer hitch. Works great! Have towed trailers locally and on the freeway with reliable performance:) Thank You!
The hitch went onto my new CRV with no problems. The instructional video was very well done and helpful. It is definitely a two man job to lift and hold it in position while starting the 4 main fasteners. It is well designed to interface with the Honda frame and components and seems to be quite sturdy. The fit and finish of the hitch are very good quality.
I look forward to using the hitch to support a rear mounting bike rack
I give your staff 5+ Star Reviews. They answered several concerning questions for me and guanntee the hitch item I purchased was a definite fit for my car. And It Is etrailers purchase price was affordable and your company also gave me a quicker delivery at no extra cost to me, which I so appreciated.
Mounting was done in about an hr., has streamline fit and ready to use my bike rack this weekend. YEAH
Great product! Installation was easy...watched video..very helpful...l measured and cut the plastic panel on the car with a razor knife then installed hitch...reinstalled the cut piece by drlling holes,cutting off 1/4" to allow for hitch then attatching it with black zip ties...worked out great! Etrailer's order/shipping process was awesome! Recieved my hitch in just a few days...will definately use Etrailer again!!
Was relatively easy to install. Great price compared to what Honda charges for their hitch. Well-constructed. Performed flawlessly when towing my small trailer. Would highly recommend this hitch for CRV owners.
I installed this on my 2015 Honda CRV. It took about an 90 minutes. Be sure to spray the rubber pieces that hold the exhaust to the car with some penetrating oil. They will be difficult to pry loose if you don't. Also, be sure to spray the threaded holes on the exhaust side. On my car, they were slightly corroded because of being exposed to the elements for 3-1/2 years.
The hitch seems to be of high quality and looks like it will last.
Product arrived mint and after the snow was off my driveway it took about 1 hour to install (and take pictures). My advice would to use the enclosed measurements to cut out the left opening (I used a dremel) instead of removing the plastic gas tank guard, its easier, faster and safer as the enclosed measurements are PRESTINE!. I installed it alone so I used a jack to hold it up while I screwed everything together. Screw the center (tow hook) bolts first. One word of caution!!!! My car was ONLY one month old (2015 Honda CRV) yet I almost stripped a bolt while screwing it in. CLEAN YOUR THREADS REGARDLESS!!!!
Do you have a question about this Trailer Hitch?
Info for this part was:
At etrailer.com we provide the best information available about the products we sell. We take the quality of our information seriously so that you can get the right part the first time. Let us know if anything is missing or if you have any questions.


Brooke M.
3/21/2024
The good and bad news is that this hitch doesnt actually come a Curt hitch plug. If you would still like one, we carry # C22272 that will fit your hitch.