
To see if this custom-fit item will work for you please tell us what vehicle you'll use it with.
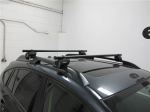
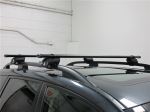
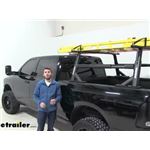
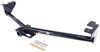
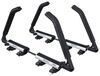
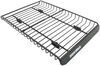
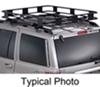
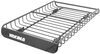
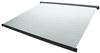
Heavy-duty crossbars mount to Yakima towers to create an aftermarket roof rack. Top and bottom channels let you add channel-mount accessories. Tie-down points in endcaps let you easily secure cargo.
Features:
Yakima HD Crossbars - 60" Long - Black - Qty 2:Videos are provided as a guide only. Refer to manufacturer installation instructions and specs for complete information.
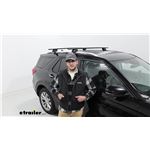
Hi, Matt with etrailer. Today we're gonna talk about our Yakima roof rack system on top of our 2021 Ford Explorer. Now this gonna be a great option for you if you're looking for something that's gonna be really heavy duty and it's gonna be able to keep a lot of your accessories on top of your roof. Maybe you've run out of room in the back of your car, because we do have three rows of seating. So if this is packed full of people, you might run out of space faster. Or if you're already using that space for other accessories or items, then you might need somewhere else to store your extra stuff.
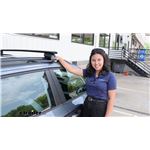
Or maybe you got kayaks, skis, or anything longer that you can't fit inside your car, this is gonna be a great solution for you. This is gonna be comprised of two parts. First, we're gonna have our 60-inch HD bars on top, and then beneath that we're gonna have our Yakima towers that grab onto your raised rails. Now let's take a closer look at these crossbars. The first thing I'd like to note is we do have this weather strip on top that's gonna protect that T-track channel at the very top of it.
And what that channel is used for is for any T-track accessories. And what's nice about this, this not only keeps debris out of that, but also reduces that wind noise from whistling through it. And then at the very edge, we're gonna have this anchor point. So if you need to tie anything off from anywhere, this is gonna make an excellent point of contact. This is also gonna be a pretty thick bar, so putting on any clamp-on accessories on here might be a little bit difficult if you don't have any HD bar adapters.
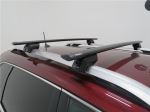
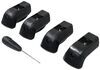
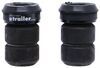
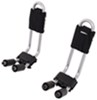
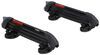
And then at the very bottom, there'll be an additional channel and that's what's gonna be what connects your tower to your crossbar. Then we're gonna have these towers and this end cap's gonna hide a lot of that hardware in here. And with that cap removing, take a closer look at how that strap wraps all the way around and it connects to these two hooks on the side. That's actually something I do kind of like about this one in particular, is that strap wrapping around this whole rail, giving you a nice secure fit. Though there is one downside to it, and that's gonna be on our rear crossbar.
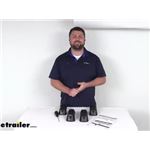
Take a closer look at it over here. If you notice, we do have this kind of plastic rubber material. The nice thing is you can push this down, but trying to get that strap to fit through this tiny crevice or hole here is a little bit of a struggle. For what we can put up here, we're gonna be able to put up to 220 pounds, but what I recommend doing is checking what your roof is able to handle. You can find that in your owner's manual so you don't exceed this weight capacity. Now for how far it's gonna stick up from the top, if I go from the top of our rails to the top of the crossbar, it's gonna be about three and a half inches. And that's another thing to note if you're going under any low clearance areas. So if you wanna make sure you can make those areas, you can take the total height of your car plus the rails, and then add your crossbars and any accessories you have on top of that so you know what areas you can make it under. And for the distance underneath from the top of our roof, that's gonna be about two and three quarters. So that's not a lot of room, but it's a decent amount of room to get a lot of different clamp-on accessories under here. Like I said earlier, you are gonna need some pretty large clamps that get around this though. So if you don't wanna use any clamp-on accessories, you can actually just use this T-channel at the top to put any stuff that you have. We're gonna have some overhang and actually, I think this is the perfect amount of overhang that you're gonna want, 'cause it's gonna stick out far enough where you're gonna be less likely to hit your head on, but you're gonna still have plenty of room to put on any accessories at the very end of it, so it's a lot easier to take off those items. Overall this is gonna be a great sturdy option, especially going for the build. If you want something that's gonna last you a long time, this is gonna be it. I would actually recommend the Yakima JetStream crossbars instead, because that's gonna be able to accommodate a lot of the same things. Now unless you're planning on getting a rooftop tent put on here, that's gonna be the only caveat off of that. But if you like this one for the sturdiness and you do plan on putting a rooftop tent on this, then I think it's gonna be the best option for you. But if you need to hand with the install, just stay tuned, we'll show you how to do that. Start off the installation, I'd just like to lay everything out to get an idea of what I'm working with. So we're gonna have our crossbars in front of me and over to the left, we're gonna have these towers. Along with the towers, the hardware to go with them. And then I'm gonna have my included Allen key with this built-in torque device. And what I recommend grabbing is a measuring tape to make things easier. First we'll get our tower ready just by taking off this end cap. And in your case you might have to loosen this up a bit just using your included Allen key. And once you've loosened it up some, you can push this through. Gonna adjust it because what we want to do is have access to this bolt that's within here. Once you can see that bolt, you're just gonna flip this around, you'll see it sticking out on the other side and you're just gonna match up this block with that bolt holding it in place. And then we're gonna just grab our Allen key and just tighten it down slightly. We just want it to be able to grab onto that block. We want it pretty loose because we're gonna be putting it on our crossbars. I've flipped over the crossbar now and you can tell, because we have this ruler on the backside and you can see this bolt in this channel. I'm just gonna unthread that bolt until it's all the way loose. And then at this point I just flip over the crossbar, let that bolt fall into my hands, and set it aside so I don't lose it. Remove that end cap. And when you're putting your towers on, you can actually put both of them on from this side. What I like to do is put the first one on backwards. Just matching that block up with that channel and pushing it all the way down to the other side. And then for the next one, I like to put that one in the right orientation, making sure that bolt is facing away from the center of the crossbar. And doing the same thing that we did on the first. And once you have it on, just make sure you put those end caps back on, and thread that bolt back through. Just move this over some so I have access to that bolt and just tighten it down just a little bit. I just wanna tighten it down enough where I can still adjust this if I need to, but it's not gonna be sliding all over the place with the slightest movement. Now I'm gonna find out where we're gonna place our crossbar. In your case, you can place the first one wherever you want to, but when you go on to that second one, you wanna find what crossbar spread that's gonna work best for you. In our case, I want a crossbar spread of about 30 inches. So that's gonna be able to accommodate a lot of the accessories we have. So if you know what accessory crossbar spread you need, then just adjust for that and then you can mark this location out. Place my crossbar up top, roughly where we marked it out to be. Matching up those towers to our raised rails, making any adjustments that we need to, and placing it right on there. And now we wanna make sure it is going to be even on both sides. So what I'm gonna do is get that crossbar spread again and I can see that's moved over just by a little bit. So I'm just gonna adjust it to make sure we're 30 inches from both sides until I'm good. I like to get my overhang distance. I like to make sure that's gonna be the same on both sides too. And when everything looks even, we can grab that strap, and pull on it and slide that metal bar into these hooks. And then once I've done that, I can just tighten this down slightly, just enough for it to make contact with the bar or the raised rails, with a little bit of tension, 'cause we don't wanna tie it in too much because it's gonna pull from the other side. Once it's been tightened just slightly, repeat the same process on the other side, going back and forth until this is completely tightened. You'll be able to tell when it's tight enough when it starts to click. Just like that. And then once you've tightened both of those all the way down, go into this small little channel up top or hole and do the same thing for this bolt here until that starts to click in place too. And repeat that on both sides. The final step is putting on this end cap until it clicks into place. Then after that, just check everything over, make sure everything feels secure, that's good to use. And then you can put on whatever accessories you need and then take it out for a ride. That's just a look at the installation and some of the features of our Yakima roof rack system on top of our 2021 Ford Explorer.
Average Customer Rating: 4.7 out of 5 stars (151 Customer Reviews)
Heavy-duty crossbars mount to Yakima towers to create an aftermarket roof rack. Top and bottom channels let you add channel-mount accessories. Tie-down points in endcaps let you easily secure cargo.etrailer was a great place to order, quick and easy. Yakima products however are over priced and overly complicated.

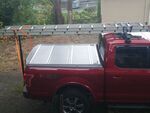
Great product, as are all Yakima products,in my opinion. These are on a Yakima system installed on my Diamond Back tonneau cover. Very pleased with them
We purchased the rack 5 weeks in advance of our up and coming trip. (Rack is amazing FYI). However, The website states free shipping over a certain amount. Weeks went by with notifications nothing was sent and the order kept being pushed back.
Once I called I was told those who chose to purchase shipping vs opting for the free shipping got their orders firsts; everyone else fell to the bottom. After waiting a month for “free shipping” I opted to have paid shipping and I received the rack within days.
While this company has many products I could use, I refuse to use them again because what is advertised is NOT what they ethically hold themselves accountable too.
These adapters were easy to install and made my system fit together nicely.
Really Easy to Install! Solid and Strong amount to Roof Rack.
Your service is nothing short of excellent! Thank you
I had a difficult time identifying whether these were the correct adapters for the rack towers that I was purchasing to fit my tracks but that has more to do with yakima doing everything a-la-cart instead of having kits that include everything you need if I hadn't already had the HD bars on my other rack and wanted to be able to transfer them to this rack I probably wouldn't have went to this expense because I think they are overpriced.AS far as etrailer is concerned I always receive great service and products and they are always well packaged and never damaged by poor delivery care and always fast delivery speed.
While putting the roof racks together, one needs to pay close attention to the detailed instructions; but, so far, the equipment is working well with a good fit on my Toyota highlander—I’ve traveled some 1000 miles so far.
Yakima OverHaul HD is built tough, sturdy, light but heave duty, well designed, easy to install and remove by leaving the locking base on the track. The height can be adjusted easily to a desired height to fit just right. The "bonus" is a beer bottle opener on each rail :)
Customer service at etrailer is excellent! Always responsive, immediately reply to help with any questions. Tayler K. was my sales representative, she's been super!
Great product and even better was the service with etrailer! These guys make it happen and delivery was super fast. Thanks for a fantastic experience, will be a return customer.
Yakima HD bars 60”
2018 Ford Expedition
The Yakima products are doing great. Just got home yesterday from a 18 day trip using them in Michigan's upper peninsula. Love them. Great products. Thanks again.
The Yakima products are doing great. Just got home yesterday from a 18 day trip using them in Michigan's upper peninsula. Love them. Great products. Thanks again.
These are some heavy duty crossbars.
Owned several surfboard racks in 45 years and these are by far the best.
Great tie downs also.
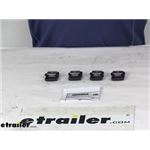
Required for Yakima HD crossbars using timberland tower system.
Great company. Fast delivery.
Solid and well engineered product. Trevor provided excellent support and service in selecting and ordering to ensure the right solution.
Great product. Great service.
Worked great
The roof rack works well. The only problem I have is noise and while I'm carrying a ladder there is none. I figured if I take the ladder off I'll split a piece of pvc pipe and mount that on the front of it. But they work well for what I needed for work. The service from etrailer was excellant. I dealt with Carol and she did a very good job in helping me.
The fit is good on the 22 Wilderness but there is definitely wind noise and I will add a diverter soon.
I choose etrailer simply because they mailed to APO. I’m a AD SM, and a lot of companies don’t shop to APO. As soon as I ordered my product, I received an email as a courtesy from etrailer letting me know I had an individual that would be tracking my product every step of the way, reassuring a smooth process. Their site functionality was easy, their customer service was great. I wanted to know if they had bike racks that would fit my cross bars, I got a email right away with a suggestion and a link that would fit my needs. I’ll definitely order from etrailer if I ever need to again.
This part adapted like no other adapter
These Yakima HD SL adapters are necessary to connect HD crossbars with Skyline Towers. This style is somewhat difficult to locate but Etrailer had them in stock, no waiting.
SIMPLE & EASY!
Have worked quite well for what we need. Very happy.


Do you have a question about this Roof Rack?
Info for this part was:
At etrailer.com we provide the best information available about the products we sell. We take the quality of our information seriously so that you can get the right part the first time. Let us know if anything is missing or if you have any questions.


Thank you! Your comment has been submitted successfully. You should be able to view your question/comment here within a few days.
Error submitting comment. Please try again momentarily.