
Thank you! Your comment has been submitted successfully. You should be able to view your question/comment here within a few days.
Error submitting comment. Please try again momentarily.


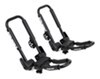
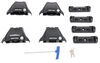
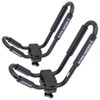
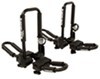
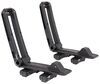
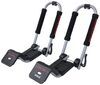
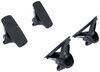
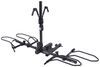
This extension arm lets you easily expand the capacity of your Rhino-Rack J-Style kayak carrier (S512 - sold separately) to 2 kayaks. Universal mounting hardware fits all roof-rack crossbars.
Features:

Videos are provided as a guide only. Refer to manufacturer installation instructions and specs for complete information.
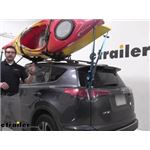
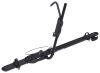
Hey, everybody. Welcome to etrailer.com. I'm Bobby. And today we're taking a look at the extension arm piece for your Rhino Rack J Style Kayak Carrier. So if you guys already have your Rhino Rack J Style carrier you'll like that you got the one up on there, but gonna be able to take a second one with you, will this arm, this extension right here is gonna allow you to do it. So it is just a separate piece from our actual carrier.
All it does is simply go right behind it, giving us a great base and an extra arm to start securing our kayaks. And what I also like about it, really easy to get installed. If you're familiar already with the Rhino Rack system then you know how that clamping system works. It's utilizing the exact same mounting features. I love that I get two kayaks up on here.
The one thing you have to keep in mind though too, you are gonna need to have yourself two bow and sterns straps. One on each of your kayaks. We have contacted the manufacturers, and this is what they recommend to stay nice, safe. And you know, it always helps to be a little legal. You never know how those state laws might be out there.
Basically for preventing any kind of dangerous activities towards people behind us, you know, protecting ourselves and others from any kind of issue, which can be great. So the install for this is pretty straightforward. If you are familiar with your Rhino Rack J Style kayak carrier already, gonna be pretty much the exact same way. We do have our clamping system here. And two speed knobs that can quickly be backed off to allow our flange to go underneath our bars.
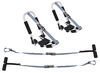
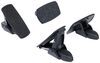
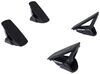
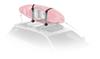
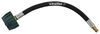
Now where your placement is can get a little trick with these guys. Here today, I do have it just on my Rhino Rack vortex arrow crossbars. There's gonna be placing it like so. You can see though, my tower is gonna be just a little bit in my way. So I'm gonna have to move this guy just a little bit further. I do find this flange likes to kind of get a little cattywampus. So once you walk it in place like that gonna be easier to secure. You can see, we have a little bit of a small gap here though and we do have a way of actually removing that. Of course we could be shifting this more back set on our vehicle here today. The one thing about that, though, right We really like our J Style Kayak carriers to be on the side of our vehicle and getting them closer to the side, makes it a lot easier. Now the issue of running in to hear though, are SX series legs I'm utilizing with my Rhino Rack crossbars today are just a little bit too wide. So I can't quite bring them in closer. Now, I still think this is gonna work really, really well. We don't need this to be butted up right next to each other. Now, if you're talking all the way out there that's obviously gonna be too long. We do want as close as possibly these posts. But there is gonna be another way of actually accounting for that. You can see on the other side, we actually have our C channel in place. So we're not actually using our flange mount system. What I could do is actually utilize the conversion kit also available here at etrailer.com to start utilizing my C channels on our bars. Now the one thing I will say about that, it is a little limiting. I highly recommend giving that video a look so you can see which bars they actually fit on. Now, something like your Rhino Rack vortex arrow bars it works great with what we are gonna need is the C channel capabilities. So that might kind of ruin it for some out there. If you are on something like a Yakima setup, probably not gonna work out well for you, but again, highly recommend giving a look at that kit. Why don't we actually see how we can get that in place on our own J Style Kayak carrier extension here that way we can get a little closer. We're gonna start with our extension arm here. You can see we have this rubber topper here and we actually need to remove that. Now, inside here, we have a little tab that gets extended. There's a little ledge that gets caught towards the outside structure and pushing that legend can help make it a little easier to get off, a little soap water as well can be a little helpful. Hopefully to make that just a little easier to slide right out. But then we just need to start wedging in here and begin removing that for ourselves. One thing I find as well though, a flathead pushing that legend a little can be a decent start. The one thing I'll say about this though you ended up stretching this rubber just a little bit. So do keep that in mind. But once we have it removed, now that's gonna gain us access here to our bolts. We're gonna need to take our included tool and just start backing those off. Otherwise, our protrusion here is gonna get in the way. So we have our factory long bolt removed and we need to add our 40 millimeter bolt here. There's gonna be two different sizes, your smaller one. It's gonna go in the middle here for actual C channel conversion but we're gonna be taking this guy. And this is actually holding onto our plastic here as you can see, this little bit is actually being held in. So we do need to re add this, but let's go ahead and reuse our hardware that we had before. The one thing I'll say about this too, it can kinda work itself out. And what I mean by that, just this alignment here at the bottom can be a little hard to get to fit, but again just using your hands manipulating a little bit and going one at a time is really helpful. If you back both of these off, then you know, it's gonna wanna fall out. So keeping one in place can be helpful. And as you tighten down your new bolt, we don't need to go all the way in place just enough so we're actually starting to catch holding it in position 'cause when we back the other one off, we want just a little bit of wiggle room to make it easier to get installed. Now that we have these to writing down of course let's cinch 'em all the way up. We don't need to go too crazy with them. We just need to make sure they're actually holding on to our molded plastic underneath. Once that feels pretty solid though, we're gonna have these three holes. We're gonna be taking our 32 millimeter bolts now placing a lock and a flat washer on it, simply setting it in. And now we actually need to bring ourselves to our crossbars. Of course, make sure you put your other bolt in and now we're gonna take our plate here and we need to actually get towards our C channel on our crossbar. I guess before we get too carried away we do need to re add our spacer in here. Just a little soap, placing that in and on the other side as well, some pliers can be very helpful of actually pulling this through. Trying to get more towards the base of as well can be helpful because we don't wanna be tearing that up or stretching it. So just like that, we're back in place. Now of course we can re-put our bolts in and get up towards our crossbars. So today we are gonna be installing this on our Rhino Rack Vortex arrow bars. Of course we have to remove our in cap here and any of our vortex stripping that we might have at the top. But then we simply take our plate here, set it in just like so and gently set these in position. We're also gonna need our included tool one more time. Begin tightening these down. Now, if you are having trouble kind of getting it in place, you can always kind of back it off a little bit, hold this plate up just a little bit and then start tightening it down. At this position though, we can leave it a little loose. You can see our plates hanging on right there. We're gonna leave it loose for now. Cause we still need to bring our J Style kayak here behind it and start getting in place. So just grab the other one, throwing it up on all here. So I have my other J Style kayak here up here. It can be a little helpful just to move this arm out of the way that makes a little easier to work with. We can see at this position now, I can get really ,really close here to my other carrier. And I really do like that. We're not having that gap that I was having because of my towers. I don't have to worry about that, right No matter where I put this on my bar they're gonna be together, which is really cool. So I'm not gonna actually set mine pretty even with my other side for now, just so we can actually see how our kayaks interact. But yeah, let's just start, start tightening these up all across the board. So, and just like that, it's installed really easy to start cinching those up. I think the big advantage with this kit, obviously, getting it wherever we want on our bars. And now I actually have a security option as well. I think that's the biggest failing love these J Style kayak carriers, Rhino Rack's done a great job, love the carrier. Other than somebody could just walk right up, spin both of our extension and our J Style Kayak Carrier off and then just take it with them, which we definitely don't wanna see. So I love that I'm getting security options and again, placing it wherever I want on my vehicle is really, really nice. So the first step we want to take is actually take our straps. I like setting here on this post. Now we are gonna wanna bring it all the way towards us though, because this is our first kayak. I'm gonna getting that towards the center of our car. With that post let down and our strap set, I can grab our kayak here. Get underneath it. And begin setting it on my carrier. And with just a little rotation like that, we're ready to start strapping it down. We're gonna be doing is taking our strap, throwing it across our kayak. And then we need to bring ourselves to the other side of our vehicle. Cause we're gonna be running this underneath our crossbar system. A little time and patience can go a long way and if I can, hopefully we have a second, If I can suggest, hopefully you have a second pair of hands at home because it's gonna make this portion a lot easier for yourself. Now we can begin to prep our strap. To do that, we're gonna shift our kayak just a little bit more. Just a wee bit so I can get underneath here. And then what we wanna do run our strap through our carrier on the underside of our crossbar back through our carrier one more time and then start cinching this up. So I'm gonna take the slack out of here of our system. And now I can run that through my cam buckle, just like so. And again, tightening this up. So we're gonna leave it a little loose here. What this is doing is as I rotate that kayak, we don't want it falling onto our roof, right So we need to keep it in position here but still need it loose enough to where I can still position it how I need. So now we wanna get our kayak all the way mounted up. I would suggest having a second pair of hands. My friend Joe here has volunteered to help me today to allow me to get this up. So Joe is gonna be walking those post up and as he does, I'm gonna be watching these straps, making sure they're set where I want them to be. And also that they're loose enough and tight enough to help us. So I'll kind of rotate this kayak as Joe walks it up and it does help in about six one or so if you're worried about height, but once Joe locks down those flaps in that vertical position, I'll be ready to rock and roll and tighten up my straps. So I'm just messing with this slack a little bit. I love that that post is up now in the air, making it a lot easier to tighten this up and start securing my kayak. So we get our second kayak up on there. All I've done is put my strap top of our post, put towards the side that way it's out of the way when I wanna get these mounted up. But simply getting that kayak up in that position. And here again, a second pair of hands can be very helpful preventing this from rotating onto the ground. Definitely wanna damage our kayak or our self. And to that end, you know, if it's really windy out there, be a little careful 'cause you know, you're kind of making this into a sailboat. It can catch some wind, but now that it's set, I'm gonna be taking my strap, walking it up and around my kayak here. And now I just need to get my slack in the right position, again, that second bear hands could be nice but just kind of pull that kayak up a little bit, get it outta the way and now I can start running my strap. So how I'm gonna do that, again, going through my carrier. This time we wanna go around our crossbars and again, that's where that conversion kit come really handy here. You're seeing I have to avoid my nods. There's one more thing for my strap to get caught on or you know to start kind of getting worked on which wouldn't be great but just walking this guy out, trying not to flip it as much as I can, that we we're not pinching anything. And then bringing this around our crossbar underneath our carrier one more time, back into our cam buckle. There we go. As long as you get that little corner there, you can usually pull the rest through but now I just need to tighten this down, again, making sure I'm not interacting poorly with anything here on the inside. And then yeah, let's just tighten this up. Repeat the process on the other side and then we're looking good. Now we need to start securing our bow and our stern straps. And lucky for us, Rhino Rack actually done a pretty good job of including the straps. We need to get it run. Now the one thing I'll say about this though, you are gonna need a necessary hookup for it. So if we take a look here on the inside. Today, we just have a RAV4 and lucky enough, I have a tie off point here on this little hook on the inside but that's not always possible for everybody at home. If you're running the issues where either, you know, the front of your vehicle or the back isn't actually having a good attachment point for yourself. You could look at something like these little hood anchors. So this one is actually from the etrailer Kayak tie down kit. Really do like how these guys work really nice and wide. Another great one is gonna be the Rhino Rack anchor hookups. Those straps are really, really nice because you just place them anywhere, either in your hatch or that front hood. Slam it down and then you got yourself a temporary mounting point. So that's really nice if you're having trouble finding a good hookup, this is the way to go. Well and just like that, now we have both of our kayaks on our roof. I don't, I do think that maybe once you get used to a little bit you might be able to get that first kayak on there by yourself by having like a medium tension there on your kayak and walking it up. But again, a second pair of hands is gonna go a long way making it easier to get on the roof of your car. Well, like I said, that install really is isn't too bad. I really do like how easy it is to get on there. And then of course Manor kayaks can become a breeze. I think that second pair of hands is gonna go a long way though. Overall, I really do like this system and one thing to keep in mind, we need to make sure that both of our kayaks aren't gonna be exceeding 165 pounds. Now that's gonna be pretty hard for us to pull out. I think a really, really heavy kayak's on here. I think most of us can be probably A okay with it. And the one thing to consider with that as well making sure you're checking your crossbar and your own roof capabilities at home. So checking that crossbar weight capacity and referencing your vehicle's owner's manual guide at home to make sure we're not doing anything too dangerous on the roof of our car. Overall though, I really, really do like that extension. Really easy to pull off too if the, you know, second person doesn't wanna come with you on a weekend, not too bad just to walk that right off and then you have it ready to go the next time. I just love how easy and breezy it is to get on there. And now I can get two kayaks to wherever I wanna go. I wanna go but I think that about does it for our look here today at the Rhino Rack extension arm piece for the Rhino Rack J Style Kayak Carriers here at etrailer.com. I'm Bobby. Thanks for watching..
Average Customer Rating: 4.3 out of 5 stars (10 Customer Reviews)
This extension arm lets you easily expand the capacity of your Rhino-Rack J-Style kayak carrier (S512 - sold separately) to 2 kayaks. Universal mounting hardware fits all roof-rack crossbars.Outstanding products,easy pesie to install with tools online,followed directions and had no problem, As of now no whistling would recommend to everyone. Makes easy securing of my wife and daughters kayaks..on our 2015 Ford Edge.Go Rhino Rack.........

I purchase the extension for the Rhino Rack that allows for 2 kayaks to be loaded onto one J-cradle. It works fine, and because I only use it occasionally when I'm carrying 3 kayaks, I am please with it. The only problem is that it is a bit unwieldy to load both kayaks in the upright position because the straps on the one closer to the center of the car have to be in just the right spot so that the one toward the outer edge of the car can be strapped down. Just takes some getting used to and a good helper.
Purchased a Rhino Rack custom fit rooftop system, along with the kayak rack to hold two kayaks and the Swagman rv bike rack. Made several trips and they all work great! Included photos to share.
Excellent product only issue is that it is very heavy. I’m using it on Yakima bars with a skybox. Yakima says load limit just over 110lbs on my Toyota Camry. So that doesn’t leave much room for cargo after loading camp stuff after. A double sea kayak or two singles.
Actually purchased this in conjunction with full Rhino carrier for 1 kayak. Easy install and worked great. No problem attaching them to the stock cargo rack of a 2011 Pathfinder.
Easy to install. Works well with Rhino rack adjustable cradle I purchased.

Chris G.

6/6/2019
Works good as new after 1yr.
After building a special bar to attach to my truck rails and attaching the carriers, my kayaking spouse is ecstatic. Works great and easy to take on and off. Great product!
Easy to install. Less expensive than buying another set of j cradles. Happy with the quality so far.

Brooke M.
10/31/2022
It looks like your experience with us or with the product could have improved. If you would like to add any comments I can assist you with that.

Do you have a question about this Accessories and Part?
Info for this part was:
At etrailer.com we provide the best information available about the products we sell. We take the quality of our information seriously so that you can get the right part the first time. Let us know if anything is missing or if you have any questions.


Corry
8/9/2017
Its working well as I got used to using it more. Its really handy to be able to carry three kayaks on occasion