
Thank you! Your comment has been submitted successfully. You should be able to view your question/comment here within a few days.
Error submitting comment. Please try again momentarily.


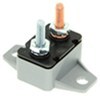
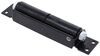
In-line 30-amp Type I circuit breaker cycles automatically and continuously during an over-current condition. Composite alloy material will bend and separate the contacts when an over-current situation occurs and return to the run mode as it cools.
Features:
Specs:
Note: 12V circuit breakers are not recommended for 24V applications since the materials are heat-affected rather than current-affected.
Videos are provided as a guide only. Refer to manufacturer installation instructions and specs for complete information.
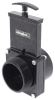
Hey everybody, Ryan here at etrailer. Today we're gonna be taking a look at, and showing you how to install, the line of Pollak type one plastic circuit breakers. So, a circuit breaker is a small, but very important component, just like the one that we're using here today. Circuit breakers like these can be used for many different types of accessories whether it be a fan, a wench, a snowplow. In our case, we have a trolling motor. More or less, what you can use these for are endless as long as it is a 12 volt accessory.
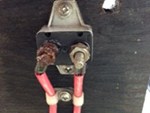
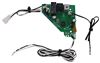
Now what the circuit breaker is going to do is it's gonna make sure that that said accessory is gonna stayed protected. So if a short or something like that we're to occur, you're going to trip your circuit breaker as opposed to burning up your accessory. So, more or less, the way a circuit breaker works is really simple. So current is going to come from your battery here, go across a contact to this stud and out to your accessory. And, more or less, how it's gonna work is there is a contact that connect these two together.
And whenever the energy goes across that contact it's going to create heat. Well, if there's too much heat drawn from a short or an electrical issue, that contact is going to break and disconnect that circuit so battery power can no longer go to the other side and out to your accessory. And that's what's going to keep it protected. As far as the amperage rating goes, all that means is the contact is gonna be a little bit different and designed to break whenever a certain amount of heat is crossed. So, depending on what you're trying to power up, you're gonna want to make sure you have the right amperage.
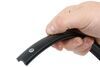
Now these are auto resetting. So what that means is once that contact cools down enough, it's going to complete the circuit again and you'll be able to power up your accessory like you did before now. Something I do want to mention, if your breaker is exposed to the elements a lot, or if it's in a high traffic area, you can actually pick up little rubber covers that go over it. And they'll cover up the contacts and just give you another layer of protection almost. In our case, since we're in a dry box in this compartment here where the weather won't get to it, really not a huge deal.
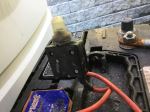
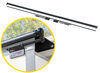
But something I thought was worth mentioning. So there is a few reasons that I can think of why you'd wanna add a new breaker. Let's say maybe you added a new accessory, and ran all new wiring. That would be one good reason to use a breaker like this. Another one would be if the breaker just went bad. Sooner or later, even these do auto reset, sooner or later if you do trip it enough times, or have issues with it, it will just go bad and you'll just have to replace it. Another reason being you just want to be on the safe side. And our case, this is a new boat. And going through the electrical system, was unsure about this old one and just wanted to replace it. That way you know everything's could be reliable and work as it should. So, whenever we're looking at the line of plastic circuit breakers like this, they're all going to be the same in regards to how they work, the shape, and size. The only thing that's going to be different is the amperage that they're rated for. So this one particular is a 50 amp rating. And it's really just going to depend on what accessory you're trying to power up, which we'll get to that in a moment. But with these being plastic, they do feel pretty good in your hand actually. If you try to really push down on them, or squeeze them, it don't feel like they're gonna break, or crack, or anything like that. So, I can see them lasting for a while. And these would be a good choice for anywhere that corrosion is possible. So, if you're constantly near the water, or let's say you live on the coast where you get a lot of salt in the air, these may be a better option for you compared to just see traditional metal style. One thing I do like, it's just something small and subtle but it does make everything a little bit easier. Your two posts here are gonna be different colors. And there's going to be labels as well. So the silver post is going to be labeled auxiliary. And so that's where you'll hook up the wire coming from your accessory. And the copper colored post is gonna be labeled battery, so that's where you're gonna hook up your power supply, particularly your 12 volt one. These are good for up to 12 volts. And if your electrical system uses more voltage in that there's another option available for you that you can find here at etrailer. I do understand sometimes these breakers can be mounted in relatively tight spaces. So I figured just a couple of quick measurements might help some of you out. If we go from the center of our hole there to the center of this hole, it'll be about an inch and 9/16. And, if you go from the bottom of the breaker to the top of the posts it's gonna be about an inch and 3/8. So relatively compact. And, unless you're in an extremely tight spot you should be able to mount this up just about anywhere. These circuit breakers do come in multiple amperage ratings. And you wanna make sure to get the one that's most appropriate for your application. So, there's a few different ways you can figure that out. One quick way is to check the accessory that you plan on powering. And a lot of times there's going to be a label or some type of information on there that will let you know how many amps that product uses. If that's not the case, you could always reach out to the manufacturer. And nine times out of 10 they're going to be able to tell you right away what you're gonna need to use. And another way to do that, if all else fails, is to use what's called an amp meter. You're gonna measure that amperage. And what you're gonna do, is typically you would get a breaker just a little bit larger than what that product actually draws. And that's to give it some wiggle room. Because a lot of times, say if you turn on that accessory and right when it fires on there can be a spike in the amperage that its drawing. And you wanna avoid tripping your breaker for no reason. It's really common for things to do that. So you just give it a little bit of wiggle room. Now, as far as the installation goes, regardless on what you're using it for these are gonna get hooked up very similar. So, they're a really simple part and everything's pretty straight forward. So it really shouldn't give you any issues. Speaking of which, let's go ahead and hook it up together now. So we're gonna be installing this breaker here with our other electrical components in this compartment. And generally speaking, you wanna install this closer to the battery, is usually better. And our batteries are right here so we're in a perfect spot. And something else you need to think about too, is depending on how your wiring's setup, this gold posts the battery power will go to, the silver post will run out to your accessory. So just keep that in mind, how you wanna mount it if you want your wiring to look clean or anything like that. In our case this is our power supply. And this goes out to the trolling motor. Some I'm gonna mount ours like that. I've actually I had some holes there already. So I'm just going to secure this using some self tapping screws. What I like to do is get one started to kind of hold it in place. And you're still able to kind of move that breaker where you want it. Kind of swing it around. Get everything lined up. And then we can tighten it down. So before we actually get anything hooked up we want to make sure that our power source is off. So either disconnect your batteries, or in our case, we a disconnect here. So I'll go ahead, put that into the off position. And now that we have no power we can get our wires hooked up to the breaker. Now we can go ahead and remove the nuts. I will say be careful with this just from past experience. They kind of come off right when you least expect them to. And they're easy to lose. So just something to keep in mind. So we'll get them out of the way. And it's as simple as taking our ring terminal here. So this is our power wire coming from the battery source. That'll go over to the gold post. We're just gonna put the nut back on hand tight. That way we don't have to worry about that wire kind of popping off. We can take the side that's going to our accessory, slide that over and put the nut on as well. And I will say, if you need any ring terminals, or wiring, anything like that, we do carry that here at etrailer. So you can grab that as well if you need to redo those ends or anything else. So now that we have those on there hand tight, we'll come back with a 3/8 and snug 'em down. When you're tightening these you don't need to crank down on them by any means. I usually get 'em hand tight as much as I can. And then I'll come back and just give it about 1/8 or a quarter of a turn. Will usually do the trick. Now that we have our wires hooked up and they're nice and tight, you can come back, turn on our power source. And it's never a bad idea just to check the accessory that we are using the breaker for just to make sure everything is working as it should. So, as I mentioned, we use our circuit breaker to work in conjunction with our trolling motor here. So, we'll go ahead, turn it on. You can see their propeller spinning and it's working like it should. And that'll finish up our look at and our installation of the line of Pollack plastic type one circuit breakers..
Average Customer Rating: 4.3 out of 5 stars (9 Customer Reviews)
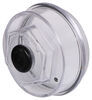
In-line 30-amp Type I circuit breaker cycles automatically and continuously during an over-current condition. Composite alloy material will bend and separate the contacts when an over-current situation occurs and return to the run mode as it cools.I have tried repeatedly to cancel this as I do not need it now. but it is still here. Also, I have tried, repeatedly to get the little 1 inch round rubber cover for the hole on the motor cover for the Lippert self leveling trailer system, for which you have failed miserably as I still do not have one. I spend $xxxx with you to have me have to cover the hold with a piece of tape. Your service is unacceptable.
The switch arrived sooner than expected and was the perfect fit. Our "frankentrailer" now has working lights!
Arrived on time and works well
Just what I needed at a good price.
just what I needed.

Do you have a question about this Accessories and Part?
Info for this part was:
At etrailer.com we provide the best information available about the products we sell. We take the quality of our information seriously so that you can get the right part the first time. Let us know if anything is missing or if you have any questions.


Katrina B.
9/28/2022
Its unfortunate that this had not been resolved immediately. I have sent your information over to our customer service department for them to follow up with you on getting a rubber plug for your situation.