
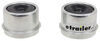
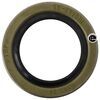
Replacement Switch for Curt Soft Trac I and II Trailer Breakaway Kits
(106 reviews)
Price: $8.40
In Stock
Replacement Switch for Curt Soft Trac I and II Trailer Breakaway Kits
Item # C52010
Retail:$12.95
Our Price: $8.40
You Save: 35%
In Stock
Thank you! Your comment has been submitted successfully. You should be able to view your question/comment here within a few days.
Error submitting comment. Please try again momentarily.


Need help with installation?
Locate installers near me- All Info
- Reviews (106)
- Q & A (0)
- Videos (2)
- Photos
CURT Accessories and Parts - C52010
- Trailer Breakaway Kit
- Switches
- CURT
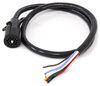
Replaces the switch that came with your Curt trailer breakway kit. This switch signals your breakaway kit to activate your trailer's electric brakes in the event that your trailer accidently separates from your tow vehicle.
Features:
- Replaces the switch that came with your trailer breakway kit
- Works with Curt Soft Trac I (C52040 or C52041) and Soft Trac II (C52028 or C52026) breakaway kits
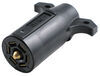
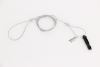
- Includes cable and pull pin
- Weldable, high-temp metal mounting tab
- Silver contact points
- Nylon case and pull pin
52010 (52011) Curt Replacement Switch for Soft Track 1 and 2 Break Away Systems
California residents: click here


Video of Replacement Switch for Curt Soft Trac I and II Trailer Breakaway Kits


Videos are provided as a guide only. Refer to manufacturer installation instructions and specs for complete information.


Video Transcript for Curt Trailer Breakaway Kit Switch Review
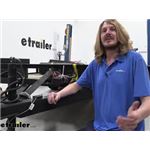
Hi there trailer owners. Today we're gonna be taking a look at and showing you how to install Curt's replacement breakaway switch. Curt's replacement breakaway switch is designed to be a direct replacement for their breakaway kits, the Soft-Trac 1 and soft-Trac 2. So if you do have any issues with your breakaway switch you can get a new one here and get that replaced. The breakaway switch is kind of the failure point that you expect in a lot of these systems. 'Cause it just sits out here.
It gets beat on with a lot of rain and stuff and it's not uncommon that the contacts in here, over several years, just don't function like they used to. So it's always good to check your system before you go for a trip just to make sure everything's working properly. And you can do that by just pulling the pin and while you're hooked up just see if you take off, if it feels like you're dragging your trailer behind you, just go, you know, just a foot and you can verify that that's working. Now, if your switch doesn't work then you can get that replaced. It's important.
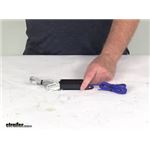
So that way, if you do have that catastrophic disconnect it will apply the brakes to help your trailer come to a safe stop and minimize any damage that occurs. Now, while this is designed as the replacement for the Soft-Trac 1 and 2 breakaway kits this will work just as a standalone part. You can install this on any trailer in any application where you'd be normally installing a breakaway switch. It's got your, just your normal in and out wire where one is hooked to power and the other one's looked to your brake system with an normally open contact on the inside and the event you have that catastrophic disconnect and the pin pulls the contacts now close which will allow your battery to flow through and directly power the brakes and engage them. And it will stay engaged until you reinsert the pin or your battery runs dead.
So we go ahead and put the pin back in there. And there's a little warning on here and it's it's just pretty important to point out that you should not use your breakaway switch here as a parking brake. If you pull the pin, obviously it's gonna apply the brakes but the brakes are being applied due to the magnet which is getting power from your battery. And that's not going to last forever. Your battery will discharge if it's sitting there with this pin pulled and if you're expecting this to hold your trailer for a specific amount of time, it may not hold that long depending on your battery.
So you don't wanna rely on that. It's not what it's for and you're putting a lot of extra stress on that magnet back there. 'Cause if you got it sittin' there and runnin' it's gonna build heat and you could cause premature wear on those components from doing that. So just don't do that. It's for emergencies only, or for testing purposes. I like to use it for that as well. Just pullin' the pin, verifying things are working but then put that back in there. It's not a parking break. So now we've talked about some of the features here of our switch, let's get into how to get it installed. We'll begin our installation here at the front of the trailer. Now this trailer here is my personal trailer. We just got done adding brakes to it. There we're no brakes existing on this trailer before. So after we got done installing the brakes we test them out, we know they all work. To ensure that I'm safe as possible I'm gonna install a breakaway switch on here as well. This one here from Curt is a, just a traditional breakaway switch. It's what you would expect as far as size and shape. I prefer the traditional styles. There are some other brands like Hopkins and stuff that make 'em smaller, a little bit more compact but me personally, you know, why change something that's worked so good for so long Curt's design here has just been solid for years. So this is the kind that I would prefer to just have on mine. It is a little bit bigger than some of the other brands but it's, it's just your traditional style. You do get plenty of length of wire there for your pull on your cable. I'd say we got pretty close to about four foot of wire there. So that'll be plenty of length to be able to mount this in a lot of different places on your trailer and still reach your hitch to be able to hook it up. We had a ground wire that was previously installed there. So we're just gonna use that. We've moved the ground further back. So we'll reuse that hole. And we do also get plenty of wire here as well. And this is really nice for other applications besides just this trailer here, like my junction box that we're gonna hook our breakaway switch to is just right here on the other side of the frame. So we only need probably, you know, a foot or less of wire to be able to make the run. But if you're installing this on like a gooseneck or fifth wheel trailer having this extra line really does come in handy to be able to reach your junction box location on those type of trailers. So this is great for not just your bumper pulls, but pretty much anything that's gonna need a breakaway switch. This is gonna be a great breakaway switch option. So both of our wires here, they are blue. And that's because it really doesn't matter which wire is hooked where as far as polarity, as long as one of these wires is hooked to power, and the other one is hooked into the power delivery to our brakes, when this pin pulls, it's gonna activate it. So it doesn't matter as far as wire color. So as long as you got it hooked up properly. So before we hook it up, we are gonna mount it on the trailer. I prefer to mount it first or at least hold it where I wanna mount it and verify that my wire length is gonna be long enough. I know it's gonna be long enough here. So we're gonna mount it. You do not get mounting hardware included with the breakaway switch. You will have to provide that yourself. We're just gonna use a self-tapping bolt here. I am gonna put a little fender washer on it there to just increase the surface area on the switch and we're gonna reuse this existing hole. So it'll run in nice and easy. It was a self Tapper that was in that place before. So we're just gonna run this down, but if you weren't using an existing hole, the self tapping screw would, would make its own hole there for you. And as I tighten this down, I want to see fairly snug but I do want to keep just a hair movement in it and that's also why I put that washer in there 'Cause if you notice here with our switch installed, there's our bolt, is if I turn it you see the switch and the washer rotate but the bolt does not. And that's kind of what we're looking for that way I know if this does rotate my bolt's not gonna back out of there. And what this also does for me is in the event of a catastrophic disconnect, our tether here that's hooked to our vehicle really needs to pull in a straight line to properly pull the pin from our switch. If we disconnect and maybe it was on a turn or the trailer the tires hit a pothole or something and it caused it to veer in one direction right at the moment of that disconnect. And it pulls at an angle like this to the side. If your switch is solid in this position and it's pulling at an angle it's just gonna rip that cable right off the plastic there on the tip, and it's not gonna pull the pin. So by leaving it a little loose that'll allow it to be able to rotate and get that straight pin pull even if it's pulling from a strange angle. So that's real important to help ensure that this is going to operate under, you know even the worst of conditions. So now we've got that mounted up there. We can go ahead and start wiring it up. I'll be feeding that probably down with my cables and stuff there but let's go ahead and turn our attention here to wiring. So one of them again has to hook to your battery power. Our battery's located here. My battery is hooked into the junction box. So we're gonna be hooking everything in the junction box to keep things nice and clean. But if you didn't have a junction box one of these would need to go over to your battery. And I would recommend putting a fuse in line. So to give you proper circuit protection. And I've already got a fuse in line from my battery going to the junction box here and we've got a 30 amp fuse in there to allow it to do what it needs to do. The other wire is just gonna hook into the brake wire. That's going to your brakes. Again I have that inside my junction box. If you don't have a junction box and you're just gonna be wired into your seven way typically the brake output wire from your brake controller in your seven way is gonna be a blue wire. That's probably why Curt made 'em blue because your brake wire is typically gonna be the blue wire but you could test that with a test light, have the assistant or something activate the brake controller while you're hooked up to your truck, just the manual slide and verify which one of those wires becomes live when the brake controllers activated to determine it. But again, blue is the most common color. Well let's head in here and open up this junction box and get it hooked up. So this is my junction box. You can buy these here at etrailer and I highly recommend them for any trailer. I've got also a small popup camper and I put one of these on there as well. It just really helps out a lot for organizing your wiring, keeping things straight. It's great for testing if you have any faults. You can come to this point for a test point. And if you're adding any accessories, this is also a great place to be able to add those accessories and access the various outputs of your inputs and outputs from your seven way. So we're going to open up our cover here so we can have access to this so we can add our components to it. This case also keeps all of our connections dry. If you we're doing this, just adding a wire into wiring, I would recommend using heat shrink butt connectors to seal 'em up. But with our cover here this keeps everything nice and sealed. So that way we can make our connections in here and have everything secure without having to use butt connectors. We are gonna be using ring terminals though and you can get those here at etrailer, to add our components. So the first thing we're gonna do is get our wires run into the box. I'm gonna go into this opening over here. So I'm gonna pull the rubber piece out of the way there. This little cap there is, your wire relief holds it secure for you. So that way, if anything, tugs the wire, it's not tugging on the connection point here. So you wanna loosen these up so you can slide your wires in if you have a junction box. After we loosen these, we can pull this out some and our wires will feed in there behind it and then we can clamp 'em back down. So we'll take our wiring here, gonna push it in place there. Into our box. There we go, get 'em both pulled in. And I always like to leave a little bit of excess on the outside of the box here. So you can see, I got a little bit back in there. I like to do that for future repairs and stuff. We'll probably end up using a cable tie to secure some of that there, but I always like to have just a little bit of excess. So we'll leave that to about there. Now one of our wires is gonna connect to the blue wire which is our brake output, and that's here. And if you look here in the junction box all the studs do have colors on 'em to help make things a little bit easier for you for when you're identifying things, hooking 'em up. So we know one's gonna go to the blue wire here for our brake output from the brake controller and the other one needs to go to our battery power which is gonna be over here. This black stud, most commonly that's gonna be a black wire. It just depends on your seven way though. My particular seven way, or it's a red wire for the power output and the battery connection but it's gonna go to the black stud here. So that's where our other one's gonna go to get our battery power. So I'm gonna trim 'em to length now. So this guy we know we want to go pretty much just to there. And again, doesn't matter which one's which as long as they're both hooked up to these two places. And then this one will go over to here. Trim off the excess we don't need. We'll now strip these back and if you we're doing just a bare wire connection you would want to cut whatever circuit you want to tap into and strip those ends back. So you can add a heat shrink butt connector in there. And again, you can buy those here at etrailer, but for us since we have the junction box, we're gonna be using ring terminals to make our connections to the posts. So after stripping 'em I like to twist the wires a little bit, just helps the ends slide into our ring terminals more easily. So we'll take our ring terminals here and crimp it onto our wire. We're just sliding the wire into the ring terminal. And we can usually see the other side that the wire slides through just a little bit. Crimp it down. We'll repeat that for the other one here, for that one. Slide it on our wire there and crimp it down. All right, so now we'll make our connections here. I'm gonna start with this one, 'cause this is the breakaway switch output. So I'm gonna start with that one just 'cause we don't have any truck or anything hooked up so there's no way this one's gonna be live. So we're using a eight millimeter or a 5/16s socket. Either one will work to remove the nut. Behind the nut there is a small washer on here so we wanna make sure we pull that washer off. And it can be a little difficult, you might wanna use a screwdriver or something to help slide that washer off. I've got a spare ring terminal here I'm gonna use. Now these ring terminals that I put on there those don't come included in your kit. We did have to get those separately and you can get those here at etrailer. After our washer slid off of there, we'll take our wire here and we're just gonna push it into place. Slide it over the stud. Reinstall the washer and the nut. All right, and now we'll do our battery positive. Now this one over here, this wire is hooked directly to the battery so this is gonna be live. So what you may wanna do is disconnect the negative cable on your battery. And that way, you know, you won't have any live wires here and you could also be, I'm gonna be careful. And I know that if I just disconnect this and don't let any of those wires come off of there, I should be fine. But our ground stud is right here next to it. So you do want to be careful. So if you're doing this at home, I do recommend that you disconnect the negative battery cable. So that way you do not have to worry about any potential shorts. So just like our other one if we remove the nut, that is going to be a washer slid on there so we need to get that popped off of there. So we get our washer slid off and then here we go, our washer is now slid off of there. So now we'll take our other wire from our breakaway switch, slide that over the stud and then we can place our washer and nut back in place and tighten those down. All right, we've got our connections made in here. So now we'll just clean this up. Tighten down our cable relief. Okay, and then you can reinstall your cover. And before reinstalling the cover, I do recommend that you test out your system and make sure it's working. I got a lot of confidence that it's gonna work here. So we're gonna put this back on. Just keep that in mind. We'll be testing it here in just a second 'cause we are all hooked up. I did Jack up one side of the trailer so that way we can spin a wheel. So it'll be able to verify our breakaway switches operation. So now we've got an assistant at the front who's gonna pull the breakaway switch pin. I've got just this side of the trailer jacked up. Wheels are chalked on the other side. Here we can see it spins and then when we pull the pin, our wheel stops immediately. We are now locked up. Looks like we are on this wheel as well. It's not a bad idea to now check the other side 'cause that way you're just verifying that all your brakes are working properly. Now I just installed these so I already know that they all work but if you're doing this at home it's always a good check to do. And that completes our installation and look at Curt's breakaway switch..
Customer Satisfaction Score:
100% were satisfied with this product
0% of customers were not satisfied
Customer Reviews
Replacement Switch for Curt Soft Trac I and II Trailer Breakaway Kits - C52010
Average Customer Rating: 4.8 out of 5 stars (106 Customer Reviews)
Replaces the switch that came with your Curt trailer breakway kit. This switch signals your breakaway kit to activate your trailer's electric brakes in the event that your trailer accidently separates from your tow vehicle.by: Richard 02/20/2024
need a new switch for my toad, this is the cheapest way to go, much cheaper, if you buy the brand name from the same company you used for your tow bar set you will pay much more... bottom line it just a switch and they are all the same, all they do is put power to the brake set up if it discounted, a switch is a switch
by: Harv05/03/2024
Carol did a wonderful job keeping me informed. USPS was bouncing my package all over the US for two weeks!
by: Dennis 02/28/2024
Arrived quickly, at a much better price than the few I found locally.
by: Stephen 05/10/2024
Quick shipping and great price.
by: Kevin 12/15/2022
Works as intended.
by: Foamcoat Roofing02/12/2024
quality products always in stock and ready to ship
by: Phil R10/18/2023
I am very pleased with this service. your company delivered faster than I expected and I will tell others about it as well. Thank you so much.
by: Michael 06/25/2023
Replaced the original on our ‘97 Coleman pop-up. Inexpensive piece of mind while towing.
by: Pmb-Sma1887409/29/2023
Exactly what I needed priced fairly
by: David 08/31/2023
Very pleased with order process and delivery time frame.
by: Octane07/29/2022
This switch easily replaced the OEM switch, same mounting (1 screw) and is essentially the same form factor. This switch has a very high retention force so it requires a good strong pull on the cable to activate it. Good for preventing false actuation. Same size wiring as the original harness with plenty of extra wire. The original switch's retention detent failed and it self activated - so having a strong retention force is important to me. A great option for the price. Realistically it probably takes 15 minutes to swap out and appears to be the same quality as the original.
by: Christopher 09/04/2023
Thank you!
by: Dan06/13/2022
Wrong part sent to me, sent 3 emails in regards to the wrong part and still waiting to hear what is going to be done about it. I should have just went to a local trailer shop.

Sierra K.
7/1/2022
I see that we reshipped the correct part to you. I am wondering how you are liking it?
by: Tom A.07/19/2019
I selected this breakaway safety switch since it appeared to be dimensionally similar to the original one. I completely replaced the brake system (electrical and mechanical) on our 2013 travel trailer, and discovered during measured testing that the original switch contacts were no longer functioning as required. I've installed the new switch, and it was indeed identical to the original OEM unit. The only reasons that I didn't give it 5 stars is that (1) the plating on the metal frame appears that it will be prone to rust excessively just as the original one, and (2) there's no instructions provided on how to effectively (and safely) shorten the pull cable so that it won't hang down too low yet not be too tight and causing an unwanted trailer brake activation.
by: M06/14/2023
No problems. Easy buy
by: RE02/09/2023
Replacing a part that was damaged. This replacement is identical to the replaced item.
by: Dave 06/22/2023
nice pricing,fast delivery.
by: Brian 05/25/2023
Good product an good service what else is needed
by: Mark10/16/2017
Applied breakaway switch to wire loop bolt, due to mounting bolt for base plate of switch was sheared off due to rust. Wires attached to original wiring and shrink-wrapped. Will not know if it works until I have a near disaster!!!
by: greg v 09/04/2019
tow set up for our CRV installed nicely easy connect and disconnect .Love the all terrain hitch towbar assembly can hook the car up all by myself now
by: Jimmy08/29/2019
Went to 4 local trailer dealers/manufacture facilities looking for battery box and breakaway kit. All I found was box/battery/switch/tester unit for [3 times the price], found etrailer.com and found exactly what I was looking for, [price] bucks and the items are quality.
by: Steven Cocoa05/04/2021
This is the standard I use on all my trailers. I have never had an issue with one of these, except the time I ran over the "key" with my lawn mower and chewed it up. That was an easy replacement from another trailer because they are all alike.
by: Greg 09/22/2021
I ordered two items, and soon after, received an update that my delivery date was about a month out. Shortly after that, I received a message from George J stating that one of the items was on back order, and if I liked, they could send the other item right away. I have an upcoming camping trip and the non back-ordered item, the one I most wanted, was the one that was available. Still, I thought that with the shipping issues I am dealing with for clients as a general contractor, the item would still not arrive in time for the trip. To my pleasant surprise, today I received an email from Carol C letting me know that my shipment had been delivered. I expected the one item, but ended up finding both had arrived. The camping trip is this weekend, so because of great service, I have the new products in plenty of time! Thank You, Greg
by: Dave W10/16/2016
Exact replacement. Hardest part was refitting the quick connects that came with my trailer. All done in 10 minutes. Meter (voltage) test plug in/out -- good. Road test -- good.
by: Dan06/04/2019
I already had a battery in my trailer for a winch. This is all i needed to have a functional breakaway system. Easy install, 1 wire to 12V+ 1 wire to brakes
25
106
Show More Reviews
See what our Experts say about this CURT Accessories and Parts
- Replacement Breakaway Switch Recommendation for US Cargo TrailerThe good news is that basically all replacement brakeaway switches are universal. So if you wanted to replace what your trailer has with the Curt part # C52010 that you referenced this would be a great solution that would work well.
view full answer... - Solution for Needing New Trailer Breakaway Switch Pin When in need of a replacement breakaway cable the easiest solution is to just replace the switch and cable since it really hard to identify the switch manufacturer. And also the switch and pin assemblies are universal to other brands since it's just two wires. So in that case the Curt switch replacement # C52010 is a really easy and cost effective solution. You'll wire the blue wires to what you have on your trailer now and you'd be set with an all new setup.
view full answer... - How to Wire Curt Soft Trac I Trailer Breakaway Kit with Battery ChargerThe Curt Soft Trac I Trailer Breakaway Kit with Battery Charger part # C52010 isn't polarity specific, meaning it does not matter which wire you attach to power or ground. In this case, one of the two blue wires goes to battery power and the other goes to the trailer brakes but it does not matter which is which.
view full answer...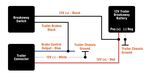
- Is the Replacement Switch for Curt Soft Trac I and II Trailer Breakaway Kits Universal Yes, breakaway switches like the Replacement Switch for Curt Soft Trac I and II Trailer Breakaway Kits part # C52010 are universal in fit. They can be used with pretty much any system no matter the brand. The wires are also not polarity specific so you mix and match colors without issue.
view full answer... - Easy Solution for Damaged Breakaway Cable on TrailerThe easiest solution is a new breakaway switch with the Curt # C52010. Since all of the switches operate using the same mechanism you can easily replace the entire switch with something like the Curt I mentioned regardless of the brand of the breakaway kit. Trying to replace just the pin of a switch you may have does get tricky though as that would require determining which exact breakaway kit you have.
view full answer... - How are Trailer Breakaway Switches TestedTrailer breakaway switches are designed to be somewhat challenging to remove. If you are pulling straight out though it will come without damaging anything. The switches are universal though so if you have the part # K71-691 you could replace it with something different like the # C52010 and it would work just fine. It's the plungers of the kits that are not interchangeable. I also attached a help article on testing breakaway kits as well.
view full answer... - Is a Breakaway Switch Normally Open or ClosedIf the pin on the breakaway switch is pulled or broken then yes you should have 12 volts entering and exiting the switch as this is what will engage the brakes on the trailer. The breakaway switch on your trailer is a normally open circuit which means power will not pass through the switch if the pin is installed and functioning properly. It is possible that the switch has failed so if you need to replace it you can do so with pretty much any brand like the Replacement Switch part # C52010....
view full answer...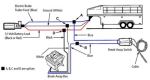
- Replacement Breakaway Switch Solution for Brake Buddy II Supplemental Braking SystemThe complete replacement breakaway kit for a Hopkins Brake Buddy II is the part # HM39340 but since you only want the switch Fred and it's a universal switch that is used you could use the part # C52010 and be fine.
view full answer... - Can Curt Breakaway Switch C52010 Be Used with Hopkins Breakaway SystemYes, the Replacement Switch for Curt Soft Trac I and II Trailer Breakaway Kits # C52010 will work for your Hopkins setup. All switches work the same way so all of the brands can have the switches interchange with each other easily.
view full answer... - Can I Use Curt Replacement Breakaway Switch With TAP Breakaway SystemThe TAP breakaway system is actually the same as the Hopkins Engager Push-To-Test Trailer Breakaway Kit with Built-In Battery Charger part # 20400. You can use the Replacement Switch for Curt Soft Trac I and II Trailer Breakaway Kits part # C52010 with the TAP system. The two blue wires from the Curt switch will splice into the blue wire from the breakaway box and the other blue wire splices into the electric brake wire of the trailer. I have attached a diagram for your reference.
view full answer...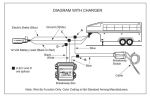
- Replacement Breakaway Switch Kit for an Older Kit That Has Melted WiresUsually when wires become melted that means there is a short somewhere in your wiring. That would need addressing first before you do anything else because if there is a short somewhere and you haven't identified it yet, the same thing is just going to happen again. Once you find and fixed the wire(s) that are causing the short, you can then replace your breakaway switch with the Replacement Switch for Curt Soft Trac I and II Trailer Breakaway Kits # C52010. These kits are universal...
view full answer...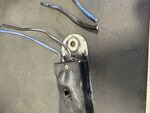
- Can Curt Switch Replace ESCO Breakaway SwitchYes, you can replace your Esco breakaway switch with the Replacement Switch for Curt Soft Trac I and II Trailer Breakaway Kits # C52010.
view full answer... - Trailer Breakaway Switch Wiring FunctionsIf the breakaway system has a charger then the 12 volt circuit from the trailer connector will go to it. Otherwise it goes to the breakaway battery. The breakaway switch will have one wire that goes to the brake magnets and the other to the breakaway battery. I have linked a help article on breakaway systems for you.
view full answer... - Should The Breakaway Switch Be Wired Through a Circuit Breaker On Travel Trailer Battery? The wiring on your trailer is correct. The Breakaway Switch # C52010 does get wired directly to the battery without a fuse or circuit breaker. This ensures that in the event the trailer becomes disconnected the brakes activate. A circuit breaker could fail resulting in a failure for the braking system to activate correctly. Personally, I recommend removing the battery when in storage and placing it on a Maintainer # 329-GENIUS1 at home. This helps to extend battery life and will reduce...
view full answer...
- Can Curt Replacement Breakaway Switch be Used With RVIYes, you can use the Replacement Switch for Curt Soft Trac I and II Trailer Breakaway Kits # C52010 with your RVI kit.
view full answer...
Do you have a question about this Accessories and Part?
Info for this part was:

Edited by:
Lindsey S

Expert Research:
Michael H

Expert Research:
Jameson C

Installed by:
Jeff D

Installed by:
David F

Written by:
Chelsea B

Video Edited:
Chris R

Updated by:
Wilson B

Updated by:
Kristina F

Updated by:
Isabelle B

Video by:
Schuyler H
At etrailer.com we provide the best information available about the products we sell. We take the quality of our information seriously so that you can get the right part the first time. Let us know if anything is missing or if you have any questions.
Product Experts Available Now!
Call 1-800-940-8924
Kevin
12/22/2023
Working great a year later as it should.