


In-stock alternatives that can ship today
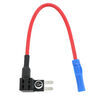
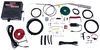
Dual fuse tap lets you to add a fuse slot onto a mini ATM fuse to protect a your vehicle's electrical system. Main slot holds the original 10A fuse while the added slot holds a 5A fuse (sold separately). Plugs directly into fuse box. Single wire.
Features:
Specs:
Videos are provided as a guide only. Refer to manufacturer installation instructions and specs for complete information.
Hi there, do-it-yourselfers. Today we're going to be taking a look at Buyers' line of fuse taps. We've got four different sizes from ATC to mini ATC, low-profile mini ATC, as well as your micro ATC.We're going to be hooking up a compressor on this vehicle, and we need to tap into the ignition circuit in order to excite the unit to get it to power up when we turn the key on and drive away. One of the things you want to pay attention to when purchasing a fuse tap is what type of fuse you have in your vehicle that you're going to be tapping into. And you also need to figure out, do you need a fuse tap Is this what's going to work best for you And in most cases, a fuse tap is something you're going to want to use for an ignition-based circuit, something that doesn't have power all the time, but only gets power when the key's turned on. Because normally, otherwise, you would just hook it to the battery and put a fuse harness directly to the battery.
That way you don't have to go off of your fuse box and potentially overload a particular fuse.But since we need that ignition-powered source, rather than testing a bunch of wires to find one that is hot only when the key's on, but not when the key's off, it's much easier to do that here at the fuse box, and then you can be certain of which circuit you're going to be tapping into, so, you can make sure you're not tapping into anything that's extremely important, such as an airbag or something that's required to make your vehicle run.We've gone ahead and opened up the fuse box here. Most of your vehicles are going to have your fuses labeled in the cover, but if they don't, you'll be able to find it in your owner's manual. We're going to use this to first identify circuits that don't seem like they're very important, and one of the ones we found was fuses 99 to 101. Those are for upfitter circuits, as well as the HVAC controls. So if your air conditioning, something happens there, it's not threatening.
Your engine's not going to die. You'll still be able to get to your destination. So we want to be able to use those types of circuits.We're going to use the one that's labeled upfitter if we can, so we're first going to check with the key off and we see we don't have any power on these fuses, so that's a good start. I'm going to go ahead and turn the key on now, and then we're going to recheck. Now that we have the key turned to the run position, we're going to recheck our fuses, and now they're hot.
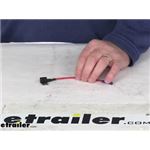
So this is the upfitter fuse right here. We know it is powered up when we have it in the run position, but not when we have the key off, so this is the perfect one for us to use right here, because it is designed for upfitting equipment. So we're just going to go ahead and remove that fuse.And then we need to determine which side of that fuse is the hot side, because it has two legs on your fuse, if you look at it here. And we need to know the hot side to make sure that we're going to be utilizing our fuse tap properly and sending our accessory that we're going to be adding through the fuse and not just directly out of the box and bypassing the fuse. So very carefully, we're going to use our test light to touch down there.
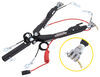
You don't want to push down there hard because you don't want to bend the pins. We just kind of want to just barely touch. Nothing on that side. So we know the hot side is the side that is closer to the outside of our fuse box here. This is going to vary depending on yours, but it's just important that you know which one is going to be that hot side and which one is going to be that cold side.Now that we've identified which side is the hot side, we're going to take a look at our fuse taps here. All of your fuse taps, regardless of which size that you need for your particular application, it's going to have a wire coming off it, and this is what you're going to hook your accessory to. This wire is hooked to this leg of the fuse, which means we need our spot in our fuse box that's hot to go to this leg so that we'll travel up this leg to our fuse, then it will go through the fuse and out to our accessory.Now, when you purchase these, you're only going to get the fuse tap, so once you've located the fuse that you're going to be tapping into, the one that you pull out, you're going to insert into your fuse tap. So once you've pulled that fuse out, you also need to identify what size it is so you can make sure you've got the right tap. The one that we pulled out here is our micro fuse. We can see that it matches up there. And I've gone ahead and laid the four different sizes out here so you can get an idea of which one is going to be the one that's on your vehicle.Here we've got all the fuses laid out next to their fuse tap so you can get an idea of the legs and determine which fuse you're going to be tapping into so you can get the appropriate fuse tap to match that fuse. Once you've got your fuse tap added to the cart, you're also going to want to make sure you add another fuse, because you're going to need one for the accessory that you're going to be adding, because our original one's going to go in the lower slot, the one that we pulled out from our fuse box. You also want to determine the size of your fuse and make sure you're using one that's going to be rated high enough. This one here is 10 amps. Red is going to be your 10 amps, so you just want to use your accessories' instructions to determine how much amperage that one draws and make sure you're just matching your fuses up so you've got the appropriate circuit protection for those.You don't want to exceed whatever it says in the manual. If you we're to go lower, that won't cause any damage to the vehicle. It just may cause the fuse to open early, so that component may be inoperative at the time. But if you exceed it, you could potentially cause damage to the wiring on your truck, so it's really important not to exceed any of the manufacturer's recommendations.Now we're going to go ahead and take the fuse tap. Now we're going to put that original fuse that we pulled out here in our lower slot. Once you've got your original fuse inserted in the bottom slot, you're going to put your accessory fuse into the top slot, so we're just going to slide our 5 amp fuse here, and this doesn't come with it. You'll have to purchase your additional fuse separately. This is our wire we're going to be attaching to it, so you do want to just make sure you got it laid out to where it's going to reach your components.You also want to just check your fuse box. Sometimes you've got a port where you can put a wire through and still close the lid. In other instances, you're not going to have an opening like this, and you may have to make a small trim to the side of your fuse box in order to accept this wire. We've got plenty of length here, so we can just go ahead and strip this back and connect it here. We can now connect it to our accessory circuit, so we're just going to strip that back. If you need strippers or crimpers, you can get those here at etrailer.com.Our fuse harness has a butt connector that's pre-attached to it, so we're just going to slide that on and then crimp it down. We can now route it into our fuse box. We've got an open slot here to route our wire in. In some instances you may need to make a small trim to allow the wire to pass through. Once we get it in there, we're going to just plug our fuse harness in. Remember this leg here on the side that's away from the wire is the one that we need to be hot. We know that's the outside one here towards our box, so we're then just going to plug it in, and it's as simple as that.Our installation of our fuse tap's now complete. We've got power to our accessory. I'm going to go ahead and test it out. Just turn the key on and make sure we've got power here at our fuses, and we'll also know because our compressor's going to be working the way it's supposed to. We've now got the key turned back on and we're going to recheck our fuses. We've got power on the main fuse that we had removed, and our accessory fuse that we added there also is powered up. You know we've got it going through the leg and through the fuse there. And that completes our look at Buyers' line of fuse taps.
Average Customer Rating: 4.8 out of 5 stars (5 Customer Reviews)
Dual fuse tap lets you to add a fuse slot onto a mini ATM fuse to protect a your vehicle's electrical system. Main slot holds the original 10A fuse while the added slot holds a 5A fuse (sold separately). Plugs directly into fuse box. Single wire.Item comes well packaged and ready to install, seems to be well made.
Good product but I didn’t need it after all. The sales rep. said I didn’t but I watched a few videos and got it just in case.

Do you have a question about this Accessories and Part?
Info for this part was:
At etrailer.com we provide the best information available about the products we sell. We take the quality of our information seriously so that you can get the right part the first time. Let us know if anything is missing or if you have any questions.


Thank you! Your comment has been submitted successfully. You should be able to view your question/comment here within a few days.
Error submitting comment. Please try again momentarily.