
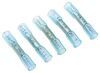
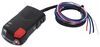
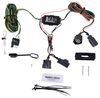
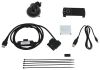
Hopkins Deluxe Trailer Wiring Installation Kit
(21 reviews)
Price: $27.40
In Stock
Hopkins Deluxe Trailer Wiring Installation Kit
Item # HM51020
Retail:$49.04
Our Price: $27.40
You Save: 44%
In Stock


Need help with installation?
Locate installers near me- All Info
- Reviews (21)
- Q & A (0)
- Videos (2)
- Photos
Hopkins Wiring - HM51020
- Tools for Wiring
- Wiring Kits
- Hopkins
- Installation Kit
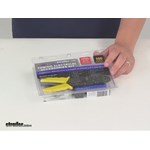
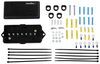
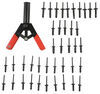
This all-inclusive kit contains a multipurpose wire tool; 12-V LED circuit tester; terminal cleaner, connectors; ring and fork terminals; zip-ties; ground screws; and more. Perfect for hardwiring, maintenance and repair.
Features:
- Great for any wiring project - installation, maintenance and repair
- Includes the essentials for rewiring or hardwiring a trailer connector to your trailer
- (1) Multipurpose wire tool for cutting, stripping and crimping
- (1) Terminal cleaner
- (1) 12-V LED probe circuit tester
- (1) Grit sandpaper cloth
- (1) Roll of electrical tape
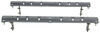
- (12) Cable clamps
- (16) Butt connectors
- (3) Terminal grease packets
- (6) Self-tapping, hex-head ground screws
- (22) 5-1/2" Long zip-ties
- (22) 3-1/2" Long zip ties
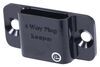
- (2) 4-Wire flat dust covers
- (6) Splice connectors
- (4) Ring terminals
- (2) Fork terminals
- (1) Resealable storage case to keep everything organized
51020 Hopkins Deluxe Electrical Accessories Kit
California residents: click here


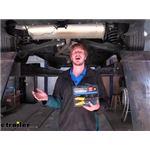
Video of Hopkins Deluxe Trailer Wiring Installation Kit


Videos are provided as a guide only. Refer to manufacturer installation instructions and specs for complete information.


Video Transcript for Hopkins Trailer Wiring Installation Kit Review
Hi do-it-yourself-ers! Today, we're gonna be taking a look at Hopkins Trailer Wiring Installation Kit. We're gonna be using the deluxe one here today. Comes with a few extra components, but there is also a standard one. So you're installing your wiring. Can you open up the box And this is really what you're going to see. We've got our module on our four-pole.
We're routing our wires now, but I wanted to show you what hardware does come with a typical custom fit wiring kit. You're going to usually get a ring terminal so you can make your connection to the battery. You're going to usually get two bud connectors and they are heat shrink butt connectors, which is nice. And these are usually for running the power wire from the rear of the vehicle up to the front. And then you get a self-tapping screw for connecting your ground.
That's on the module and that's it. So if you're making any repairs, one of these rolls off. If you go to crimp a wire and the wire falls out of there while you're crimping it, you don't have any other hardware. There's nothing else that comes in the kit. You don't get any extra components.
So having these laying around can save you a trip to the store could save. You potentially really need in that job to be done. And you don't have your parts on hand, but having them on hand, you can ensure you can complete that and do everything you need to do. Additionally, if you've had your wiring installed now for maybe a year or so and service, and maybe you ran over something or somebody hit you at the back end or just any little thing might've happened out on the job site, you need to make her a pair to any of your wires. You're going to have all the components on hand to be able to do so, so you can keep on working and keep on enjoying yourself if you're out on vacation.
So here we can see inside of our kits some things you're going to get in there. You get some zip ties. So you get some various butt connectors, ring terminals as well as self tapping screws. So you can get those mounted up. You've got some quick splices here. Replacement ends for four poles for the dust cover to get some terminal grease to protect your connections to four pole ends as well as a terminal brush here. This is great for cleaning out those females terminals on your a four pole connectors and also get some electrical tape and plenty of zip ties to secure everything up. And it wouldn't be complete without a set of wire, strippers, and crimpers. So we can utilize all these parts here and get everything installed. One of the things we're going to be using here on our particular install is these loom clamps here. These only come in the deluxe kit and when you have a location where there's just no place to zip tie your wiring when you're running it front to back something like this can really come in handy to ensure your wire doesn't get into a predicament like touching on your exhaust and Melton through and shorten out or getting tangled up in your steering or suspension components. So we're gonna go ahead and use one of these. Now we're also gonna use one of the self tapping screws to get it installed. Ruined, pull this out. And we're going to go ahead and pull out one of the self-tapping screws. So you can see here this is our power wire that we've connected up in our wiring kit that we're installing here for our Jeep. And this wire has to run all the way to the front and this spot right back here. There's just really no good place to zip tie. This wire and our exhaust is right here. So we really want to keep it away. Try to keep it over on this side. So we're going to be using one of the cable clamps that came in the kit. We're just going to slide it over our wire, just like that. And then we can use the self tapping screw that comes in the kit to secure it right to the side of the frame there. After making our connections at the back we do have to run that power wire all the way to the front. And it was as if title on the wakes we want to keep it nice and safe. We've got those clamps for locations where there's just nothing to tie it to but there's no reason to keep drilling holes in your vehicle. If you've got a place where you can just put a zip tie on to hold your wiring. So we're just going to run this through one of these open holes in our under shield here and our wiring's right there. That's going to keep it secure. That's going to keep it away from our exhaust over here cause our again, our main goal is to get this wire up to the front without getting damaged. By anything down when driving down the road and then, we can take the rest of our excess here and we're going to trim it off using our wire cutters here because we want to have a nice clean looking installed as well. We've got our wire right up here towards the front of the vehicle, but we need to get up to the engine compartment to get this connected to our battery. So one of the things you're not going to get in your kit is any way to really get this up there. You're just going to have to push her up there and try to figure it out. Well, if you're watching and following along with a one of our videos at home trying to get the installation you're being with you're probably going to see us do the fish wire trick where we take a piece of airline tubing or a coat hanger or something. We pushed that down from the top that where we can attach our wire to it, to pull it back up so we can use some of that electrical tape that comes in our trailer, wiring installation kit. And we're just going to tape that wire to the piece of airline tubing. I've run down. And that way, when I go back up top cause it's much easier to push this down. I can just pull this wire right up and that's going to make our life a lot easier. In addition to the fish wire trick here let's go take him to all sorts of scenarios. Maybe when you we're making your connections or cutting your wires you accidentally Nick the wire a little bit and you've got a small exposed section. You can take this up to seal that back up through it and your shorts. If you've got wires that are blood cut and maybe there are some you're not going to use. Cause when you're doing certain vehicles you may have some wires that just don't end up getting used. You just got to ground those, your tape off the ends. We can do that with this to keep and ensure that none of our live connection wires are going to ground out or touch against anything else and causes any problems down the road. So we've gone ahead and pulled that wire up now thanks to that electrical tape and our fish wire. I've gone ahead and routed it around our box. We are here at our battery when you start making some connections over here. So we're going to take our strippers that come in our kit. These are cutters and strippers and they get to here. We can do the entire job with just these. We can cut, We can strip and we can crimp. And I do like that, the crimpers are on the outside. That actually makes a pretty big difference in where you're going to be able to fit these crimpers. Some tight locations are going to have a real hard time crimping wires when they put the crimpers on the inside like this. So I do like that, they've got it out there. How we've got that crimp, we're just going to strip this other side. we've got to put a butt connector over here to connect to that black wire that we ran up. Now this is an outside connection, so rather than using one of the connections that come in the trailer installation kit we're going to be using one that comes with our custom fit wiring harness here since this does live outside the vehicle. And if we take a look at the ends here the crimpers are also designed for insulated wires which is important with these outside heat shrink butt connectors because it's not gonna protrude through the plastic there and it's still going to give us a good crimp. So once we heat this up it's going to seal this completely with no chance for leaks. So now I'm gonna go ahead and make my connection to my black wire. Here. We can use those cutters once again and we can strip this. This wire is a little bit different gauge than the fuse harness there but we've got plenty of options here. We can go between a 10 gauge wire all the way to the tiny little 22 gauge wire. And that's going to be enough for just about everything you would do as far as trailer wiring's concerned. This is a great kid, especially if you're looking at upgrading from this wire from just a custom fit wiring like this to a brake controller as well to some of the parts that come included with our trailer installation kit are really going to come in handy with a brake controller. In addition to our custom fit wiring here. With our wiring, it's all we want to test everything out. I've got an assistant in the vehicle so we can operate the various lighting signals. And then we want to see if we've got them here at the back. Currently, we've got the tail lights on with the left turn signal take your clip and put it on ground. That's going to be the exposed stud our terminal there on your four-pole. And then we go over one. We're going to have our tail lights. And if we see here, we touch it and it lights up which means we've got our taillight signal. Next is going to be our left turn signal here. And we can see we've got a blinking signal there. We'll then get our assistant to switch it over to the right turn signal. And we can see that we've got our right turn signal there. And then if they hit the brakes we should be able to get brake signal on both the turn signals on the scene. We've got brake on the passenger and brake on the driver's side. So our systems working out and this tester can be used not only for testing your four-pole but you can use this really anywhere that you've got a 12 volt connection that you need to check for power at. So this can be even useful on your trailer. If you're making repairs over on that end as well a couple of additional parts you're going to get in your kit for your four-pole here. You're going to get a terminal cleaning brush. This is great for cleaning out those terminals, nice tight fit. That's going to really get in there and get that corrosion out. If you do have any corrosion or maybe it's just dirt and debris, that's in there causing you a bad connection we can ensure that we get that out of there. So when we go to plugin, we've got good metal contact to help combat against corrosion. We do get some terminal grease included in our kit. So we're going to go ahead and put this here. This comes with our trailer installation kit. We're just going to rip that open here. And you do want to be pretty generous with this because this is going to keep out moisture as well as dirt and debris that can get up in there and cause corrosion cause that dirt and debris also holds in moisture, which causes things to corrode even faster. So we want to keep all that stuff out of there. This one that we just installed has a dust boot that's made onto it, but some of them just come with ones that slide on. And this year, this can get easily get ripped off. If something happens to it gets cut. Maybe it hits something or those other ones that you have to slide on. They sometimes you lose them. They fall off of there. You need a couple that come in your kit. So you're going to have some replacement dust caps here. It's nice to ensure that your connection stays a corrosion-free cause once you put that terminal grease in there and seal it up with this cap, that really makes a big difference on how long this connector's going to last living outside the vehicle here. You're also gonna get a couple of other items in your kit. Let's say you gotta hook up to your trailer and you've got all your lights, but one and it kind of comes in and out as you're messing with your wiring, check your ground. In many cases, your ground is what's causing your your components to cut in and out. And a lot of times it's just corrosion that builds up or maybe the surface you had put your ground on has a it's a painted surface and you're not getting a good ground. So you're going to get some angry clause in there. This is an abrasive material that you can use to just clean that up. And you can also use this to clean off corrosion in other areas, maybe you got it on your terminals. We showed you the little brush for cleaning out the inside but maybe that ground on the outside of your connector needs a little bit cleaning up. You can knock those off with this as well unless we get some quick splices in our kit. And when you're installing your regular custom fit wiring and things like that and doing repairs on your trailer, they're not as useful. Cause this is really exclusive for inside the vehicle because corrosion will occur on these if left outside the vehicle. But where they really shine is when you go to install a brake controller in your vehicle you're going to have to tap into your stoplight switch. And this is going to be one of the quickest and easiest ways to get that stoplight switch signal for your trailer brake controller. And when you're all done the packaging works as a storage case. It keeps all of our components nice and separated. So we can just fill this in our toolbox and it's ready for the next time we need it..
Customer Satisfaction Score:
96% were satisfied with this product
4% of customers were not satisfied
- Wrong item was ordered
- Product did not meet expectations
Customer Reviews
Hopkins Deluxe Trailer Wiring Installation Kit - HM51020
Average Customer Rating: 4.5 out of 5 stars (21 Customer Reviews)
This all-inclusive kit contains a multipurpose wire tool; 12-V LED circuit tester; terminal cleaner, connectors; ring and fork terminals; zip-ties; ground screws; and more. Perfect for hardwiring, maintenance and repair.by: edibob01/02/2015
Wow! This kit has everything and makes rewiring a trailer much easier. If you've never wired a trailer before and want to have everything you might need (so you don't have to keep running to the store) get this kit.
by: Paul01/24/2019
Everything needed to install new wiring and LED lights on the trailer.
Made the job more efficient. Pleased.
by: Lawrence04/07/2018
This particular trailer wiring installation kit included everything needed to attach light wiring to trailer wiring. Excellent bang for your buck as they say.
by: John 08/08/2021
Good kit, though I did need to buy wider ring terminals for my SUV's battery. Otherwise, no issues.
by: Frank G08/07/2020
Kit arrived as expected. Had it installed by UHaul. Worked great with their trailer to move daughter from MD to NC. Thanks again
by: Jimbo02/02/2016
Has all you need to run wire maintenance on your trailer.
by: Sam09/24/2019
I was moor impressed with the customer services I received from Dena W.
She was very professional and extremely helpful through this hole process. Dena stayed in constant communication with me through everything that happened with this order. She gets 5 Stars
by: Frank 05/21/2020
Great kit. Must have for re-wiring or just in case.
by: Daymean10/16/2019
Product arrived on time they even upgraded my delivery, really appreciate it ,I will continue business with you guys
by: Richard 07/04/2022
Arrived promptly and intact . Haven't used on install yet.
by: Jim G03/29/2017
Great selection. Easy to manage site. Very timely delivery. All products received as ordered.
by: Chris F.06/12/2013
A useful basic kit, with all the essent ials.
by: charles butts12/19/2013
great prices fast shipping thanks
by: Clarke Edens09/22/2013
the tie raps to small
by: Thomas12/20/2020
Pretty basic..
by: Roger 09/19/2022
by: Kevin 08/10/2022
by: Tom B.08/09/2017
Excellent buy!
by: Kenneth 02/27/2021
by: Stephen 03/10/2021
by: Osvaldo09/17/2020
21
21
See what our Experts say about this Hopkins Wiring
- Parts Needed to Add Electric Drum Brakes to 2016 Wells Cargo Fast Trac 5x8 Enclosed TrailerWe can help you with the parts you need to add electric brakes to your 2016 Wells Cargo Fast Trac 5x8 enclosed trailer. In fact we even have a complete FAQ article on the topic that I have linked for you which includes info on all the items needed. The trailer axle will need to have brake flanges to mount the brakes; you'll need the left- and right-hand brakes themselves, hub/rotors to fit those brakes and spindles, wiring components, a breakaway kit and a brake controller in the tow vehicle. I...
view full answer... - Using a Switch and Trailer Mounted Battery to Power Interior Trailer LightsWhat I recommend is to wire up the lights via a switch installed inside the trailer and connected to the battery. You can mount the battery where needed but 10-gauge wire will be too large for lights. A lot depends on the lights and how much power they draw but 16-gauge wire such as # 16-1-1, sold by the foot, would likely be all you need. For a switch you could use something like # PK34513. It is a basic on/off toggle switch rated for 10 amps. Another option is # PK33300 rated for 20...
view full answer... - Can Bargman Tail Lights with Reverse Lights be Added to a Trailer that Does Not have Reverse LightsBargman Surface Mount Tail Light # 30-92-002 mounts to a flat surface so technically it can be installed on any trailer. To determine if they are a direct fit to your 2015 Keystone Hideout I would have to know which lights it has now or the overall dimensions of the lights. Trailers rarely have reverse lights and to add them is going to require hardwiring at least 1 wire and changing the connector (if the current connector is a 4-Way). Or there are connectors you can get that also have...
view full answer... - Adding Electric Drum Brakes to a Scamp Camper TrailerSetting up a trailer with electric drum brakes is going to be the easier and most cost effective way of adding brakes to your Scamp trailer. Since the trailer already has the mounting flanges that will limit the amount of parts and work that will need to be done. Starting with the hub and drum assemblies since your bearings are both L44649 and you have an EZ Lube style axle you would need # 8-257-5UC3-EZ with the 5 on 4-1/2 bolt pattern. They are designed for 2,000 pound axles but will...
view full answer... - What Function Is Each Wire on Optronics 80 Inch 3 Function LED Light # STL69RRXBThe White wire will be the ground and should be connected to the trailer frame or a clean metal surface. The Black wire will be connected to the tail light circuit. The Red wire will be connected to the Brake and Turn Signal circuit. The Optronics 80 Inch 3 Function LED Light, part # STL69RRXB, is a sealed light and does not require use of a gasket. To connect the wires, you will want to use butt connectors, part # 05732-2, and I would recommend wrapping the connections in electrical...
view full answer... - Ring Terminal Sizes Needed for Installing Epicord 7-Way Plug with Junction Box 277-000141 The terminal posts in the Epicord 7-Way Molded Trailer Plug with Junction Box # 277-000141 are indeed a 3/16-inch diameter. You can use ring terminal # 44-5310A for connecting 10- and 12-gauge wires. For the lighter 14-gauge wiring use part # DW05702-1. You'll need a crimping tool like the one included in our Deluxe Trailer Wiring Kit # HM51020. I also recommend using dielectric grease # 11755 on those connections to protect them from moisture and corrosion.
view full answer... - Re-Wiring Old 4-Wire Boat Trailer Plug With a New 7-Way Trailer PlugConsidering that the 4-wire round connector on your Dad's old boat trailer may be nearing the end of its life (due to use and corrosion) you will be better off replacing the 4-way round connector with a 7-way plug such as # H20046 from Hopkins. Installing a new trailer-side male plug will also avoid the complication and cost of having to use an adapter and it will make the trailer much more user-friendly to the majority of tow vehicles likely to pull it in the future. Installing the 7-way...
view full answer... - How To Power The Lippert Power Stance Electric Trailer Jack For A-Frame TrailersThe Lippert Power Stance Electric Trailer Jack w/ 7-Way Plug - A-Frame - 18" Lift - 3,500lbs # LC89VR can be powered by using the included 2-way to 7-way plug or by using wiring it to a battery on your trailer. Yes, you can upgrade the wire gauge to 10AWG # 10-1-1 to counteract voltage drop off. You'll also need to some ring terminals to connect the wire to the trailer battery. You can use the Hopkins Deluxe Trailer Wiring Installation Kit # HM51020 which will come with everything you need....
view full answer... - Components Needed to Add Electric Drum Brakes to a Tandem 3500-lb Axle TrailerTo mount electric drum brakes on your 3500-lb axles you'll need to have brake flanges on the axle spindles. You'll also need to choose hub/drums and brake assemblies that match each other in size and capacity, and that match the bolt pattern of your wheels. Additional parts required on the trailer include the wiring components for the brakes, a breakaway kit and a brake controller in the tow vehicle. You might care to refer to the linked article on adding electric drum brakes to a trailer...
view full answer... - Extending a Wire on the 4 Pole to 6 Pole AdapterI would not recommend connecting the white wire to the brown wire, because the white wire is your ground connection. If you need more wiring just splice the brown wire and simply run a new 10 gauge wire # 10-1-1 to resolve this issue. The Hopkins Deluxe Trailer Wiring Installation Kit # HM51020 will allow you to make all the connections in this process easier.
view full answer... - Parts Needed to Add Electric Drum Brakes to 2017 Load Rite 20280096VT Boat TrailerWe can help you with the parts needed to add electric drum brakes to your 2017 Load Rite 20280096VT single-axle boat trailer. There is no all-inclusive kit made for your specific trailer but we can help with each of the components you'll need to make this trailer upgrade. Please have a look at the linked article that details this very process you're looking to undertake. Since you already have a trailer brake controller in your Cherokee we'll just need to concern ourselves with the trailer. Starting...
view full answer... - How to Ground a Trailer Light and Corrosion Prevention Yes, as long as you do not break continuity in doing so. I suggest you complete steps toward grounding trailer lights, verify proper grounding with meter or probe before addressing the area of concern. Once you have completed the process, check continuity one final time. I prefer to use a heat shrink ring terminal such as # DW05737-1 attached to grounding wire and a self tapping screw such as # FA1131822. The use of a self tapping screw will allow continuity of ground by way of drilled...
view full answer... - Should Junction Box be Used For Adding 7-Way & Wiring to TrailerFor adding wiring and a 7-way to your trailer, a junction box and 7-way connector is absolutely the way to go, because it is the easiest way to connect your wiring. The best option for that is the following: - Junction Box - 7 Terminal # 3375601100 - 7-Way RV Style Connector - Trailer End 6 ' Long # HM20086 or 8' Long # H20046 If you need added components for install such as a wire tool, zip ties, circuit tester, butt connectors and more, you may want to consider getting that in one...
view full answer... - Wire Gauge of 25 Foot Harness Included with Submersible, Under 80 Inch Tail Light KitOptronics uses small 20 gauge wiring for their 4-Way wiring harnesses so it would be even smaller than 18. In order to get 14 gauge wires I recommend # DW04923-1 which is sold by the foot. Each of the wires in it are 14 gauge. Then you would just need the lights, # ST6RB and # ST7RB, 2 of # MC36AB, and license plate bracket # LP10SB. And for the additional clips, connectors, ties and other parts I recommend the wiring kit # HM51020.
view full answer... - Recommended LED Trailer Light Kit for a Small Utility TrailerI recommend the Optronics LED trailer light kit # TL16RK. The kit includes 2 LED tail lights, 2 amber side marker and clearance lights, license plate bracket, wiring harness and stainless steel mounting hardware. I also recommend getting a deluxe wiring installation kit # HM51020 because it includes all the necessary essentials for rewiring a trailer.
view full answer...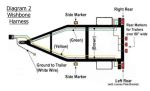
- Connection 12 Volt Power Wire for 7-Way on a 2009 Dodge JourneyWhether you are talking about the 12 volt power wire from a 4-Way powered converter or the 12 volt circuit from a 4- to 7-Way adapter, such as # 37185, they both connect to the vehicle positive battery terminal. It sounds like you are talking about the 7-Way so for it you will need a 40 amp circuit breaker, # PK54540, and enough wire, # 12-1-1, to reach from the front of the vehicle to the rear. You would change the number in the quantity box on the wire page to the amount of feet needed....
view full answer... - Is Anything Else Needed to Install Trailer Light Kit # TL29BKThe only other thing you might need to actually install light kit # TL29BK is a wiring kit such as # HM51020. But if you already have tools and connectors and the other items in the kit you will not need to add anything else. I have included a link to a video review of this light kit for you. One tip I can add is that to avoid ground problems down the road, either mount the license plate bracket by itself (and not sandwiched between the light and trailer frame) or put a ring terminal in...
view full answer... - Trailer Wiring Repair Kits and PartsIf you need to do a temporary wiring repair on your trailer the wire color used does not matter but the wire gauge can matter. The brown and yellow wires on your trailer carry stop/turn and tail light signals and probably were either 16- or 18-gauge. Using solid wire instead of stranded wire is okay, but solid core wire can be harder to work with since it is less flexible and harder to twist together for splicing. Also, solid core wire will typically do less well with vibration since it...
view full answer... - Is Optronics 20 Foot Wishbone Wiring Harness Long Enough to Wire an 8 X 10 Foot TrailerI spoke with my contact at Optronics about the Wishbone 4-Way Trailer Wiring Harness, # A20WB and she said the harness is actually 20 foot in total length, so you will have almost 10 feet of wire to spare when you update your 8 x 10 foot snowmobile trailer. I have included a video review of this wiring harness for you to check out. We also offer a Wiring Installation kit that comes with several different connectors, electrical tape, a crimping tool, and numerous other parts, # HM51020.
view full answer... - Connecting 12 Volt Power From RV to Battery on 2010 GMC Sierra through 7-Way to 6-Way CableI can explain how to attach a wire from the 6-Way connector in Roadmaser kit # RM-146-7 to the battery on your 2010 GMC Acadia. The center pin on the 6-Way is the 12 volt circuit. Attach one end of a wire to the back of that 6-Way, center pin. Then route the wire in such a way that it does not make contact with any hot or moving parts under the hood. Route the wire over to the positive battery terminal and attach it to a free stud with a ring terminal. For wire you can use # 12-1-1,...
view full answer... - Installing The Brake Buddy Stealth Brake Controller In Your MotorhomeThere is not currently an adapter available so you will have to splice some wires together to install the Brake Buddy Stealth Supplemental Braking System - Proportional # HM39530 in your 2020 Jayco Greyhawk. The brake controller of this system has 4 wires: Blue Wire: Brake wire - this will run to the 7-way connector and tell the brakes to activate. White Wire: Ground Wire - Splice this wire into the existing wire going to negative post on the motorhome battery. Grounding to any other...
view full answer...
- Parts Needed to Add Electric Drum Brakes to Rear Axle of Tandem Axle Travel TrailerTo select replacement electric drum brakes for your tandem axle travel trailer you will want to confirm the axle weight rating, which can be found on the axle itself or on the trailer's main identification sticker. You also want to confirm the brake flange mounting bolt pattern and the size of the hub/drums. The brakes you referenced, part # AKEBRK-35-SA, are for 3500-lb axles with 10 x 2-1/4-inch drums and they use a 4-bolt mounting pattern. If you want to add electric drum brakes to...
view full answer... - Adapting Different Connectors on 2014 Mercedes GLK250 and Prolite Suite TrailerVehicle and trailer connectors come in several varieties, including both 6-way round and 7-way blade types. The linked article on trailer wiring illustrates both, as well as other types. These two types are NOT compatible with each other. Within each type of connector sizes are usually standardized, although the actual wire configuration (what particular signal is carried by any given pin/wire) can vary by brand. My associates and I have not heard of this issue before but certainly a...
view full answer... - 4-Way to 7-Way Trailer Connector Adapter for an Infiniti FX35We have many 4-Way to 7-Way adapters you could install on your Infiniti FX35 but the one I recommend the most is # 37185. It is similar in design to the Curt version, # C57674 so you could use either one. If you only need the lights on the trailer to function then all you would have to do is mount the adapter, plug your 4-Way into it, and ground the white wire to a bare metal surface. The other wires can be taped up and stowed out of the way. If the trailer has reverse lights (uncommon)...
view full answer...
Do you have a question about this Wiring?
Info for this part was:

Video Edited:
Dustin K

Installed by:
Cole B

Installed by:
David F

Updated by:
Alexander C
At etrailer.com we provide the best information available about the products we sell. We take the quality of our information seriously so that you can get the right part the first time. Let us know if anything is missing or if you have any questions.
Product Experts Available Now!
Call 1-800-940-8924
Thank you! Your comment has been submitted successfully. You should be able to view your question/comment here within a few days.
Error submitting comment. Please try again momentarily.