
Thank you! Your comment has been submitted successfully. You should be able to view your question/comment here within a few days.
Error submitting comment. Please try again momentarily.
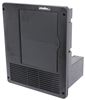
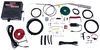
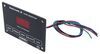
If your RV tank monitor readings change from 25% to empty in the blink of an eye, that's a problem. SeeLeveL sensors track 3 holding tanks with single-digit accuracy at the monitor. Also displays your propane level and battery voltage.
Features:
Specs:
Note: SeeLeveL tank monitoring systems are not compatible with metal tanks.
Traditional tank monitors have a reputation for being unreliable. Only a few sensors are installed inside, meaning that they usually only measure in quarter increments and can send false readings if they get dirty. When you're keeping an eye on how much fresh water you have, the difference between 25% full and empty means a lot, and that inaccuracy can be a problem.
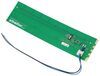
The SeeLeveL tank monitoring system uses technology that can sense fluid levels from the outside of the tank. The sensors' flexible circuit board sticks in place and measures along its entire height. This makes it accurate in single-digit increments.
LPG Monitoring
Large RVs with permanent propane tanks often feature wired sensors on their gauges. These can go by different names, such as LPG gauge sensors, tank level monitors, remote ready dials, or R3D dials. If your RV has an interior panel for monitoring LPG levels, you know you're good to go with wiring already in place for an easy install. If you're not sure, check the tank itself. If the gauge has a wired sensor attached to it, you can connect it to the SeeLeveL monitor.
SeeLeveL sensors used for fresh, gray, and black tanks will not work on metal tanks of any kind, including LPG tanks.

Videos are provided as a guide only. Refer to manufacturer installation instructions and specs for complete information.
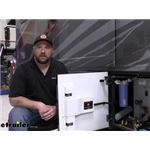
Hey guys, this is Jake here with etrailer. Today we have a 2022 Renegade Valencia, and we're gonna be taking a look at and showing you how to install the See Level II tank monitoring system. The specific system we installed today is gonna allow you to monitor your battery levels, your black, gray, and freshwater, and your propane tanks. The biggest difference and the greatest benefit of this system is that with the traditional style system, you'll have these pegs that poke through your tank and as the water fills up inside of whichever tank, it is going to make these connections. So your neutral is going to be the white wire here, you see. So when your tank is a third of the way full, this bolt will get wet on the inside and complete this connection and as it fills up, it'll touch this bolt and complete the connection.
That's what's telling you that you're at empty, one third, two thirds, or full. Well, not a lot of people like to know when they're two-thirds full. They like to know a little bit more accurate measurement because what can happen is it may say it's only a third of the way full, but it could be literally within one gallon of being two-thirds the way full. So when you're out camping, you wanna know more accurately what is in your tanks. That is what the See Level is designed to do.
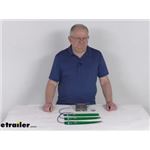
The specific installation we did today is going to have seven sensors. There's these little blocks you see on the side, which if you break it down into a hundred percent, that's gonna be about 13% of the time. So instead of saying 33% full, 66% full and full, this is gonna break it down 13% at a time. So as you reach that 13%, it'll tell you 13, and then as it rises, it'll tell you 26, and so on and so forth. It's a way more accurate way to see what's in your tanks, and to see if you're full enough to empty before you leave for your trip.
Another great benefit of this system that most people don't even think about or you might be watching this video to help solve your problem. Because these are probes, they're sticking into your tank about two inches. Well, we all know what goes into our black tanks, and a lot of times stuff can get stuck on those probes, and that's gonna give you a false reading. So if you're getting a false reading, that's probably why a lot of people have different techniques on how to clean it. But why have to ever worry about that again You put the See Level system on, and it's an exterior tank monitoring system.
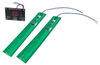
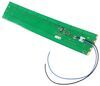
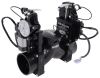
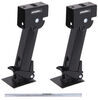
So you don't ever have to worry about anything getting stuck to the sensor. The one thing I will note is that from time to time, if stuff sits in your tank long enough, it can sit on the inside wall. If there is material in there that is throwing it off, if there's something stuck to the wall, maybe some tissue paper or something, it's gonna give you a false reading. So you still may have to clean your tanks, but you're not gonna have to knock something off of a probe. You're just gonna have to clean your tank and knock stuff off the walls. Now the really nice part about this kit that I like is that the strips are gonna be customizable 'cause all RVs will have different size tanks. The tanks on our Valencia here are gonna be really odd shaped. It's an L-shaped tank, but the owner of our RV here was perfectly fine with just sticking 'em to the outside. He really just wants to know when they're full. He just wants a more accurate reading of when they're full. The strips will come in three different sizes. You can get a six, a 12, which we have here, and a 16. And what you wanna do is you wanna get the strip that is the closest to the size of your tank without the tank being larger than the strip. So for instance, our tank here, we had about 11 inches of space. So we took the 12 inch strip, and you'll cut in between the sensors and we just cut one sensor off the bottom of our sensor here. Now for our freshwater, which is inside underneath the bed, it is a 16 inch tall tank. So we we're able to use the whole 16 inch strip, which is really nice because you want to be able to include as many of the sensors as possible. So if you have a six inch tall tank for instance, you wouldn't wanna use a 12 inch strip because at six inches, you'll only have four sensors. And I believe the six inch sensor will have eight. So just an example of it's gonna be able to break down that percentage even lower if you have more and more sensors 'cause again, if we stuck this 12 inch with only half of it on, that's gonna give us 25% at a time and that's not really much better than what we already have. So make sure you're getting the sensors to match the size of your tank. Now one note to make is that if you have a tank that is larger than 16 inches, so say you have a 20 inch tank, what you wanna do is for a 20 inch tank, I would recommend a two 12 inch strips, and then you'll cut whatever remainder off and pretend as if it's one solid 24 inch strip, and you'll cut four inches off the bottom. You have to use the same size strips to pair them together because the sensors are different sizes on the strips. They don't work well if you were to stack a 16 and a 12. So just be sure that if you're ordering your sensors, be sure to match them if you have a larger tank than 16 inches. Now one other thing is that if you're having trouble deciding which pair of strips that you need to use for your size tank, you have to keep the strip a quarter inch to a half inch from the top of the tank because all of these tanks are gonna be rounded on the corners and they want these to be on flat surfaces. Now when it comes to this specific installation, the owner of this RV really wanted two monitors. They wanted one inside and one outside. So when they're out on their trip in the middle of the night, if they're worried about their tanks being close to full, they don't have to go outside to check the level because they're used to having their touchscreen inside, which is going to tell them all of that information. So we do still have the original sensors hooked up because we ran all of this separate, which you'll see in a little bit. But if you would like to still use your touch pad with the new See Level system, and you have a Firefly touch system, you'll either have to A, figure out if your Firefly has been programmed to work with See Level. Ours was not, so we would have to get this touch pad programmed by Firefly to be able to accept the information coming from the new sensors. If you'd like to do that, it makes perfect sense. The touch panels are really nice, they control everything in the RV so having another set of monitors, it is a small monitor so it really doesn't make that big a difference. A lot of people like that they don't have to scroll through all these options. They can just hit the battery and show that it still has 13.1 volts running to it. But again, you have to get that programmed into it if you wanna use your existing monitor, or you can do what the owner did for this coach. They just got a separate monitor and ran four wires from here down to our other monitor, and we tied 'em together and ran 'em to the sensors. When it comes to mounting your sensors and running your wiring, you'll just wanna make sure that you have a large flat place to be able to mount however long of the sensor that you want to mount, and they put warnings on here to tell you that the wires need to go this way. And the reason for that is because if this blue wire were to cross over this top sensor, it will always tell you that your tanks are full. It interferes with this signal that's why they actually train the wires to loop over the right side so that you don't have that problem. So if you have that issue, you wanna make a big enough loop and you need to run these wires that way, run the loop large enough over top of the sensor, and then head towards your end goal. And the last note before we get into the insulation is that when mounting these up, you want to keep them at least one inch away from any metal. We have our tank actually goes like another inch up here, but we checked with the owner of the vehicle. This is gonna be a good indication when his tanks say they're full. That means they're getting really close to actually being completely full. But we couldn't mount the sensor any higher up because this tank is mounted inside of a steel box so we don't have enough room to run the sensor up behind it. So we mounted it just below but just so you know, keep the sensors away from anything metal that will also interfere with the sensor. Now that we've gone over some of those details, the insulation is not too bad. This one was a little bit more involved because we installed it as its own system and we didn't tie into any of the factory systems. If you do tie into a factory system, it is very, very easy to put in place. Essentially, all you have to do is tap each of the sensors into the existing wiring, and then go up to where your panel is normally at. If you have the old traditional push panel where you push and hold it and you have a little LED light that pops up, it shows you what level your tank's at. Those you just pull that panel off the wall, cut the wires, and tie 'em into the wires that come on the back of this panel. With our installation, we had to run all of our own custom wiring. But with that installation style, then you have your own system. So if you know something's wrong, you know it's coming from this and not from the rest of the coach. Now that we've gone over some of that, let's go ahead and show you how we got it installed. To begin our installation, we're going to plot out where we're gonna put all of our components. We're gonna start with the control panel because we're doing something a little different with this install. The owner of this motor home wants a panel outside, and he wants one inside. So we're gonna try to find a good place for the outside one now, and then we'll find our sensor locations. So this panel here is removable, and we see that we have some space behind this that I think is gonna work out pretty good, and then we can run our wiring over, make a loop, and run it into the bay. The reason I want it here is because all of his other controls are here for the black tanks, all his black, gray, and freshwater dumps are all right here. So it makes perfect sense to have this monitor right here. So what we're gonna do is we're gonna mark out a spot here on our white panel, and then do our best to mark out the same spot on our back panel, and we're gonna have to notch out a little bit of this metal bracket. It's not doing anything right here. I think this is where if you have a different style latch, but we're just gonna cut out a chunk of this metal in order to make space for the back of this. Now we've got our hole cut in our plastic panel. We'll test fit it. It fits perfect in there in front of this metal bracket. We are going to have to, however, cut a section of this bracket out in order for the wiring to fit past it. We've got this area marked out. Now what we're gonna do is we'll unbolt this bracket. It's not holding anything on so we'll unbolt it, take it over to our bench, cut this out, and we can put it back up. The next step in our process is going to be mounting up our sensors. With our specific scenario here, what you wanna look for on your tank is all the corners on your tank are gonna be rounded. So here at the bottom you can see our rounded portion starts right about here. So we'll want the bottom of our sensor to be here. The problem with ours is that the top of our tank isn't 'til about there. So we're gonna have this much tank above this metal housing that's around it. The problem with that is the sensors will be thrown off if there's metal too close to them, and it's within an inch so you have to be further away than an inch. Ours is about a half inch here. So we checked with See Level, they said it's probably better just to mount it below, and then this person's gonna have essentially a reserve above whenever their tank says it's a hundred percent full. It's kinda like your gas tank. Even though your gas gauge says it's empty, there's still some fuel in there to get you to the gas station. So this is, we figured out, it's gonna be about 10% left in the tank when ours says a hundred. But we'll take some alcohol and we'll want to clean the spot wherever we wanna mount it really, really well. We're just gonna mount it straight up and down here. So we'll want to clean this tank really well of any dirt or debris so that our sensors stick as best they can. Now when installing your sensors, you'll see the top. It says two gray, three black, and top. So what we're gonna do is you want to cut whichever one you're wanting to assign the tank to. So since we're doing our gray tank here, we're going to cut the gray tab And essentially all you're doing is cutting the circuit so that that circuit is no longer complete and that's how it tells it which tank you're putting this on. With the side of our tank clean, we can now prep our sensor. What you're gonna wanna do here, and you also need to know this for when you order them, take a measurement on your tank. You do not want the front of the sensor to be within an inch of metal. So our whole box here is metal. That's what we're kind of having an issue with. We do have about an inch more of tank above it, but again, like we said, it's gonna give you a little more time to get to a dump station. So we'll hold our sensor up here, we want it to be right at the bottom of this, and we can see down at the bottom our bottom sensor's gonna have to be cut off. And the way that you cut these is you cut right in between the sensor. So you can see we have one, two, three, four, so on and so forth up. We'll take this sensor and you wanna cut directly between these two sensors without hitting the sensor. So we'll just cut across the board. There we go, and just cut it off the rest of the way. Now we can put our sensor in place. Again, try not to touch the sensors. That's why I like to have gloves on so that you don't get any fingerprints or grease on it. But we'll peel these back. You can see the part of the sensor that's actually gonna be sending the signals, and you always want these wires to drape this way. If they drape that way and go across that sensor, the electrical signal going through the wires will tell you your tank's full all the time. So line it up with the bottom, stick the middle of it, and then, go up. We'll just take, I like to take the back of my hand, just push on it to adhere it a little bit. Now we're gonna repeat the same process for our remaining tanks, which for us is going to be our black tank and our freshwater tank. So again, checking for a spot on our tank that is clear of any wires or anything. You just want the most accurate reading. So this spot here looks pretty good. We've got this decorative carpeting, I think it's just to hide the tank so you don't have to look at it when you open up the doors. We'll just hold it back, let that alcohol dry, then we'll cut our strip again and stick it on. This time, instead of cutting the gray tab, we're going to be cutting the black tank tab. Just be careful with this. Put this in a very tight area. But if you're careful, you can usually get in there to cut it loose. Just like that. I will take this, peel the backing off of it. Now this stuff is extremely sticky so make sure the first spot you choose is gonna be the last spot. Our third sensor we're gonna put in place is going to be our freshwater. Now depending on your vehicle that you're putting it on, on the 2022 Valencia that we're putting it on today, the freshwater tanks are two tanks but they're tied in together, and they're underneath the master bed. So we'll do the same thing as our exterior tanks. These should be a lot cleaner than those, but you still wanna wipe 'em off with some alcohol, let that dry, and then these are gonna be taller than our outside ones so we're not gonna be using a 12 inch. We'll be using a 16 and we're not gonna have to cut it. We can stick the whole thing to the side of it, which is gonna give us a really good read on the tank itself. Now we're ready to put our sensor on. Because this is our freshwater sensor, you won't have to cut any of the tabs. That's how it identifies that it is the freshwater sensor. We'll start, we're gonna do this one a little bit at a time because it's in a tough spot here. You want it to be about a quarter inch off the bottom, and a quarter inch from the top. So we'll stick it there. And again, making sure that it's straight up and down on the tank to get an accurate reading. Now to connect all our sensors up, we got a pair of 18 gauge wires. You can find 'em on our website. This one actually came in a three wire combo, and what we did was we ripped a green wire off so that we can use that for the propane 'cause that wire is going to be a green wire anyway. So it'll help us keep everything organized. We drill a hole through our two boxes, came into our black tank cavity, ran it across, and then over and into our gray tank cavity. And this is where we're gonna make our connections, and then we'll do the black tank next, and connect it to the board. Our yellow wire, we're going to pair with our blue wires, and then our brown wire we're gonna connect to our ground wires. You'll need some heat shrink butt connectors to do this. We've got some blue ones here, they fit the 18 gauge wire pretty good. Slide it in. Cut a little bit of that off. Slide it in and crimp it down, and we'll take our blue wire, cut some of that back too, and tie it in with our yellow. And we're using heat shrink just because it's in a bay that involves water. We don't know how much water gets inside these bays, that's why we wanna use heat shrink. We'll take another blue butt connector. Try our other two connections. Coming back from our gray tank to our black tank, we cut our wire in half. So here we have the original brown and yellow wire. So we took our ground, tied it in with our ground, and then continued to run it on, and then we tied our blue into our yellow, which is again still tied to the front sensor, and then ran in on. And essentially what these are gonna do is they're not all going to be reading at the same time, but because of how we marked each of the sensors, when you push the button on the pad to see what tank you want to, it's going to send that electrical signal and give you just that tank. So that's why we can tie 'em all together, and then you'll just be able to read one specific tank at a time. Now back up here by our freshwater, we need to make our connections, but we had to run our own wires up through the floor. Essentially what we did was we found a spot, and we drill a hole down through the floor between the two tanks, and we knew there was a large enough space down by the generator that we could drill through the floor and run our wire through it. The reason why we had to do that and we couldn't use a preexisting hole, there's a lot of tubing here that we could have followed it down through, except all of this stuff is directly over top of the fuel tank. So we didn't wanna have to deal with that, so we drilled the small quarter inch hole over near the generator, then ran our two wires up, and again just like the the other two tanks, we're gonna connect the blue to yellow, and the black to brown. The next step in our process is going to be mounting a second panel. Your kit is only gonna come with one control panel. You saw us mount the one outside earlier. This particular owner of this coach wants to so that he can tell the levels of his tanks from inside or outside his RV, which is not a bad idea. It just means routing a few more wires. It's up to you to choose whether or not you want it mounted outside or inside. Most people are going to mount it inside if they only have one. So with that being said, our second panel is going to go we're gonna put it right here. So we're gonna have to knock a hole in this wall to be able to flush mount the panel, and then we're gonna run our wiring down through the floor. Now we're prepping to cut out the opening in our wall. We started by first running the wire up, we used a PVC pipe, we called a manufacturer, and they said that they did not use that pipe on this model because the sink is on this side. Otherwise, the sink would've been on this side and that's what the PVC pipe was for. So what we did was you just drill the hole in the cap, ran the wire down and out through the bottom, and then ran it up behind our existing panel for now, and then we can mark out this square that we're gonna need to cut out. What I did here is I took the three screws off the back of this 'cause this is what we're gonna have to drill the hole for. So we'll line those up. I have a piece of tape on it too so that when we get it over here, we're gonna try to get it as close to the place that we want it just right about there. Then stick it to the back, and then, you know, we'll straighten this up. But that is going to be we're gonna trace this, and that's what the hole we're gonna need to cut out. Let's take a marker and mark out our four sides that we're gonna need to cut out. We're gonna be using a multi tool to be able to cut this out. I started by drilling some pilot holes so that we can start in each corner. (tool whirring) We can just pop it out the front, and we'll clean up these edges. For connecting our wires, the wire strand that we decided to use has a black, red, green, and white, which works out great because we're going to need to connect to a black, red, green, and blue. The blue we just ran to the white. That way on the other end, we know that these three are gonna be the same colors coming out. We do have this available on our website if you'd like to pick some up. All we have to do is make our connection. Like so, and then run our wiring back down into the hole. Now we can use the screws that come in a kit and mount up our panel. (tool whirring) If you're mounting it to this Luan, which is a really thin wood, do not screw these in super tight 'cause you'll strip out the hole then you'll have to use a larger screw. Now as far as the wiring routing goes, because we had to put that other sensor inside, that's the only reason we had to run 'em out here. What we did was we ran down inside that PVC tube that we showed you, and then on a motor home it's really nice because all the moving components are so much lower than the floor. In a vehicle, the bottom of the vehicle is really, really close to the drive shaft and the suspension and all that stuff. So what we did was we ran it down out of that tube, just find a place to pop it out underneath the floor, and then follow existing wiring all the way through, and then we popped out up here in the top of this box. The best way to find an open cavity in a box is to take a bright flashlight, shine it in the box, and then go underneath the vehicle, and look for the light. If you do not see any light, that means there's no openings in the box, and you may have to drill one yourself. Now as far as the freshwater tank wire goes, we had to drill a hole between the two tanks through the floor, popped out underneath the motor home, and then ran it over top of the frame rail, and then ran it along the frame rail following existing wiring up over the axle, and into the same wet bay that we ran the other wiring through. We've got all of our connections made at our other controller. Again, ours is gonna be a little different unless you decide that you wanna install a second monitor also. But to go through 'em, our green wire is gonna go to a green wire that we use to run up to our propane, which we still have to connect. Our blue wire is gonna be connected to we have it connected to the white going to the other controller 'cause again, we connected the blue to the white. And then the yellow wire is going to all of the blue wires on our sensors. And then our black wire is going into our ground, which again goes to the other remote, and then we have this wire which we're going to use the self tapper to tap it into the body of the vehicle. And finally, our red is going to be tied into our red wire, which is run up to the battery, and we still have to connect that. Our connections here on our outside panel are gonna look quite a bit different than the ones on the inside. Inside was a lot simpler because we we're just connecting single wires to each other. On the outside we have our blue wire connecting to all of the blue wires on our tank sensors. That includes the one coming from our bedroom. That's why we have two yellow wires here. The other one goes to the black and gray water. Then we have the green, which is going to tie into our propane which we have not yet connected. And we have the black which we tied into a ground, and we're going to take this ground and ground it to the body inside of our storage bay here. Then finally we have the red, which is going to be connected to power. We ran a separate power wire all the way up, and we'll connect that to the battery. Now we just have to get this tidied up, and then screw on our panel. We'll take a ring terminal. We're using one that will accept a self tapper, crimp it on, and we'll find a good place on our body to mount it. I think we're gonna try to go a little higher with this. Self tap it into the frame. (tool whirring) One of the last two connections we're gonna make is going to be to our propane sensor. To connect this, the See Level sensor to our propane, we're just gonna tie directly into the existing propane lines that your tank on an RV will already have a sensor on it. So we just need to tie into one of the two wires. We're gonna go with the orange wire because the white wire is gonna be our ground, and at this time you'll also wanna make sure that your propane tank is full because once we make the connection, the See Level system is automatically gonna think it's full. So say your tank we're to be 50% full and you connect it, it's gonna say it's at a hundred and when you go to fill it, it'll say it's at 150. So you just wanna be sure that your tank is full. We got this one filled up, and we can make our connection. Take our butt connector. We're gonna fold this over 'cause the wire that we're using is a little bit larger. Just slide it on, and crimp it down. For our power wire, we're gonna connect to the positive post on our battery. We just put a ring terminal on the end of our line here. Of course I need another wrench. With our power all hooked up, we can test out our system. We'll press the battery. 13.1 volts, that's good. Fresh we know it's empty, gray is empty, black is empty, and then we'll check our propane. Our propane is at 92%, which makes sense because a lot of people can't fill propane tanks to a true 100%. It's just how propane works. But with everything working properly, that's gonna do it for our look at and installation of the See Level II tank monitoring system on our 2022 Renegade Valencia.
Average Customer Rating: 5.0 out of 5 stars (4 Customer Reviews)
If your RV tank monitor readings change from 25% to empty in the blink of an eye, that's a problem. SeeLeveL sensors track 3 holding tanks with single-digit accuracy at the monitor. Also displays your propane level and battery voltage.
These sensors are so much better than the internal probes because they don’t get gunk on them. You can set the sensors on the outside and the positions that you want and it reads by percentage. I would definitely buy them again.
Awesome product!!! Now I can really see how full each of my tanks are!
Do you have a question about this Smart RV?
Info for this part was:
At etrailer.com we provide the best information available about the products we sell. We take the quality of our information seriously so that you can get the right part the first time. Let us know if anything is missing or if you have any questions.


Dan
2/22/2024
Outstanding ! The confidence with accurate tank level readings is a game changer. Not surprised that many mfgs have them standard on current model RV’s.