
SeeLeveL RV Holding Tank Monitor - Fresh, Gray, Black - Multiplex Compatible
(0 reviews)
Price: $280.60
SeeLeveL RV Holding Tank Monitor - Fresh, Gray, Black - Multiplex Compatible
Item # SE97VR
Our Price: $280.60


In-stock alternatives that can ship today


- All Info
- Q & A (0)
- Videos (2)
- Photos
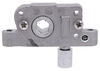
SeeLeveL Smart RV - SE97VR
- Monitoring System
- Water Tanks
- Digital Display
- SeeLeveL
Get advanced tank monitoring for your advanced RV. This monitor is compatible with multiplex, RV-C systems so you can get improved readings at your primary control panel. Accurately tracks 3 holding tanks using SeeLeveL sensors (sold separately).
Features:
- Monitor displays the levels of your RV's fresh, gray, and black tanks at the push of a button
- Hardwires to SeeLeveL sensors (sold separately) mounted on the outside of the tanks
- Also detects battery voltage
- Compatible with RV-C multiplex systems to display tank levels on your center console
- Checks status and signal strength of sensors using diagnostic mode
- Helps improve accuracy during install
- Alerts you of any errors or calibration issues with various display codes
- Codes explained with suggested solutions in user's manual
- Works with multiple monitors so you can check tank status from the service bay and inside your RV
- Installs easily - cut hole for recessed mount monitor and screw in place
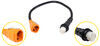
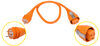
- Includes pigtail needed for installation
- Existing wiring from your old tank monitor system can be used to ease install
Specs:
- Application: 3 holding tank setup with multiplex systems
- Monitor dimensions: 4" wide x 2-13/16" tall x 3/4" deep
- Operating temperature range: 32 F - 140 F
- Operating voltage range: 11V - 16V
- 1-Year limited warranty
Note: SeeLeveL tank monitoring systems are not compatible with metal tanks.
Advanced RV Tank Monitoring
Traditional tank monitors have a reputation for being unreliable. Only a few sensors are installed inside, meaning that they usually only measure in quarter increments and can send false readings if they get dirty. When you're keeping an eye on how much fresh water you have, the difference between 25% full and empty means a lot, and that inaccuracy can be a problem.
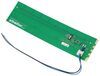
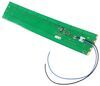
The SeeLeveL tank monitoring system uses technology that can sense fluid levels from the outside of the tank. The sensors' flexible circuit board sticks in place and measures along its entire height. This makes it accurate in single-digit increments.
Multiplex Compatible
This monitor is compatible with RV-C, multiplex wiring systems in RVs. This method of wiring allows multiple components in an RV to be operated by splicing them all into a single wire. This single wire usually connects to a central control panel, letting you control everything from lights, slides, and temperature from one place. This also simplifies the wiring process in RVs, since every component doesn't need to be individually wired to its own control panel.
With multiplex compatibility, this monitor can send accurate tank readings to a primary control panel. It will still work in RVs without multiplex wiring - just wire it normally. But if your RV doesn't have multiplex wiring, and you have no plans to get a multiplex system, then you can save your money and choose another SeeLeveL monitor without this capability.
Get the Model You Need
SeeLeveL monitors come in a variety of configurations depending on your specific requirements.
| Model | Fresh | Gray | Black | Galley | Propane | Water Pump Switch | Water Heater Switch | Bluetooth | Multiplex Compatible |
|---|---|---|---|---|---|---|---|---|---|
| SE94VR | ✔ | ✔ | ✔ | ||||||
| SE34VR | ✔ | ✔ | ✔ | ✔ | |||||
| SE44VR | ✔ | ✔ | ✔ | ✔ | |||||
| SE64VR | ✔ | ✔ | ✔ | ✔ | ✔ | ||||
| SE74VR | ✔ | ✔ | ✔ | ✔ | ✔ | ✔ | |||
| SE67VR | ✔ | ✔ | ✔ | ✔ | ✔ | ✔ | |||
| SE37VR | ✔ | ✔ | ✔ | ✔ | ✔ | ||||
| SE47VR | ✔ | ✔ | ✔ | ✔ | ✔ | ||||
| SE97VR | ✔ | ✔ | ✔ | ✔ | |||||
| SE84VR | ✔ | ✔ | ✔ | ✔ | |||||
| SE24VR | ✔ | ✔ | ✔ | ✔ | ✔ | ||||
| SE57VR | ✔ | ✔ | ✔ | ✔ | ✔ |
If you are replacing an old tank monitoring system, you'd want to check which functions are being provided by the existing panel. Some models incorporate switches for pumps or heaters or are providing information on propane levels. You'd want to pick the SeeLeveL monitor that can provide for all of these features.
709-RVC_NLP Garnet Instruments SeeLeveL RV 3 Tank Monitor Display - RV-C MultiPlex Compatible - Fresh, Gray, and Black Tanks - Battery Voltage
Installation Details


Video of SeeLeveL RV Holding Tank Monitor - Fresh, Gray, Black - Multiplex Compatible


Videos are provided as a guide only. Refer to manufacturer installation instructions and specs for complete information.


Video Transcript for SeeLeveL RV Holding Tank Monitor Installation - 2020 Taxa Mantis Travel Trailer
Hey guys, Kevin here with etrailer, and today I'll be showing you, how to install the SeeLevel II Tank Monitoring System, here on our 2020 TAXA Mantis Travel Trailer. So with our neighbor today, they have this TAXA Mantis, it came with some water tanks, but these water tanks have no sensor, so, he has no idea when he is filling up his fresh tank, until the water comes spurting back out at him. So instead of dealing with that, or dealing with his grey tank overflowing, he wanted us to put in the SeeLevel II Tank Monitoring System. That way he can easily just press a button and know exactly where he's at. Kevin As you can see, this is super simple to work. If you press your battery button, you can see exactly what your battery's reading at.
If you click on your fresh tank, or you can see that we're at 5% right now, I didn't put that much water in. And then with our grey tank, I don't have anything in that yet, so it's still sitting at "zero". On our black, just because we don't have a black tank on this, it's gonna read "open" because there's not actually a sensor running over to the black. But, there's no option in the monitors for just "grey" and "fresh". So, this is gonna be the closest option for us.
If you have other things like a LP tank monitor that you want to have put on here or if you want to have your water pump also on here, there are other monitors that are gonna come with the switches, so that you can check all that as well. But in our case, this is what we needed for our neighbor today. So on your strip, you're gonna notice, that there's each of these little sensors with a break in between it. These are where you can actually cut through and change the length of the strip. Like I said before, during the installation, you don't want to actually cut through the sensor 'cause that's gonna ruin that sensor right there.
But, the way that this works is, whilst it's stuck onto the side of your tank, it's gonna sense the water to air displacement, as it moves around in your tank, and then know exactly where it is on each of these sensors. That way you get a way more accurate reading than just your simple probe, or it's the 1, 2, 3, or "empty" kind of system, so, this gives you a much clearer picture. Obviously, as you start cutting these down though, these are going to be less sensitive. On ours today, we only we're able to put three on our grey tank. So, this is going to be just a simple 1, 2, 3 on just that specific tank, but on the fresh, we we're able to put five.
So we have no issue there. We're getting a whole lot better of a reading. Obviously, if you have a much larger tank, you're gonna have a way better reading on it, and you're gonna know precisely where you're at. So, the installation difficulty for this system is going to vary, depending on what kind of setup you have. With ours here, it was super simple to run the lines. If you are in a camper that already has water sensors, it's real easy, just cut right into those lines, like I did in a different video for one of our other models of this product. So all-in-all, it is a very simple thing. Your hardest time is really just gonna be running lines if you're doing a fresh build. Kevin So for a fresh build, like we're gonna be doing on our Mantis today, you're going to need to lay out your kit. We have our monitor, we're only gonna be using our grey tank and our fresh tank, just because this doesn't have a black tank on it, but this is the closest monitor to what we need. And because of that, we're not gonna need our third strip either, but what we are gonna need are some ring terminals, 'cause we're gonna ground our grounds on our strips, right to the frame, and then we're also gonna need some wire. We're gonna run that from our sensor up into our trailer so that we can have it connect to our monitor. So, the first thing we're gonna do is, we're gonna have to cut down our strips 'cause these are obviously just too long for our tanks. So what we're gonna do is hold it up and it looks like we're at three and a half sensors. So we're only gonna be able to do three because you can't cut in the middle of a sensor. It's got these little lines right here, of where you can actually cut. Kevin So we're gonna go ahead, we'll cut down the strip, and then, since this is our grey tank, we're gonna take out the little G R E Y letters then we can go ahead, got our backing, can place it on our tank. I wanna make sure that we're getting a nice snug fit on our tank. As you can see how the manufacturer molded the top portion and the bottom portion of the grey tank here together, it has this bump, that's going the whole length of the tank. So we really need to make sure that we're pressing down, getting our sensor completely on here, and sticking. That way, it actually makes full contact with our tank, so it knows exactly where the water level's at. So the black wire on our SeeLevel sensors, we're gonna strip back the casing on that, 'cause we're gonna ground this straight up to the frame. I'll twist that up a little bit and then I'll fold it over, a little bit thicker and stick on our ring terminal, go ahead and crimp it down. Now we have a ring terminal on, I'm gonna go ahead, I'm gonna use the self-tapper, just drill right into the frame and then we can ground our sensor. So now I'm gonna go ahead and do the same thing on our freshwater tank. This one's a little bit more forgiving. We got an extra two sensors that we can put on here. So I'm gonna go ahead and cut right through, and we can take the backing off of our sensor and place it on our tank. When placing it on the tank, the manufacturer does recommend leaving about a quarter inch to a half inch space above and below the sensor which we're gonna be pretty much on. And just like before, this also has that bead right in the center, so you wanna make sure you really press it down, get a nice tight seal against the tank. One other thing I forgot to mention, is if your tanks are pretty dirty, you're gonna wanna wipe those down with some soap and water. Luckily for us, our Mantis today had a pretty clean tank. So we didn't have to. One other thing I did wanna mention, is also that because this is our fresh, we didn't have to cut any tabs upon our sensor. If you leave them all intact, it's going to automatically know that this is the fresh tank. So now we can go ahead, we're gonna do the same thing we did on the other one. We're gonna cut back our casing on our ground wire, we can then crimp on a ring terminal, and then we can ground it into our frame. All right, now that we have our grounds on both of our sensors in place, we're gonna go ahead and run some wiring from our blue wire on our rear sensor, over to my other sensor, and then I'm gonna run that up into our main system, so that we can have it connected with our monitor. This is gonna be a little bit of time consuming work, just cuz we're gonna try and trace around, and go through the holes that are already in our frame. That way we stay away from any moving parts, or any parts that are gonna be generating any heat. So we can start by cutting back a little bit of our casing here and then crimping on some fresh wire. Like I said, we're just going to be crimping on some extra wire, will be using a heat shrink crimp connected just because we're gonna be outside of the trailer here. So with our wire trace through, over to our other sensor, I'm gonna go ahead and snip it right where these are gonna meet, gives us a little bit extra just in case. So we'll cut it right about here. Then we can go ahead and strip back the casing. Then we can go ahead and strip back the casing on our sensor wire, and then what we're gonna do, is twist these two together and then we're going to crimp on a heat shrink butt connector. So now we're gonna take some additional wire and we're gonna put that in the other end of our butt connector, and then run that up into our trailer, up to our monitor. We're also gonna heat this up, shrink down our butt connector. With that all connected, I'm gonna go ahead, I'm gonna use a zip tie to hold our wires tight, to our other wires on here, keep them from dangling down at all, and we're gonna trace this up into the trailer. So the last thing we're gonna do, is worry about our placement for our monitor. For our neighbor today, they want it right about here. Kevin I'm gonna try and center it, make it look nice. And then we're also gonna have to check on the inside of our cabinet here, and make sure that we're not gonna be getting in the way of anything, or not having enough room to put on our wiring harness. So, right about there is about where we're gonna have to be. So what I already did was I cut out a piece of tape, it's the same size as the inside of our monitor here, that's gonna sit inside of our cabinet. That way, I can easily just cut out this space. Now we can go ahead and just start making our cut out. Kevin On our wiring harness, we're gonna have four wires. We have our red, which is our power, our black, which is our ground, our blue, which is going to be our signal wire, which is the wire that we ran under the trailer already, and then our orange one here, which is an optional indicator or alarm. So if you wanted to run a little light, or anything to indicate whenever one of your tanks was full, you could go ahead and run this up to a light. For our neighbor today, we're not gonna be doing that. So like I said, this is just optional. If you don't use it, you can just leave it as it is, or cut it off if you don't plan on ever using it. I'm just gonna leave it on there, just in case down the road, maybe they do want to add in a LED light, to indicate whenever one of their tanks is either full, or empty. Normally, you'd be wiring this either to a battery disconnect or straight up to your battery, because this is gonna run off a 12 volt DC power. We lucked out, we have a distribution panel for our DC side, right under where we're mounting our monitor. So I'm gonna run it from our wiring harness straight down there. So I'm not actually gonna have to use any extra wire. I'm just gonna need to clip on a spade terminal. So I'll go ahead and we'll put this on right now, just to give you an idea. So this would have a spade terminal onto it, and then we're gonna come right down to one of these "open" positions right on here. So we can take our crimper or wire cutters, strip back our casing. I am taking off quite a bit extra, cuz I'm gonna fold this up and then twist it, just to get it a little bit thicker than the gauge, just cuz this is such a small wire. We put on a spade terminal, crimp that down, and then we will fish it down into our open switch. It feels like we got one right here. So now our power is good to go on our wiring harness. For our ground, it's a little short. I am gonna go ahead and just add just a little bit extra wire. I don't want this being too tight, and anything's being connected on it and doing any damage to the wiring. Right here, We have a busbar that's acting as our ground. While every terminal is being used, we are gonna be able to just butt up two ring terminals together. So I'll go ahead and do that right now. Now the last wire that we're gonna do anything with, is gonna be our blue wire. Like I said, that is our communication wire. We're just gonna connect that to the white wire that we ran under the trailer to our strips. So, typically, you'd wanna mount this right away. Just because I wanted to make sure everything works first, I went ahead and we wired everything, and now we can go ahead and test it. We don't actually have any water in our fresh or our grey tank, but you can see sensors are reading "zero". One way to really test how this is working is to check our battery, which is reading 12.6. And as you can see on our distribution panel down here, it's also reading 12.6. So we know that it's accurate. So now that we know that this is working, we can go ahead, and I'm gonna mount this in place, using some wood screws. All right, so we actually went, and filled up our fresh tank quite a bit, go ahead and hit our button right now to test it out and showing that we're at 50% of our tank right now. So I'm gonna go ahead, I'm gonna run a little bit more water into our sink, and then have it show you what our grey water's gonna be at, once that water drains down through our plumbing. Well, I think that about does it for today's installation of the SeeLevel II Tank Monitoring System here on our TAXA Mantis travel trailer. My name's Kevin. Thanks for watching..
Customer Satisfaction Score:
87% were satisfied with this product
13% of customers were not satisfied
- Wrong item was ordered
0
0
See what our Experts say about this SeeLeveL Smart RV
- Will SeeLevel Sensors Work With OEM Water Tank Sensor MonitorsThe SeeLevel systems will require you to replace your current monitor in order to properly read the sensors and operate. There are quite a few different combinations of monitors and sensor strips so I'd like to know exactly what you're needing for your RV. There are monitors that come with propane sensors, water pump switches, Bluetooth, etc. I've attached a video below where I install the SeeLeveL RV Holding Tank Monitor - Fresh, Gray, Black - Multiplex Compatible # SE97VR in a trailer...
view full answer...
Info for this part was:

Video Edited:
Jacob T

Updated by:
Wilson B

Updated by:
Carrie F

Edited by:
Amanda M

Video by:
Jonathan Y

Installed by:
Andy C

Test Fit:
Kevin C

Written by:
Cody B
At etrailer.com we provide the best information available about the products we sell. We take the quality of our information seriously so that you can get the right part the first time. Let us know if anything is missing or if you have any questions.
Product Experts Available Now!
Call 1-800-940-8924
Thank you! Your comment has been submitted successfully. You should be able to view your question/comment here within a few days.
Error submitting comment. Please try again momentarily.