
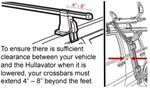
To see if this custom-fit item will work for you please tell us what vehicle you'll use it with.
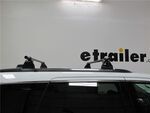
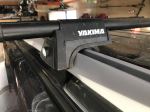
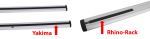
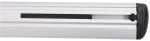
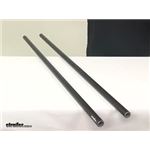
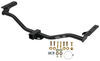
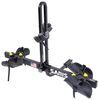
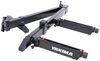
These multipurpose, galvanized steel crossbars supply the backbone for your aftermarket roof rack system. Works with accessories that clamp around the bars. Pair with Yakima towers, fit kit, and RoundBar SL Adapter to create a complete roof rack.
Features:
Yakima Roundbars - 48" Long - Black - Qty 2:Videos are provided as a guide only. Refer to manufacturer installation instructions and specs for complete information.
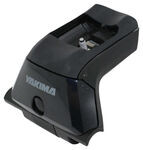
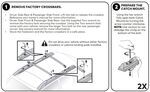
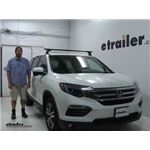
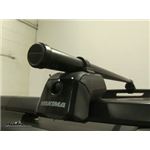
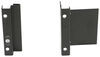
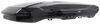
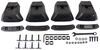
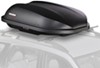
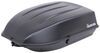
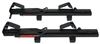
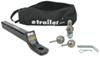
Speaker 1: Today in our 2016 Honda Pilot, we're going to be test fitting the Yakima Round Bar Roof Rack System consisting of part numbers Y00409, these are the round crossbars on the top here, and these are 58 inches long.We'll also be using part number Y03536, and this is the Round Bar Adapter Kit for the Yakima towers.We'll also be using part number Y00146. These are the Baseline Towers designed for naked roofs.Finally, to attach it to the vehicle, we're using the Base Clip Fit Kit part number Y06152.This is going to be the same for the rear bars as well. These are great sturdy cross bars for your roof, and car carry a wide variety of accessories such as bike racks, cargo carriers, excuse me, cargo baskets, and cargo boxes.While, they are exceptionally sturdy, they do cause noise while you drive. Now, you can purchase fairings that you can find on etrailer.com to help cut down that wind noise and drag, or you can upgrade to the Yakima core bars that also utilize this tower system.Moving onto the towers themselves, at the end caps here, we do have these plastic portions that can be removed and replaced with the Yakima SKS Lock Core System, so you can secure it to your vehicle and make it key to like with the accessories that you're hauling.Removing our end cap here you can see how everything attaches to the vehicle itself. We have the clamp that attaches to the door frame, as well as the pad underneath. So, your vehicle isn't going to get damaged or scratched once this is installed, because the clamp is also padded once it's being installed.So, let's go ahead and show you how the rear bar gets put into place.
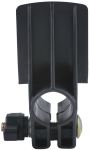
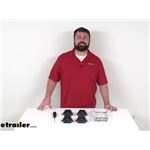
We already have it partially assembled on our lovely table over here, With all the parts that you need right in front of it. So, our first step is, we're going to take our adapter kit for the round bar and attach it to our tower.This is a very easy process. You simply take the plastic portion here, push it in on the top, you're going to hear a little bit of a click. We'll take our round bar adapter, attach it to the screw in the center. We'll pull out this tab here, so we can get to the screw, flip it upside down.
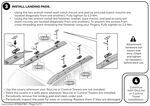
We're just going to loosely tighten it so we can get it in place on our bar.Move over to our bar, slide this into place. To help out with this, we're going to flip it on its side here like so. Now we'll take our measuring tape here and measure out the distance between the two towers. You'll find this in your instructions.Move this out a little bit. Now normally what you would do, is you would find the center of the bar and measure out to both sides.
We already know where we had to be at so, kind of cheated a little bit. There we go. Now we'll tighten it down. I'd like to point out something here in a second. That's the tightening tool that comes with the kit.
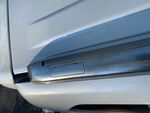
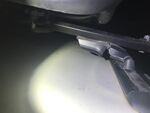
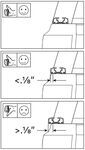
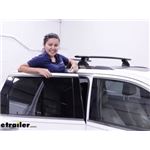
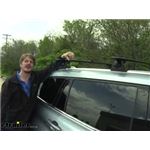
It does give those audible clicks so you know when everything is torqued to its specifications without overtightening it.Now, one thing I'd like to point out, looking at the underside of our tower here, you're going to see three notches on each side here. One, two three. One, two, three. Knowing which side is the front is very important because that determines the pitch and the tow that you set. The pitch is on this side and we have it set to B, which is the middle notch. The first notch, A, B, C, and so on.On the other side the tow is set to two. One, two, three. We tighten it down with this screw here, which has already been done. Just be sure to take a look at this in your instructions when you're tightening everything down.Next, we'll take our pad here, pointing out that the arrow's going to be facing away from the vehicle, we'll snap that into place on the bottom, and now we're ready to set this on the room of our vehicle.Set it down gently, as to not damage our vehicle while we're doing this. Now, at this point, we're going to measure from center to center of the bars on both side to keep it even, and then we'll make sure that's it's even side to side too.Alright, we're going to want to make a couple adjustments here. Double check the measurements since I kind of had to move it a little. Alright. Looks like we're even on both sides too. Now we can open up our rear doors and start installing our clamps. This isn't necessarily the steps that they have you do in the instructions, but, I find that it make it a little bit easier on us while we're installing this, so we don't have the clamps accidentally making contact while we're setting them into place.So, our first step is we're going to loosen up the bolt here. You can see how this raises up like so. We're going to take our included clamp. We're actually going to loosen this up a little bit, going to push that in, and then, we're going to tighten that bolt that we just loosened up. You see how it's now going against the vehicle. We'll repeat this process on the other side as well.There's some other items you can put on this roof rack system. It can be anything from your ski and snowboard carriers to your kayak carriers as well. A wide variety of objects. Once we have this loosely installed, we'll get it snug up against the door frame on both sides. We'll go back and forth until it's completely tight, and then you hear those clicks from the tool. See how it's tightening down around there There we go. Close that up.Now we can put on our end caps on both the bars and our towers. I'd like to give you a couple final measurements here to give you an idea of how high it sits off the roof once it's installed. From the center of the roof to the bottom of the bar's going to be about two and five eighths of an inch, and from the center to the top is going to be about three and five eighths inches as well. So, that's more than enough space for your accessories that wrap around your bars, so it's not going to make contact with your roof and scuff it up at all.Also, you can still utilize your sunroof once these are installed as well. These bars do have a carrying capacity of 220 pounds once installed, but you should always check your vehicle's manual to make sure your roof can take those weights and go by their recommendations.There you have it, for the Yakima Round Bar Roof Rack System on our 2016 Honda Pilot.
Average Customer Rating: 4.8 out of 5 stars (249 Customer Reviews)
These multipurpose, galvanized steel crossbars supply the backbone for your aftermarket roof rack system. Works with accessories that clamp around the bars. Pair with Yakima towers, fit kit, and RoundBar SL Adapter to create a complete roof rack.Kimberly has shown that great customer service is not dead! etrailer and Kimberly are great to work with and have earned my business and will always be the 1st and last place I look for my rack+ needs!
As for the application, I needed more space to fit my cargo box on top of my 4Runner TRD Pro’s rack. I came up this this… Thank you!

Everything from etrailer is timely and of good quality! The Yakima crossbars are no exception - they are indestructible.
Works perfectly. I am always impressed that Yakima continues to make parts for the "old roundbars" since they have since moved on to the superior JetStream bars.
My 2014 Jeep Grand Cherokee used landing pads 18 to mount to the roof my newer 2023 JGC uses landing pad 19. I was able to change the pads thanks to etrailer and install my older roof rack on my newer Jeep. I love that the majority of my roof rack is upgrade-able.
Excellent selection of rack parts. Very useful installation videos help when choosing between products. Easy ordering process. Quick delivery.
In the confusing world of roof racks, the etrailor site had a locator tool that made it easy to identify the correct landing pads and towers for my vehicle.
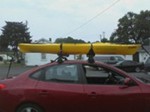
I ordered the Yakima roof rack, with the Hullyrollers for the back crossbar and the Mako saddles for the front crossbar to use with my kayak. It arrived just like they told me and I put them on my car the eveningit arrived. Got to finlly use the roof rack on June 22 to go out kayaking and it worked great. Only thing is I did not know about the air reflector piece for the front crossbar. Now I will be ordering it to help with the wind noise.
Fit our Subaru Forester perfectly. Install was a breeze. For the money I wish they came with the core locks.
Great rack, go on fast, easy to install and work well on my VW TDI wagon. Care has to be given and follow the instructions for the install to what type of rails you have. Works great carrying the VW luggage carrier and plan on using it to carry kayaks as well. Just have not decided what kayak rack type to get yet.
These crossbars were easy to install and adjust. Be sure to get all the pieces you need. There is no mention of the Landing Pads necessary to use these.
I've attachec a few pictures of the Yakima rack on my Audi Q7. It took a few attempts to find the right combination of attachments, but in the end, the pin attachments work best with the access points on the factory flush-mount rails. Great product!!!!!
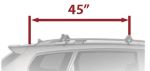
necessary for using the widest cross bar option (78"). East to install
Very nice quality towers. Very heavy duty! They have a cool "snap" on / off mechanism for quick removal and installation.
roof racks showed up in great condition, and showed up as one package.... I should have ordered the J racks from here but I found them cheaper locally so Thule J racks compliment the whole setup and i am just about ready to hit the water :)
The installation of this rack system went very well, all of the instructions were easy to read and use. I have attached some pictures of our installation. The vehicle is a 1994 Honda Accord EX four door sedan
Roof Rack 2008 Saturn Astra The roof rack arrived one day early...The packaging was excellent and the quality of the product more than met my expectations. The instructions made the insulation very easy. It took less than 45 minutes to install the unit complete.
I had cross bars and landing pads on my Jeep Grand Cherokee. I bought these to put on my wife’s new Grand Cherokee L. They were extremely easy to install and now I can easily move the roof rails between the two vehicles. They are a great product as is most of Yakima’s products. I highly recommend them.
The rack has been so useful since I purchased it. Staff at etrailer.com were exceptionally helpful in getting the best option for my car and answering questions. I recommend this company, for its 110% customer service, excellent prices and timely delivery.
Great products though, again, written instructions would have been nice.
One quick phone call and Gwendolyn figured out exactly what I needed for our new car to use my old Yakima rack.
You guys provide great products and excellent customer service.
Thanks
Everything arrived as promised and earlier than expected just installed. Looks like it will do everything I need it to which is haul around paddleboards. So far so good!
I have these installed on a 2022 Honda Pilot. I could not get them to fit on my raised roof rails with the included rubber gaskets. I have mounted them without the gasket but this leaves a gap between the rail and the landing pad. This seems secure but does not have a finished look. I will be trying to see how to get the gaskets to fit.
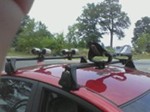
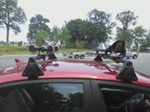
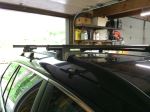
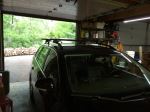
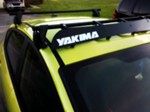
We got a Yakima Roof Rack system with locks and fairing for a "lime squeeze metallic" (Green...) 2011 Ford Fiesta 5dr Hatchback. Received the package yesterday and set it up within about an hour.
Great product and very easy to install! I called in to put my order in due to not trusting myself in getting one that fits my car. Jessica W. Was beyond professional and helpful in the process. She went also well above her position and tracked my order and sent additional information. Couldn’t be happier with the product and customer service!


Do you have a question about this Roof Rack?
Info for this part was:
At etrailer.com we provide the best information available about the products we sell. We take the quality of our information seriously so that you can get the right part the first time. Let us know if anything is missing or if you have any questions.


Thank you! Your comment has been submitted successfully. You should be able to view your question/comment here within a few days.
Error submitting comment. Please try again momentarily.