
Thank you! Your comment has been submitted successfully. You should be able to view your question/comment here within a few days.
Error submitting comment. Please try again momentarily.
Features:
Replaces BKUP-97
Videos are provided as a guide only. Refer to manufacturer installation instructions and specs for complete information.
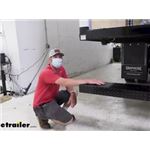
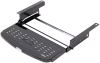
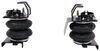
What's going on, everybody Adam here with etrailer. Today we're going to be taking a look at the Custer surface mounted backup alarm. So this is going to give us about 97 decibels of sound. So we're going to go ahead and turn it on for you to see exactly how loud it is. It's pretty loud. It really is a small, nice and tight unit.
So it's not really very bulky at all. So let's go over some measurements. One, the mounting holes are going to be three and a quarter inches on center. And then we're going to have an overall length of about four inches. It's going to come down about three inches, and it's going to be about an inch and three quarters thick.
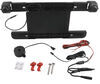
It does come with just the alarm. So we are going to have to grab some wires and stuff like that. A lot of people are wondering if it's going to be able to adjust sound. So we have some that will, but this one will not. It's always going to be pushing out that 97 decibels whenever you hook it up.
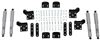
One thing that you will need to get are some terminals like this. We have them here at each trailer and also the wires as well. So if you're wondering if it's going to work with your vehicle, all you have to do is just find the power wire that goes to your reverse lights, tie it into that, and then ground it. And you are good to go. So if you stick around, we're going to show you exactly how we got the scene mounted and how we wired it up.
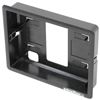
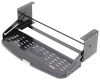
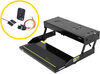
First step is finding the reverse light wire. So the way to do that is to have somebody go into the cab, and then what we're going to do is we're going to take our tester and then just check for the wire that has the reverse circuit on. So Brad, you put it in reverse real quick. All right. So that is good. So we know that is the circuit that we want. We already ran this wire. So basically what you can do is you can take the wire that runs to your reverse lights. You can cut it in half, and then you can take another wire and twist that together with one side, put it in here, clamp it down, and then take the other to complete the circuit again. So you have two coming off this way. One goes to here, the other one goes to where it was before. And then the other ones is coming from the body harness. So that's what we did. And you can have it right here. So now we can go ahead and start mounting it up. So first we want to figure out exactly where you want to put it. I'm going to put it right here, just because that is where all of our wiring goes for our signal wire. So, you go ahead and take it. And I already have these holes pre drilled, and you are going to have to supply our own hardware. So I'm just using a self-tapper, just like this. And of course, the tool to put it in. So we want to go ahead put that up. We want it to be nice and tight, but not too tight. We don't want to crack that housing. It is pretty tough plastic, but just be mindful of it. You go ahead and put the other one in. Now that it's mounted, we can start working on our wires. So once you find your signal wire for the reverse lights, you're going to need to grab some extra wire. We have some here at etrailer for you. So add that to your cart and then add a little terminal like this. Also have that, slide that in and then tighten it down. I like to get it threaded on by hand first. Get it pretty tight. And then you can come in with an eight mill socket. I don't want to over tighten this. I'm going to tighten it by hand and then just do one little turn with the tool. And that is pretty tight. So now we can go ahead and move on to our ground wire on this side. And then we just put together a little wire. If you do grab wire from us, you can just use that same wire. You probably have some leftover. It doesn't need to be that long for our situation. But what we can do is we can take one off, do the same exact thing as we did before. This goes on like that. Nice and tight. Perfect. We already had a hole drilled over here, so I'm just going to use that for ground. And again, just use a self-tapper and a little washer. Get that up and in there, and then zip it down with the tool. Simple as that. Now you go ahead and grab a buddy, have them get in. Brad's gonna go ahead and put it in reverse just to make sure that it works. And it works. Now let's see what it sounds like back here, right next to it. BradA lot louder back here, but still plenty loud up there in the cab. We have a lot of different backup alarms here at etrailer, besides the one we just showed you. So we laid them all out. And we're going to do a sound test here. So we have all of them laid out. And over here, we're going to have a little gauge. So as you can see, once I start talking real loud, it goes up. And when I stop, it goes back down. So this is going to give us an idea of exactly how accurate the decibel ratings are, and see which one's the loudest. First one up on our list is going to be the Buyers Products back up alarm. And this one is supposed to do 102 decibels. So, they got some wires ran and we're rigging this up so we can get it to work on the table here. So I'm going to go ahead and put the wires in place, just like that. Let's see exactly how loud it actually is. All right, here goes the test. So about 96, 97 decibels and it is a little far away. So right here, it's probably going to be around that 102 decibel mark, which is exactly what it says. So let's move on to the next. This one's going to be a little bit louder, 107 apparently. Again, Buyers Products. And we're going to connect it up. All right, test number two. So we're peaking out about 95, which is kind of the same as the other one. It does have a little bit different tone, so that might have something to do with it. And also we do have it a little farther away. But it is still within that range in the same ballpark. And that's what we're kind of looking for here. So moving on, we're going to go with the Pollack back-up alarm. So this one is going to be about 107 decibels. So let's test it out and see if that's what it is. Testing. Again, kind of going around that 95 decibel range. But again, it's just an app on one of our iPads we keep hearing the shop, but it still is pretty loud, but all in all, it's around the same or we're looking at maybe about eight decibels of difference from what it says and what our gage is telling us. Now for the Custer backup alarm. Let's go ahead and hook it up. Testing. So not as loud as some of the others that we had. About 83 is what we're getting with that. And this one's supposed to be 97. So it's within the range. And now for our Peterson backup alarms, going to be about 112 decibels. So it should be a little bit louder than the others. It's reading about 95, but that was a lot louder. I think it's because of the little projection that they have in the molding, but this one definitely seems louder, even though it is reading about the same from all the others, but let's move on. So now we're going to go with the Pollack. And this one's going to have different settings. So at its highest setting, it's supposed to be around 112. So let's see if it's any louder than this one. Testing. Again about 97, but this one definitely is a lot louder. So I think usually when the housing's a little bit bigger kind of projects that sound a little bit more, it makes it a little bit louder. Out of all the ones we tested today, the one I would go with is the Pollak. So this one is my favorite just because we are going to have adjustments on the side for the decibel output. I ended on the 112, but we can make it go to 97 or 107. So this is going to be adjustable and it's extremely heavy duty. It does feel a lot more solid than some of the smaller ones. And typically these are going to go on larger vehicles. So it being compact isn't really a big deal for me. And if you do want a smaller one, the Buyers Product is going to be a nice, compact little unit. And this is going to be a little bit easier to find a place to put it. And that'll do it for our look at the Custer backup alarm..
Average Customer Rating: 4.8 out of 5 stars (9 Customer Reviews)
Product worked as described. It did not come with any instructuins but the online videos from etrailer.com were fairky helpful. The only thing that was not clear was the size wire to use. I ended uo using 14 guage wire after some online research but it would have been nice if the product came with a few quick directions. Other than that, the speaker is very clear and works as designed.
Was an easy installation and it works fine. Thank you.

Everything was excellent, you sell great products. Will always look to you first for anything trailer related. Thanks
Bought I think 12 of these for our fleet of work vehicles. Great Price, Easy to install and work great.
This works like a charm. It not overly loud, but enough for the folks at Krogers to know I'm backing up.
Glad that I found this, only took approx. 30 mins to install.
Great company, fast delivery.
Fast shipping, 5 minute prep time, approx 20 minute install, pretty simple, works great .
Easy to install and performs great
very good and easy to install
Do you have a question about this Back Up Alarm?
Info for this part was:
At etrailer.com we provide the best information available about the products we sell. We take the quality of our information seriously so that you can get the right part the first time. Let us know if anything is missing or if you have any questions.


Danny
5/19/2022
Great, works great and not overly loud. I highly recommend the product. Quick install and I have not had any issues.