
Reese Quick-Install Custom Bracket Kit for 5th Wheel Trailer Hitches
(576 reviews)
Price: $189.64
Reese Quick-Install Custom Bracket Kit for 5th Wheel Trailer Hitches
Retail:$314.32
Our Price: $189.64
You Save: $124.68
In Stock
Thank you! Your comment has been submitted successfully. You should be able to view your question/comment here within a few days.
Error submitting comment. Please try again momentarily.


In-stock alternatives that can ship today


- All Info
- Reviews (576)
- Q & A (0)
- Videos (2)
- Photos
Reese Accessories and Parts
- Fifth Wheel Installation Kit
- Brackets
- Custom
- Reese
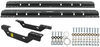
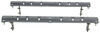
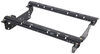
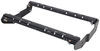
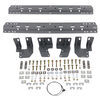
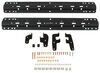
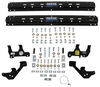
Custom brackets reduce the amount of drilling and time required to install your fifth-wheel trailer hitch. Hardware included. Base rails sold separately.
Features:
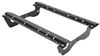
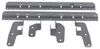
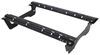
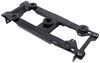
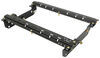
- Custom brackets mount beneath your truck bed to provide attachment points for 5th-wheel rails
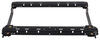
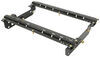
- Base rails (RP58058 - sold separately) sit in truck bed and allow installation of 5th-wheel trailer hitch
- Vehicle-specific brackets mount to existing holes in your vehicle's frame
- Minimizes drilling and measuring
- Cuts installation time in half when compared with universal bracket systems
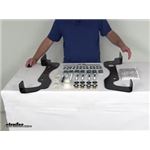
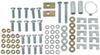
- Kit includes custom brackets and hardware
- Black powder coat finish resists corrosion
- 10-Year limited warranty
50074 Reese Custom Quick Installation Brackets
Item # RP50074
Installation Details

California residents: click here


Video of Reese Quick-Install Custom Bracket Kit for 5th Wheel Trailer Hitches

Videos are provided as a guide only. Refer to manufacturer installation instructions and specs for complete information.


Video Transcript for Reese Quick-Install Custom Bracket Kit and Base Rails Installation - 2019 Ford F-250 Super Duty
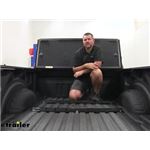
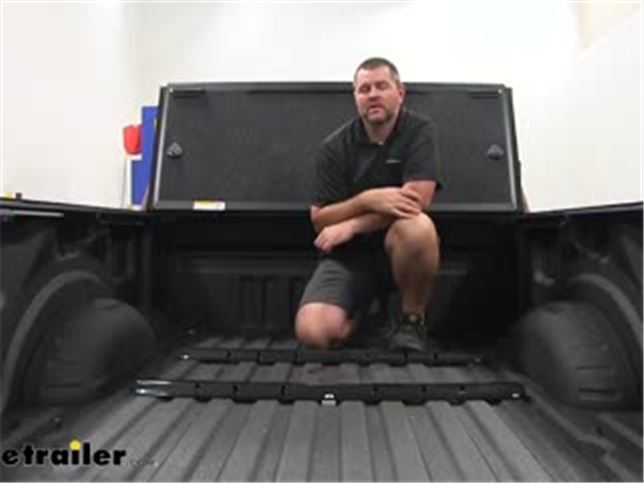
Shane: Hi, I'm Shane with etrailer.com. Today, I'm going to walk you through how to install the Reese Universal Base Rails and a Quick Install Custom Bracket Kit on our 2019 Ford F250.This is what our base rails are going to look like in the bed of our truck. You can see they're really not going to take up a whole lot of space. They're only going to stick up about an inch and a half. So, they're really not going to come up too high. Not really going to interfere with anything.
Maybe you want to put plywood in here or some drywall. So, it's going to help us maintain plenty of bed access. Also, these base rails are going to work with many different fifth wheel hitches.You can see, here on the top, we're going to have different slots and those are for different weight ratings. These holes here, these are for your pins to go through to lock your fifth wheel hitches down into place onto the rails. These are going to be of steel construction, nice black powder coat finish that's really going to help resist any rust or corrosion.
As far as the installation goes, it's pretty simple and straightforward.When you combine it with the Reese Quick Install Custom Brackets, it makes these very easy to install. We're only going to have a few bolts in each rail that has to be put in from the top side through the bed. It's the only drilling that really has to be done. The rest of the hardware is mounted underneath through existing holes.As far as our custom brackets, again, steel construction, nice black powder coat finish, pre-drilled holes that are going to match up with the holes in the frame rail. So again, the only holes we're going to have two drills when we're installing our base rails, is the holes into the bed to match up with our frame rails.
Now, that we've gone over some of the features, let me walk you through how to get it installed.To begin your installation, it's a good idea to go ahead and remove your spare tire. Then, we're going to set our rails in the bed of our truck. We're going to start with the most rear rail. And what we need to do is we need to measure from this edge to the edge of our bed. And make sure it's the edge of the bed, not to tailgate.
We're going to do it per the instructions. And what I like to do is not just measure the center, I like to measure the ends and put a mark in the center on all three to make sure our rail is lined up evenly on both sides.So, we'll go from our rail per our instructions, 29 1/2-inches. I'm going a little bit extra because of the bed liner or the spray-in bed liner. About a 16th of an inch is probably good enough. So, now what we'll do is we'll go ahead and mark our rail side there. And then we'll go down to the other end and do the same thing. Go ahead and mark the center, let's see. Now, I'm going to take my marker, I'm going to mark right along the edge. That way if our bracket happens to move a little bit, we can always line it back up. That's going to be our straight line.And what we need to do is we need to get even measurement from our wheel well to this edge, wheel well to this edge on the same side, just to make sure the measurement is the same and the bracket is centered. About 3 3/4. Do the same thing on this side. We just want to make sure our measurement's the same. Now, what we're going to do is I'm going to mark my holes. We're going to be using the two outside holes, the two inside holes and the two outside holes on the other ends.Next, we're going to take a small drill bit, we're going to drill out the center of each of the holes that we just marked. Before you do any drilling it's a good idea to check underneath to make sure there's nothing in the way that's going to interfere with the drill bit. Next, we're going to take our frame brackets. They're already marked, D for driver, P for passenger. And they're going to be installed just like this on the outside of the frame rail.Before we do it, you're going to get some isolator strips because it's an aluminum bed, we need to put an isolator strip between this bracket and where it touches the bed of the vehicle. We'll just peel it off and it's going to be right on this top outer edge, just in front of the hole. And we're going to take this and we're just going to fold it over just like that.Now, we're going to do this, both rails on both ends. Same way, just like that. Now, we're going to take the 11 1/2-inch bolt, hex bolt. You can see it's got a shoulder on it. We're going to put a flat washer on it. We're going to have two of them. We're going to set our rail in place, or our bracket on the frame rail just like this. Line up the two holes in the frame rail with the frame bracket.We're going to take our bolt, we're going to slide it through. We're going to have one here, and we're going to have a forward one. On the inside, we're going to take a conical tooth washer, put it over the bolt, and then we're going to put on a nut and we're going to hand tighten it. We're going to do this on both sides of the vehicle. Now, what we want to do is we want to check the holes that we drilled for our rails on top.We want to check them and see if they align with the holes in our frame brackets. If they don't, you're going to pull your frame brackets off and adjust your holes to the way you need to. You can see ours are pretty lined up. So, we're going to go ahead and go up top and open our holes up to the correct size. Next, we're going to drill out our holes to the correct size. We're going to do these two holes, the center most rear one and then the two on the opposite side.We're going to take them up to a 9/16ths. You can use your 9/16ths drill bit. Or, what I like to use as a step bit. This center hole here, which is closer to the cab on our rear rail, we actually need to open that one up to an inch and an eighth. Keep in mind, we only want to open up the bed side to an inch and an eighth because it's going down into the hat channel. And then, we're going to have to insert this pipe spacer, but we're going to have to do that on the bottom.We're going to have to open the bottom of the hat channel to 9/16ths. Just like that. Before we insert that, we're going to clean up, up here. We'll vacuum up our shavings. And what I like to do is take a little bit of clear spray paint or black spray paint if you have it, and we're going to cover up this bare metal. If you don't have a spray-in bed liner, you're kit's going to come with some isolator strips like we put on the brackets down underneath. You're going to need to install those in between the plates and the bed.Once we open up our lower hole in our hat channel to 9/16ths. We're going to go ahead, drop in our pipe spacer. Slide our rale over the top. Line it up with our holes. Next, we're going to take our larger spacer blocks, going to look like this. I went ahead and put the isolator strip on there even though I said because we have a spray-in bed liner it wasn't necessary, but I'm going to go ahead and use it anyway just in case any of the bed liner around that whole kind of chips off over time. Just to help protect it. Keep it from corroding.We're going to slide it in that hole. Same thing with this one. Slide it through this hole. Small carriage bolt in the very rear, longer carriage bolt all the way down. And it's going to go through the hole in the hat channel. Just like that. Then for our outer holes, the two towards the tailgate, we're going to put in carriage bolts. The two inside, outer holes, we're going to use hex bolts.Next, on the underside, our two bolts that are coming down here, grab the long skinnier spacer block with a round hole in it. Make sure you put on the isolator. We're going to slide it up over our bolt. And it might be easier if have someone up top. Just kind of help hold that bolt down. Conical tooth washer, nut. We'll do the same thing for this one, except our plate is actually going to run this way, not across this way.Now, we're going to take two U-shaped spacer blocks. And you'll notice the gap from our frame rail bracket to our bed. Make sure you use an isolator sleeve on the top one that's going to be touching the bed. Once you get your U-shaped spacers in place on both sides, you're going to take a conical tooth washer, teeth facing the hitch. Then, you're going to put on a nut.In your hat channel, on the outside of your frame rail, you can see the backside bolt, the hex bolts that we dropped down through, that's where they're going to come out. What we're going to do is you're going to take a large spacer block. Again, put on your isolator. And you're going to have a nut plate like this. You're going to have somebody up top, you're going to take it and you're going to slide it in, line it up with the bolt and had somebody up top screw that bolt down into the nut plate.Once you have all your hardware installed for your rear bracket, you're going to go ahead and snug everything up. We're going to set our fifth wheel in place. We're actually going to use our fifth wheel to line up our rear bracket. Once you get it in, you want to make sure you're centered. So, measure from the sides of each wheel well to the edge of the bracket, centered up as needed.And then, for this one, we're drilling the outside two holes, same as we did on the most rear bracket. But we're only going to be drilling this center hole that's closest to the cab. And we're going to do it the same way. I'm going to use a small drill bit for the center of the hole. And then we'll open up our holes to the correct size. Again, it's going to be 9/16ths. Difference between our rear bracket and front bracket, again, we're only using this very forward center hole and we're only opening this one up to 9/16ths.And then, our center one where it drops in the corrugation, again, we want to use a larger block. Go ahead and put our isolator strip on there, and then, carriage bolt. And we're going to do the same thing underneath, two U-shaped spacer blocks, isolator sleeve, and we're going to slide it in between the frame bracket and the bed of the vehicle. Want to make sure we're going around both bolts.Once you get all of your hardware installed for your front bracket, go ahead and snug everything up. And then we're going to tighten and torque all of our hardware to the specifications in the instructions. Once you have all of your hardware tagged and torqued to the specification in the instructions, you're ready to go.Again, I'm Shane with etrailer.com. I hope this video has helped you, whether you're still deciding or installing the Reese Universal Base Rails and Quick Install Custom Brackets on our 2019 Ford F250.
Customer Satisfaction Score:
92% were satisfied with this product
8% of customers were not satisfied
- Wrong item was ordered
- Product did not meet expectations
- etrailer mistake
Customer Reviews
Reese Quick-Install Custom Bracket Kit for 5th Wheel Trailer Hitches - RP50074
Average Customer Rating: 4.7 out of 5 stars (576 Customer Reviews)
Custom brackets reduce the amount of drilling and time required to install your fifth-wheel trailer hitch. Hardware included. Base rails sold separately.by: Pennee & Billy Barron01/31/2017
We ordered a bracket kit for our new 2017 F350. It was needed to install our Reese fifth wheel. which we use to pull our RV. Product was on back order by manufacturer, however Delisa at Etrailer diligently kept us very informed with updates & shipping status. My husband & son were able to install in a couple of hours. Looks great, outstanding craftsmanship & over exceeded our expectations! We would highly recommend!!!!!


by: Tom A09/18/2023
The product was fine but the service from the etrailer folks Is excellent. I had issues with my order (my fault) and they did everything they needed to do to get my issues resolved. Their service was very much appreciated!
by: Larry06/23/2018
It was great to be able to adapt the 16K hitch purchased just a couple of years age for my Dodge Ram pickup to my new Ford F250. The brackets used the existing frame mounts and no holes had to be drilled in the frame. It was a bit of work to drill the bed floor holes, but the kit came with accurate instructions and the plastic galvanic corrosion protection and all mounting bolts for the aluminum body. Extra work required because the full plastic bed liner had to be notched so the tracks would bolt directly to the bed.
by: Willis F08/30/2019
I installed the hitch and brackets myself and am very satisfied with the bracket kit. I’ve towed my fifth wheel about 6 k during the past year and am very satisfied. The instructions were clear and easy to follow.

Willis F.

8/31/2020
I have towed my fifth wheel about 15000 miles in total since installing the rail and bracket kits. No problems to this point and don’t see any reason to think I’ll have any problems in the future. I have nothing but praise for ETrailer. The people are re knowledgeable and give good insight on the installation process. Many thanks
by: Mike03/05/2022
Thank for the great delivery was on time as usually.

Michael P.
3/6/2023
great not one issue
by: Brian01/13/2021
etrailer folks were awesome! I placed my order during the pandemic and some of the parts were on back order it took a couple of months to get everything together, normally I would have waited until things were caught up to place and pay for the order but these guys kept me in the loop via email. However I wasn’t to thrilled to see that the paint on the mounting brackets that I Oder was coming off and the hardware was rolling around in the box which also dinged up the mounting plates normally I wouldn’t care but I’m installing this on my brand new F250 so needless to say that I had to sand and repaint the custom mounting plates because you can see them in the wheel well. Other than that etrailer was awesome as well as the other parts that I had ordered! Thanks guys and gals
by: Butch A.10/17/2017
This is an awesome product. No frame drilling required and everything fit perfect. Glad I found this on etrailer.
Marlin A.
10/17/2018
Everything is fine after a year. Great product.
by: Excellent04/06/2017
I have purchased products from etrailer a few different times. I am always impressed how quickly it comes to my home. The product fit and worked great with detailed instructions and helpful video. I think where etrailer sets themselves apart from other online vendors is the customer service. I had some questions and I spoke with Bill on a couple of different occasions and he made me feel as if I was at my hometown hardware store. Thanks much, I have nothing but good to say about etrailer, their products and their people.
by: Bill M06/23/2017
I needed a mounting kit for a fifth wheel. No one but these guys had it in stock. They shipped it fast and very reasonably priced. The customer got the truck for the weekend and can go camping now.
by: Dale01/21/2019
Received my bracket kit just as I ordered. Fit perfectly and everything is there. Was pleasantly surprised when I got it in just two days.
Thanks To Angela for all your help and knowledge.
by: JasonB 08/27/2019
Works great, no issues to date, Thank you etrailer for great products at great prices...
by: Tim 02/26/2021
Easy to install. everything lined up well.
No holes to drill in frame
by: steve01/07/2021
These frame brackets I ordered will do the trick for me.Thanks to the recommendations of the sales people at etrailer.
by: Kevin03/01/2018
Heavy duty! Much better than the universal L style frame mount brackets. No frame drilling!!
by: Gregory 06/18/2020
Install went smooth ,all parts fit and instructions were very helpfull.
by: Brian 03/28/2021
Excellent service and the right part and I got it 3 days earlier than Then expected I would never hesitate to use your company for my trailer needs in the future
by: Michael H.03/22/2017
Fit great and installed in minutes. Really liked no drilling..
by: Jonathan S08/08/2019
MAKES INSTALL A HELL OF A LOT EASIER! CANT BEAT THE PRICE!!
by: Terry 09/02/2022
Great service. Thanks
by: William 05/16/2020
I'm 76 years old and installed it my self, follow the directions and you will not have any problems. Very well built, great product.
by: Ray06/02/2018
Fit exact easy install. Great product
by: Steve 11/16/2019
What a great business to purchase my parts from. Shipped the same day as purchase. Parts are high quality. Will definitely be using them again.
by: Lee11/17/2018
Shipped fast and was here in 2 days. I haven't installed the rails yet but will do so in a couple of days.
by: Jeff11/20/2017
Product came just as described. Fast shipping with no damages. Highly recommend!
by: Michael06/23/2019
Well made and very easy to install
25
574
Show More Reviews
See what our Experts say about this Reese Accessories and Parts
- Reese Fifth Wheel Bracket Kit that Fits 2021 Ford F-150Reese has a quick install bracket kit that fits your 2021 Ford F-150 with the part # RP56034 which is part of the fifth wheel rail kit part # RP56034-53 that also comes with the rails.
view full answer... - Can You Use Reese 5th Wheel Rails RP30153 On a 2023 Ford F-350I do have an option for you but you have outboard rails part # RP30153 which are longer than the standard rails part # RP58058. Unfortunately, they only offer brackets for standard rails, the Reese Quick-Install Custom Bracket Kit part # RP50074 so you'd need to use these with the shorter, standard rails part # RP58058.
view full answer... - Reese Custom 5th Wheel Mounting Brackets For A 2021 Ford F-350Yes, the Reese Quick-Install Custom Bracket Kit for 5th Wheel Trailer Hitches # RP50074 does fit your 2021 Ford F-350. If you' d also like to add a 7 way to the inside of your truck bed for, you can use # C69CR.
view full answer... - Will Reese 5th Wheel Trailer Hitch Bracket Kit for 2017 Ford F-250 Fit Universal Reese Base RailsThe Reese Bracket Kit, part # RP50074, is a fit for your 2017 Ford F-250 short bed and also works with the rails that are included with the universal rail kit, part # RP30035. You also need new hardare to install the base rails to the brackets. Use part # RP58430.
view full answer... - Reese Fifth Wheel Bracket Kit that Fits 2019 Ford F-350Reese has a custom fit bracket kit that fits your 2019 Ford F-350 with the part # RP50074 but the # RP50026 does not fit your truck.
view full answer... - Custom Bracket Kit for 5th-Wheel Trailer Hitch on 2017 Ford F-250If you are needing a custom bracket kit for your 2017 Ford F-250 to use with the 43 inch Reese Universal Base Rails # RP58058, you will use the Reese Quick-Install Bracket Kit # RP50074. These are custom-fit brackets for your truck and they will mount to existing holes in the vehicle frame. I have attached a short demonstration video and the installation details on this kit for you to check out.
view full answer... - Custom Brackets for 2018 Ford F-250 Super Duty DieselThe correct kit for your 2018 Ford F-250 Super Duty diesel is the Reese Quick-Install Custom Bracket Kit # RP50074 which does include the hardware. These brackets will require base rails # RP58058 and if you do not have those rails they can be purchased with the brackets with part # RP50074-58.
view full answer... - How To Mount Reese Base Rails On a 2019 Ford F-250In order to install the Reese Universal Base Rails for 5th Wheel Trailer Hitches part # RP58058 on a 2019 Ford F-250 you'll need to use the Reese Quick-Install Custom Bracket Kit for 5th Wheel Trailer Hitches part # RP50074. This kit is a custom fit so no drilling into the frame is required. I'd also recommend adding the Curt 5th Wheel/Gooseneck Custom Wiring Harness w/ 7-Pole Connector for Aluminum Beds - 7' Long # C57008.
view full answer... - Correct 5th Wheel Installation Bracket and Hardware For 2021 Chevy Silverado 2500 W/ 6-3/4 BedI have a different option for you, but the Reese Quick-Install Custom Brackets # RP50074 you were looking at is actually for a 2017-2022 Ford F-250 or F-350 and will not be correct for your 2021 Chevy Silverado 2500. Instead you will need the Curt Custom 5th Wheel Bracket Kit for Chevy/GMC Truck # C16429 which is confirmed to fit your truck and will allow you to use your current above bed rails assuming they are the industry standard rails and are made by Curt. If your rails are made by...
view full answer... - Which Brackets for 5th Wheel Rail Installation Kit on 2020 Ford F-250 You're looking for the Reese Quick-Install Custom Bracket Kit for 5th Wheel Trailer Hitches # RP50074, which are custom fit for your 2020 Ford F-250 and will allow you to install your existing rails and 5th wheel hitch.
view full answer... - Recommended 5th Wheel Installation Kit for a 2010 Chevrolet Silverado 1500I do have a 5th wheel installation kit compatible with your 2010 Chevrolet Silverado 1500 with the 6-1/2' bed but the Reese Quick-Install Custom Bracket Kit for 5th Wheel Trailer Hitches part # RP50074 will not work for you as they are designed to fit Ford Super Duty Pickup Trucks. For a 5th wheel installation kit that will fit your truck, I recommend taking a look at the Reese Quick-Install Custom Base Rails part # RP56007-53 for an outboard rail kit or part # RP50064-58 for an inboard...
view full answer... - Do I Need a Bracket Kit to Install Pro Series # PS30133 5th Wheel Trailer Hitch with Base RailsThe Pro Series fifth wheel hitch that includes the rails, part # PS30133, doesn't include brackets. It's the hitch and the above-bed rails. It will work in your 2017 Ford F-250 but you need the brackets as well. For a universal bracket kit you can add part # RP30439. Or for a custom bracket kit use part # RP50074. Both fit your truck but the custom kit is an easier install and requires less drilling. You also need to add the hardware kit, part # RP58430, to connect the rails to the...
view full answer... - Fifth Wheel Bracket Kit Recommendation for Reese Rails to Fit 2017 Ford F-250We can't recommend mixing fifth wheel rail and bracket manufactuers. If you have a set of Reese fifth wheel rails we have the bracket kit part # RP50074 which is a custom fit bracket kit for your 2017 Ford F-250 and will fit your Reese rails that you currently have. Since the hardware that attaches the rails to the brackets is only designed for one time use you would also need the part # 58164. This will work great with your Husky fifth wheel hitch that you have as well.
view full answer... - 5th Wheel Hitch and Rail Kit Compatible with Curt Gooseneck Adapter PlateFor a 2019 Ford F-350 I recommend the Reese Quick-Install Custom Installation Kit w/ Base Rails for 5th Wheel Trailer Hitches # RP50074-58 or just the bracket kit # RP50074. The custom brackets will allow you to mount the 5th wheel rails easily and these rails will accommodate the 5th wheel hitches and the gooseneck adapter you have pictured. The rails are industry standard so you will have no issues with compatibility of your Curt gooseneck adapter # 16055or 5th wheel hitch between...
view full answer...
- Recommended 5th Wheel Rail Brackets for 2017 Ford F-250 Super DutyThe 5th wheel brackets I recommend for your 2017 Ford F-250 Super Duty are the Reese Quick-Install Custom Brackets # RP50074 that also are available in the full kit # RP50074-58. These will not require extra drilling into your frame for installation. If you want the universal fit brackets you can use the Universal kit # RP30035 or just brackets # RP30439. If you use the brackets only with either kit, you will still want to use new hardware for the rails # RP58430.
view full answer... - Comparing Reese RP56017 and RP50074 Quick-Install Custom Bracket Kits for 2019 Ford F-250Although the # RP56017 and # RP50074 both fit your 2019 Ford F-250, they are used to install two different sets of rails. The # RP50074 brackets are part of the Reese Quick-Install Custom Installation Kit # RP50074-58 which uses the # RP58058 rails. The # RP56017 brackets come with installation kit # RP56017-53 and use the Reese Universal Outboard Base Rails # RP30153. These are 48" long extended base rails which allow for mounting farther out from the truck frame.
view full answer... - Recommended 5th Wheel Rail Kit and Custom Brackets for a 2017 Ford F-250 Congrats on the new truck! The complete industry standard 5th wheel rail kit with brackets for your 2017 F-250, is the Reese Quick-Install Custom Installation Kit w/ Base Rails item # RP50074-58. If you need just the brackets you will want the Reese Quick-Install Custom Bracket Kit for 5th Wheel Trailer Hitches item # RP50074. I have linked an installation video below. To make towing with a 5th wheel easier I recommend adding the Curt 5th Wheel/Gooseneck Custom Wiring Harness w/ 7-Pole...
view full answer... - Does Reese Quick-Install Customer Bracket Kit RP50074 Fit A 2020 Ford F-250 Super DutyThe Reese Quick-Install Custom Bracket Kit for 5th Wheel Trailer Hitches # RP50074 you were looking at is a confirmed fit for your 2020 Ford F-250 Super Duty as long as it is not a dually or a cab and chassis model. You will also need the Reese Universal Base Rails for 5th Wheel Trailer Hitches - 10 Bolt # RP58058 to complete the installation. I included a video of the Reese # RP50074 and # RP58058 being installed on a 2019 Ford F-250 for you to take a look at.
view full answer... - Brackets Only for Reese 5th Wheel Installation Kit # RP50074-58Yes, you can get the brackets and hardware from kit # RP50074-58 by themselves. Use part # RP50074. But you will also need hardware # RP58504 to attach the rails to the brackets. The hardware is meant for one-time use only so the old hardware, if you still have it, should not be reused.
view full answer... - 5th Wheel Bracket Kit for Reese Rails Installed in 2017 Ford F-350Since your fifth wheel rails are Reese you would actually want the Reese Bracket kit part # RP50074 to install the rails you have already. This is a custom bracket kit confirmed as a fit for your 2017 Ford F-350 short bed. We don't recommend mixing the rail manufacturers so we wouldn't recommend trying to use Curt brackets. This kit does come with isolators.
view full answer... - How To Transfer Reese Base Rails To a 2019 Ford F-250I do have an option for you but you cannot mix Reese Rails with Curt Frame Brackets. Therefore, you will need to use Reese Quick-Install Custom Bracket Kit for 5th Wheel Trailer Hitches part # RP50074 with the Replacement Hardware Kit for Reese 5th Wheel Base Rails part # RP58504 to complete your setup.
view full answer... - Brackets and Hardware Needed For Current 5th Wheel Base Rails on 2018 Ford F-250The Reese Quick-Install Custom Outboard Brackets for 5th Wheel Trailer Hitches # RP56017 is only a fit for the extended length base rails # RP30153 which are 48 inches long. The Replacement Hardware Kit for Reese 5th Wheel Base Rails - 10 Bolt # RP58504 will be needed in addition to the bracket kit. If you instead have the standard base rails which are 43 inches long # RP58058 then you will need the same replacement hardware kit # RP58504 but will instead use bracket kit # RP50074.
view full answer... - Does Reese Quick-Install Custom Installation Kit Fit 2019 And 2021 Ford F-250 Super DutyYes, the Reese Quick-Install Custom Installation Kit that fits a 2019 Ford F-250 Super Duty also fits a 2019 Ford F-250 Super Duty. The correct part is the Reese Quick-Install Custom Installation Kit with Base Rails for 5th Wheel Trailer Hitches # RP50074-58. I have added a link below to a video review and the instructions for you to check out.
view full answer... - Fifth Wheel Trailer Hitch Bracket Kit for 2017 Ford F-250Custom brackets to install a fifth wheel trailer hitch in your 2017 Ford F-250 are # RP50074. These will fit even if you have the diesel with a DEF tank. If you don't have the diesel, and want an easier install, you can use the outboard brackets # RP56017. If you'd also like to add a 7-way trailer connector in your truck's bed use # C57008.
view full answer...
Do you have a question about this Accessories and Part?
Info for this part was:

Expert Research:
Mike L

Expert Research:
Jameson C

Edited by:
Lindsey S

Installed by:
Jeff D

Video Edited:
Jacob T

Updated by:
Wilson B

Updated by:
Jeremy T

Updated by:
Isabelle B

Written by:
Alexander C

Test Fit:
Shane H

Video by:
Jacob H
At etrailer.com we provide the best information available about the products we sell. We take the quality of our information seriously so that you can get the right part the first time. Let us know if anything is missing or if you have any questions.
Product Experts Available Now!
Call 1-800-940-8924
Larry
6/23/2019
Works Perfectly. No issues.