
To see if this custom-fit item will work for you please tell us what vehicle you'll use it with.
Thank you! Your comment has been submitted successfully. You should be able to view your question/comment here within a few days.
Error submitting comment. Please try again momentarily.
Features:

Videos are provided as a guide only. Refer to manufacturer installation instructions and specs for complete information.
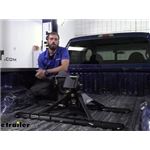
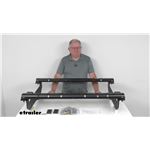
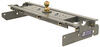
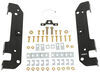
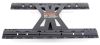
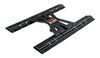
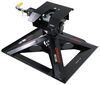
Hey, guys. Kevin here with etrailer. And today, we'll be showing you how to install the CURT custom fifth wheel base rail kit here on our 2010 Ford F-250. Our base rails here are gonna have a nice carbide finish on it, which is gonna go nicely with another CURT hitch, just like our CrossWing that we have in here today. The brackets themselves are gonna come with all the hardware you need and are a custom fit for this specific year, make, and model. So it gives you a little bit easier of an install versus a universal kit where you'd have to sit there and really drill a bunch of holes into the frame.
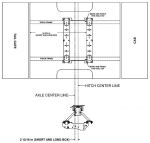
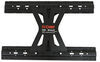
If you've ever had to do that before, it does take quite a bit of time. So throwing on these custom-fit ones will make your installation much easier. These base rails are gonna be ISR, which stands for industry-standard rails. And what that means is that the center of our base rails is gonna be 22 inches apart, which most manufacturers of fifth wheel hitches set their legs at. So on top of that, there's also gonna be different slots so that you aren't having to choose only a CURT hitch.
You could throw on a Reece, a Valley, or any other kind of hitch that is gonna conform with ISR rails. Now, one thing that most people find kind of inconvenient about base rails is that they just sit above your bed here, and they aren't really easy to take out. It's not some simple thing that you can unstrap. It is bolted down, but it is gonna sit about an inch above. So right now, with it sitting on the corrugation right here, it is an inch higher.
So you will have to kinda take that into account if you're trying to put other things in the bed of your truck. If you wanted a completely under-bed option, you could go with a gooseneck hitch and then use like B&W or maybe a different adapter that can take on your fifth wheel hitch if it is set up for base rails. As far as installation goes, it is a very varying process depending on the vehicle. So you could have different things under your truck. You could have lines ran a different way than how it was for us today.
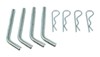
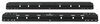
Overall, it really isn't hard. It's just kinda tedious. So like I said, there's a lot of things that you kinda have to work around. You don't have to have your truck up on a lift or anything like that. You can do everything on the ground. You could do this at home really easily. But like I said, just kinda plan a good two-hour chunk of the day just to kinda really get everything set correctly. And definitely take your time while you're making your measurements. You don't wanna drill any extra holes in your bed that you don't need. For the first step of our installation, you're gonna wanna first remove that spare tire. So go ahead and drop that off, get that out of the way. And then you're gonna grab one of your base rails, and you're gonna set it up in the bed of your truck. Now, from there, you're gonna go ahead and take your tape measure. And you're gonna measure from the tailgate end of your bed. So have it right up on that lip. We're gonna come out to 54 3/16. I've already gone ahead and gotten my base rail in position. You're gonna wanna make sure that you go back and forth and that on both sides, you're getting that same measurement just to make sure that we're even. And then once you know that you're right at there, you can go ahead and take a paint marker. And on your four corner bolt holes, we're gonna just color that in with our paint marker 'cause we're gonna drill down through the bed right here, so we can get our bolts in place. Now, on this side, we do kinda end up on the edge or lip right there of that corrugated bed. So that is gonna be a little bit of a challenge, but it just kinda is what it is. Now, we can go ahead and kinda slide our base rail out of the way and grab our drill. So the next step is to take a center punch and just put a nice dent in there so that you can see it from the bottom. If you feel confident in that hole, you can go ahead and just drill it out after you put that center and just use an eighth-inch bit. That way, you can really see down there. But if you don't want to risk putting extra holes in your bed, you can wait, get your side brackets on in place, and see if this matches up. So we're gonna go ahead and try that first. And then if we can't really tell, we're gonna go ahead and switch over to just putting that eighth-inch hole in. So right here, you can see here's where we punched down with that center punch. We've got our other one a little bit further back. But if we hold up our frame bracket on here, we can see that bolt hole is gonna line up right with our hole in our frame bracket so we know we're good to go. So we can go ahead and just drill that right down. All right, so I'm gonna start by drilling out the center of our hole with a 1/8 drill bit and then work my way up to a 9/16. Or if you want, if you have a step bit, you can go ahead and use that as well to easily get down to the correct size hole. Now, I'm gonna go ahead and just take a file and kinda clean up the edges of these holes. We wanna make sure that they're not sharp. That way, we don't cut ourselves while we're working on it. And then I'm gonna go ahead and take a paint marker and just kinda get around there and make sure that we get a nice, even coat of paint on there so that it prevents our bed from rusting out. All right, now I have my driver side bracket in place. I'm gonna go ahead and just stick a bolt through it in the center just to kinda hold it snug up against here. And we're gonna end up having to drill out our hole right here and right here so that we can actually mount our plate into the frame rail. You may end up having it in there already. You may have that hole or you may have a smaller hole that you just need to enlarge, just kinda depends on the model. All right, we'll set the bolt there. That's just gonna sit there for a bit, so we don't have this wobbling all on us. Give us a little bit more stability as we drill out those holes. I don't want this trying to move on me. All right, now that we've gone ahead and drilled out our hole, we're gonna go ahead and we're gonna take our 5/8 bolt along with our black spacer. It's the biggest one in the pack. You're definitely gonna know exactly which one I'm talking about. And then our 5/8 bolts locking flange nut. So we will slip that over. All right, so I'm gonna sneak this spacer block behind our wiring right here and push the bolt through. Now, we can go ahead on the other side and just hand tighten on our flange nut. All right, now we're gonna repeat this same process with our half-inch hole right here at the front towards the front of our bed on our cab side. We're just gonna drill it in and kinda work our way up to that half-inch bit. All right, for this one, we're gonna use that half inch, and it's gonna be an inch and a quarter in length. We'll have the smallest spacer. So there is a bigger spacer in there with a little bit extra on the side of it. So we won't use that. We'll be using these smaller ones and then a flange nut. We're gonna go ahead, I'm gonna get under here, and we'll pass that bolt through just like we did with our rear one. I will pass that through. And now, I'm gonna get on the other side and hand tighten on that flange nut. So now, we have our bolts hand tightened on here. We can remove that center bolt, and then we can go ahead and just repeat the same process over on the other side. All right, so now we are gonna have a little bit of issue on this side just because our shock mount comes up, and it's kinda blocking this whole area. So what I'm gonna do is run my fish wire through that and then we'll pull our bolt right through it, and it's gonna easily pop right into place in this hole. And then I can put on my flange nut. So let's go ahead and we'll pass that through, and we'll get under there so we can get it hooked up to our fish wire. Okay, now we can go ahead and just screw on our bolt. And then I'm gonna get the spacer in there kinda first, just make it a little bit easier to transition in. Now, we can start wiggling in our bolt. And if we just wiggle our fish wire, we'll get it to pop out through our hole. There we go. All right, now that I got that in, go ahead and I'm gonna twist off the fish wire. I'm gonna try and save it. Just in case we need to use it again later. And then now we can stick on our flange nut. And we'll just get that hand tight for right now. So now, we're gonna go ahead and we're gonna stick our base rail back in place where we are going to drop in our four bolts. But before doing that, the directions do recommend just sticking those spacers in, just to make it a little bit easier. 'Cause sometimes, if you drop the bolt in there, it kinda wants to fight it a little bit too much. So we'll get back down under there, put our spacers in, and drop down our bolts. So we're gonna go with our U-shaped spacers. We're gonna have that flat end sitting towards the center of the bed. Now, it is pretty tight in here. We do have extra things in the way. We have this little bracket coming off from this crossbeam, so it is gonna be tight. We are gonna have to try and really force this into place. You may need to get a screwdriver and maybe a hammer and just kinda force it in. Do a little persuasion. Looks like we're gonna have to do that here 'cause it's just kinda catching real bad right here. All right, I've gone ahead and dropped down my bolt. Now that I got my U-shaped spacer in place, we're gonna take our rectangle spacer that we have and our flange nut, and we can just get this hand tight for right now. And then, we'll repeat the same process over on the other side. All right, so now we're gonna go ahead and we'll do this front side of our bracket here. We're going to slip our bolt in, just 'cause there's enough room as it is. We'll use our U-shaped spacer and then our rectangle-shaped spacer and then our nut. So we'll just set that up on there. I'm gonna try to hold down on that bolt just a little bit, keep some pressure until I get this started. Get that down, there you go. And then just 'cause there's so much space here, as I'm tightening it up, I'm gonna make sure that I really get that spacer kinda centered on that bolt. If you need to have a second person up top, just kinda putting some pressure down on that bolt as well or you can stick like a block or something on there that's a little bit heavier. But we'll just get that hand tight for now and come back and torque it down once we're ready. The next step in our installation is going to be installing our base rail that's gonna be closer to our tailgate. Now, in the instructions, they tell you to just drop your hitch into the cab side base rail and then line up your tailgate side base rail. But if there's any issues with the feet on your hitch or maybe you just don't have an ISR hitch, that's where you can run into some issues. Because then your spacing's gonna be off just a little bit. What the spacing should be from the center hole that you have on your base rails to the center hole on the other base rail should be 22 inches. So I am gonna set our hitch in there, but I'm also gonna measure it to double-check, make sure that everything's good on here and that we have everything nice and even and set up. Like I said, it'll be from the center of that hole to the center of this hole. We got 22, right on. So we know we're good. One other thing I'd recommend is just also measuring from the end of your bed up to the base rail itself, just making sure both of these are the same measurement. That way, you know your rail isn't crooked one way or the other. So I'm getting 32 3/8. And just a slight tap on here and we're good. Now, we can go ahead, we'll take our paint marker, we'll color in our four outer holes, and then we'll drill those out just like we did with our first base rail. All right, I've gone ahead and drilled out my holes. Just make sure that you go ahead and use some spray paint. Or in our case, we just used some clear coat over the holes, just to protect it so the bed doesn't rust out. And now, we're gonna go ahead and drop in our bolts, put our U-shaped spacers, and then our other rectangle spacers in and get this all tightened down. So the instructions aren't really that great. They just tell you put those bolts in, and they kinda neglect the center bolt that you're gonna have to put in as well. So on the outside of the rails, so facing the tailgate and then also facing the cab, you are gonna slip one bolt into these middle holes. Now, since they don't really say it until the last minute, it's a little bit inconvenient trying to pull that base rail back off and then drilling out that hole for it. Definitely go ahead and just do that before you actually tighten down your base rail again. So when you're doing those side pieces, go ahead and just mark out that center hole as well and just drill it out. But definitely make sure, just because you're in the center right here, there's gonna be a lot more things in the way. So just double-check, make sure that there's nothing that you're gonna hit when you drill through and then go ahead and do it. All right, same process for our center bolts. Just our U-shaped spacer, our rectangle spacer, and then our nuts. Just hand-tighten it down for now. And then we'll come back and torque all of 'em all at once. So now that we have all of our bolts in place, we're going to torque all of 'em down. Now, there are two different torque settings for your half-inch and your 5/8 bolts. So just make sure that you're tightening 'em down correctly to their correct torque setting. And you're gonna wanna make sure that you do the frame bracket. So that's gonna be the ones going into the frame first. And then once those are done, you can go ahead and hit those four bolts or actually five bolts that are gonna be in the base rails that are shooting down. Now, with all of our bolts properly torqued down, that will complete our installation of the CURT custom fifth wheel base rail kit here on our 2010 Ford F-250. My name's Kevin. Thanks for watching..
Average Customer Rating: 4.6 out of 5 stars (92 Customer Reviews)
Fast shipping need new fith wheel hitch for new truck easy install took 2hrs think you
Received product, frame brackets were all scratched up, an the hardware bag was busted open, missing bolts, not very happy

Katrina D.
1/6/2024
That is not good to hear. Let me get you over to our customer service department for them to get you replacements.
Installation Kit delivered in an extremely quick time - getting ready to install with new hitch. appreciate your professionalism!
Not too hard to install holes lined up. Had to make the hole in the frame toward the front larger. After measuring the rails perfect hole placement to installed the rails. Took about 4 hours total. Very good help from the customer service at etrailer to match up the item and also save me a few dollars.
Great products and customer service on my Curt 5th wheel hitch.
Not installed yet but very fast shipping

David

4/1/2024
No issues, no problems

Put these on my 2006 F250 about a year ago, they have pulled my 10,000 lbs 5th wheel RV like a champ and also a 14,000 lbs skid steer and attachments using the gooseneck adapter like a champ. Only thing that gave out was a tire on the trailer!
Fast shipping. Quality product, Good In structions
Great service product looks good haven't had time to install yet.
Pro: The team at etrailer.com. They are very helpful and know their products. Fast shipping. Good prices. The kit seems to be of good quality.
Con: Had to drill 2 holes into the frame. Was hoping for a no drill custom application. Only 4 bolts total into the frame, but 10 bolts into rails through box. I would have liked more bolts into the frame.
I had wanted to use Reese for my 2006 F-250, but the two kits I wanted were on nationwide back order. I settled for #3, the Curt kit. I couldn't wait.
Had for a year easy install i use it everyday and has never let me down
Did a quick fit and it looks like it will fit perfectly, needing to get the drill bits and install soon.
the response and the information plus the feedback from the second I place the order was great.
Tracking my order was easy and simple. I will share photos once I get a chance to complete the installation and add further comments.
Thank you
MY Q16 5TH WHEEL HITCH WORKS WONDERFUL IT IS WAY EASIER THAN THE OTHER TYPES.I GOT RIGHT ON THE MONEY THE 1ST TIME I HOOKED MY 5TH WHEEL.ALSO I BOUGHT THE WIRE HARNESS TO INSTALL IN THE BED OF MY F350 AND IT WAS A BREEZE TO INSTALL.
Product was exactly as described. Reasonable price and received item quickly. Would recommend this seller.
Fits perfectly and the directions were spot on!
Curt Custom Fifth Wheel Installation Kit for Ford - Carbide was received very promptly from etrailer.com. The product was a perfect fit and installed very quickly by a trailer and truck company. Thank you for a great product and reliable service.
Everything was exactly as described. The only thing that could have been different and better with the product in my application was the single front tab on the side plates could have been double, just like the rear of the plates. Simple, easy installation. Did have to drill the front side plate mounting holes in the truck frame, no factory existing holes present, but no problem. The right side front hole is directly behind the shock tower. Over-all a great product.
Second time I have installed Curt kit. Process is fairly easy and instructions are good. Thanks to etrailer.com for great installation videos and quick shipping.
Very high quality and the instructions are very detailed.
Custom fit brackets made the job fairly easy, even though this was my first time to install a 5th wheel hitch. The installation took several hours, since I took my time and measured several times before drilling.
Awesome product good quality finish after a year minimal rust spots but that's just because I banged it a few times little black spray paint get his new
Haven't installed yet but looks like all is what was shown and arrived 3-4 days early which is excellent very pleased so far
Good quality and finish. Have not installed yet.

Do you have a question about this Fifth Wheel Installation Kit?
Info for this part was:
At etrailer.com we provide the best information available about the products we sell. We take the quality of our information seriously so that you can get the right part the first time. Let us know if anything is missing or if you have any questions.


Leeann
11/27/2023
Great easy installation