
To see if this custom-fit item will work for you please tell us what vehicle you'll use it with.
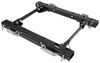
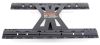
Install your fifth wheel trailer hitch in half the time with this custom bracket kit. Requires less drilling than universal kits and provides a custom fit for your . Includes everything you need for installation.
Features:

Videos are provided as a guide only. Refer to manufacturer installation instructions and specs for complete information.
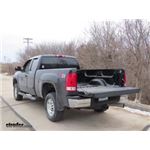
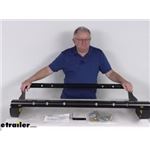
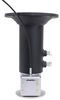
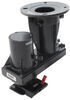
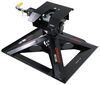
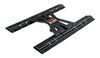
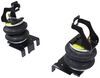
Today on our 2008 GMC Sierra, we'll be installing the Curt custom fifth wheel installation kit, part number C16418-204. Now, here's what our rails look like installed. These rails will work with industry-standard fifth wheel adapters and goose neck adapters. They will fit, depending on the application, on the wide ones, the middle ones, or if you're using a gooseneck adapter, the middle ones right here. They are constructed of a durable steel construction with a durable carbide finish powder coat, which will give us many years of rust and corrosion-free service. Also, our bolts are coated in a zinc material, so you don't have to worry about your bolts rusting out either, making sure your fifth wheel rails will stay in place while you're towing your trailer. Now, what I like about this kit compared to other brands on the market is that our rails do not stick up very high compared to other ones, giving us full access to our truck bed, so if we wanted to lay something down flat, we don't lose much of our height capacity.
Now that we've gone over some of the features of our Curt rails, we'll show you how to get them installed. All right, to begin our installation, we've already removed our spare tires so we have room to get up underneath the truck to install our hardware and both of our rear wheels. You don't have to do that, but for video purposes we did that so you can get a better idea what's going on. Now we've already made our measurements in our bed here for our front rail, for our bed length. They're two different measurements if you have a long bed or a short bed; make sure you use the right measurements for your truck. You get the measurement from the rear edge of the bed. Now, we'll just make sure our rail is centered in our truck bed.
What we're going to do is take a paint marker, we'll mark our appropriate holes. It's the center front hole and all four of our outermost holes. Okay, at this point, I like to point out that your truck bed won't look like ours more than likely. Ours had a gooseneck previously installed and then an underbed fifth wheel system, so we'll just get our rail out of the way and you can see our paint marks. We use a centerpunch here on our paint marks, and we'll drill a pilot hole. We'll do the same for all five of our holes. All right, if you look underneath our truck bed here, where our hole is where our gooseneck hitch used to be, you see that there's a segment of our exhaust heat shield that's already cut out.
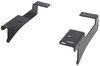
In order to install this product, we have to remove a majority of the exhaust heat shield. With this section already gone behind this cross-member, we'll remove the other section right here, cutting along this edge, and back over here, so it'll give us plenty of room to work. We'll just use a cut-off wheel. If you like, you can use tin snips. Now we'll just take our frame brackets, line up the holes, and make sure the holes we drilled in the bed line up with the hole in the frame bracket. We'll check it out on the passenger side as well the same way.
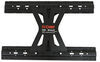
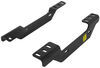
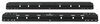
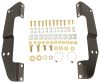
Okay, now that we've verified that our holes line up, we're going to enlarge them to the final size. Use a step bit first and then finish it off with a 9/16 drill bit. Okay, we'll slide our rail back in position now. Drop down our two-inch-long carriage bolts through all of our holes. Now on our outermost holes, they go down through our channel here in our bed, we'll slide in a spacer plate. This will help prevent our bed corrugation from getting crushed and getting pulled on up. Two screws here we need to remove, one's a 10 millimeter and one's like a T-25 Torx bit. There should be a third one over here, but our truck doesn't have it. We'll just remove these. These two, here and here, we'll use to reinstall our electrical connector to the new bracket we're installing. That one, you just keep; you don't need it anymore. Okay, here's the module that we disconnected. In case you're wondering, this is actually your brake controller. Then here is our bracket that we're going to attach it to. Now, you won't have this if your truck doesn't have a factory brake controller installed on it. We'll just take our bracket here, line it up the appropriate way, and then we'll take our screws, run them on through in there, and we'll tighten those down. Okay now we'll take our 3/4"x2"-long bolt, go through the bracket we installed in the brake controller, place on our 3/4" flat washer, take our bracket and go through right here in the big hole in the frame. Okay, now we'll take our frame bracket, slide it in position. Make sure we go through the bottom hole. Then we'll thread on our flange nut. Let's get this loosely started for right now. Now we'll take our large bolt leader, go through our large-diameter hole here, feed it through our frame until it pops out on the back side. I'll take on our flat washer here, so our smaller-sized one, and we'll thread on our shorter 3/4" bolt. Then we'll pull it through our frame. Okay, we're going to take our pull wire off now and we'll install our flange nut. Now that we have our driver's side frame bracket loosely in place, we'll repeat the same process for the passenger's side. Now we'll place our rear rail into position. We're going to use our fifth wheel head to position our back rail in the proper location. All right, after we've made sure that our rail is squared in position with our bed sides and the rear of our bed, we'll make our appropriate marks using our paint marker again. We'll do the rearmost spot in the center, and, unlike our front rail, we'll do the one closest to the outermost hole on both sides. Okay, with those marked, we can now take our head out of the way, center punch our marks, and we'll drill out our holes. Pilot hole made, we'll enlarge it out. We'll do the same for the other four holes. Now we'll drop down our hardware. Now we'll just drop our fifth wheel head back in place. Okay, this will help hold the rails in position while we tighten down all of our hardware underneath. All right, for our middle bolt locations in our rail, we'll slide in a steel spacer so our bed doesn't get crushed, we'll place on a flat spacer here, and then we'll thread on our flange nut. This is on our front rail. Our rear rail is exactly the same way. Okay, for our rear rail, because our bolt comes down through the raised section of our channel, we're going to have one of these spacers here, the U-shaped ones, come up. This will prevent our bed from being crushed. Then we'll have our lock underneath, and then we'll thread on our nut. We'll do the same for all four of the bolts that go through the sides on our rear rail. Okay, now that we have our back rail bolted in place to our frame bracket, we'll do the same for our front rail, except we're not going to have the spacer between our bed and the frame bracket. We'll just have our spacer here on the bottom side of our frame bracket and our nut. Okay, now we'll tighten down our hardware starting with our rails-to-bracket hardware first using a 3/4" wrench. Okay, with all of our hardware now snugged down by hand, we'll do the same process for the other side. Okay, now we'll snug down our frame brackets using an 1-1/8 socket. Now, right above our big bolt in our front of our frame bracket we have this smaller hole. We're going to use our frame bracket as a guide and drill out a 1/2" hole here to install our last remaining hardware. Okay, now we'll enlarge this out to 1/2". Okay, now we'll take our 1/2" carriage bolt lead and our 1/2" carriage bolt . These are the short carriage bolts; we already used all the other ones. Go through our hole, and it'll come out the back of our frame. We'll slide on our plate here, and we'll thread on a carriage bolt. Then we'll stick it inside our frame and pull it on through. Take off our bolt lead, and we'll put on our nut, and we'll snug it on down now. We're going to do the same for the other side. Okay, now we'll torque all of our hardware down the amount specified in the instructions. Okay, with all of our hardware torqued underneath, we'll now torque our frame brackets to the frame. That completes our installation of the Curt custom fifth wheel installation kit, part number C16418-204 on our 2008 GMC Sierra.
Average Customer Rating: 4.7 out of 5 stars (158 Customer Reviews)
Install your fifth wheel trailer hitch in half the time with this custom bracket kit. Requires less drilling than universal kits and provides a custom fit for your vehicle. Includes everything you need for installation.Nice well made with thick material. Time would tell how sturdy it is. Easy to install, clear instructions with everything you need for it. (Nuts and bolts).
This is my second mounting kit that I get for my trucks.
High quality, heavy duty system. Bolted right in and instructions were easy to follow. I feel good about pulling our camper with this set up. Only issue was shipping, the box was damaged and was missing the pins that were ordered. But customer service quickly got thing fixed and resent.
2004 Chevy Silverado 2500HD, installed the Custom 5th Wheel Installation kit along with the Q16 Slider Hitch. Product arrived very quickly after ordering. It was shipped in 3 different boxes. One box was a little beat up during shipping, but all of the parts were there and undamaged. I watched the installation video once, then my brother-in-law and I tackled the job which took us about 2 hours. This was not difficult to install other than trying to get the 1/2" bolt through the hole on the driver side of the frame (the frame is boxed there). The included wire guide helped, but you still have to manipulate the bolt into the right position in a very tight spot. Everything turned out to be a perfect fit, no modifications needed. Also, I removed both rear wheels before starting which gave us plenty of working room. I have purchased from etrailer in the past and will continue to use them in the future.
Upon delivery the box was a little banged up. Everything was inside was still in good condition. To my time with install to insure proper alignment, the only thing I can say negative about it is, you need 4 additional 3/4 inch washers for the frame bracket bolts that are not included, at least I did! On both sides. In the end it was a rather easy success.
This kit is perfect! Comes with everything you need with easy to install instructions. I’d recommend this and other etrailer products. They match all factory specs. Simple and easy

Installed on my 2005 Chevrolet 2500. Used install videos from your website and had no problems at all installing. Fast shipping also. Thank you for a great website!
Well built. Some bolts are a bugger to get tightened up but not bad. Didn't remove the heat shield.
Had an issue with my bank denying my order of two of the same items. Talked to Adam with customer service and he was fantastic. He got everything straightened out and received my order in less than two days
Great product, fits like a glove
Very strong product I would give five stars except the instructions would not be good for an every day truck owner but the E trailer video is really good the only issue with a long bed is you have to drill 4 holes in the front of the frame two on each side and be aware if you do have a long bed truck you will need a big drillbit for instants I used a 7/8 but the overall product is good shipping was great could not imagine having to install the universal brackets and this kit made it so much easier
Perfect fit and great quality.
I wish I could give two ratings for this kit, one for quality of product, and one for quality of fit and instruction. The product quality, once it is installed is very nice and heavy duty.
The instructions, and the fit on my 2005 GMC one ton dually leave a lot to be desired. They say it should take about 90 minutes to install. Plan on about 8 hours if you don't have a lift, and plan on drilling 3/4 inch holes in the frame rails. You better have access to a compressor, cut off wheel, 1/2 inch impact gun, 1/2 inch drill motor and 3/4 drill or reamer. This is NOT for the average "weekend warrior" with a small set of hand tools to install.
Just received this and haven't installed it yet. I plan to add it to my truck in about 2 weeks. This is exactly the same as my last truck which was a perfect fit. It also worked great pulling my 35-foot fifth wheel RV. I look forward to the same quality as before, perfection.
The Help & professionalism of Quinn F @ etrailer.com was outstanding. He confirmed that the product was the best choice for my vehicle & purpose, his personal response & follow through impressed me (including an e-mail letting me know my parts were delivered a couple days early). I will definitely be using Quinn F @ etrailer.com for all my RV related needs.
Another success from etrailer! Ordered a 5th wheel rails kit for my Chevy 2500 Duramax. It arrived within a couple of days as scheduled. Even though I didn't install it myself, the install fit my truck well and looks very clean. I didn't get any nasty calls from my installer so I am guessing there weren't any issues. Lol. I will continue using etrailer as my go to place for quality parts that fit well at a good price!
Just got everything delivered today. Looking forward to installing it. More to follow
The installation kit had everything I needed & fit perfectly as it should have. I would have given a five star rating but neither the instructions nor the video mentioned lowering the gas tank which was neccessary on my 2009 Chevy dually with the 35 gal tank. Aside from that the install went smoothly. I would have no problem recommending this kit & etrailer to anyone
The curt custom kit was very well made I have a 2005 chevy 3500 Dully long bed A couple of things that you will have to do when installing the kit you will have to drill two holes in your frame for the installation of the frame brackets on the front a 1/2 inch hole and 7/8 hole you will have to remove your spare tire you will not have to drop your gas tank or cut your exhaust heat shield out of the way but the only thing you will have to do is cut a quarter inch off of the large bolt on the driver side front three-quarter inch bolt because it will not fit in The frame area properly without doing that other than that the install was great and very well-made it Took me 3.5 hrs to install and my hands are beat up good luck and safe travel
Installation was simple enough with the guide. Measurements were spot on and bolted through the bed correctly. The frame rails are a different story...the front holes shown in video were for a short bed. On the long bed version, the two front holes have to drilled on each side. Make sure to tighten the bolts in the bed first to ensure alignment. The driver side frame rail doesn’t allow for the fish wire for the larger of the two bolts, because the fuel tank support straps are directly behind and Chevy made this section of the frame narrower. The bolt must be installed from the outside with a small person, daughter-in-law, holding the nut inside the frame and tighten from the outside. The passenger side, no problems at all. Once those four holes are drilled everything else is a cake walk. May be different on other models than Chevy, but would have been nice to know before and to have a large enough drill bit on hand. If not for the extra drilling and frustration this would have received a 5 star.
The system installed super easy. And works like a champ.
My order arrived quickly, as promised. It was an easy process of ordering it. I reserve 1 star on my rating as I have not opened the box and installed it yet. I'm hoping - all the pieces are present and the installation goes easy?
Time to install is way off
I just received the hitch. I ordered it very late New Years night. It shipped the next day with an estimated delivery of Friday before 8pm. I received it on Thursday about noon. Awesome super-fast shipping. It came in 3 HEAVY boxes, one of which was slightly damaged but I have not unpacked it yet. I hope to do so this weekend. I have bought from etrailer before and have no doubt this will be as good as the other purchases I have made.

Do you have a question about this Fifth Wheel Installation Kit?
Info for this part was:
At etrailer.com we provide the best information available about the products we sell. We take the quality of our information seriously so that you can get the right part the first time. Let us know if anything is missing or if you have any questions.


Thank you! Your comment has been submitted successfully. You should be able to view your question/comment here within a few days.
Error submitting comment. Please try again momentarily.