
To see if this custom-fit item will work for you please tell us what vehicle you'll use it with.
Thank you! Your comment has been submitted successfully. You should be able to view your question/comment here within a few days.
Error submitting comment. Please try again momentarily.
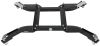
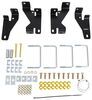
Install your fifth-wheel trailer hitch in half the time with this -specific bracket kit. Requires no drilling and provides a custom fit for your . Includes everything you need for installation.
Features:

Videos are provided as a guide only. Refer to manufacturer installation instructions and specs for complete information.
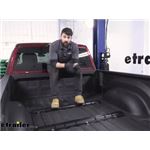
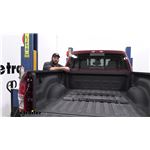
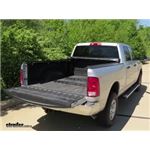
Hey, everybody, how's it going Today we're gonna be going over and showing you how to install the CURT custom fifth wheel installation kit here on our 2020 Ram 2500. So here we have our rails installed. This is what it's gonna look like. We actually have two different finish options here for the rails. We're gonna have the carbide finish that we see here. We're also gonna have a gloss finish.
Now it's really gonna depend on preference. This truck actually has a spray-in bedliner, so the carbide finish actually matches this a little bit better, 'cause it's a little bit duller. So what are our fifth rails gonna do Obviously they're gonna allow us to tow a fifth wheel trailer. We also offer adapters that allow you to tow a gooseneck trailer as well. So no matter what type of trailer you have, you're gonna be able to tow it here with this fifth wheel installation kit.
I'd also like to point out that you can actually use a wide variety of fifth wheel hitches. We don't necessarily have to have a CURT hitch. And the reason for this is the spacing between our rails, front to back, and our pegs here, left to right, is actually gonna be an industry standard measurement. Therefore, we can use fifth wheel hitches such as those from Reese, Draw-Tite, Husky, and so on. So a couple of questions we get asked here about the installation kit is number one, they do not come with the pins and clips which secure the fifth wheel hitch to the rails.
Those are more than likely gonna come with your fifth wheel hitch. And another question we get is in regards to weight capacity. So these particular rails and installation kit here, they don't have a rated weight capacity. They're basically gonna be able to handle whatever the truck is capable of. So in regards to installation, you do want to set a little bit of time aside to be able to complete this.
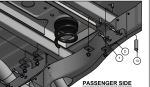
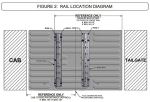
It's not hard per se, but it is gonna take some time. We don't really need to make too many modifications. That's actually gonna use some existing weld nuts in the frame. We do, however, have to drill a couple holes into our truck bed. But aside from that, it's pretty straightforward. Let's go ahead and show you guys how to do that now. So the first step of our installation here, we're actually gonna be lowering and removing our spare tire temporarily. In order to do this, you're gonna need to get a tool out of the cab of your vehicle here. It's gonna go into a slot underneath the tailgate here. There'll be some more detailed instructions in your owner's manual if you're not sure how to do this. We're just gonna be using a specialized tool we have here to make it a little bit easier. But we're basically just gonna be lowering the spare tire so we can temporarily remove it from the vehicle. So now that we have our spare tire out, we're gonna come underneath the vehicle here, we're gonna have a heat shield here. We're gonna need to remove that as well. We're gonna have various fasteners, couple over here, as well as a couple on the backside as well. So we'll use a 10-millimeter socket to go ahead and remove all of those. And now with our heat shield removed, we can go ahead and set it aside. So now we're gonna come underneath our truck here. We're gonna be coming forward of our rear axle here. So directly in front of our coil springs here, about the same location as where our shock mounts inside the frame, we're gonna have a wiring harness on either side which attaches to the frame with one of these little connection clips here. We're gonna take a trim panel tool, we're gonna get up underneath that, and then we're just gonna work it free. And the reason we need to do that is because we can see two connection points here. There's gonna be two weld nuts inside the frame here. We're gonna be using these to attach one of our fifth wheel plates. We're gonna be doing this on both sides. So because our weld nuts are on the underside of the vehicle here, they're gonna be subject to dirt and debris. We want to make sure that we go ahead, take some spray lubricant here, along with a nylon brush. We just want to clean those out so our hardware threads in nice and easy. So now, before we begin installing the bracket on the vehicle, we're just gonna be showing you all the hardware and brackets we're gonna be using for this step. We're gonna grab our bracket here that's got a longer standoff on this end, it's got our two attachment holes here. So this is gonna be the forward most bracket. We're gonna be installing this one first. And then we're gonna get some of our hardware ready. We're gonna be getting one of our two thick spacer blocks in our kit here. We're gonna be getting two bolts, different sizes, both gonna be in 12, but this one's gonna be a little bit longer, as we can see here. We're also gonna have two conical tooth washers. Now, the one that we're installing the spacer block through is definitely gonna be the one that we're gonna be using our longer bolt with, so we have a little bit more material there. So now we can take our bracket here. Now they are gonna be side-specific, we're gonna want the longer standoff to be facing towards the cab of the truck. And we're first gonna start by installing this hole here. This one's actually gonna be flush with the back of our plate here, so we can grab our smaller bolt. You may need to maneuver it around this wiring harness as well. Then we can place it up into position. We're gonna get our holes lined up here. And then we can take the smaller bolt of the two that we have here with our conical tooth washer. We can just do our best to try to thread that on. So now that we have one bolt securing the plate, we're gonna come back to this other side here. We're gonna be taking our spacer block, we're gonna be slipping that between the frame and the bracket. And then we can take our longer bolt here with conical tooth washer and line everything up. So now we'll take our 19-millimeter socket, we'll go ahead and snug down our two fasteners. So before we tighten down our fasteners here, we want to make sure that we take our plates here. We're gonna pull it towards the cab of the truck. We essentially want the backside of our bracket here to sit flush with the channel of our bed support. So I'm gonna hold that there in position and tighten them down. And now we'll just repeat that same process for forward most bracket on the other side. So now with our brackets into position, we're gonna be taking an eighth inch drill bit, we're gonna be drilling a pilot hole as best we can in the center of our holes here. So again, we want to try to line this up with the center of the hole as best as possible, and then drill through. Repeat the same process on the other side of our bracket, and then on the other side as well. So now that we have our four holes drilled, we're gonna take our mounting rail here. This is gonna be the forward most location. We're gonna go ahead and align that with our four pilot holes that we just drilled. Now, now would be a good time to make sure that those pilot holes are in the correct location here. You basically just want to make sure they're in the center of our second set of holes here, so our square holes. You're not gonna be using the outside ones, we're gonna be using this inside set here. We're gonna do that on both sides. So basically, just make sure that our holes are in the center of that square hole. You may need to re-drill the pilot hole if that's not the case. But now we're gonna have one more drill for one more hole we're gonna have to drill, and that's gonna be the center hole here closest to the cab. So again, just make sure we get as center of the hole as best as possible. Then we can go ahead and drill that all the way through. Now, what we're gonna do is we're gonna remove this rail here. We're gonna take a 9/16-inch drill bit, we're gonna enlarge all of our holes to their final size. Now, once we have our holes drilled, we want to make sure that we come back with any sort of paint, if you have a paint marker, a rattle can of paint will work as well. Just make sure we cover that bare metal so we don't have any issues with rust. So now with our holes enlarged, we can go ahead and reinstall our mounting rail here. The hardware we're gonna get ready for our carriage bolts are gonna be the shorter ones here along with our U-shaped spacers. That's gonna go between the corrugations in our bed and beneath the rails here so we don't collapse these corrugations when we tighten down our hardware. So now we can take our U-shaped spacers, place that underneath our rail here, lining them up with our holes, can set our rail back down, and then we're gonna go ahead and insert our carriage bolts. So now that we have all of our carriage bolts into position, we can go underneath the truck and secure the rail to the brackets in our bed. Before we do this, we're gonna go ahead and take a 19-millimeter socket. We want to loosen up our brackets here and how they attach to the frame. Give us a little bit more room to work. In our particular application, on the backside of this bracket here, there was quite a bit of a distance between the top of that and the bottom of our bed. So in order to help us out sort of close that difference, bring the two pieces of metal together, we stuck on one of our flange nuts here. We just sorta zipped it down. That's gonna bring this other side tight so we can install our spacer block. We're gonna be using the one with the center hole and then a flange nut. Once we have that on, I'm gonna take a 19-millimeter socket. We're just gonna go ahead and snug that down. Now, once we have this side snug, we're gonna go ahead and loosen up that other side so we can install our spacer block. So now we'll come back with our offset spacer block insert that, and we'll secure it with our flange nut. And now we'll go ahead and snug up our two bolts, which hold the bracket to the frame. Now we can just repeat the same process on the other side of the vehicle. So the next thing we're gonna do, we're either gonna be taking the base of our fifth wheel hitch, or chances are, you're not gonna be using one of these, but we actually have a gooseneck plate here, which installs inside the fifth wheel rails. That's gonna have the same spacing as your fifth wheel hitch, so we can use this as well. Basically, what we're gonna do is we're gonna drop one side of the pegs into the rail we just installed, and then the other side of the pegs is gonna go into our second rail here, which we haven't secured yet. Once we get everything lined up, we're gonna push our rail, sort of butt it up as close as we can as this other rail, we're gonna be pushing in. And then we want to make sure we center it left, right in the truck bed, so we'll just simply measure from the inside of our wheel well here to the edge of the rail, and make sure that's even on both sides. So now we can go ahead and start drilling our holes here for this rear rail. Now keep in mind, we're not gonna be using the same set of holes we did for our other rail. We're actually gonna be using the closest ones to the inside here, so if we count over one, two, three, four, we're gonna be using our inside most holes here. And we're gonna have one more attachment hole, which is gonna be on the side closest to our tailgate. So we'll take our eighth-inch drill bit. We'll try to get that as centered as we can in our hole. Then wee'll go ahead and drill those all out. So now that we have our eighth-inch holes drilled, we're gonna go ahead and remove the rail. We can come back with our 9/16-inch drill bit and enlarge them to their final size. So as we're drilling our holes, we're gonna notice that we can actually see through to the ground on the one closest to the tailgate, but the one closest to the cab for our rear wheel here, we actually can't see all the way through it, and the reason why is there's actually gonna be a bed support underneath. We actually gonna have to find a smaller drill bit that's a little bit longer than the 9/16-inch one we're using. Chances are your 9/16 isn't gonna be long enough, because we need to go all the way through this hole and drill through the bottom of that channel. So I just grabbed a half-inch drill bit here, which is a little bit longer than the one I was using before, and I'm just gonna puncture the bottom of that bed channel. Then we'll come underneath and enlarge it to the final size. So now we'll come back with our step drill bit here. Here's a hole that we just drilled through the top. We're gonna come back and enlarge this to the final size, which is 7/8 of an inch. We'll come back with a paint marker here and then seal it up. We're also gonna repeat the same process on the other side. So don't forget to take our paint marker here and just make sure we coat the inside of these holes for this rear wheel as well. So we said we need to repeat that process over here on the passenger side, but keep in mind, we're only gonna be drilling from the top down. We're not actually gonna be able to drill and enlarge that hole on the bottom of the channel over here on the passenger side. Because what we're gonna be doing is, if we take a look inside our wheel well here, we're gonna see our channel. What we need to do is we actually need to go ahead and take our spacer tube here. We're gonna have to sneak it up in that channel here. And once we get it stood up in the channel, we're gonna be taking a magnet tool that we have like such, we're gonna be attaching it to our spacer tube, and then we're actually gonna be pushing that forward until we can get the spacer tube to line up with the hole that we drilled earlier. Now, keep in mind, you may need to trim about a quarter inch of our spacer tube off in order to set it inside the channel here of our bedrail. So once we have our spacer tube into position, we have it lined up, we're gonna come back with our hex bolt here. Now we're only gonna have one of these in our kit. It's gonna be about three to four inches long, so you should be able to distinguish this from the rest of the bolts, but we'll simply use a flat washer, and then we'll place the bolt through the hole, aligning it with the spacer tube and then securing it on the bottom side of our bed channel with a flange nut. So now we can begin inserting the rest of the hardware for our rail here. We're gonna be using the smaller carriage bolts on all of our holes, except this far one back here. This one is gonna take our longer carriage bolt. So we're only gonna have one of these in our kit. It's gonna look just like all of our other carriage bolts, except it's gonna be a few inches longer. Just like that. So don't forget, on all the spots where the rail isn't flush to the bed and we have a carriage bolt, we need to come back. I need to lift the rail up a little bit, but we need to come back here, you shake the spacers here, set them down in position. So now we're gonna be installing the frame brackets here for the rear rail. In order to do that, we're gonna be coming on the driver's side here. We need to go ahead and remove this wiring harness from the frame here. So using those same clips that we removed earlier, just take our pry tool and pry them out. Once we get that away, now we're gonna go ahead and clean out our two weld nuts at the top here, which are attachment points for the frame brackets. So now that we have our wiring harness free, we're gonna take our driver's side rear bracket here, along with our hardware. We're gonna be using these smaller fasteners here with a conical tooth washer. Then we're also gonna need our spacer tube here. So the spacer tube will have to go on first. We'll place that over our longer carriage bolt there, just like that. And then we can go ahead and install the frame bracket. So now that we have that pushed up in the place, go ahead and secure the bracket to the frame. We'll leave those loose for now. So now we can take our square hole spacers here, get one of our flange nuts ready as well, just slip that over our carriage bolt here. Then we can take one of our flange nuts and thread that on. Now I will say, if you have a little bit trouble threading on the nut because you're pushing the carriage bolts back up through the rail, you can just use some tape tape down the carriage bolts, or a heavy object. So now we can just repeat the same process and the other side. However, we're only gonna be using this one attachment hole up here. We should already have our flange nut on our other bolt, which is gonna be inside this channel here and above this bracket. So now, before we tighten everything down, we're gonna go ahead and set our fifth wheel hitch, or the gooseneck plate, into our rails here. We also want to make sure we install our pins here. That way, when we're tightening everything down, we don't have to worry about anything binding on us. So now we're ready to torque everything down. Keep in mind, we're gonna be torquing the rails to the frame brackets first, and then the frame brackets to the frame. So with everything torqued down, don't forget to reinstall the heat shield along with your spare tire, but that will do it today for our look-in installation of the CURT custom fifth wheel rail kit here on our 2020 Ram 2500..
Average Customer Rating: 4.7 out of 5 stars (186 Customer Reviews)
Install your fifth-wheel trailer hitch in half the time with this vehicle-specific bracket kit. Requires no drilling and provides a custom fit for your vehicle. Includes everything you need for installation.
Does what it is supposed to do. I’ve pulled my 5th well 4000 miles with no problems since I installed it. Very happy with the product.
However, Installing it is no easy task. Every truck is slightly different, and Directions are vague but You-Tube videos help. Swivels and various lengths of extensions are necessary and even then getting a torque wrench on the bolts is tricky. Drilling is required as well as a step bit. Final alignment is very important. If you are not mechanically inclined and patient, you might consider getting it professionally installed.
Seems like a super high quality kit, but I will disagree with the ease of install. The instructions are super vague. It is quite difficult without putting the truck up on a lift and having several specialized tools. I consider myself sort of an average backyard automotive DIYer and I’ll have to take this in to a shop to finish. I think the page should say installation level medium or moderate.
Thank you for such a fine product!! We installed the fifth wheel hitch in my 2015 RAM 2500 Mega Cab without any problems. It took us 5 hours to complete the installation and all the brackets and bolts went in without an difficulties!!
Great people, great service and great products. Installation went as smooth as one could wish for with no mistakes thanks to the helpful advice given in the videos. Etrailer will be my only source for my trailer and hitch needs. A special thank you to Katherina.
I haven’t installed yet, but looks to be very good quality and good installation instructions
These people continue to amaze me! Their knowledge in anything trailer related is astounding!
Thanks, Russ
Before even starting the install I was sure to read the directions a couple of times to make sure this was something I wanted to attempt on my own. I hadn't installed a hitch before but had assumed since it was a custom kit it wouldn't be too difficult. The directions stated that the total install time for the diy'er was 180 mins. I read through and took note of all the tools I was going to need. What I would have REALLY appreciated was a "tools required" list at the top of the instructions. I thought I had all the tools needed but at the very end when you get to the rear rail you need a 7/8" bit for the bottom of the bed support. I advise you have one at the ready. I had to hone it out with my 9/16 which was a giant pain. Everything else went really smooth. On my particular application I had a real hard time torquing the front right bed bolt on the rear rail to spec (110ft-lbs) as the mount for a cross-bar makes it nearly impossible to fit a torque wrench in. (I ended up having to use 3/8" drive extensions to go up inside the bucket and torquing it from the bottom.
Total time:(including a couple of breaks, meltdowns, and a bunch of swearing and a 2yr old hiding dad's parts) 180 mins. Touche' Curt Mfg., touche'...
Experience level of installer: None
This is something that the average person can do. Make sure to watch all the helpful videos here on etrailer.com, read through the directions before starting, and make sure you have all the necessary tools to help ensure your installation goes as smooth as possible.
Product was great, installation instructions were well written and easy to follow.
I think after using it for about 5,000 miles of pulling our fifth wheel there must be a better system out that reduces the expected jarring from the movement of the hitch due to needed clearance to use pins.
I might have the hitch welded to the rails or find one that is not removable.
If you have a solid mount hitch, please let me know.

Tyler M.
12/16/2020
Hi Sam, Thank you for your review! If your truck does not have the OEM gooseneck package, then I would recommend getting the B&W Companion 5th Wheel Trailer Hitch - Dual Jaw - 20,000 lbs Custom Underbed Installation Kit for B&W Companion 5th Wheel Trailer Hitches, part BWRVK3500-5W and Part BWGNRK1384 . This setup will give you a much more solid connection to your truck and should help eliminate the jarring you are talking about.
Everything was heavy duty and well made. The order was shipped and delivered quickly. I had the Camper dealership install the rails in my old truck so I didn't know exactly what to expect. The installation is a little more detailed than what you see in the video but that is always to be expected. it is manageable if you are a DIY'er and it helps a lot to have a second set of hands. The rails mount directly to the frame with the included hardware.
Haven't had a chance to use the hitch yet but I got it installed without too much trouble. It took about 4 hours to install, the frame mounting brackets and rails, at a leisurely pace. The unit seems to be very sturdy and it is certainly built heavy. I'm looking forward to testing it out soon.
the no drill kit was just that,no drilling except the bed and that was not too bad. I would reccomend this kit to any one installing rail for a hitch.....
Missing lots of hardware! Previous reviews say the same, you would think they would fix the problem seeings how it appears to be a well known problem!

Jenny N.
7/19/2023
I am sorry that it the kit arrived missing hardware. Customer Service will be in touch.
Works great and easy install. The kit had the wrong nuts sent but curt sent me the right ones. It needed castle nuts and they included nuts and lock washers making the bolts to short. They did not know why but it was through Covid supply issues. Had great service through both teams. Thanks.
Was a easy install I was very pleased
Took about 5 hours to install but fits great using factory holes. Take your time lining up bracket before drilling. Only issue so far paint did flake and rust where hitch locks into bed rails. Will need ocassional sanding and touch up.

Rich R.

12/17/2021
Little bit of rust forming around slots where Andersen mounts to rail Other than that, working well.
The installation Kit for the Ram Truck was great. Had it installed within 3 hours and ready to use. picture is attached.
the service from etrailer was just great. Order shipped the same day and I had it on the 2nd day.
Brackets and rails were of high quality and were a perfect fit on my 2015 Dodge Ram 2500 HD, using the factory frame 'jig' holes for attachment
.
INSTALLATION NOTES: I looked up eTrailer's installation Video on the Dodge-specific custom brackets (in this case on a 2014 Dodge Ram 2500 HD). It was invaluable! It stated the task would take 1 and 1/2 hours for an expert; 3 to 4 hours for a novice. I am NOT an expert but have torn down and rebuilt an engine, replaced clutches and transmissions, and done brake jobs on my vehicles. Being admittedly slow because I want to be thorough (I wanted NO mistakes in drilling the holes needed into my new truck's bed), the task took about 3 days.
THE ISSUE: Though the under-bed brackets were perfectly made, there are two differences between the 2014 Dodge shown in the video (which I suspect was Gas engine equipped) and my 2015 Dodge 2500 (Cummings Diesel).
- CLEARANCE BETWEEN DIESEL FUEL TANK AND FRAME appeared to be MUCH less on my 2015 Dodge than the fuel tank on the 2014 Dodge (Gas?). The front left (in front of rear axle) frame bracket installation was WAY more difficult than in the video due to this clearance issue. A standard Torque wrench head with socket could not be fitted over the forward-most bolt due to this clearance issue between the Diesel fuel tank and the frame. I finally broke down and used a 'breaker' bar/socket combo and a piece of pipe to get that particular bolt tightened within a reasonable range of the proper torque.
- The rear axle suspension in the 2014 Dodge installation in the video was different than my 2015 truck. A significant mounting bracket for the new torsion bar was attached to the right-rear portion of the axle. I was adamantly against temporarily removing it (not even sure if I could have -- I THINK it was welded in place). Again clearance issues made installation of the right rear bracket quite a challenge for me.
Still I applaud eTrailer for making a high-quality kit that fits the bill!
The rails fit perfectly
Very pleased with the quality
The issues with the first delivery was handled to my satisfaction
The only reason I am not giving a 5 star is I get a lot of noise out of the unit I bought. I had the Ram dealer install my unit so I would hope it’s installed properly however I get a noise when towing my fifth wheel that sounds like the bed is twisting and moving. I had the dealer lift the truck up and I personally checked to make sure the sleeves that go in the bed supports were properly installed. After everything was checked for tightness and proper installation I still get the noise. This is my first fifth wheel that was not factory installed so perhaps this noise is common. This is my only complaint. This has otherwise been a great product.
Missing hardware. Pretty crappy quality control and now I have to wait 2-3 days for replacement hardware when I am suppose to be using my new hitch tomorrow
Great fit and product easy install did it in the dirt on drive way with no issues on 2016 Ram 2500
Very heavy duty steel with a thick coating of paint/powder coat on brackets. I recommend this kit if you have a ram 2500
These rails arrived at least 3 days sooner than expected!
I just had them installed today. While I it's too soon to make a proper assessment, the install when quicker that the service department estimated...by 3 hours!!!
So for delivery and installation "Only" I give a 5+.
I'll give a rating on functionality later.

Michael C.
3/14/2022
Theses rails have proven themselves to be sturdy, safe, well fitting and functional.

Do you have a question about this Fifth Wheel Installation Kit?
Info for this part was:
At etrailer.com we provide the best information available about the products we sell. We take the quality of our information seriously so that you can get the right part the first time. Let us know if anything is missing or if you have any questions.


Joel P.
3/25/2015
Rails work flawlessly. Between two hitches and a GN adapter all have fit without any problems.