
To see if this custom-fit item will work for you please tell us what vehicle you'll use it with.
Thank you! Your comment has been submitted successfully. You should be able to view your question/comment here within a few days.
Error submitting comment. Please try again momentarily.
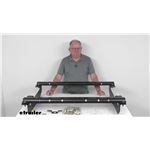
Install your fifth wheel trailer hitch in half the time with this custom bracket and base rail kit. Requires less drilling than universal kits and includes everything you need for installation.
Features:

Videos are provided as a guide only. Refer to manufacturer installation instructions and specs for complete information.
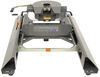
Shane: Hi, I'm Shane with etrailer.com. Today I'm going to walk through how to install the Curt Custom Fifth Wheel Installation Kit on your 2015 Ford F250 Super Duty.This is going to allow you to pull a fifth wheel trailer or add a fifth wheel hitch in the bed of your truck. This kit is going to work with many different fifth wheel hitches. As you can see, it's going to be an above bed rail kit. Installation side, it's very simple. The only holes that need to be drilled is just the hardware that's going down through the bed to hold the rails down.This kit is going to allow you to work with many different fifth wheel hitches.
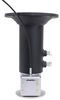
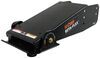
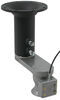
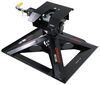
Another great thing about it is maybe you pull fifth wheels through the week at work. Maybe on the weekends, maybe you have a gooseneck trailer camper, and an easy way to convert your fifth wheel rails and allow you to pull that gooseneck trailer is with the Curt Spider and this is what it's going to look like. It's going to drop right into place in your rails. Again, pin it the same locations and you're ready to hook up your gooseneck.It's going to be a steel construction with a carbide black powder coat finish, so they're really going to hold up well against rust and corrosion. You can see even though they're in the bed of the truck, they're still going to give us plenty of access.
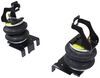
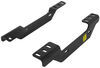
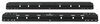
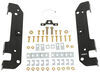
We want to throw some plywood back here, drywall. We're still going to be able to get that stuff in here.They're only going to stick up from the bed about an inch to an inch and a half from the top, so again, plenty of bed space. With these, we can take our fifth wheel out and these would be the only things that we had that remain inside the bed. These holes here are going to be your pin holes that hold your hitch down to the rails. These holes here are going to be for different size, weight rated pitches.It's also going to come with frame brackets.
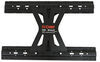
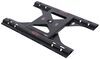
These are going to be custom fit. It's not going to require any holes to be drilled. It's going to fit into factory holes already in the frame. These are going to be a steel construction also with a carbide black powder coat finish.Now that we've gone over some of the features of this rail kit, let's go ahead and show you how to get it installed. To start your installation, if you have a plastic drop in bed liner, you're going to need to take that out because we want our measurement to be on the bed, not on the mat itself or on a insert.
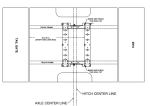
If you have a spray in bed liner, what we're going to do is we're going to measure to the edge of our back rail.Our customer just bought this truck and it actually had a previous above bed rail kit in place, so it already had the holes drilled, but I'm going to walk you through what you would do if you we're drilling the holes into a new bed. You're going to measure from the edge of your bed per the measurements in the instructions up to this edge of this rail, this very front rail. Now if you have a spray in bed liner, you're going to add about a 16th to an eighth inch onto that for the thickness of the spray in bed liner. Once you get this measurement, you're going to mark this center hole.Then you're going to measure between your wheel wells and you want to measure from this edge out and from this edge out and you want to make sure it's equal distance so that your rail is centered in the bed. Once you get your holes marked, you're going to take a step bit. You want to make sure you check underneath before you do any drilling, make sure you're not going to be drilling into anything.Take a step bit. I'm sorry, a small drill bit, and you're going to drill the center of the holes that you marked and then what you're going to do is you're going to move the rail. You're going to open up to nine sixteenths. The holes you're going to be drilling are your two outside holes on the ends of the rail and the center hole towards the center of the bed or towards the back of the bed.The next thing you want to do, is you want to come down and you want to mount your side rail brackets or your frame rail brackets. We went ahead and dropped them all down here, lined up our holes. You want to make sure and double check to make sure that the holes you drilled in your brackets are lining up with the holes, or I'm sorry, in your bed or lining up the holes in the bracket. You're going to have a large bolt that comes through a factory hole in the frame here. You're going to have a smaller one here and then a smaller one back here.Now that we've shown you what it's going to look like, let's go ahead over to the other side of the vehicle and we'll show you actually how to put it in. This is what our side frame brackets are going to look like. There's going to be a difference between driver and passenger. You'll notice that these flanges, these want to be facing out away from the frame. You want the single one towards the front, the double ones towards the back.You'll notice the holes here. These are going to be our factory holes in the frame that we're going to be running our bolts through. The hardware that we're going to be using, this is going to be our larger bolt that I had mentioned. It's going to be coming through the center from the inside, putting on the bolt, putting that washer on, and we're going to feed it from the inside of the frame out through the bracket, and then you're going to put on a large nut.Our two smaller bolts are going to have a spacer block and these are going to be carriage bolts, are going to have a spacer block. You're going to put the spacer block on and they're going to feed through the two smaller holes that I had mentioned before on the outside flat part of the bracket.For our passenger's side, what's going to be different about is there's airbags on this. There's a large bolt where this bolt has to go in through our frame that has to come out. This one has to replace it, so let's go ahead and take that one out now.This is going to be our bolt that we needed to take out so we can utilize that hole to mount our frame bracket on. Now the large bolt we had to remove, you'll notice this large square hole on this bracket for the air bags. Originally I had said we we're just going to be using this small square spacer. However, with the airbags installed, when I took the bolt off, this square spacer in the bolt head by itself is not going to hold the top of that bracket in place. So what I did is I took the large washer that was on the old bolt, slid it over top of this one, put my small squares spacer on and we should be able to slide this right into place like that.Now that we got our bolts in place, our frame bracket set in place, I'll go ahead and put our nut on. This is going to be our second hole and then again, our third hole is going to be right here. Then we're going to take our spacer block, put it on our carriage bolt, we're going to come from the inside of the frame rail the same way we did this one, right through the hole and then we'll put our nut on the outside. We're going to do that on both holes.Once you get your front rail put in place. You got your bolts dropped down through, go ahead and set your hitch in place. That's going to give you your alignment for your rear rail. As I mentioned before, our holes we're already pre-drilled, but this is how you would do it if they weren't.Set your hitch in, line up your rail. Again, take your measurement from side to side to make sure that it's not twisted one way or the other. Two outside holes on the end of the rail and this very back hole. When drilling your center hole in this back bracket it may be a good idea to go ahead and lower your spare tire so you don't drill a hole into the tire.Now that we have our rear rail drilled out, we have our hardware put in place, we can go hide. go down underneath and put the rest of our hardware on. So if you'll notice, there's a gap right here. Where the corrugation raises, you're going to have a U-shaped spacer like this. It's going to sit around the bolt and as to keep that corrugation from smashing flat when we tighten it in place. We're going to take these, put them in place. Again, you want to make sure they're going to go around the bolt and we're going to put a square spacer block and then a flange nut.You're going to repeat that process for all your hardware, all remaining hardware. Once you have all your hardware installed, you're going to tighten and torque it all to the specifications in the instructions. You're going to start by tightening the bolts coming down through the bed and you're going to tighten the frame rails to the frame.Once you have all your hardware tightened and torqued to the specifications in the instructions, if you have a drop in bed liner, go ahead and place that back in and you're just going to cut around your rails. Once you get that done, you're ready to go.Again, I'm Shane with etrailer.com. I hope this video has helped you, whether you're still deciding or installing the Curt Custom Fifth Wheel Installation Kit on your 2015 Ford F250 Super Duty.
Average Customer Rating: 4.8 out of 5 stars (174 Customer Reviews)
Install your fifth wheel trailer hitch in half the time with this custom bracket and base rail kit. Requires less drilling than universal kits and includes everything you need for installation.2012 Ford F-250 - Fast shipping and easy to follow directions were included. Bed rails and side plates lined up perfectly. My truck has the line x bedliner so I added 1/8” when setting the first rail. I highly recommend using a step bit to drill your holes for the rails in the bed. No drilling was required for the side plates into the frame. Install by myself took 4 hours with no lift. Could definitely be completed faster with an extra hand or lift. Measure several times and drill once and everything will line up great. Highly recommend!
Product was an exact fit for my 2016 F350 (I have Dual wheels but the kit fits both SW and DRW to my understanding.) I've paid up to $400 labor to have rails mounted in 3 previous trucks. This kit and the videos made me sure that I could do it myself, and I was right. Take your time, measure twice before drilling, and save some money. It took me about 4 hours, but only because I was being extremely cautious with a brand new vehicle. I did learn that the person that installed my previous hitch didn't follow directions as they put the spacers on the top of the bed instead of between the bed and the mounting plates in my previous truck. Getting the spacers in was the tricky part (and probably why the last installer I used didn't do it right). After seeing several other rail installations...I am much more comfortable with the way these mount to a solid rail bracket that is definitely secured better to the frame using heavy duty hardware and no drilling. Great product!
Box arrived damaged bolts and hardware falling out of holes in box very displeased this is the second time this has happened
GREAT product, GREAT price, GREAT folks to deal with! Installed easily, followed the online video and everything went together perfectly. I did move my gas tank vent line on the left side as I was afraid the center bolt head would rub a hole in it but not a big deal.
Etrailer is terrific!
The installation is straight forward. With a helper it took about 6 hours to install. With the hitch set at it lowest height was able to close my bed cover.
Great product! Easy to install by yourself, would have been easier with 2 people but installed solo in about 1 1/2 hours.

Straight forward installation
2016 F350 crew standard box. Installation went well with the videos help in about 3 hrs. The bolt leader provided really helped on the driver side.
Purchased this hitch, install kit, and wiring harness for a new to me 2015 F-250. After watching the installation video and reviewing the included instructions the install went smoothly. The only deviation from the instructions was instead of using a unibit to drill the 9/16" holes in the bed I used a Rotobroach hole cutter(the holes are cleaner and the bit does not drift. I hooked in to my fifth wheel for the first time on Saturday.
It went easy for install! Now I need to install on my new truck
Easy to install nice products
What I was hoping for was the replacement hardware that was lost in shipping due to damaged packaging. I had communicated with Becky and Carol about the missing items. Because of the missing parts, I needed to have a friend bring our new trailer home for us. e had hoped to use the new camper trailer a few times this past year but now I'm saving money toward another hitch. Don't look for any stars unless things get worked out. I asked for help and got no responce.

Jenny N.
10/25/2021
I will have our customer service team reach out to you.
The kit was a exact fit for my 2011 f-250 truck. I will be purchasing other items from etrailer . Shipping was fast and delivered ahead of time.

Steven

10/9/2022
Fantastic with no problems
The only thing I found with this kit is that the brackets do not completely isolate the hitch plates from the body, the brackets and shims actually squeeze the body floor to the frame brackets. The body then cannot move or flex as it should!
All the brackets, shims, nuts bolts and washers are good quality
Very pleased with the product. Installation was easy. No frame drilling just as etrailer Mike L. said in answering my question and recommending the curt rails and mounting kit for my husky 5th wheel hitch.. Thank you etrailer and Mike L.
Looks great I will install later this w eek
I ordered the install kit for my Curt 5th wheel and etrailer had the best price by far. The package got here way faster than expected.I haven't installed it yet but there were plenty of videos on how to install it.
Frame brackets lined up great. Good instructions on lining up the bed rails to the brackets, an they Lined up first try. Seems to be good quality product.
My reese fifthwheel hitch fit great to this curt kit.
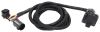
Very pleased with etrailer.com. All product information and reviews help make decision very easy. Very quick delivery and installation instructions are very easy to follow. Purchased 5th wheel hitch and custom wiring extension for my 2014 F250.

Mike S.
6/9/2018
Thanks for the follow up. I’ve enjoyed the products ease of installation and use. I easily hook up my 5th wheel camper by myself and have had no issues. Great products!
Been happy with the product overall. Chain is already rusted and I live in San Diego where it doesn't rain much. When detaching, I find I need to move the truck up and back a skosh (sp?) to release the clamp. this is my first purchase so they may all do this. I have a 8 foot bed and pull a 40 foot 5th wheeler and would probably purchase again.

Heather A.
10/9/2017
If the handle is not releasing the kingpin is binding with the jaws. The hitch needs weight on it to couple and uncouple so it makes sense that you have to move the truck back a bit to release the jaws.
Very fast shipping and EVERYTHING was there, no missing parts!!! The only thing i would change would be the directions. Read the NOTES before proceeding. You would think they would have put the NOTES before the next step.
Excellent product and fairly easy to install minus having to find a torque wrench that can torque 350 ft lbs. overall I love shopping with etrailer and there customer service is outstanding!
Arrived a few days later than I hoped, however, I have installed the in/underbed parts, yet removed the in bed parts in preparation for a spray-in bed liner. Easy instructions, just follow the measuring instructions diligently and recheck measurements several times before cutting/drilling. I left the underbed parts installed and the fish wire provided makes installing the forward driver side bolt a breeze. Easy to install!
Les
11/1/2017
Still using and I really like the hitch and other items I purchased a year ago. After installing the Curt fifthwheel hitch, Ive used it several times and I will be using it a bunch over rbe next several weeks. Easy to maintain and use.
Once I got the rails installed in my 2016 FORD F305( with plenty of ease) almost immediately I went pick up a fifth wheel travel trailer (approximately 14,500#) stopped once to check the hardware, HAD ABSOLUTELY NO ISSUES WITH ANY OF THE HITCH. Thank you for such a good and dependable product, and yes I have even recommended it to others.
Earl Breaux
Do you have a question about this Fifth Wheel Installation Kit?
Info for this part was:
At etrailer.com we provide the best information available about the products we sell. We take the quality of our information seriously so that you can get the right part the first time. Let us know if anything is missing or if you have any questions.


Richard P.
8/31/2017
Rails have been in place for a year and used many times. Absolutely no issues and the bolts have all remained tight, thanks to the proper torque.