
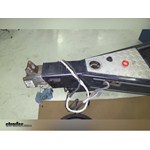
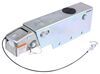
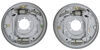
Demco Hydraulic Brake Line Kit for Single Axle Trailers - Drum Brakes
(5 reviews)
Price: $56.88
In Stock
Demco Hydraulic Brake Line Kit for Single Axle Trailers - Drum Brakes
Item # DM5402
Our Price: $56.88
In Stock
Thank you! Your comment has been submitted successfully. You should be able to view your question/comment here within a few days.
Error submitting comment. Please try again momentarily.


Need help with installation?
Locate installers near me- All Info
- Reviews (5)
- Q & A (0)
- Videos (2)
- Photos
Demco Accessories and Parts - DM5402
- Brake Actuator
- Trailer Brakes
- Hydraulic Drum Brakes
- Brake Lines
- Brake Line Kits
- Demco
- Single Axle
- Steel Brake Line
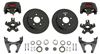
Designed for single-axle trailers, this hydraulic brake line kit includes a 16' steel line, a 17" steel line, a 5-1/2' steel line, an 18-7/8" flexible hose, a 3/16" tee, and hardware required for affixing lines to your trailer.
Features:
- Provides lines and fittings needed to run brake fluid from surge brake actuator to trailer brakes
- Designed for use on single-axle trailers with drum brakes
- Includes:
- (1) 193" Long steel brake line
- (1) 17" Long steel brake line
- (1) 66" Long steel brake line
- (1) Hose bracket
- (1) Brake line retainer clip
- (1) 3/16" Brake tee
- (4) Brake line control clips
- (1) 18-7/8" Long flexible hose
- (1) 5/8" Machine bushing
- (4) #10-16 UNC x 1/2" self-drilling hex washer-head screws
- Made in the USA
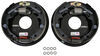
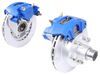
Hydraulic Brake Line Installation for Single Axle Trailers

1. 193" Long steel line runs from the hydraulic actuator to the trailer axle that has brakes.
2. Brake line clips and screws let you affix the steel lines to your trailer.
3. 18-7/8" Long flexible hose connects the steel line from the actuator to the lines that go to the trailer brakes.
4. 5/8" Machine bushing is used in the connection between the flexible hose and the steel line from the actuator.
5. Hose bracket lets you attach the flexible hose to your trailer.
6. Additional steel lines (17" long and 66" long) run to each trailer brake assembly.
7. Brake line tee connects the flexible hose to the steel lines that run to the brakes.
5402 Demco Trailer Brake Line Kit - Single Axle - Drum Brakes
California residents: click here


Video of Demco Hydraulic Brake Line Kit for Single Axle Trailers - Drum Brakes


Videos are provided as a guide only. Refer to manufacturer installation instructions and specs for complete information.


Video Transcript for Demco Hydraulic Brake Line Kit Installation DM5402
Today in this boat trailer we're going to install part number DM5402. The Demco hydraulic brake line kit for single axle trailers. A couple of things to know about this trailer before we start off that the axle already replaced for new axle, so we need to add our brake line kit to this. Our first step is to go ahead and remove the original brake line that's inside the frame. Cut off one end from the master cylinder and go ahead and help pull it out. Once the old line removed we can go ahead and install our new line that goes up to the coupler.
Just leave a long line that come in the kit. First off, we'll go ahead and wrap one end up with tape to help protect it as you push it to the frame. Now, we'll go ahead unravel slowly as you push it through the frame until it reach the end. Now on this case we find that this length of line is too short. To help extend it, we're going to use part number T1061900 and tighten. This is a 30-inch length of brake tubing.
To connect our first line we're also going to use a hydraulic brake union part number T1287900. We'll go ahead and thread this parts together and then tighten them down then we'll continue on pushing it align into the frame. Once we reach the end of our brake line, we'll go ahead and manipulate and bend it until it fit the original fitting on the end of the frame. Basically, just gently bend and move around as needed until we get to the right S shape that goes into the frame, it doesn't rub inside of the hole but also goes through our bracket that preexisting on the frame, but we'll go ahead and install a flexible line. Now our flexible line will fit into the bracket that's where we weld it into the frame. We'll go ahead and push it into place and then install the clip that will hold it.
Sometimes it might be helpful to go ahead and run two lines together first. Now at other end in the flexible line, we'll get the T fitting. We'll go ahead and thread that into place. At this point we'll go ahead and tighten down the T fitting to the flexible line, then you want to take note on how a T fitting is going to sit on the axle. Now, we'll go ahead and go from our T fitting over to the closest wheel. We'll take our line and throw it into the wheel cylinder and then we'll go ahead and thread it into our T fitting.
We'll go ahead and just get them started but not tighten down. We'll still need to have everything loose and flexible as we install the second line. We'll go ahead and run over to our T fitting and then run over to the wheel cylinder on the other side. Then, you want to in coil this wire and be as straight as possible to get the maximum length out of it. Then, we'll go ahead and lose this thread into the wheel cylinder. Once we have all our fittings loose and installed, we'll go ahead and tighten them down for good. Now, we'll go ahead and take a look at our T fitting. Now it has a bracket built into it that we can use to attach to the axle. Now this is the time to make adjustments on the lines, then we'll go ahead and attach our T fitting to the axle. In this case, all we're going to use is a number 14 self tapping screw to attach it to your axle. You also want to double check to make sure if it lines that go towards the wheels are on top of the U-bolts. Sometimes the top of the U-bolts can hit the bottom of the frame and you don't want the brake lines pushed in between the two. We'll start the connect are done underneath the axle, we'll go back up to our master cylinder and make our final connection. We'll go ahead and take of our excess line and coil them underneath the coupler and then thread it into the master cylinder. We'll go ahead and tighten it down. In this point we can go ahead and fill the master cylinder for fluid and bleed the brakes. When we bleed the brakes, it's a good idea to have an extra set of hands to help push the cylinder in while another set of hands opens up the valves behind the wheel cylinders. To help contain the old brake fluid, we use a rubber line. We'll slip the rubber line over the valve and then in the other end we'll go into an old jar to collect the old fluid. Bleeding brake is pretty simple. Let's go ahead and push in on the cylinder upfront and then we open up the valve in the back. We'll go ahead and make sure if the fluid pushes out all the air. When there's no more bubbles left, we're finish. We'll down for close fitting to the master cylinder. Now we'll go the other side and repeat the same process. Once everything is bled out, it's good idea to check for leaks one more time and then we're finish. It's a good idea to take a short test drive and go ahead and top off the reservoir and with that, that'll finish it for our install part number DM5402 on this boat trailer. .
Customer Satisfaction Score:
95% were satisfied with this product
5% of customers were not satisfied
- Product did not meet expectations
Customer Reviews
Demco Hydraulic Brake Line Kit for Single Axle Trailers - Drum Brakes - DM5402
Average Customer Rating: 5.0 out of 5 stars (5 Customer Reviews)
Designed for single-axle trailers, this hydraulic brake line kit includes a 16' steel line, a 17" steel line, a 5-1/2' steel line, an 18-7/8" flexible hose, a 3/16" tee, and hardware required for affixing lines to your trailer.by: John T.11/21/2016
I have been working on a boat and trailer that I got in a government surplus auction. The trailer is a triple axle and needed quite a bit of work. I replaced one axle and the brake lights. I am in the process of replacing all of the brakes, tires, bearings and seals. I am about half way done with the trailer and so far I have been very happy with the parts I have received from etrailer. I have not been able to road test them yet but installation has been great. I intend on getting a majority of the parts I need to finish the project from etrailer. The video overviews and installation instructions have been very helpful. Looking forward to sharing more pictures when the project is done.


by: Dave05/11/2017
As always, E-Trailer has put together a very accurate description of its product. Installation of this kit was very straightforward using brake assembly kit AKFBBRK-35.
A few observations:
The bed of my trailer is just slightly over 6 feet wide. The lines going to the wheels were of adequate length, but if the distance between the wheels were any greater I would have needed longer lines.
The tee is permanently attached to a mounting bracket, but the kit does not include the hardware to mount it.
The kit includes four self-tapping screws for the line clips, but be prepared to pre-drill the holes for the screws because the tips of the screws are too soft to dig into a steel crossmember.
by: Mike .K.02/25/2017
Prices are reasonable, the site was friendly/helpful, and the delivery of the product was expeditious.

Mike ..

2/25/2018
Its all good
by: Boris04/04/2024
by: Kenneth 09/25/2020
Have not used item yet but it was exactly what I ordered and arrived proptly.
5
5
See what our Experts say about this Demco Accessories and Parts
- Parts Needed to Add a Third Brake Axle to a TrailerTo tee into your current brake setup you would need the part # T0778500. This would need to get added to the main brake feed line of your trailer. From there you would want to use a single axle trailer brake line kit like the part # DM5402. Basically everything from this kit would get used minus the long brake line. Basically the tee that you add in will go to the new brake assemblies and then using a flex line like part # BH-3MFS-1 back to the original axle lines. For stainless rotors...
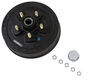
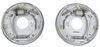
view full answer... - Replacement Brake Kit for a 1995 Mastercraft Single Axle Boat Trailer with 3,500 Lb AxleI have attached for you below a complete list of parts you will need to replace the brakes on a 1995 Mastercraft Single Axle Boat Trailer. It appears you have a standard 3,500 lb axle so the parts are all easily attainable. Trailer Hub and Drum Assembly part # AKHD-545-35-G-K (Standard Spindles) Trailer Hub/Drum Assembly part # AKHD-545-35-G-EZ-K (E-Z Lube Spindles) Hydraulic Brake Kit part # AKFBBRK-35-D Demco Hydraulic Brake Line Kit part # DM5402 Demco Hydraulic Trailer Brake Actuator...
view full answer... - 30 Foot Trailer Tandem Axle Brake Line Kit RecommendationFor a 30 foot brake line kit you would need the part # HS496-251 for the first axle and then to tee into this kit for the second axle you would need part # T0778500 and then use the single axle kit part # DM5402 for the second axle lines. Everything of this kit would be used minus the main feed line, but you would need the part # # BH-3MFS-1 to go from the first axle to the second.
view full answer... - Difference Between Demco Hydraulic Brake Line Kits DM5402 & DM5424It looks like you ordered the Demco Hydraulic Brake Line Kit for Single Axle Trailers - Drum Brakes # DM5402; the only difference between this and the Demco Hydraulic Brake Line Kit for Single Torsion Axle Trailers - Drum or Disc Brakes # DM5424 is a minor difference between parts. The # DM5402 comes with a single 18-7/8" flexible hose which connects the brake line from the actuator to the brake lines that directly go to the trailer brakes. The # DM5424 comes with two 18-7/8" flexible...
view full answer... - Will the Demco Hydraulic Brake Line Kit # DM5402 work with Disc BrakesYes, the Demco Hydraulic Brake Line Kit # DM5402 that you referenced will work on disc brakes as well as drum brakes. I attached an install video for this product for you to check out also.
view full answer...
Do you have a question about this Accessories and Part?
Info for this part was:

Written by:
Lindsey S

Installed by:
Jeff D

Updated by:
Laura H

Updated by:
Wilson B

Video Edited:
Chad S
At etrailer.com we provide the best information available about the products we sell. We take the quality of our information seriously so that you can get the right part the first time. Let us know if anything is missing or if you have any questions.
Product Experts Available Now!
Call 1-800-940-8924
Dave
5/8/2018
No drama to report the brake system works fine with no apparent leaks.