


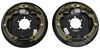
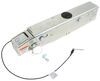
Designed for single-axle trailers, this hydraulic brake line kit includes a 16' steel line, a 17" steel line, a 6' steel line, an 18-7/8" flexible hose, a 3/16" tee, and hardware required for affixing lines to your trailer.
Features:
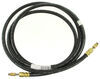
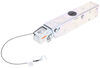
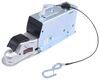
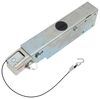
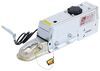
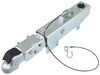
1. 193" Long steel line runs from the hydraulic actuator to the trailer axle that has brakes.
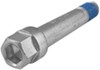
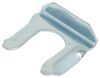
2. Brake line clips and screws let you affix the steel lines to your trailer.
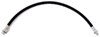
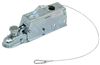
3. 18-7/8" Long flexible hose connects the steel line from the actuator to the lines that go to the trailer brakes.
4. 5/8" Machine bushing is used in the connection between the flexible hose and the steel line from the actuator.
5. Hose bracket lets you attach the flexible hose to your trailer.
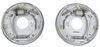
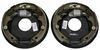
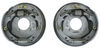
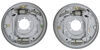
6. Additional steel lines (17" long and 72" long) run to each trailer brake assembly.
7. Brake line tee connects the flexible hose to the steel lines that run to the brakes.
California residents: click here
Videos are provided as a guide only. Refer to manufacturer installation instructions and specs for complete information.
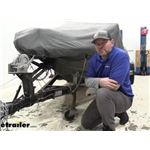
Shane: Hey guys. Shane here with etrailer.com, and today I'm going to be installing Demco's hydraulic brake line kit. This brake line kit is going to be designed for single axle trailers. They're going to be steel lines and our main line is going to be 16 foot long. So you just want to make sure you measure to make sure that a 16 foot line is going to go from your coupler back to your first brake. If not, there are different kits available here at etrailer.
Now whether you're replacing some old lines or you're upgrading from electric brakes over to hydraulic brakes, this is going to be one way to make sure that fluid is getting back to your brakes. Keep in mind with steel lines, you've got to make sure you watch how you make your bends in your lines once you get back to your brakes.If you're worried about that, a nice upgrade would be flexible lines. Flexible lines are like this hose we got here and it makes it much easier to install. You can find those kits here at etrailer. This kit's going to come with everything needed to get installed.
If you're not running your hard line directly into your actuator, you're going to need the union and you're also going to need a flex line. You can find both of those here at etrailer.com. One thing to keep in mind is with steel lines, if you're in an area where there's a lot of salt, salt in the air, maybe on the coast somewhere, these lines can eventually rust, which can cause an issue later on. With flex lines, flex lines are completely rubber. You don't have to worry about the rust and corrosion like you do with a steel line.
Overall the installation for the steel lines is going to be pretty straightforward and they will work great for getting your fluid back to your brakes so you have the proper braking needed. With that being said, let's go ahead and walk you through how to get them installed.Before we start our installation on the new lines, I want to go over a little bit of what was going on with this trailer. We installed the new actuator and we installed new brakes, but I found that the lines we're blocked. The customer that had this didn't have an actuator on it, but the trailer itself had a hydraulic line on it. Well, it was wasn't used for a while and what happened was it got clogged.
So my opinion, if you're putting a new actuator on, you're putting new brakes on and you see any rust on your lines, change them out, put new ones on and then you won't have to worry about it ever again.To start our installation, we need to remove our old line, which I've already done. I'm going to start here in the front with my line. What I suggest is getting a tube bender because this line, if you bend it too much, it's going to put a kink in it. It can break pretty easy. If you put a kink in it, it's going to cause the fluid going through there to be limited and you may not get all the pressure going to your brakes. So the best way to do it, use a tube bender. We're going to start up here, so I'm going to get my line flattened out here.It's going to come rolled up like this, so take your time. What I'm going to do before I get it all the way flattened out, I'm going to start feeding it through here, through the factory attachment points, and then we'll just work it all the way to the back as we're bending it. Now if you're installing this and your boat doesn't have a hydraulic brakes but you're switching over to it, it's not going to have any factory points like this to run your line through. Take some hose clamps. It's going to come with a few. Take some hose clamps, and you can take a self-tapper and go right through the frame just to hold your line in place. You don't want that line to be free to where it's going to bounce around.I've found that my hardware that I'm putting in is a little bit longer than the factory, so I'm not going to be able to use this bracket. It actually comes with a new one, so what I'm going to do is I'm going to take my flex line. I'm going to test fit it to find out where I need to mount it. Your kit's going to come with self-tapping screws to get this installed on the frame. I'm just going to take a marker, mark a line on here. Then we can take our hoses back off so we don't damage them while we're putting our self-tapper in. We've got our bracket in place. We're going to take this into our hose, our flex line. We're going to put it all the way through. You're going to have a clamp that looks like this. It's going to go on this side, on top of that hose, and you may need a hammer or something to get that down on there. That's going to hold your flex line in place.You're going to have a little bracket like this. It's got a T fitting on it. We're going to take our flex line. We're going to screw it right into the top. 5/8 wrench and a pair of pliers and we're going to tighten it down. We're going to have a short line like this. We're going to take it. It's going to go to the side that we're working on. Run this right into the back of the brake. For these fittings, I would suggest using a line wrench to get them tightened down. Line wrench is going to look like this. You can see how the end is kind of closed and not like a normal wrench where it comes straight out. This is going to help stay on that fitting much better and this is going to take a 3/8.Get this lined up here. I think we can almost go right into it. Then I'm going to take a self-tapper. I'm going to mount that bracket right there and we can run our line from here over to the other brake. You see I've already got my line ran across. It's going to come with these clamps to hold your line in place. I've got three of them in. I want to put one more here and then once you get your line and these secured in place, you go ahead and bend your line and connect it to your passenger side brake. These self-tappers tend to break off once they heat up. So what I suggest doing is take a small drill bit, make sure it's smaller than the tapper itself and drill a hole for it first and your tapper should go in pretty easy.When we started, I had this line ran back here, this flex line, but because this line was a little bit longer, I just ran it where there the factory line was, ran it through this bracket and then through this one where the original connection was and you can see how far out it comes. To connect this to our flex line, you're going to need a union. Just take the union, put it on one side. The union doesn't come with the kit, so if you are doing it this way you will need it. 12 millimeter and a 3/8 line wrench, same line wrench we've been using for all of our other connections.We can take our flex line. Put it in the same way. Once you get all your connections made, we're going to fill up our actuator and we're going to bleed the brakes. Might be a good idea to have a second set of hands so that you can check all your lines as you're pushing fluid through it to make sure all your connections are tight. Get any air out of the lines that may be left in there. With someone inaudible 00:08:12 the actuator. Again, make sure you got fluid in. Make sure you untwist this fitting until we get fluid to come out of it. Go ahead. Let's see. We got fluid, we got clear line, no air bubbles. We'll close it back up and move to the next one. Once you've bled your brakes, you've checked all of your fittings for any leaks, you're ready to go. That's going to do it for a look at and installation on Demco's hydraulic brake line kit for drum brakes.
Average Customer Rating: 4.4 out of 5 stars (9 Customer Reviews)
Designed for single-axle trailers, this hydraulic brake line kit includes a 16' steel line, a 17" steel line, a 6' steel line, an 18-7/8" flexible hose, a 3/16" tee, and hardware required for affixing lines to your trailer.
Don’t like it at all. You need to be on a perfectly level surface to connect and disconnect. I actually need to leave a pry bar in the back of my truck to disconnect. I have been towing everything from equipment, to boats and small utility trailers for 45 years and I have never had this much trouble. The brake mechanism itself works great.
Good quality, but the flexible brake lines would have been easier to install.
For my axle, the steel lines for the brake drums need to be 1"longer.
Made installation very easy. Had all parts I needed
Everything went well on install had all necessary components, no complaints.
outstanding customer service in every w ay
Perfect fit
Do you have a question about this Accessories and Part?
Info for this part was:
At etrailer.com we provide the best information available about the products we sell. We take the quality of our information seriously so that you can get the right part the first time. Let us know if anything is missing or if you have any questions.


Thank you! Your comment has been submitted successfully. You should be able to view your question/comment here within a few days.
Error submitting comment. Please try again momentarily.