
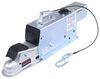
Reverse Lockout Solenoid for Demco Hydraulic Brake Actuators - Non-Bypass
(35 reviews)
Price: $76.83
In Stock
Reverse Lockout Solenoid for Demco Hydraulic Brake Actuators - Non-Bypass
Item # DM11993
Our Price: $76.83
In Stock
Thank you! Your comment has been submitted successfully. You should be able to view your question/comment here within a few days.
Error submitting comment. Please try again momentarily.


- All Info
- Reviews (35)
- Q & A (0)
- Videos (3)
- Photos
Demco Accessories and Parts - DM11993
- Brake Actuator
- Disc Brakes
- Hydraulic Drum Brakes
- Solenoid
- Demco
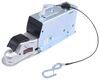
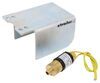
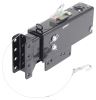
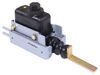
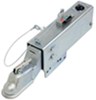
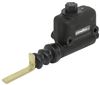
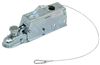
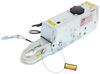
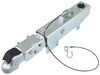
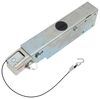
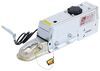
Replaces or adds an inline reverse lockout solenoid to Demco DA10, DA20, DA70, and DA91 hydraulic trailer brake actuators. Non-bypass design allows you to thread the solenoid valve into your master cylinder for a hassle-free installation.
Features:
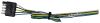
- Solenoid allows you to replace or add a reverse lockout solenoid to your Demco hydraulic trailer brake actuator
- Allows you to move in reverse without engaging the trailer brakes
- Fits Demco models DA10, DA20, DA70, and DA91 hydraulic trailer brake actuators
- Non-bypass configuration
- Allows you to install the solenoid without drilling into your master cylinder
- Easier to install than bypass models
11993 Demco Reverse Lockout In-Line Solenoid for DA10, DA20, DA70, and DA91 Hydraulic Brake Actuators - Non-Bypass


Video of Reverse Lockout Solenoid for Demco Hydraulic Brake Actuators - Non-Bypass


Videos are provided as a guide only. Refer to manufacturer installation instructions and specs for complete information.


Video Transcript for Demco Hydraulic Brake Actuator Reverse Lockout Solenoid Review
Instructor Hi there Surge Brake Coupler owners with Demco's easy-connect version. Today we're gonna be taking a look and showing you how to replace the Lockout Solenoid. So the first thing you would wanna do is get the fluid out of the system. So I actually took the leader screw at the back loose but you could also take it loose right here at the back of the actuator. It was just easier to drain into a container, towards the rear, a little bit closer to the ground, 'cause you really don't wanna get brake fluid on any painted surface. It is quite corrosive to, to paints and stuff.
Your paint will come off of there. It'll discolor 'em. So, just try to avoid that. We did place a napkin under here for when we take that loose for any of the fluid that's left in there. When you do drain it, I do recommend that you pop the cap off here.
That'll let it drain a little bit faster. Air can get in this way, and let it drain out. So, we've already let ours drain. So, we should be pretty dry at this point. So, we're gonna head over to this side and we're gonna get our hoses disconnected here, and our wiring disconnected.
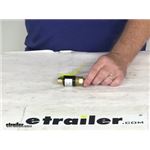
Then we'll have to take out the bolts here that actually hold the entire coupler onto the trailer, because the actuator inside's not just gonna slide out of there. We'll go ahead and begin our installation right here at the back of our actuator. When you're ready to add the Lockout Solenoid, you'll need to remove the connection right here at the back of the master cylinder or brake actuator. Now, I've already gone ahead and drained the fluid from the system. I just opened one of the bleeder screws at the back.
If you open up the cap on top, the fluid will drain out a lot faster. Fully, you wanna fully pull it off there to make it drain faster. After it's done draining, I do usually thread it back on there, 'cause if there is any little bit of fluid left in there, and that does help to keep it from kind of dribbling out slower than it would if the cap was off. So, we're gonna go ahead and remove this piece here. So, we're gonna disconnect our line first. So, we're gonna hold this piece while we disconnect the line. The piece at the back of our actuator, typically, it's a half-inch in size but it does vary slightly from manufacturer to manufacturer. But for our Demco here, it is gonna be a half-inch. And the actuator we're installing is specifically designed to work with the Demco actuators. Since we actually get some components that will protect the actuator, in addition to the actuator itself. So, we also are using a line wrench whenever working with our line 'cause the metal there is going to be softer than like the head of a bolt or anything is gonna be. So, you can see you get additional surface area there. If you need line wrenches you can get some here at etrailer and this is what a standard box end wrench would look like. So, make sure you are using the appropriate one. Once you get it loose enough you can usually pull that off. Now again, we've already drained the fluid out so you can kind of see it, it might be a little dribble there. You do want to prevent getting fluid on there. So, if you've got a napkin you wanna set down there we've drained it so much already that we're good to go. But you may want to put a napkin down first 'cause brake fluid can be pretty corrosive to your paint and, and cause that to bubble and flake off there and stuff. So, I wanna get that out of the way. Now this fitting that's here at the back of our actuator, we actually wanna remove this fitting. So we're gonna pull that fitting off there. We're not gonna be using that fitting anymore because our new Solenoid here, that we're gonna install, is gonna thread directly into it. We are gonna put a little bit of Lock Tight on it before we install it there to help seal it up and ensure it stays in place. This will thread into the back of our actuator. You do want to be careful and make sure that you're threading it in without cross threading it. So, just make sure we're going straight in there. There we go. All right. And that's about as tight as I can get it by hand there. You can see there's still a gap. We're not all the way tight yet. Now there are flat spots on each side that will accept a seven-eights wrench. So you can use those to finish snugging it down. Now again, this is a, it is threading into a plastic actuator or Brake Master Cylinder whichever you wanna call that. But it is all a plastic assembly so you do want to be careful and make sure you're not over tightening it. And, actually, with this particular trailer, you might notice that once you get so far, it can be difficult to get your wrench on it 'cause it's hitting the bottom of the trailer there. So, what I've found works fairly well, if you do run into that, is you can use the nut here on this side but you don't want to use just this nut. This is gonna be a nine-sixteenths in size, but I'm also going to be using a set of Channel Locks over here. I'm just gonna be using both. The Channel Locks will do the majority of the work. But to help prevent my Channel Locks from slipping and giving myself a little bit extra edge, we can use this as well. But we don't want to just use this to tighten it 'cause you can actually over-tighten the mechanism that's inside. And we really only need to turn it far enough to be able to get our wrench back on it again. So, just a little bit of a turn like that, and once our wrench will slide back on there again, we'll finish snugging it down. And I'm not going too crazy tight 'cause again, it is just a plastic housing. With all the throw that I've got of this wrench on there, it doesn't really feel like it's all that tight. But, I don't think I would feel comfortable going any tighter than what we are about there. If I had to guess about the amount of pressure that I'm putting on it I'd say we're probably only putting on maybe like 25 inch-pounds. It's really not all that much. That should be probably pretty good right there. Take our line and reinstall it. Start it by hand. Go as far as you can by hand first, 'cause, again, we don't want to cross-thread anything, especially once you get this far. So we got that in there now. Now you need your wrench to hold this 'cause we don't wanna damage the Solenoid. So hold that and then use your three-eighths wrench to snug it down. And of course your line wrench. And then what sometimes I'll do is with this being a flex hose, I'll turn the flex hose this direction. Kind of twist the flex hose beforehand, so that way when I go to snug it down, it kind of twists the hose back upright. And I'll loosen it just a hair. Twist our hose just a little bit. Snug it down by hand. Then we'll put our wrench on there and snug it down with our three-eighths wrench. There we go. And that's, that's decently snug. We'll put maybe a little bit more on it. and you'll notice that the line, has a nice gentle curve in there. We're not twisting the hose. The pre-twist we did allowed it to bend back up right and go down. Hook up our Lockout Solenoid. They do come pre-stripped but you probably wanna strip back just a little bit more. That'll be a difficult amount to be able to attach to. So one, of course, is gonna go to ground and we've got our ring terminal here that we can reinstall into the location there. And then the other one here, we're gonna clean this up and reattach it back into the trailer there. So we're gonna score and strip these back just a little bit more. Now they're either both yellow because it doesn't matter which one goes where. Just one of them has to go the ground and the other one has to go to the Reverse Lockout Circuit, or that would be the Reverse Light or Backup Circuit from your vehicle. Strip that one back. And we'll strip this one back just a little bit more. All right. So we'll go ahead and hook up our ground first since it's right here. Strip that one back. Wanna take a Heat Shrink Butt Connector, slide it over the end there and crimp it down. And I do recommend a Heat Shrink Butt Connector because we're outside the vehicle. It's on a boat trailer. This is definitely gonna be exposed to moisture so we'll seal up the ends with our heat gun once we've got our connections made. And, based on length, I think I'm gonna use the one that's a little bit higher up on top for the ground one. Just to make sure I got enough length of wire to reach down here to our other circuit. This one's just a little bit closer. And we'll get the electrical tape off here, get this one cleaned up and we'll get our other one attached the same way back to this circuit. With our heat gun, we'll seal those up. We can now go ahead and reinstall our ground wire. We'll push that Wire Loom back on there. Line it back up with the hole. Re-insert it. And then use our fifteen-sixteenths or eight-millimeter to run it back down. Make sure it can't rotate. We got a good ground. And then now we can reinstall the cover onto the back here, covering this stuff up. This does need to be done before you go to fill up the fluid. Because without these four fasteners tightened down, it can pull in air around that gasket that we kind of saw when we had it disassembled. So we'll just line that back up there. Put our fasteners back down in there. Make sure we start 'em by hand. And then go ahead and run 'em on down. And now we just wanna snug these back up 'cause we didn't have 'em all the way fully tightened. Now you don't want to tighten up them very tight 'cause, again, it is just a plastic housing. It threads into a metal nut but you don't want to compress it too far. So just, just stay on the lighter side. If you have an inch-pound torque wrench, you would probably want to use that and keep it fairly low. So this is a drum break set up here and you're gonna find your bleeder screw on the wheel cylinder where you hooked up your line. It should be right next to it. Now if you we're working on a disc brake setup, I've got a sample caliper here to show you, typically something like this. And you'll notice on the disc brake setup, this is where the line would enter and here's the bleeder screws. Now, not all disc brake calipers are gonna have tube bleeder screws. But if they do have tube bleeder screws, you would always want to use the top bleeder screw when bleeding your brakes. And the size of the bleeder screw can vary. It looks like this is probably five-sixteenths for this Kodiak caliper. And over on our drum break here I know that that's gonna be a three-eights in size. So, we're gonna need bleeding drum breaks. But again, it's the procedure's the same it's just the location of the bleeder that you need to really pay attention to. And always use the top one. With drum brakes you shouldn't have multiple. There should just be this one. And when I do this I, I always wanna start at the wheel that is furthest from the actuator. So we're gonna go ahead and start on the passenger-side rear here. That's typically the furthest one but depends on where your actuator's located; if it's in the center, the left, or the right. So we're gonna start on this one though 'cause this is the typical, usually the furthest rear and for us it's gonna be the furthest to the rear. So now we're gonna go ahead and take our little cap off of there. Don't lose your cap. It's nice to have that on there to keep dirt debris and stuff from filling up in here and clogging up your bleeder screw for future maintenance and things like that. So, we're gonna go ahead and loosen this up. Now, we haven't filled it with fluid yet but we're gonna do gravity bleeding first to let, let nature and gravity kind of do most of the work for us here. Minimize how much we have to pump our system. So I'm opening up the bleeder screw. And I went ahead and pulled it open, just a couple of threads there. In most cases, you don't need to open it that far when bleeding, but when doing gravity bleeding, a little bit extra opening helps that flow just kind of work naturally better. So you may also want to take a rubber hose and place that on there and bring it down to your pan because brake fluid can be pretty bad for painted surfaces, wearing off the paint and stuff. So, we're gonna also grab a little hose and have that go down to our drain pan here, just to minimize exposure of brake fluid on our components. All right, we've slid our hose on there to direct it down into either a container or a pan. We do have a container that we kind of just rigged up here. This is a, just an old sports drink bottle. So this works out fairly well for something like this. But again, we got a pan under it here as well just in case the hose does drip a little bit. We're catching it. So now we're gonna head up to our actuator. And we're gonna go ahead and fill it up. And then let nature take its course. And, let gravity do the best it can to start pushing the air from the front, back through our lines, and out, and getting that fluid there. Now even though we are gonna be gravity bleeding it, you are still gonna have to do some pumping. Gravity's not gonna do all the work but it will minimize how much physical labor you have to do. So here we are at the front now. I went ahead and took the cap off of our actuator. If you look at the top here, you'll notice that it tells you what specification of fluid to use. You can use either DOT three or four fluid in this particular setup. We're gonna be using DOT three today. Again, you can use either. You do wanna make sure that you're using brake fluid from a new container 'cause brake fluid is hygroscopic, which means it absorbs moisture. So even an open container that's been sitting for a while can actually draw that moisture out of the air. And the more moisture that is in your brake fluid, the lower the boiling point is in the fluid. And we, and we don't want fluid to boil. We're gonna be careful not to spill the fluid. And go ahead and fill it up. And since we're gonna be bleeding it we're gonna get it pretty close to the top, 'cause we are gonna be losing fluid as it goes through the system and out towards the container that we're, we have at the back. All right, so we've got it filled up there. We're gonna go ahead and let gravity do it, take it's course. So you're probably gonna see some bubbles there as it starts to make it's way through the system. Some of the air is gonna come to the top here. Some of the air is gonna get pushed back through that open bleeder screw we have towards the rear. We went ahead and let it gravity bleed for a while. We ended up not really getting any fluid out the back. Sometimes you do. Sometimes you don't. Sometimes lifting up the front of the trailer to make it the highest point, which it should already be the highest but sometimes lifting up a little higher can help speed up that process and get it started. But in the event that it doesn't, no big deal. You can still pump it manually. So, we've got it all topped up here. After you've got it topped up, it is a good idea to put the cap on. In a lot of cases you don't want the cap on when bleeding. But we we're trying to minimize how much mess we make here. So, keep it from kind of squirting back out of there. Our assistant is gonna push in and we're gonna be at the back and we're gonna open up the bleeder screw. So we're gonna go ahead and head to the back now to the wheel, and we'll communicate with our assistant here to press. And what we want to happen is we want our assistant to press it in. We'll open the bleeder screw, let the fluid come out, or air, whatever we get out of it. We'll close it. Our assistant will then release. And then he will then press in and we'll, we'll just repeat that process over and over. But we never want to have the bleeder screw in the back open when our assistant is releasing 'cause that's gonna draw air back in our bleeder screw. Go ahead and push it in. Our assistant's gonna press. We're gonna open, and there's our fluid coming out. I can see a few air bubbles there. So we're gonna go ahead and close it back up. Okay, you can go ahead and release. Our assistant's now released. So then what we're gonna do is we're gonna now have him press it again and we're gonna open it again, and just keep rinsing and repeat until we get a solid stream of fluid out. Every few presses you may wanna recheck your reservoir and refill the fluid 'cause you don't want it to go empty. If it goes empty up there, it's now drawing in air from the front and we don't want any air in our system. So go ahead and press. There, you can see all that air shootin' outta there. So we're gonna close it. You can go ahead and release. And now that he's released, you can go ahead and press again. And that was a pretty good solid stream we've got there. So we're gonna double check our reservoir. Probably hit this one, one or two more times. Then we're gonna head over to the other side and do that one. And you just rinse and repeat for however many wheels that you have until you get a solid stream out of each one. Once you've got everything bled you can go ahead and reinstall your wheels. If you purchased new drums and hubs from us they do come with new lug nuts for half-inch studs. So you can utilize those as well. We can go ahead now and tighten them down. The new nuts that it comes with is gonna be a 21-millimeter in size. And when tightening 'em down, you wanna do it in a star pattern. This will ensure the wheel draws in evenly. And the tapered side of the nuts should face the wheel with the flat side facing outward. And once you get this back on the ground you'll wanna make sure you torque your lug nuts to the manufacturer's specifications. And that completes our look at Demco's Lockout Solenoid..
Customer Satisfaction Score:
96% were satisfied with this product
4% of customers were not satisfied
- Wrong item was ordered
- Product did not meet expectations
- etrailer mistake
Customer Reviews
Reverse Lockout Solenoid for Demco Hydraulic Brake Actuators - Non-Bypass - DM11993
Average Customer Rating: 4.9 out of 5 stars (35 Customer Reviews)
Replaces or adds an inline reverse lockout solenoid to Demco DA10, DA20, DA70, and DA91 hydraulic trailer brake actuators. Non-bypass design allows you to thread the solenoid valve into your master cylinder for a hassle-free installation.by: Kevin 04/04/2024
The part was shipped out very quick very happy with the service
by: Jack 01/25/2024
Part worked good
by: James 06/24/2023
Just what I needed for my fifth wheel. Works perfectly and easy install.
by: Jeff08/10/2023
Quality product as described, prompt shipping, and great communication/follow up from seller.


by: Dave06/11/2020
Easy to install and everything works excellent! Would recommend it for anyone in need of one!


by: Mario 09/20/2023
Easy install.
by: 06/14/2023
sometimes no action inmediately
by: Brad 04/24/2021
It worked as expected. I paired it with a new surge brake hitch. I can back my boat up a ramp into the storage shed with ease. No more getting out and manually locking out the hydraulic brakes.
by: David08/03/2019
Thanks!! What a great experience with etrailer.com. Trailer needed many parts, rusted, broken etc. Tried to contact maker of trailer for replacement parts, bad experience. Rude, unwilling to help, handling fees, VERY expensive shipping, and cash up front. I then turned to etrailer.com! Fantastic people on the line, sales personal were Kind, patient, and very knowledgeable about all my trailer needs. My parts arrived quickly, free shipping, and accurate. Not to mention I saved a bunch of money!!!! New Break System from front to back, new Trailer Winch. Thanks, Customer for life!
by: Reis Mobile Auto Repair04/24/2022
We have ordered a couple parts from here now and we have nothing but good things to say. One of the first things that we ordered was a trailer tongue and the box it was in was damaged during transit. We also noticed that the brake line was damaged. I called and spoke with customer service and they were very helpful and quick to get me a replacement part. Their communication with customers is amazing. We will defiantly be using them for future ordering.
by: Ryan06/01/2021
Perfect Replacement for my Crownline boat trailer. Welded right on and weather breaks. Works great!
by: Jose 03/15/2023
Was shipped quickly and arrived when it was supposed to. Have not installed the product yet, but looks like it will fit and work great.
by: Michael 01/28/2023
All good. No issues.
by: Jeff10/23/2019
Received the parts i ordered on time. The master cylinder (model 20) was an exact fit to the original on my myco boat trailer. I look forward to doing future business!! [Thumbs up]
by: Matthew 10/04/2021
Good part
by: Ben01/31/2022
Friendly on the phone. Shipped when said they would. Was delivered as promised.
by: Patrick C.09/02/2020
Fits and works exactly as described. Easy install.
by: Geary11/25/2020
Easy to install and worked as designed
by: Keith 04/18/2021
Great valve
by: Douglas01/02/2019
not installed yet
by: Daniel08/09/2019
Exelent, it fits perfect and it works good too.
by: Rob05/01/2018
Works as advertised...
by: Edmund 06/09/2020
Great
by: Jeremy06/02/2023
by: Daniel04/06/2024
25
35
Show More Reviews
See what our Experts say about this Demco Accessories and Parts
- How To Install Reverse Lockout On Demco Actuator DM72VRThe Demco # DM72VR you installed is not designed to have any sort of manual lockout or bolt to hold it together, so I would not recommend doing that as you could potentially damage the coupler and render it unusable. The better option is installing a reverse lockout solenoid # DM11993 and installing a 5-way connector on the trailer with # HM47913. You'll wire one wire from the solenoid to the blue wire of the 5-way, and ground the other wire from the solenoid. You'll need to make sure...
view full answer... - Replacement Recommendation for Atwood Actuator on a 2014 T@B Little Guy Travel TrailerThe Atwood couplers have been discontinued for a bit so you'll be hard-pressed to find any replacement parts for them. We don't have any replacement parts for them anymore so I recommend just replacing the whole coupler with something that's currently being manufactured. I wasn't able to find exact specs on your current coupler but the Demco Hydraulic Brake Actuator # DM72VR is a good option to check out. This is designed around 3" wide trailer tongues and is rated for 7K and installs...
view full answer... - Can Demco Disc Brake Actuator w/ Lockout & 20,000 lb Capacity Work w/ Drum BrakesDisc brake actuators like the Demco Hydraulic Brake Actuator w/ Drop and Electric Lockout - Disc - Zinc - 2-5/16" Ball - 20K # DM8204311 cannot be used with drum brakes because disc brake actuators use much higher pressure, so they could blow out the wheel cylinders, among other issues. That said, you can add a lockout to the drum brake version of this actuator: - Demco Hydraulic Brake Actuator w/ Drop - Drum - Zinc - 2-5/16" Ball - 20,000 lbs # DM8204011 - Reverse Lockout Solenoid for...
view full answer... - Solution for Reverse Lockout on Demco DA70 ActuatorThe # DM5939 is only compatible with the DA91 like the # DM8759131. Unfortunately, there is no option for manual lockout on a DA70 like the # # DM72VR. There are two ways you can keep your brakes from locking up with this brake actuator. The first is to add a solenoid like the # DM11993. The other option you have is to switch out the brakes on your trailer with free backing brakes like # AKFBBRK-35-D. These brakes won't engage in reverse so there would be no need to add a lockout to your...
view full answer... - How to Determine if the Demco Hydraulic Brake Actuator Will Work on a 1983 EZ Loader Boat TrailerThe Demco Hydraulic Brake Actuator # DM72VR will work for your 1983 EZ Loader boat trailer, as long as it has a straight, 3" wide trailer tongue. From what I could find on your trailer, that does appear to be the case. But to be safe, I recommend double checking that is the the tongue style that you have. As long as that is the case, the Demco Hydraulic Brake Actuator # DM72VR will work for your boat trailer. This brake actuator does not come with a reverse lock-out, so you will want...
view full answer... - What is the Difference Between a Manual Lockout and No Lockout Brake ActuatorA brake actuator with a manual lockout, like part # T63FR, will have a lockout lever on the actuator that prevents the internal spring and shock from engaging the master cylinder when backing up (see photo). A no lockout brake actuator, like part # DM72VR, does not have this feature, so the trailer would either need free-backing brakes or an electric lockout solenoid like part # DM11993 to keep the brakes from locking up while in reverse. Backing up a trailer with hydraulic surge brakes...
view full answer...
- Recommended Reverse Lockout Solenoid For Shoreland'r Boat TrailerWe do offer reverse lockout solenoids like the # DM11993. Since the Solenoids are a universal design it will work for the surge braker actuator on your Shoreland'r trailer. You will need to change the 4-way connector on your trailer to the # 20017, and wire the blue wire of the connector to one end of the solenoid, and ground the other to the frame of the trailer. Using heat shrink butt connectors # DW05744-5 will make sure you get a good connection. Lastly you will need to add the Curt...
view full answer... - Installing Reverse Lockout Solenoid To Stop Brakes n Trailer When Going Downhill With MotorhomeThe reverse lockout solenoids stop brake fluid from being released from the master cylinder and sent to the wheel cylinder. It does this by receiving an electric signal, usually from the reverse light circuit. That said, if you were to wire this into a circuit on the motorhome active when braking downhill then I do think it is entirely possibly to stop the brakes from being applied while going down hill. The reverse lockout solenoids are universal in design so you can use the Reverse Lockout...
view full answer... - Is Manual Reverse Lockout as Effective as Solenoid For Demco Actuator A91There isn't an angle I can give you for when the lockout would be needed; however, if you want to be able to back up as needed you will need a reverse lockout with the Demco Hydraulic Brake Actuator # DM8609502. That said, the Manual Reverse Lockout Kit for Demco Hydraulic Trailer Brake Actuators # DM5939 is absolutely just as effective as the Reverse Lockout Solenoid for Demco Hydraulic Brake Actuators - Non-Bypass # DM11993. The trade-off being the manual lockout just isn't as convenient...
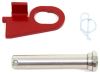
view full answer... - How to Manually Lockout Brake Actuator With Electric LockoutYou could run a bolt through the # DM8104311 to manually lock it out if the solenoid fails. However, there is no spot on the actuator to do this so it would require drilling. A Replacement solenoid # DM11993 is also available. The hole would require a 1/4" pin. We don't have a regular pin but you could use the # e98887 which would hold it in place and deter theft.
view full answer... - DA91 Demco Disc Brake Actuator for 2-5/16 Hitch Ball with Electric Lockout NeededThe DA91 Demco surge brake actuator that you are looking for is part # DM8750311. This has a 2-5/16" coupler, comes with an electric lockout, is designed for disc brakes, and has a weight capacity of 8,000 lbs towing and 800 lbs tongue weight.
view full answer...
- Recommended Replacement Reverse Lockout Solenoid for a Demco DA70 ActuatorHey Kevin, for your Demco DA70 actuator you can use the Reverse Lockout Solenoid for Demco Hydraulic Brake Actuators # DM11993.
view full answer... - Recommended Simplest Conversion for Trailer 4-Way Flat to 5-Way for Surge Brake Lockout & Jeep 7-WayFor your 2015 Jeep Grand Cherokee, the 7-way trailer connector is already a huge help. I recommend simply using the 7-Way to 5-Way/4-Way Trailer Adapter # 707250 or the # 707250. This will give you the 5-way that includes the reverse function to allow you to add the solenoid lockout to your surge coupler. Using a Reverse Lockout Solenoid for Demco Hydraulic Brake Actuators - Non-Bypass # DM11993 or the Titan # T4748800 will allow you to backup without the braking pressure to your trailer...
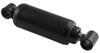
view full answer... - Replacement Parts Available For a Demco DA10 Surge Brake ActuatorWe do have a large selection on replacement parts for a Demco DA10 surge brake actuator. Replacement Shock # DS12426 Slide Repair Kit # DM5943 Replacement Drum Brake Master Cylinder w/ Bypass Solenoid # DM5920 Replacement Disc Brake Master Cylinder w/ Bypass Electric Lockout # DM5918 Replacement Drum Brake Master Cylinder w/ Inline Solenoid # DM5921 Replacement Disc Brake Master Cylinder w/ Inline Solenoid # DM5919 Reverse Lockout Solenoid # DM11993 Replacement Solenoid Cover # DM11674-95 Replacement...
view full answer... - Is There a Hydraulic Drum Brake Actuator With Electric Reverse Lockout & 2 Inch Ball CouplerWhile the Dexter option you mentioned is for disc brakes only, there is a way to get a similar hydraulic drum brake actuator with an electric reverse lockout. You'll need to get the actuator and lockout separately, so what you can use is the following: - Demco Hydraulic Brake Actuator - Drum - Zinc - 2" Ball - 7,000 lbs # DM72VR - Reverse Lockout Solenoid for Demco Hydraulic Brake Actuators - Non-Bypass # DM11993 I have added a link below to an install vide of the lockout solenoid for...
view full answer... - Can Electric Lockout be Added to Demco Hydraulic Brake Actuator w/ Drop For Drum BrakesHi there Rich; while it doesn't come with one, there is a way to add an electric lockout to the Demco Hydraulic Brake Actuator w/ Drop - Drum # DM8669112. All you need to do is add the Reverse Lockout Solenoid for Demco Hydraulic Brake Actuators - Non-Bypass # DM11993.
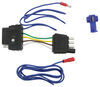
view full answer... - Troubleshooting Reverse Lockout Solenoid On Boat Trailer Not Allowing Trailer To Back UpYou've wired the solenoid correct, so there are a few things to check. Do you have a 5-way or 7-way connector on your trailer and vehicle? You can't use a 4-way connector as you need an additional pin to go from the reverse lights of the vehicle to the solenoid. If you have a standard 4-way on the trailer and vehicle you'll need to replace the trailer end with the 5-way # HM37908 with the blue wire going to the solenoid, and adding the # C57187 to your vehicle. You will need a circuit...
view full answer... - Is the Titan Reverse Lockout Solenoid Compatible with Non-Metallic Master Cylinders?The Replacement Solenoid Valve for Titan Brake Actuators with Reverse Lockouts # T4748800 is compatible with a variety of master cylinders just like the Demco Reverse Lockout # DM11993. Either will work with a plastic master cylinder like the Demco # 5650. I recommend going with the Demco Solenoid because it is made to be a non-bypass solenoid so it seems to function a little better.
view full answer... - Solution for Surge Trailer Brakes that Activate When Backing Trailer UpSurge brakes will activate when backing the trailer up unless you do one of two things to address the problem. You can install free-backing brake assemblies on the trailer (I attached a link to a page that has all of the ones we carry) or you can use a reverse lockout solenoid which will prevent hydraulic pressure from making it to the wheel cylinders when the reverse light circuit activates the solenoid. If you have a Titan actuator you would need the part # T4748800 or if you have...
view full answer... - Installation of Reverse Wire Addition to 4-Way for 5-Way Trailer With Hydraulic BrakesFor your Adapter 4-Pole to 5-Pole Trailer Wiring Adapter - Shorter # 47515 you will connect the blue wire to your reverse light power at the tail light. Use a circuit tester like # PTW2993 to find the power wire that only comes on when the vehicle is shifted in reverse. Don't trust wire color, just follow functions. Test all your 4-way functions as well to ensure everything is working correctly. If not, use the circuit tester to trace the wires. On the trailer side, that pin location...
view full answer... - Reverse Lock Out Solenoid Recommendation for DA10 ActuatorIf you wanted to install an electric reverse lockout on the DA10 Demco actuator part # DM8102222 you would want the part # DM11993. This is confirmed to fit DA10 actuators like this. When this solenoid has power on it would prevent hydraulic pressure from building in your brake lines and assemblies.
view full answer... - Best Replacement Reverse Lockout Solenoid for Demco Hydraulic Brake Actuator # DM8509612We do have a replacement reverse lockout solenoid for the Demco Hydraulic Brake Actuator # DM8509612, but the Replacement Solenoid Valve # T4748800 that you referenced is not designed and has not been tested to fit the Demco actuators. Instead you will want part # DM11993 for just the solenoid or part # DM5837 for the kit that includes the solenoid cover. These are designed specifically for the Actuator # DM8509612. I have attached a link to an installation video of this solenoid for...
view full answer... - Surge Brake Actuator Recommendation for 2004 Trailmaster with Reverse Lock OutThe Demco Actuator part # DM8608601 that you referenced does not come with a reverse lockout but you can add one with the # DM11993. When this is wired up and activated it basically prevents the brakes of your trailer from activating so that you can backup without any issues.
view full answer... - Electronic Lock Out Recommendation for Demco Actuator with Manual Lock OutYes, if you wanted to install an electric reverse lockout on the Demco actuator part # DM8102222 you would want the part # DM11993. This is confirmed to fit DA10 actuators like this. When this solenoid has power on it would prevent hydraulic pressure from building in your brake lines and assemblies.
view full answer...
Do you have a question about this Accessories and Part?
Info for this part was:

Installed by:
Jeff D

Installed by:
Brent H

Installed by:
David F

Expert Research:
Jameson C

Written by:
Laura H

Video Edited:
Chris R

Updated by:
Wilson B

Video by:
Schuyler H
At etrailer.com we provide the best information available about the products we sell. We take the quality of our information seriously so that you can get the right part the first time. Let us know if anything is missing or if you have any questions.
Product Experts Available Now!
Call 1-800-940-8924
Matthew F.
10/15/2022
Still working well