
To see if this custom-fit item will work for you please tell us what vehicle you'll use it with.
Thank you! Your comment has been submitted successfully. You should be able to view your question/comment here within a few days.
Error submitting comment. Please try again momentarily.


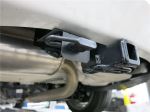
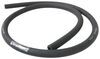
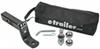
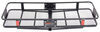
Fully welded vehicle trailer hitch is strong and durable. Draw-Tite's Tested Tough guarantee ensures that this hitch exceeds industry standards. The combination of an e-coat base and a powder coat finish provides excellent rust protection.
Features:
Specs:
Draw-Tite's Tested Tough program provides testing standards far superior to those outlined by the Society of Automotive Engineers (SAE), the go-to source for engineering professionals.
Each Draw-Tite trailer hitch receiver undergoes extensive fatigue testing and static testing with the ball mount that is either supplied or recommended for use with that particular hitch, thus ensuring results that are applicable to real life use. Fatigue testing is also conducted on hitches rated for use with weight-distribution systems.
In addition, Draw-Tite performs static testing on a simulated automobile, as opposed to the rigid fixture used for SAE testing, resulting in a more true-to-life scenario.
At etrailer.com we're committed to the products we sell, and to our customers. Our experienced and knowledgeable staff are available via both phone and email to address your questions and concerns for the lifetime of your hitch. The technicians at etrailer perform hitch installations on a daily basis, making them a valuable resource for do-it-yourselfers. The one-on-one, personal service you'll receive comes straight from an expert in the towing and automotive field. We've installed it, we've wired it and we've towed with it, so whatever your question, we can answer it.

California residents: click here
Average Customer Rating: 4.7 out of 5 stars (197 Customer Reviews)
Fully welded vehicle trailer hitch is strong and durable. Draw-Tite's Tested Tough guarantee ensures that this hitch exceeds industry standards. The combination of an e-coat base and a powder coat finish provides excellent rust protection.Excellent Hitch for the 2012 Honda Odyssey. The installation is easy if you've got some mechanical skills. Watching the video was a huge help - thanks for those. With a little ingenuity, I was able to do the entire installation alone. Some notes on install. I used a set of ramps, and an ATV jack with some wood to hold the bumper as I removed/installed it. I used the same setup to hold the hitch temporarily as I mounted it using the underside bolts. When it comes to putting the bumper back over the hitch, something the install videos missed - the top bolt holes in the metal bumper have a triangle cut out, meaning you can put the bolt and washer into the top hole a few threads THEN hang the bumper on the bolts ensuring you get the bumpy washers on the inside of the bumper. Then put the front/bottom bolts through the front holes with a socket extension as shown in the video. Cutting the bumper - there is a better way if you know to use a utility knife. I propped the bumper up on sawhorses, then from the inside, I used a 12" framing square and utility knife with a new sharp blade to cut the rectangle and exhaust areas. The trick is to just score lightly first, don’t go crazy, and using the edge of the square, and then progressively cutting deeper - It looks totally pro and is way easier to cut than you may think.
Rust – This was actually the hardest part. If your vehicle is older, I highly recommend running the hardware into the rusty holes (likely the exhaust side) all the way to mounting depth before attempting to install anything. Just take your time, and get this right, knowing the bolts will seat before struggling with anything. I ended up using one bolt as a tap, and the other to go to the hardware store to replace the one I modified/damaged. I also removed a very large dent from my bumper with the hot water trick while I had it off. All told, it took 3 hours, alone, and I don’t do this type of thing often. Overall, I'm super happy with the product and glad I took on this little challenge.
The product is great. I was quite surprised how destroyed the cardboard box was that delivered my trailer hitch though. The heavy trailer hitch was essentially rolling around in an oversized box with no padding or stuffing. It probably fell completely out of the box at some point (both ends were completely ripped open). Thankfully it’s heavy duty steel, so the product only incurred superficial scratches and paint chips, but the packaging left much to be desired.
The install process itself is easy enough to do on your own but I had problems with cross threading that added additional time and frustration. Cutting the bumper fascia can be done with just a box cutter and elbow grease. It definitely could be done in under 2 hours or even less with help. The only issue I had for not giving 5 stars is the 3 welded pieces in the center of the metal bumper really make it difficult reinstalling the bumper fascia and getting a good fit. I had to disconnect the bumper again and modify the welded pieces in order to get the bumper to fit right without having an obvious imprint on the surface, did what I could but kind of a pain to deal with. I had to use zip ties underneath where the 2 clips are supposed to go as the final alignment wasn't perfect, but it works. Satisfied with it overall.
I did it! 2011 Odyssey touring elite. And I'm in my sixties! First, watch videos to be sure you can do it. I've built things all my life, however I had to install this hitch totally by myself. Videos were great . First removing bumper really was easy after getting clips and 10mm nuts loose. Had to remove .additional connectors for backup and lane departure. Bent bumper tips about a 1/8 inch in were shown in video. Did not bang them in as far as paper instructions suggest. . Loosen top bolts about a half inch and remove bottom ones. Then lift bumper up this will allow bumper to come off, this is shown in video for 2014, but mine is a 2011 and it works also. then if yours is as old as mine, use wire brush to clean nuts holes for bottom support. Took muffler off hanger and it allowed me enough room to use racthet..Tape washers to car as suggested in instructions. Back to hitch, lift it and install new bolts in top holes only. First on passenger side, then other side. Just in deep enough to hold hitch.Install hitch bolts under car, I did driver side first, made it easier working around muffler. Now place bumper on top bolts, this will allow you to install lower bolts and washers. Now remove top bolts add washers and reinstall. I used inside bumper cover guides I think there 5 inches a part, found center. I traced diagram of cutout on outside of cover, then used utility knife ( new blade ) to cut. like butter. muffler cutout was easy from inside. Reinstalled bumper, don't forget to connect connectors, both sides on my van. Followed steps in video and was done. No extra parts and it took me only about 4 hous to complete. Looks factory, and I did it at my own pace. Great product and company, they had it to me in 4 days, lost tracking service and support center verifed it was on its way . Then they called the day it was to arrive, just to be sure it had. Wow, great customer support. Highly reccommend etrailer. Now for the wiring I found a plug in the van that I plan to use for wiring (picture shown). then towing a small bowrider for the grandkids, and me.
I just installed my hitch today on my 2012 Honda Odyssey. It took me about 3 hours start to finish. I am extremely happy with the result and I'm SO glad we decided on the clean, hidden frame on this Draw-Tite hitch. It looks so good and almost identical to a factory install. Just a few tips after having done it once with the video:
1. The right side of the car near the muffler didn't have much info about it in the photos or video. It would have been great to have some tips about removing the rubber muffler mount in order to get access to the bolt that needs to be torqued to xx ft-lbs. Just spray some WD-40 on the rubber hanger and it will slip off the hanger with a little effort.
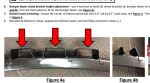
2. After you cut out the areas of the fascia, use a plastic brush tool on a Dremel or similar rotary tool at medium speed to clean up the rough edges. It works really well and gives a nice clean edge. See photo below.
3. When you hammer the bumper beam projections, don't do it straight on. If you hammer from the side, you will be able to flatten them almost completely and it looks so much better. See photo below.
Honestly the hardest part of this project was putting the mud flaps back on and aligning the holes. Everything was so easy and well instructed in the video. I HIGHLY recommend this option if you want a nice clean finished look on your hitch without the frame hanging down in plain site. The few extra steps and extra work are WELL worth the effort.

A hitch was perfect for the car. I purchased unfortunately because I put the hitch on it brought me to Chicago don’t ever move to Illinois. But as far as a hitch, it was perfect. They did a great job.
Estimate of 80 minutes is optimistic and does require both skill, experience, and a certain tool. I enjoyed the process but somewhat frustrated because I do not have a right hand power wrench as shown in the demo video. This said, the video was excellent. However, to install the wiring harness took extra time.
I think this model #76025, is a great addition to my "new to me" 2016 Odyssey. I have a small (5x8) utility trailer for hauling an ATV. This hitch will be perfect.

Allen

7/5/2022
Flawless functionality. How much better this unit looks compared to the hang down models!
There was one small hitch (pardon the pun) with my order, there was no hardware in the box with the hitch. A call to etrailer got replacement hardware sent my way.
Installing the hitch was not difficult, just more involved than the ones that have the crossbar hanging below the bumper. The install video is excellent, I followed it almost exactly. Honda made this vehicle easy to take apart, and the hitch fit very well. I had a helper (age 7) to manage a few of the times where I needed to hold the hitch or bumper beam and get bolts started. Cutting the bumper was no big deal, I marked it with tape and cut it with a Dremel. The end result looks really good, much cleaner than other below-the-bumper models, I'm very pleased.

Paul A.
7/26/2018
Ive used this hitch a couple of times, just to transport bikes on a hanging bike rack. The hitch works great, and its very unobtrusive when were not using it. During the install, I guess I didnt hammer the brackets that support the foam flat enough, because there are very slight bumps in the bumper cover. Barely noticeable. Overall, Im very pleased with the hitch, the install, etrailers videos and customer service.
Nice product and excellent video directions. I followed along using the video to help me as I haven't done anything to cars besides change headlamps and tires and jump start. Thankfully all the materials were included in my box; it was a bit banged up as per other reviewers but with how heavy the piece is that is sort of expected. I had to purchase a torque wrench and socket extender; the directions say 6" (socket extender) but the auto parts store was out of that length so I got a 10" and it gave me just enough (!) clearance from the ground to work just fine. **One reviewer mentioned on the right side of his car next to the exhaust that the threaded hole was corroded. I found this to be true on my 3-4 year old van as well.** Because of the rust and corrosion, I was initially unable to insert the threaded bolt. I ended up running to the hardware store to get a thread tap. That and a new bolt thankfully (!) fixed the problem. As an aside, it was definitely more worn and corroded on that side of the vehicle than the left, perhaps a function of the exhaust and heat. A rotary tool is certainly the way to go when cutting off the fascia, although I had to get creative since my car wasn't on a lift as opposed to the video's car! I like the clean look and plan on attaching a bike rack to it.
Lena
3/14/2020
Product still doing great! It’s been used multiple times no issues.
I chose this one for the low profile install (inside the bumper) and the ability to us a Draw-Tite J-pin to reduce rattle.
etrailer’s installation videos were very helpful.
Bought a year ago for our Honda Odyssey. Had it installed at a Leer truck accessory store nearby. Very happy with this trailer hitch! Fits behind the bumper so we hardly notice that it's there.

Tarun
6/23/2023
Still enjoying this hitch. No issues over the past 2 years.
This install looks more daunting than it really is. I am mechanically inclined, but have never been a fan of body work, so I was concerned about removing the rear fascia. No problem at all, snaps off/on like butter. Also, I like the way the cross bar is hidden, provides a really nice look. This really is a nice product. I have not yet had a chance to pull a trailer, but have used it with a cargo tray. No issues.
Tommy
4/27/2019
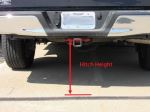
This is a great product. We have had zero issues and I really like the look. It is a solid hitch and is just high enough that I havent bottomed out on any drivewaysentrances. I am extremely satisfied with both the product and the helpvideos on this site. I will purchase all my gear from etrailer.
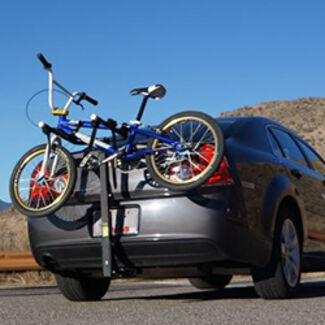
I bought this hitch so we could use a bike rake instead of loading our bikes in the van. I installed myself using the installation video on their website. The hitch fit perfectly and was very easy to install. The video was awesome! Very thorough! Love the way it looks on the van!

Bill H.
10/7/2018
Use our hitch all the time and it is still solid and looks like new. Great product!
Hitch was not a perfect fit for my 2012 Odyssey. The shims supplied with the hitch were too wide and interfered with weld seams requiring modification to fit correctly. Once installed, hitch is tucked up nicely under bumper. Looks as good as OEM.

Scott
7/7/2018
Still very pleased with the product after 1 year. I did add a simple preventive measure to keep the tail gate from getting scratched if accidentally opened when the the carrier is in the upright position. A piece of pipe insulation and a nylon tie strategically placed.

Pretty easy to install, even with basic hand tools. It’s hard to see in the photos, but, the receiver opening has a bezel welded onto it and it was a bit crooked. I had to hammer my hitch into it but after that it’s just fine. It’s in there I have no need to remove it.
OK...let me first state I'm very happy with the final result! Installing this hitch was battle but that wasn't the hitches fault. I reviewed the video to get the general idea of what I was doing and dove right in.
The facia and rear bumper came off as expected. I had some trouble getting the electrical plugs off but managed without breaking anything (I have the sensors in the rear facia). Everything was prepped and ready and that's where the trouble started.
First, I noticed that since the right rear side has no under-body plastic shield (that's where the exhaust is...duh), Honda, or someone, had sprayed a bunch of this rubber coating...like that Flex Seal stuff. I'd assume to give the frame some extra corrosion protection since it is exposed to the elements. As such, I had to cut away a chunk of the stuff to allow the large spacer block to sit properly in between the frame and the hitch. That was minor and I expected that sort of deviation but the next part was killer.
I started to thread the larger bolt on the right side (read in one of the reviews to do this to make sure it could thread before trying to install everything...glad I did) only to notice that, no matter what I did, it wouldn't go in. Upon inspection, I noticed the hole and threads were completely corroded with rust. It took the next 2 hours, a small can of WD-40, and an electric impact driver to get it sorted out. More than once I thought I was in over my head and thought I should take it to a professional. What I wish is that Honda would put a plug in those holes on the right side that are unprotected. It would cost the company may be less than a penny and maybe 2-3 seconds on the production line to protect those holes. Then someone like me would be very thankful that Honda was thinking ahead and sing praises of the company for being awesome. BUT that was not to be!
In any case, with the help of a friend, I got the hitch/bumper installed, torqued to the correct specifications, and the facia back in place.
It looks sharp and I am very pleased with the results. I love the clean look! I decided to run the wiring harness through the hole just left of center. The gromet there is made of rubber and it was very easy. I did have to cut and splice the 4-conductor wire which is a no-no according to the instructions but I don’t care. The thought of seeing the harness come out of the bottom of the door seems really ghetto to me and what I did looks more professional. T-One should really make that an option somehow.
If you want to run the harness the way I did, do it after removing everything but before installing the hitch. It was easier to fish the wires.
Good luck and have fun! Cutting the facia was nerve-racking but not bad so don't let that scare you off.
My only critic was the condition of the box when it arrived. The box looked like it had been run over by a Sherman tank! A huge hole was ripped in the top as if someone was trying to get at something inside (everything I ordered was there…whew). The powder coating on the hitch was damage in a spot or two but that was very minor.
Hi, I was able to get this hitch installed on my wife's Odyssey without too much trouble And it works great with our Thule T2. I've been telling all my friends that etrailer is excellent. I just realized that when my wife goes out of town with the kids it will be a great time for me to do some mountain biking but she will be driving the Odyssey with the hitch. I guess I need to order another hitch for my Honda Accord. Got any discount codes you could send me?
Great product, easily installed it myself on my 2015 Honda odyssey , I like that it’s more concealed and up higher for better ground clearance than other bumper hitches, looks professional from the factory on my van. I can now pull a trailer and haul my bicycles with a bike rack. They have a nice video on their website that helps you to install correctly .
I could not be happier. A picture is worth 1000 words. This hitch looks better than the factory installed ones. Katie D. from etrailer was extremely knowledgeable and gave sound advice so that the job turned out perfect!
You will need to have advanced skills to install this hitch. I recommend that the install is performed by a professional installation center.
The product was professionally installed but it didn't go well and the finished installation looks sloppy with the bumper cover bending over the hitch receiver.

Heather A.
7/13/2020
It looks like the installer forgot to trim the fascia. This particular installation requires a 3.0’’ tall by 8.5 cut out of the bottom panel according to the installation instructions.
Great package at a really good price. This is a two person job as the instructions and video say. So 80 minutes was more like 4 hours for me working alone. If you are like me and don’t like the “leave the wiring inside” mentality. There is a pop-out that will allow you to run the wiring outside without having to cut any cables. Also do a field fit before cutting the fender. I measured the bumper thinking the tabs were centered. They are not. Have someone hold it up for you and mark he edges then drop it down and cut the 3” depth.
I am greatly impressed with the product.
It fits and looks great on my Honda Odyssey 2015.
It is high quality and worth every penny!
Installation was pretty simple overall. The only complications were as follows (See photo of bumper beam:
The heads on the bolts that come with the hitch are larger than the Honda factory ones. This makes getting them through the access holes in the bumper beam (marked in red) difficult as the result of larger heads is needing a larger socket which does not fit through the aforementioned access holes.
You will most likely need a "thin-walled socket" with a 6 inch extension to get those in. Additionally, if the bolts won't start and are cross threading, get a small socket on your extension (one that does not fit around the head of the bolts), take some double sided tape, and use it to stick the bolt to the socket. Now gently insert the bolt into the hole and begin to turn at a cautious pace. If it's not going in you'll now have room to adjust the bolts pitch/angle because of the smaller socket. Once you get the bolt threaded you can use a regular (thin-walled) socket to tighten to the appropriate torque (do not tighten any bolts until they are all started). Also if the bolts wont seem to thread check that the hitch mounting holes are positioned correctly. If they are off too much they will get in the way of your bolts.
I shaved the corners (marked in yellow) on the bumper beam using an angle grinder about 1/8 inch to make the bumper cover fit better (took about 30 seconds to do all 6 corners).
This hitch model is a steal to begin with. Half the price plus free shipping compared to OEM, can't beat that. I was initially hesitant on buying this and do the installation myself. I was so intimidated by the fact that I have to cut portion of the rear bumper fascia. But after watching the video a couple of times on how to install this on a 2016 Honda Odyssey, I started to build my confidence and finally decided to order one for our minivan. No regrets, really easy to install, just follow the installation video step by step and you can't go wrong. I have to hammer the bumper square buffers though to remove the dimples. Maybe if I didn't use the washers (4 total) for the bumper bolts, I may not need to bend the squares anymore since the dimples was caused by the bumper being pushed out by at least 3/16 of an inch when the hitch vertical steel plate was added between the bumper and the chassis. It took me about 2 hours on installation, could be faster if without mud guards.
Easy to install and looks great. So much better looking then the ones with the huge beam across the back. It took me about 2.5 hours by myself and I haven’t done something like this before. I didn’t lift the car off the ground although that would have made it easier. Next time I would probably back it up to a curb and have the back end hanging off to give me 6 more inches. The instruction video was awesome. The only tricky thing to me as putting back in the trim panel pins that hold in parts of the plastic on. I found it easier to remove the pin into the two parts and get the first part in first then push the pin through. Overall I would highly recommend the hitch and the installation wasn’t that bad.
Do you have a question about this Trailer Hitch?
Info for this part was:
At etrailer.com we provide the best information available about the products we sell. We take the quality of our information seriously so that you can get the right part the first time. Let us know if anything is missing or if you have any questions.


Jenny N.
4/22/2022
I recommend touching up the affected areas with a rust resistant paint which you will then have on hand for regular hitch maintenance
Helpful Links
faq-rust-prevention-maintenance.aspx