
Summer Starts Here - Save up to 70%
Thank you! Your comment has been submitted successfully. You should be able to view your question/comment here within a few days.
Error submitting comment. Please try again momentarily.
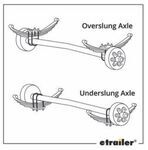
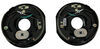
Moves your trailer's leaf springs to the top of your axle with this kit. For 2-3/8" diameter axles and works with double-eye leaf springs only.
Features:

Videos are provided as a guide only. Refer to manufacturer installation instructions and specs for complete information.
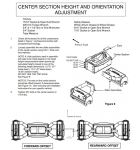
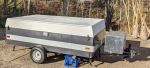
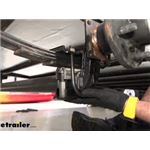
Hey, guys, Kevin here at trailer and today I'm gonna be showing you how to install the Dexter Over-Under Axle Conversion Kit here on our enclosed trailer build. So we get this question all the time: How can I boost the height of my trailer so that I can get it level with my tow vehicle, especially with newer trucks Seems like Ram keeps making their trucks taller and taller so that they can't, you know, no one can't get their fifth wheel in there without actually hitting the bed rails. So let me show you this conversion kit that we have, on our enclosed trail. So with our tire off now, I can show you what our assembly looks like here. As you can see, the U-bolts are facing up. When we put this conversion kit on, it's going to have our U-bolts facing down.
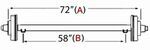
And then we're gonna be dropping our axle down here, increasing our ride height. But the first thing we need to do is measure our axle. So we're gonna try and find the diameter of the axle so that we can get the correct kit. So looking at it. It looks like we're at two and three eighths inch.
Now, this kit does come with two and three eighths inch and a three-inch diameter kit. That really is gonna go with the size of the U-bolts and then the spring seats. All right, I want to give you some measurements here. Let's see where factory ride height is. So from the ground to the wheel well, we're sitting at 29 and 1/4.
And the ground to the body, we're sitting right at 12 and 3/4. Okay, so now we got our kit installed and the axle flipped under our leaf spring. Let me give you a ride height. So now from the ground to the wheel well, we're sitting at right about 34 and 1/4 inches. And then let me also give you one for, ground to the body.
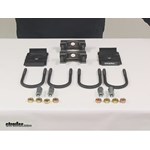
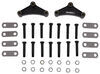
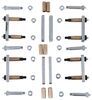
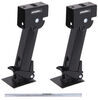
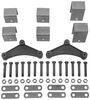
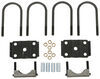
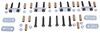
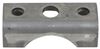
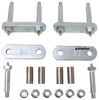
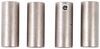
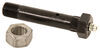
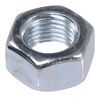
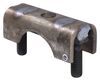
Sitting right at 17 inches. So it's gonna give us some extra space, handle all those clearance issues that we've been having. So the installation difficulty of this kit is going to vary trailer to trailer. Obviously, with our small enclosed trailer here, it really wasn't that difficult. But if you have a giant fifth wheel, maybe you have a 40-foot fifth wheel with all kinds of weight. Whole lot of axle trying to jack it up, it's gonna give you a little bit more of a challenge. So you're gonna wanna take that in mind while you're doing this. Other than that, just bolting on the parts, really isn't that difficult. It's really just a lot of set up for a couple of changes. So your Dexter Over-Under Conversion Kit is going to come with, two spring seats, your nut adjusters, your nuts, your U-bolts, and your U-bolt plates. So first step of this installation is gonna be removing your tires. So you wanna do that while the trailer is still on the ground. So now I got the nuts off, and take up my wheel. I'll set it to the side. I did jack up this trailer, now that I have the nuts off, and then I added four jack stands. You're gonna make sure the new place, and even amount of jack stands along your trailer just so that you can support it without having a worry about it coming down on top here. Obviously, if you have a bigger trailer, go ahead and use more. Do whatever you feel comfortable with. As you can see, our U-bolts in our U-bolt plate is pretty rusted up here. So I'm gonna spray some penetrating oil on here just so that we can get our bolts off. I'll let that set in just a little bit, and then we're gonna take these nuts off. All right, we got our first U-bolt out. I try to go back and forth on each of these just so that the U-bolt doesn't try to tension one way or the other. All right, now that we got our second U-bolt off and our U-bolt plate down. We can go to the other side, do the same thing. So the next step we're gonna do is we're going to, support our axle here cause right now it is free-hanging since we don't have the bolts holding it to our springs. So what I'm gonna do, is I'm gonna stick a jack right in the center, to just support that weight. So, as you can see, if I lift it up this is just free. You don't want that falling down on you while you're working. There we go. And then we're gonna take this bolt off right here. So we're gonna be dropping off the bolt from the front of our leaf spring. So that's gonna be going towards the nose of your trailer. All right, now that we got that out, we're going to pull out our bolt. This can be a little stiff here just because it's got some weight pressing down on it. Our bolt's actually on here pretty good. We are going to actually just thread our nut back on just a little bit. So that we can hammer on our nut, not damage our bolt here. And then we're gonna pop it out that way. Alright, so next, I'm gonna take a punch, and we're just gonna hammer this, bolt out a little bit. So we're gonna get to a point where the punching hammer isn't really gonna be effective here. And we're just gonna get under and socket it ,the rest off the way out. All right, so now that we got our bolt out. I'm just gonna pop the, spring down out of the hanger. May have to loosen this bolt just a little bit. So that it will hang freely. Just like that. So now we can remove our axle, and move, hang our springs back up and redo our whole setup with the conversion kit. So now we have our axle loose and our leaf springs loose. We're going to pull our axle out. We can get our leaf springs back in place, and then work on bolting our axle. So now we have the axle off, we can put this back in place. I do wanna mention that I did loosen up these bolts just to kinda move this in a little bit. Just so that we can get lined up right. Now we can sled our bolt through. And you are gonna have to kinda hammer it back into place cause it is sticking up just a bit. And then we can thread on our nut. So the next thing we're gonna do, is sled our axle back over into place. And we're gonna take our spring seat, and our adjustment nuts here. I'm gonna slide these on. They don't need to go all the way down. We're just getting them on about halfway just so that we can see exactly where we need to be. So the spring seat is actually gonna sit right here. And then we're going to tighten it down, put up a little bit more. So we'd set this on here. We'll get this level. And then tighten these down using a wrench so they put pressure on here, the bracket on our axle. Alright, so we're gonna just tighten these just so that the spring seat is level. We don't want this actually pushing up off. We want the spring seat actually making contact with the axle. And one other thing I do, want to note is that Dexter highly recommends coming in afterwards and tacking this on both sides so that you don't have any chance of the axle moving it all and getting off level. I already went ahead and put the other side up just so that it was a little bit easier on video to show you me putting this side on. But what you can do also, just stick your chunk of wood, some kind of black, anything that you got. Just to kinda get it up level. And now we're going to, set this on here. So there's gonna be a little, my nipple thing right here and the other side that you're gonna poke onto. It's gonna line that up, there you go. And then you can ,use something to hold it up in place. We're gonna set our plate on here, Just like this. If you set it this way, your bolts aren't gonna line up and you're gonna be hitting, your brake from, or your flange for your axle here. So now we will take our U-bolts. We're going to put them through the axle like that. And then up through our plate. All right, before our U- bolts, we're going like this. Now we're gonna be flipping them upside down this way. So we're gonna get under the axle. And then open into our plate. And then we will put our nuts on. It's gonna get inside through both sides going, then we can tighten it down. Alright, now we can go ahead and tighten these down. So right now I'm just doing this with our regular circle wrench. Just to get it, kind of hand tight. But then we are going to do this, to check what you can find in your instructions. And you do wanna do these evenly. So that you're not pulling on one side too much and throwing it off. So here's our completed conversion kit. Basically, if you look at, our side by side of our axle to start with. From now, we basically completely flipped our system here. The bend of the U-bolt used to be up here and now it's down here. So you're going to gain the diameter of your axle as well as your leaf Springs. So that you can get your trailer sitting a little bit higher so that you can handle all those clearance issues that you might be facing. All right, now that we got our system in place. We can put our wheel back on. So as you can see, now that we have the trailer lowered back down. It's sitting on the wheels. We have clearly a bigger difference here. So we have a way higher ride height, But really that's it for this installation. My name's Kevin. Thanks for watching guys..
Average Customer Rating: 4.8 out of 5 stars (459 Customer Reviews)
Moves your trailer's leaf springs to the top of your axle with this kit. For 2-3/8" diameter axles and works with double-eye leaf springs only.
Great kit! Installed this on my 1995 Jayco Fifth Wheel and it really improved the ride height with my truck. It’s been on 2 round trips from Texas to Montana since and many other trips locally with no issues.
Our trailer was so low...that it could not make it up a low curb and some driveways - especially when fully loaded. Went with the Dexter axle flip kit. The Dexter bracket and base plate pieces are worth the extra $20-$30 compared to other similar kits - they make fitment easier, eliminate any guesswork on placement, and decrease installation time because of it.
Took 2-3 relaxed pace hours for us to do single axle install.
Tools required were ratchet/wrench set (13/16 deep socket worked for us for most of the bolts), cheater bar (for working those rusty bolts off), drill, angle grinder (cutter disc for oem u-bolts and leaf spring bolts that are rusted or welded in place, stripper disc for cleaning area around new bracket for welding) welder, floor jack and jack stands.
We had to remove the leaf springs, as the wheel mount brackets would not fit through the openings. Was hoping we wouldn’t have to, but it was pretty simple to do. We jacked the trailer up. Removed the wheels. Removed the axle. Cleaned the axle area where new brackets go. Set the height and placement of the new Dexter brackets. We left the OEM brackets on the axle and placed the Dexter ones in the exact same position 180 degrees on the other side. Welded them on. Reinstalled leaf springs. Reinstalled axle, reinstalled wheels. Then voila!
We added 6 full inches of height. Super awesome.
Great conversion kit, easy to get the plates lined up perfectly. I welded the new saddles onto the axle and welded the nuts to the bolts so there is zero chance of anything moving. Having the plates held in perfect position while welding made it simple. Solved the "dragging wheels problem" without having to cut off and reweld the fenders (which had been welded without enough clearance to the tires at the factory.)
This worked great to increase clearance on my camper. I'm pretty sure I would have ripped off my tank drain if not for the over/under axle kit when I pulled my camper onto some BLM land out in Utah. Straight forward to install and works great.

Jim

1/25/2024
This has been an excellent upgrade to my camper. I can actually fit my cooler and other things under my camper when three weather is bad. Great product!
One order gets you the kit for only one axle, and realized this after my order arrived for my project on a two axle trailer. Seems obvious now but that wasn’t labeled & pictures were deceiving as I saw two axle trailers advertised. Hardware all seems to be in good shape but packaging quality is poor. Before opening my package I could see into my box with loose hardware rolling around. Thankfully no nuts fell out during shipping. In the future please tape around all seams or place in more secure packaging.
Easy to install and no issues after one year. I bought it to gain clearance on my cargo trailer. After install I gained about 5 inches in ground clearance.
This kit does exactly what it advertises. Gave me 4 1/2 in of lift. It is very straightforward to install. The only difficult part was getting the trailer up on jack stands. Make sure you do it on level ground, it makes jacking it much easier. I also had an issue with not having enough spacer nuts. I actually bought two kits and both only had 2 nuts and 4 are needed. There is no packing list so use the picture in the etrailer ad. etrailer was great about making it right.
Very happy with the parts and instructions on the installation.
I was able to use (4) jack stands to support my 2019 Clipper 106 Sport. Once I was able to drop the leaf springs, the axle slid right out. I DID tack weld the new parts as recommended. Very straight forward install and shouldn't bottom-out in the future.
Product is as expected. I picked up about 4” of much needed clearance on a cargo trailer used to haul my snowmobiles. Installation was straight forward. Of course, the service from etrailer was, as always, the best in the business!!
This kit worked great. I gained about 5 inches clearance. The camper seems to tow alot better with the trailer frame inline with the truck frame. I would recommend this kit if your in need of more clearance.
Working great on my RV trailer. Gave me enough lift to get into those tough to reach places for a week of hunting big game without wrecking my RV trailer. Pretty easy to install. Did it in my driveway with help from my hunting partner in about 4 hours on two axles.
Perfect fit! I put this kit on my K-Z sportsmen classic camper. Like I said it was a perfect easy fit. Jacking the camper up took the longest. The kit says you can just bolt it on but we welded to be extra safe. I also went from an 13inch tire to a 14inch tire. Also upgraded to a load D tire. With the tires and axle flip I gained 6 extra inches. It now fits my truck perfect and the better tires made it way more stable. Would highly recommend. I was also quoted $130 for a similar kit by my local RV service garage. Buy this to save the money. Even if you get this and need to pay someone to do the recommended welds it’s going to save you money. I’ll include some before and after pictures.
Great kit. Lifted our 87 jayco up for more ground clearance
Easy install after u-bolts were cut off. Lift was badly needed, great kit!
Easy to install, Sturdy product for my single axle enclosed trailer giving me about 8" of extra clearance!
The kit got here before the date listed that was good. All the parts were there. The instructions could use some pics or diagrams of how the parts should be arranged. The bad the plate sent with the kit was way to narrow for the springs so had to use the plate for the old setup which is fine I guess it was heavier duty anyway. But if I am buying new parts I would like to use the parts I paid for. Over all it did the job. The holes in the new plate was at least 1/4" off for the u bolts to go through. Again no way would it work. Have not towed the camper yet but looks solid. One thing more I read that you could weld the one part onto your axle. Would not recommend that if your wires are like mine they run through the axle to the other side which is kind cool but if you heat that metal up you could melt the wires and cause problems with your brakes. I would be careful. I did not weld it looks stable as is and I plan to take this camper off road.

Jenny N.
4/25/2022
You mentioned that the plate bolt holes did not match up to the u bolts and I wanted to see if you would be able to send a picture?
Jim
4/25/2022
Hello Jenny, I will attach a pic of the parts I could not use. As you will see the space between the holes are call it 1.75 inches it is even different a little between top and bottom holes but just a 0.0625 or so. I did not get the calipers out and both plates are the same and my spring is 2 inches wide defiantly not going to fit. I really did not want to take the tire off and take pics of the trailer axle as the bottom view did not show much. Hope this helps and if you really need it I will take the tire off so I could show you the old plate.
Jenny N.
4/25/2022
I believe I have figured out what happened. This conversion kit is meant to be used with double eye springs which are 1.75 inches wide and if you have 2-inch-wide springs then you have slipper springs. This would account for why the plates did not line up the way they normally would.
Looks like like quality product. Won't be installed until next week.

Wolfgang
4/1/2024
Just fine. I did reuse my U bolt because they were 38 of an inch and yours were only 5/16th. S so I used the larger ones for added streng.
Once again out did super service and fast shipping. ETRAILER IS ALL ABOUT QUALITY SERVICE..
Install was easy enough for one person. All necessary parts included. Trailer no longer drags the ground while towing over steep inclines behind our long motorhome.
It installed pretty easily, it gave me an extra 4" of clearance to install a grey water tank. To me the trailer pulls a lot better, drove from Ohio to Arizona.
Easy to install and clear instructions and video .
Simple swap out… functional, practical & looks good.
Needed to lift my 2015 Pacific Coachworks trailer as it dragged the hitch and bumper . Easy install DIY for me as I am Handy. Took the entire day, taking my time for measurements. Had to jack up the trailer quite high, 2 feet lots of cribbing. I had a wire feed welder and tacked the brackets to the axle. Gained over 4+ inches. Never drags anywhere now even offroad. Tows no different, with my Fastway e-2 10k hitch. Before and after pics.
High quality product. Straight toward install and has held up very well. Installed in a driveway in a few hours. I installed this kit on my 1974 komfort camper last year and have put highway and dirt road miles on it since. I take it elk hunting and get into some tight rough situations and haven't had any issues. It gave the camper just the right amount of clearance and it pulls level behind my Tundra with a curt anti sway stabilizer hitch. Before this kit my campers ground clearance was awful and I was always worried about puncturing my holding tank. This product fixed that problem.
We modified a client's newly acquired Flagstaff pop-up to better handle off-road camping. This kit made the process simple, reliable and inexpensive. We opted to remove the original spring perches and weld on new (and shock mounts) but the kit allowed for simple bolt on.
The customer had us winterize the camper, as part of the service we checked tires, bearings and axles....the U-bolts and mounts all looked fantastic.

Do you have a question about this Trailer Suspension Part?
Info for this part was:
At etrailer.com we provide the best information available about the products we sell. We take the quality of our information seriously so that you can get the right part the first time. Let us know if anything is missing or if you have any questions.


Soggy
6/22/2021
1 year later and the axle flip is working great, zero problems. Glad I did it!