
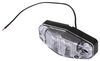
LED Mini Side Marker and Clearance Light - Submersible - 3 Diodes - Amber LEDs - Clear Lens
(23 reviews)
Price: $10.52
In Stock
LED Mini Side Marker and Clearance Light - Submersible - 3 Diodes - Amber LEDs - Clear Lens
Item # OP24FR
Our Price: $10.52
In Stock


- All Info
- Reviews (23)
- Q & A (0)
- Videos (2)
- Photos
Optronics Trailer Lights - OP24FR
- Clearance Lights
- Oblong
- LED Light
- Amber
- 2-1/2L x 1-1/8W Inch
- Surface Mount
- Rear Clearance
- Side Marker
- Submersible Lights
- Optronics
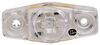
2-1/2" x 1-1/8" Oblong. Waterproof, LED trailer light serves as a clearance and side marker light when properly mounted. Durable polycarbonate housing and lens. Surface mount to trailer - hardware not included. 1-Wire design. PC rated.
Features:
- Mini LED trailer light functions as a clearance and side marker light when properly mounted
- LEDs make great replacements for incandescent lights
- Last 50 times longer
- More efficient - provide brighter light with less power output
- No bulbs to replace - no brittle filaments
- Durable polycarbonate housing and lens
- Clear lens over amber LEDs
- Compatible with 12V DC systems
- Mounts on surface of trailer - hardware not included
- Can be mounted vertically or horizontally
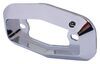
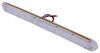
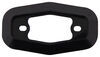
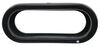
- Available bezels (sold separately) provide a finished look
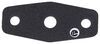
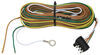
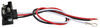
- Single wire design grounds through mounting hardware
- PC rated light produces a 180-degree beam pattern
- DOT compliant
Specs:
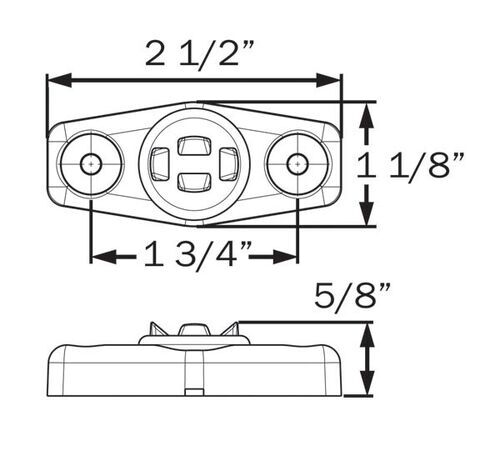
- Dimensions: 2-1/2" long x 1-1/8" tall x 5/8" thick
- Distance between mounting holes (center on center): 1-3/4"
- Diodes: 3
- Power draw at 12.8V: 0.06 amps
- Lifetime warranty on LEDs
Sonically Sealed, Waterproof Trailer Light
The waterproof construction of this light makes it ideal for use on trailers that may be submerged, like a boat trailer. The housing and lens are sonically sealed together to create a single unit, which means that water will not get into the light and damage the diodes or circuit board.
PC-Rated Lights

A PC-rated light produces a 90-degree angle of light to either side of its centerline for a total of 180 degrees of coverage. This beam pattern can be clearly seen when you are standing directly in front of the light, as well as when you are standing on either side of the light. When properly installed, this type of light can function as both a front clearance light and a side marker light or as a rear clearance light and side marker light.
Surface-Mount Light

Surface-mount trailer lights install using a flange or bracket with mounting holes. These lights lay flat against the trailer surface and only require a small, often pre-existing hole, for wiring. Mounting hardware is used to secure the light to the trailer.
MCL14CAGB Optronics LED Trailer Mini Side Marker and Clearance Light - Submersible - 3 Diodes - Oblong - Amber LEDs - Clear Lens - Surface Mount - PC Rated - 12V
California residents: click here


Video of LED Mini Side Marker and Clearance Light - Submersible - 3 Diodes - Amber LEDs - Clear Lens

Videos are provided as a guide only. Refer to manufacturer installation instructions and specs for complete information.


Video Transcript for LED Mini Side Marker and Clearance Light Installation
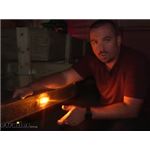
Hello neighbors, it's Brad here, at etrailer. And today, we're taking a look at installing the Optronics mini LED 3-diode clear lens with amber light. And this is gonna be a great option for updating your trailer with some nice LED lights. And it's gonna be completely submersible, so it's gonna be great for your boat trailers as well. Now, this is an obvious upgrade compared to what we had on here. Not only is the footprint smaller, but the light is absolutely better.
And being LED, it's gonna be more efficient overall. Taking less energy to give us that brighter light. Another benefit of the LEDs, is you have the diode there. So, with incandescent bulbs, as you're kind of bouncing around down the road, as trailer's can do, that bulb has got those small filaments that can break over time, and you have to change out the bulb. Well, that's not the case here with our LED.
The lifespan of these is significantly longer than your normal incandescent bulb. Now, when not in use, this is a clear lens. And it's gonna be a polycarbonate, so it's gonna hold up really well. It's extremely durable. That way, if, you know, little rocks or whatever hit it, it's not gonna chip.
These are great housings here. And that's gonna house our three LED lights that give us 180 degrees. Giving us a beam pattern that's able to be seen across the board. So, we mount it on that flat surface, that 180 degrees will be easily visible. And the great part about this, is it has a single wire.
The grounds integrated on the mounting point. So really, it's just one wire that you're tying in to your running lights. And other than that, it's gonna be an easy replacement, or addition, to your trailer. Now, having some clearance lights like this one that's burnt out, it's a good time to not only replace, but upgrade. And really, lighting has come such a far way. LEDs are wonderful, they're very efficient, and they put off a really good light that these incandescences just can't keep up with. So, it's a good time to replace this with a nice LED version. So, I'm gonna go ahead and get this old one off and then I'll show you how to get our new one in and wired up. Now, we have our existing hole and that's how it mounted up. So, we're gonna need to drill two holes. We can use this existing one to pass our wire through. And the way I'm gonna do this, is just make sure that I have it nice and lined up here. And what I'll be doing is using the one side that doesn't have this ground. That way, we're not gonna damage this ground plate. So, pretty easy. We'll just go ahead, get this in place. And its going to be hard to get a marker, you could probably get a pencil in there, or something along those lines to make the mark, but I'm gonna just take a very small drill bit and kind of make some pilot holes here. If you have a punch, that'll work as well. And then what I'll do, so I don't have to use that ground, I'll just line this one up, and then make my drill on the other side. And then what I found, is the holes here are gonna be about perfect for a 5/16 drill bit, or 5/32, I'm sorry. And that 5/32 allows for our hardware to pass through. Now, it doesn't come with hardware, so you are gonna want to pick some up. We found some 8/32 stainless hardware with some washers and locknuts that's gonna do a good job of mounting this up. But I'm gonna go ahead get our holes drilled in, and then we can mount this. And obviously, before drilling, make sure that you don't have any wiring behind there that you could potentially damage. Now, these are really, really nice because they ground as you mount these to a metal frame here. But, we're gonna want to make sure we have a really good ground, so part of that is gonna be grinding down the surface. So, one of these, you're gonna want to make sure it's nice and clean and smooth, that way we have nice, clean ground. So, you can use Scotch-Brite or some sandpaper. Either way that's gonna work well. I'm just gonna throw a quick grind on it here. And then, now we can pass our wires through. Make sure our ground goes on that edge there. And with your hardware, go ahead and get this mounted up. Now, I'm using a washer here, to give it a little bit more, a little bit more protection. That way if you over-tighten it, at least that washer's gonna kinda disperse that pressure there and it doesn't crack our light. So, I'm gonna go ahead and put a flat washer and then a split washer here, before putting our nut on. And that's gonna allow this to kinda, hold in place long term, it's not gonna rattle loose. I do recommend getting some stainless hardware. That way it doesn't rust and corrode over time. And it's just gonna keep the lifespan of the mounting here, pretty much for a long time. So, good hardware makes all the difference. Now, as far as the wiring up portion goes, it's gonna be really simple here. Depending on the way that yours was previously attached, or if you're adding a new light, it doesn't really matter. You're gonna want to find the connection where it goes into the brown wire, which is gonna be your running light circuit. And that way, when you have the running lights on the trailer, these clamps lights will come on. So, this one does have a quick splice connector. Because this is exposed to the weather, we do have some wire loom that's seen better days here, but you don't want your wires to corrode. Especially on where they're making contact here, they can become brittle over time. So what I'm gonna do, is I'm actually gonna cut our brown wire here, and use a heat shrink butt connector. And that way when we have this tied in, it's gonna be nice and sealed up and watertight. So, I've gone ahead and I've just cut here where that quick splice was on our brown wire. And I'm just gonna take our yellow wire from our new light, twist this together with our brown on one side. And we'll get our heat shrink butt connector in place. And then we're just gonna tie back in to that brown wire on this side. Now, once those are crimped down, I'll go ahead and get my heat gun. And then just be careful not to get your wire loom, but, just kind of work the heat back and forth. If you don't have a heat gun, a lighter actually works pretty well. But as you keep this up, you're gonna see it start to shrink around it and that's gonna create that watertight seal. So, this is why they're super beneficial, especially in spots where the trailer could be exposed to weather, which in this case, it absolutely is. So, I'll go ahead and get this shrunk up. All that's left to do is test to make sure that it works. You can hook up to your truck or a test box and turn your turns, or your running lights on. And they should kick on. And that was a look at installation of the Optronics mini LED side marker and clearing slides..
Customer Satisfaction Score:
100% were satisfied with this product
0% of customers were not satisfied
- Wrong item was ordered
Customer Reviews
LED Mini Side Marker and Clearance Light - Submersible - 3 Diodes - Amber LEDs - Clear Lens - OP24FR
Average Customer Rating: 4.9 out of 5 stars (23 Customer Reviews)
2-1/2" x 1-1/8" Oblong. Waterproof, LED trailer light serves as a clearance and side marker light when properly mounted. Durable polycarbonate housing and lens. Surface mount to trailer - hardware not included. 1-Wire design. PC rated.by: John 03/23/2024
Work great, still working
by: Jim 05/17/2023
Nice little light. Easy installation.
by: Chris 06/03/2023
Item as described, fast shipping.
by: Michael06/06/2022
Exact match to factory installed lights….. Works great
by: Gary 04/26/2023
GREAT SERVICE
by: Bryan 03/20/2023
Fast shipping. Thank you.
by: Alan 02/23/2023
Always have what we need!
by: Dave 09/28/2022
The right high quality part, on time, at a fair price!
by: Peter12/28/2021
Exactly what I ordered and great service. They resolved an issue with a back order part and took great care of us!
by: Dana 12/07/2021
Exactly what I was looking for!
by: Travis 02/12/2024
by: Fred 11/15/2020
Great service fast delivery very good to do business with
by: Javier 02/14/2024
by: Charlene 03/08/2023
by: Steve 02/22/2024
by: Garry 08/10/2021
by: Robert 10/04/2023
by: Thomas 08/15/2022
by: Gregory 06/04/2023
by: William06/06/2022
by: Gary 01/17/2023
by: Kevin 03/09/2021
by: Donald 10/10/2022
23
23
See what our Experts say about this Optronics Trailer Lights
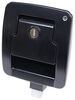
- How to Ground Optronics LED Mini Side Marker and Clearance Light with 1 WireThe ground for the LED Mini Side Marker and Clearance Light # OP24FR is established through the mounting hardware actually. If you check out the linked photo you'll see the metal tab on the backside of the light that will make contact with the trailer frame and establish the ground connection at the installation.
view full answer...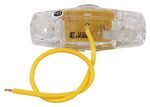
- Which Chrome Bezel Fits Optronics LED Mini Side Marker and Clearance LightThe correct chrome bezel for the LED Mini Side Marker and Clearance Light # OP24FR is the Snap-on, Polished Chrome Ring for MCL13 Series LED Lights # A13C2B.
view full answer...
Do you have a question about this Trailer Light?
Info for this part was:

Video Edited:
Jacob T

Installed by:
Kathleen M

Installed by:
Bradley B

Video by:
Dustin K

Edited by:
Daron K

Written by:
Brian T

Updated by:
Noah M
At etrailer.com we provide the best information available about the products we sell. We take the quality of our information seriously so that you can get the right part the first time. Let us know if anything is missing or if you have any questions.
Product Experts Available Now!
Call 1-800-940-8924
Thank you! Your comment has been submitted successfully. You should be able to view your question/comment here within a few days.
Error submitting comment. Please try again momentarily.