
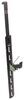
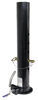
1-1/2" Wide Continuous Hinge - 6' Long - Stainless Steel
(7 reviews)
Price: $49.49
In Stock
1-1/2" Wide Continuous Hinge - 6' Long - Stainless Steel
Item # SH150
Our Price: $49.49
In Stock
Thank you! Your comment has been submitted successfully. You should be able to view your question/comment here within a few days.
Error submitting comment. Please try again momentarily.


- All Info
- Reviews (7)
- Q & A (0)
- Videos (1)
- Photos
Polar Hardware Trailer Door Hinges - SH150
- Piano Hinge
- Continuous Hinge
- Stainless Steel
- 72 Inch Long
- 1/8 Inch Diameter
- 1-1/2 Inch Wide
- Bolt-On - No Pre-Drilled Holes
- Weld-On
- Polar Hardware
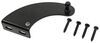
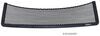
Great for cabinets, toolboxes, and panels in your enclosed trailer, this piano hinge provides uninterrupted support for your door. The hinge rotates 270 degrees and contains no pre-drilled holes, so it can be welded or drilled to match your setup.
Features:
- Hinge provides sturdy, continuous support along the length of your cabinet door or panel
- Continuous design offers more support than smaller, individual hinges and reduces stress on heavier doors
- 270-Degree rotation for full opening and closing motion
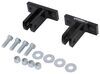
- Weld-on or bolt-on installation
- Bolt-on installation requires drilling holes into hinge
- 16-Gauge stainless steel construction is rustproof and resists corrosion
- Made in the USA
Specs:
- Dimensions: 72-1/2" long x 1-1/2" wide
- Each side of the foldable hinge measures 3/4" wide
- Individual knuckle length: 5/8"
- Pin diameter: 3/32"
847 Polar Hardware Piano Hinge - Stainless Steel - 1-1/2" Wide - 72-1/2" Long


Video of 1-1/2" Wide Continuous Hinge - 6' Long - Stainless Steel


Videos are provided as a guide only. Refer to manufacturer installation instructions and specs for complete information.

Video Transcript for Polar Hardware Continuous Hinge Installation
Hi there trailer owners. Today we're gonna be taking a look at polar hardware's line of continuous piano hinges. Today we are going to be using the six foot long, one and a half inch wide stainless steel version to replace the damaged entryway for this enclosed trailer here whose old one here had ripped off and if you wanna slide things in and out now it's really troublesome. So you can use this piano hinge here to get this back up and running, get that diamond plate back where it needs to be and allow this doorway to open and close easily. And this is what our replacement piano hinge looks like when it's installed. We will have to cut it to the appropriate length to match 'cause our original one here was about six foot in length.
We've trimmed it down to match the component here that we're using it with. This is our entryway step that allows us to easily roll items in and out of our enclosed trailer here without having to worry about our rear dipping into here. Now the diamond plating here was our customer's, this doesn't come included with it. Just the piano hinge here is what you're purchasing and we utilized that to repair his trailer here because the other one had corroded so badly and you can kind of see its transferred zone there that the screws we're coming out of it. It had ripped out of the floor and the hinge just really was not smooth in its operation and that's kind of what caused it to rip out of the floor.
I took some penetrant to it and really worked hard to get it to free up again and it was just worth replacing at this point 'cause of how badly the operation of it was. So, you will have to provide your own hardware to attach it. It is just the piano hinge. It's a stainless steel piano hinge. So you don't have to worry about rust or corrosion with it.
This is also, if you're working with aluminum and stuff, stainless steel is a good option so that you don't have to worry about corrosion occurring due to the similar metals. They are not the exact same metal but they're very close together in their property so they minimizes the corrosion that you get between those two metals. And I will say though, with a DIN stainless steel, it is a little bit harder to work with. I was able to cut through it with my chop saw but it was quite a bit of effort there so take your time with that. And drilling out the holes to attach it is also very difficult due to the the strength of the stainless steel so make sure you got some sharp bits on hand so that way you can drill out your holes 'cause we do have to drill out all the holes and stuff in it.
It just comes as a solid hinge all the way down and that way you get the option of putting it wherever you're wanting to use it. This is what we use it for, for our customer here but this isn't the only location you would find a piano hinge like this. A lot of your trailer doors of like for your side doors, for your smaller doors, many of those attached with a component like this like screen doors and stuff is well attached with this. So kind of just any folding object, you'll mainly see this in ramps and doorways is where this is kind of most commonly found. Now we do offer these hinges in varying sizes. So we have them in different widths here for the end so that way you can match it up appropriately. This one here is known as a three inch. You get about an inch and a half on each side of the hinge and we have them in varying pin diameters as well so you can get one for the appropriate strength that you need. We're using the quarter inch pin model here but we do have them in three eighths and half inch as well for those heavier duty applications. Well if this guy just be in just a simple floor, just kind of a smooth floor attachment here. We're gonna be just fine with our quarter inch. And actually I would recommend the quarter for like this application 'cause the smaller our hinges here the easier we're gonna be able to roll things over it. You go up to those bigger hinge sizes, those heavier duty ones, they get bigger and bigger and for like floor applications for rolling over it smoothly sometimes they may not be the best option. Smaller may be better for you. So here we are, we got our customer's trailer. This is their old piano hinge that they had here where it was attached to the wood of the trailer. It stays ripped up and it basically ripped out because the corrosion that had occurred here on the old one it made it significantly harder for it bend. You really gotta try. I sprayed a bunch of penetrant in here just to try to free it up some. That's what happened with it. It was just so seized up that when the door was opened this thing was tried to fold down, it ripped it out of the wood and many of the screws had rusted off and stuff as well. So we're gonna be taking the plate here that the screws had broken off from the rust. We're gonna attach the plate to our new piano hinge. We're gonna get rid of this old one but we are gonna use this kind of as a template to know the length that we need to cut our new hinge to match our plate here. And the main purpose of this plate, the reason why the customer had installed here is for the entry way here to make it smooth. So normally it'd be like this and then when you open your door, it's able to go down, cover up that gap so you can easily roll things in and out of the trailer without having to worry about your wheels dipping down into this. And it's just a little safer moving in and out, a lot easier to load and unload the trailer. So we're gonna bring these parts into the shop. We'll get this plate attached to our new one and then we'll come back out here and get it installed. We've brought it in here. Here's our old one and this is our new one here. I put electrical tape on it here indicating where we need to make our cut to match up with the proper length. This also works out kind of nicely 'cause it's right here on the edge of the hinge. So we can kind of cut right there and it should make it fairly smooth here on the edge kinda like it was supposed to be that way. All right, so we'll just put it in our saw here kinda lined it up with where our mark is. Now we're just gonna trim off the excess that we don't need. Okay. Got a nice cut there. We'll probably end up taking a file to it just to clean up those edges so we don't have anything sharp on there that we can cut ourselves on. We'll probably use the flat file today. All right, so now we're gonna attach our metal plate that they had to our new hinge here. So we got that cut to length. I set the plate on here and then if you look at it you can see that if you fold the end over here that we're gonna able to be able to floor this flat to the floor if we need to. So that's kind of why I sat it right here like this to make sure that it's gonna be able to close all the way. The next thing I was gonna do is I was gonna use these hex head screws here to self tappers to run down to attach it but if we do that, then the head of the hex is gonna be sticking up here and we're gonna lose the ability for that to lay flat. So instead we're gonna use these kind of tapered screws here so they're gonna be more flat on top so that way it'll still lay flush. They're still self-tapping on the end so that we're gonna run it right down into here and then I'm folding this in. After I fold it in, I'm just pushing this thing all the way in just kind of making sure it's all the way in that way we know that this will close and we can just open this up, make sure you've centered it side to side and that's right where we wanna put our screw. Now be careful here because we are going straight through the metal. So don't put your hands underneath right where you're drilling. And this is gonna be really difficult to drill through. So we've made our mark there. I'm gonna now take this and I'm gonna use a drill bit, a small one start it just because these self tappers, they're gonna have a very, very difficult time going through this hard stainless steel plate here. So we've got that one marked, I'm gonna get the drill out and kind of step it up a little bit with that drill and then we'll come back with our fastener. All right, so we started it with our drill bit, now we're gonna switch back to that self tapper and without even having our plate there, I'm gonna try and just see if I can get this to run through. And it kind of looks to me like we are mostly just smoking the end of this bit here. All right, so I think we're gonna have to continue to step it up just a little bit more here to see if we can get something to grab and bite through this. It's a very hard material. All right guys, so we we're able to get through it. We had to go to a larger drill bit in order to get the hole drilled out. We went with an 11/64" drill bit for the self tappers that we're using here. I believe these are three 316 self tappers. So after we went through it with that, we we're able to get it to make some threads here. You can see it's in there now. So now that we've got that kind of figured out, I'm gonna grab my plate so we can attach it to the sheet here. This way we can use our plate here as a template for the remaining holes. So I'm just setting this right on top here, dropping our bolt down through. And that's it. I don't wanna over tighten it just because we're not sure how much, you know, how the quality of those threads with it being so thick, so much harder here, we may end up pulling the threads on our fastener. So secure, it's gonna hold it where we need it. We're just gonna double check, make sure that it still shuts, push it up in there tight and we know we're good to go here. So now we're just gonna repeat this at the remaining ones working our way down, getting this drilled out and attached. Once we get all of our fasteners in, we're gonna address the issue of them sticking through the bottom, you know, we'll trim those off there. All right guys, we've got our self tappers run through so now we're gonna cut off the ends of all these. We're just gonna use our cutoff wheel to do so. All right, so we've got this side fully attached, we cut it all off. Now we're just going down and we are drilling out holes for where we're gonna mount it over on the trailer. So I'm just working my way down and to try to make them even, what I've done is I've moved in one link and then I put a hole there, I moved over five and then put one here, then I went over 10, put one there. And then just mirrored that on the opposite side, we moved in one over five over 10. All right, so now that we've got all of our holes drilled out, we've got our plate on here, we're back at our trailer. We're gonna attach it here on the floor going across the inside here and you'll see that, that way it's able to fold flush down on the floor when we're not using it and then it'll fold down and cover up that gap there. We're putting it at a position where it only hangs over the edge here by about a half an inch. That way there won't be too much of a leap here to go over from the metal plate. And then we've centered it side to side kind of measured from the wall here this side and we measured from the wall here with this side. Got it at about nine and a half on each side centering it. So now we've got the correct depth on each side and centered it side to side. We're ready to just take our self tappers and run them down. And I'm gonna start in the middle and work my way to towards the outside. All right. Now we've got that one started there. We'll just make sure that we're re-centered once again. I did have a pretty difficult time getting that one to start so for the rest of them, I'm probably gonna make a pilot hole so I'm not struggling so much because this one here, since I struggled, I can tell it's cocked itself a little bit but since we only have the one screw in there, we can still correct that but for the rest of them, we don't want to have that happen where it moves on us. Once we get our second one in here, the plate shouldn't be able to move so that the rest of 'em should be much easier for us to install. Now that we've got 'em all running, we just gotta check the operation of our door, make sure that it's going to open and close smoothly. Real quick when's it's checked, make sure that it sits flat like we want it to and it folds open like we want it to. So now as long as our door opens and closes, that'll finish our installation. All right, so I went ahead and take our door here and we'll flip it up and everything seemed to shut fine, there was no binding. It seems to go all the way to the seal. Let's just verify that we can cinch it down and it doesn't seem like we're putting any extra effort into cinching this down here. All feels nice and smooth in its operation. So I would say at this point we have a successful install. And that completes our look at polar hardware's line of continuous piano hinges..
Customer Reviews
1-1/2" Wide Continuous Hinge - 6' Long - Stainless Steel - SH150
Average Customer Rating: 4.9 out of 5 stars (7 Customer Reviews)
Great for cabinets, toolboxes, and panels in your enclosed trailer, this piano hinge provides uninterrupted support for your door. The hinge rotates 270 degrees and contains no pre-drilled holes, so it can be welded or drilled to match your setup.by: Michael08/20/2020
Works perfectly for a entrance ramp door flap hinge. It allows me to add a small strip up plywood to the ramp door to make a smooth ramp into the trailer.
by: Bruce03/22/2013
Needed a stainless piano hinge for my concession trailer. Etrailer had just what I needed and sent it out fast. Thanks guys

Bruce

9/22/2014
Still looks and works like new. Great replacement for those rusty ones you may have.
by: Dustin08/16/2017
Product worked great, I was able to cut it to the size I needed and screw it in to my tent trailer door. Good quality metal, seems like it will last. 4 stars because shipping took a little longer than expected and it arrived pretty bent. I was able to bend it back, fortunately. They need to send it in a plastic non bendable sleeve or something.
by: Mike08/01/2016
Product as described, shipping was fast...easy to do business with etrailer.
by: Tom O.10/18/2013
Needed SS hinges for a boat rebuild and these are just what I needed. One fifth the cost from a marine supplier!

Tom O.
10/18/2014
Still working great. If you need SS continuous hinges these will fill the bill.
by: Ed S.08/20/2013
Excellent service,quality product and at a decent price. Packaged very well. Thanks Guys!
by: Steve K12/20/2016
Awesome, I just need three more! I will add a photo when i complete the inside of the Camper
7
7
See what our Experts say about this Polar Hardware Trailer Door Hinges
- What Grade of Stainless Steel is Used to Make 6 Foot Long Piano HingeFor stainless steel piano style hinge # SH150 the grade stainless steel used is 304.
view full answer... - Can the 6-Foot Long Stainless Steel Piano Hinges be Cut In HalfAll of the hinges we sell like # SH150 are 6 feet long. You can certainly trim a 6-foot length as needed provided you use the proper saw with a blade designed to cut metal. Hinge # SH150 is stainless steel, 6 feet long, and 1-1/2 inches wide. Hinge # SH200 is stainless steel, 6 feet long, and 2 inches wide. Hinge # SH300 is stainless steel, 6 feet long, and 3 inches wide.
view full answer...
Do you have a question about this Trailer Door Hinge?
Info for this part was:

Expert Research:
Michael H

Video Edited:
Jacob T

Updated by:
Amanda M

Updated by:
Mike S

Installed by:
David F
At etrailer.com we provide the best information available about the products we sell. We take the quality of our information seriously so that you can get the right part the first time. Let us know if anything is missing or if you have any questions.
Michael B.
8/21/2021
Still working great