
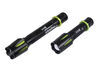
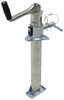
Replacement Sidewind Handle for etrailer and Ram 2,000-lb A-Frame Jacks
(12 reviews)
Price: $8.18
In Stock
Replacement Sidewind Handle for etrailer and Ram 2,000-lb A-Frame Jacks
Item # TJA-2000S-HD
Our Price: $8.18
In Stock
Thank you! Your comment has been submitted successfully. You should be able to view your question/comment here within a few days.
Error submitting comment. Please try again momentarily.


- All Info
- Reviews (12)
- Q & A (0)
- Videos (1)
- Photos
etrailer Accessories and Parts - TJA-2000S-HD
- Camper Jacks
- Trailer Jack
- Handles and Cranks
- Sidewind
- etrailer
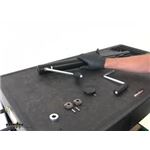
Replaces the sidewind handle from your etrailer or Ram 2,000-lb A-frame jack (TJA-2000S or TJA-5000S-B). Handle allows you to manually crank the jack. Handle arm has a corrosion-resistant, zinc finish.
Features:
- Replaces the sidewind handle on your etrailer or Ram 2,000-lb A-frame jack (TJA-2000S or TJA-5000S-B)
- Sidewind handle allows you to manually crank your jack
- Durable, zinc-finished arm resists corrosion
TJA-2000S-HD Replacement Sidewind Handle for Ram A-Frame Jacks - 2,000 lbs


Video of Replacement Sidewind Handle for etrailer and Ram 2,000-lb A-Frame Jacks

Videos are provided as a guide only. Refer to manufacturer installation instructions and specs for complete information.

Video Transcript for Rebuilding etrailer and Ram Sidewind Jacks
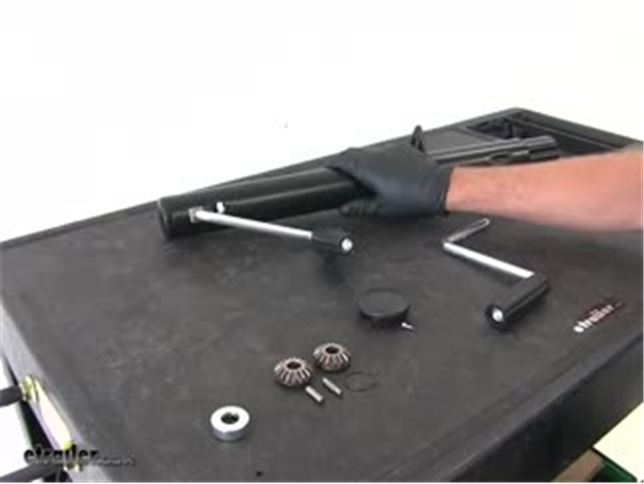
Today we're going to be showing you how to rebuild the etrailer Ram Brand Trailer Jack, this is part number TJA-2000S-V. Also, if you need a handle replacement, it's going to be part number TJA-2000S-HD. If you just need a handle replacement, you'll be using this one. We also have a replacement cap, this is in case you drop something on top of your jack or it happens to become cracked. We want to prevent any moisture from getting in there and causing damage, so we got that replacement. That is part number TJA-2000S-CP.
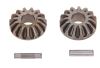
It's going to come with a set screw that you'll need to install that. Now for the gearing and the jack, it's going to have 2 gears. One is our base gear, see it's designed to hold the pin in place. The other one is going to be a pass through gear, the crank gear itself. You can see where that pin will pass through it. We're going to have the base gear pin, we're going to have our handle pin and a keeper for that.
This is going to be part number TJA-2000S-GR. Then to go along with that and I recommend if you have to change your gears, go ahead and change the bearing as well. This is part number TJA-2000S-VR. That is going to be our replacement bearing kit that's going to allow that screw to turn freely, very low friction, which is going to make it pretty easy for us to raise and lower our trailer. We will start by bringing our jack over and get the other parts out of the way. The first thing we will need to do is remove the cap with a small Phillips head screwdriver for that.
Just pull that up and off. Now inside you will see our gear kit. We've got our shaft gear here, our crank gear on the side and then you can see that base gear down there a little bit lower. Now this gear has that keeper that goes around that slot, it's a little easier to show you here. This is the same gear, it's over against the side and you'll see this little slot on the backside of the gear.
That's where this fits in, so we need to get that removed. Typically a small pic or a small screwdriver is what you're going to want to use to do it. Find one end of it and then lift up on that to get it around to the backside, or the outside of the gear. You can see how it's not sitting over on this edge, rather than being in the groove that's right behind it. Then if we put our pic in there, we should be able to just rotate the handle and push it off there. It's off far enough there, we can get to that pin, see right in that little U-shaped opening on the gear, you can see the end of the pin there. What we are going to do is just use a punch 5/32 of an inch is the size and we'll get that driven through. It won't take a lot of effort, but once you get it started most of the way through, what we need to do is turn that hole from being straight to where it's tilted down. That gives us a little more room, which will allow us to drive that pin our all of the way. At that point, you will see that our handle is free and we'll pull our handle out. If you're just doing the handle replacement, you'll just put it back together. We will set that aside and see there is that ring that went around our gear to help keep it in place. This is the gear itself, it goes on the crank and it's going to be a match for our replacement. Now this little spacer, you saw it fall out of there, that handle just passes through it, just takes up the gap that would be there. We also have the bushings that fit on the outside of the spacers, if you want to call them that. It just gives our handle a wider area to ride on, makes it a much smoother operation, as to opposed there just being a hole cut in the side of the jack there, it has a little area there to ride on. You don't necessarily have to remove these, but they are going to fall out, so we will just take them out now. We want to be sure to get that little pin that we knocked out. That's for our handle. We do have the replacement there, but you don't want it to stay in your jack mechanism. Set that aside then you will be able to lift that gear straight up and off. If you look in there you will see the little pin, the little floating pin there. That one is real easy to push out. Now you are going to pull out slightly on the inter-tube of the jack, and it's just going to slide on out for us, just like that and you will see that is where that bearing is going to sit. That's our friction reducer, that allows the screw to turn without it building up a lot of friction on that top plate that sits right above that. That is essentially all there is to the jack. Just extend the leg out and retract the leg back and these screws are really hard to damage, they are nice, strong heavy-duty screws, so it's a good way to save yourself money by doing these replacements. We take our new bearing, slide that down and on and you will see this little plate here, it's also a washer that goes underneath that bottom gear. This plate just rides on the bottom there and our gear rides on top. It's a thicker slot on one side and a thinner on the other. It's going to go in the thicker slot. Now we will line up the long groove in the inner tube of the jack with the little dimple that's on the outer tube there. Slide that down so our screw now comes up through the plate and then we will put our washer back on. We will grab the pin for that base gear, this is going to be the one without any grooves on it. Right above that plate there's a little gap, like to put it in there, grab it with my pliers and bring it into position. We want that to be about centered, so we've got about equal amounts sticking out each side of the screw there. Now we will just align the bottom of the gear with that pin. We waNt to make sure it seats all the way down, which really doesn't take any effort to do it, it just slides right on. Remember we have these on each side, so these need to go back in. Now we just want to get our handle started. Place our keeper ring on it, we can place our gear on and the handle itself just passes right through the gear. Now remember that spacer, we want to put that in place. Our handle goes right through it and it will come out the other side here. Now it's time to turn the gear, so that we can see that open, or that U-shaped slot in there and then you'll also see the hole for the handle that lines up with it and it's time to put our pin back in place. Place it in and then tap it into position. All right, one we got that about equal, we're going to start our little snap ring and get it put back on there. All right, see it's snapped back in place there, it's going to keep that pin from sliding out. Now you want to use some good quality grease. Any standard grease will be fine, just want to keep plenty in there to keep it protected. Be sure it works in there really well and then we'll be ready to put our cap back on and start using our jack. Now this is a really simple installation as you can see. It would be a great way to save yourself some money, rather than buying a new jack. There's not a lot to them. Just put our screw back in and that's all she's got. That's going to complete our rebuild. I hope it shows you how in just a few parts and a little time you can rebuild your jack, rather than completely replacing it.
Customer Reviews
Replacement Sidewind Handle for etrailer and Ram 2,000-lb A-Frame Jacks - TJA-2000S-HD
Average Customer Rating: 5.0 out of 5 stars (12 Customer Reviews)
Replaces the sidewind handle from your etrailer or Ram 2,000-lb A-frame jack (TJA-2000S or TJA-5000S-B). Handle allows you to manually crank the jack. Handle arm has a corrosion-resistant, zinc finish.by: David 11/27/2023
Part worked great, was able to get my jack back working in no time.
by: Edward 02/04/2024
Fit perfectly.
by: Daniel 06/12/2023
I had a graet service and the original part was delivered.
by: Mark04/15/2019
I ordered two replacement handles from etrailer and they were exactly what was advertised on the website. Website provided enough detail to make a perfect match for my replacements. Shipping fee was reasonable and delivered to my home within 4 days.
by: Donald06/19/2020
Handle and handle shaft bushing fit perfectly and easily into jack. Jack, damaged by me, is back in operation. Delivered quickly so equipment was out of service a minimal time.
by: Jeff H09/22/2016
Received handle and replaced with ease for a repaired, fully functional trailer screw jack.
by: Craig03/13/2018
Nice and solid crank handle at a great price!
by: Ralph06/01/2018
Good fit fast delivery

Ralph

6/1/2019
great
by: Dorin05/18/2019
Good product! I’m building something and it will be extremely usefull.
by: Scott 03/03/2021
by: Jim 02/11/2021
by: Brenda 07/04/2021
12
12
See what our Experts say about this etrailer Accessories and Parts
- Replacement Jack Handle and Crank for etrailer trailer jack # TJB-2001S-BThe correct replacement handle and crank for trailer jack # TJB-2001S-B is # TJA-2000S-HD. I have linked it to this page for your convenience.
view full answer... - Replacement Handle for a 2,000 Pound Ram Trailer Jackjack handle # MJ-1000B-HD is designed for 1,000 pound jacks and it looks like you have a 2,000 pound lift capacity jack. If your Ram jack is a side winding A-frame jack then you can use handle # TJA-2000S-HD instead. If it was a top wind handle then you would need # TJA-2000-HD.
view full answer...
Do you have a question about this Accessories and Part?
Info for this part was:

Video Edited:
Jacob T

Video by:
Kathleen M

Installed by:
Randy B

Updated by:
Wilson B

Updated by:
Mike S

Written by:
Amanda M
At etrailer.com we provide the best information available about the products we sell. We take the quality of our information seriously so that you can get the right part the first time. Let us know if anything is missing or if you have any questions.
Product Experts Available Now!
Call 1-800-940-8924
Donald
6/21/2021
Handle and shaft are still performing after one year. NO PROBLEMS.