
Summer Starts Here - Save up to 70%
Thank you! Your comment has been submitted successfully. You should be able to view your question/comment here within a few days.
Error submitting comment. Please try again momentarily.


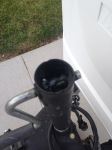
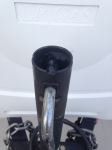
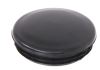
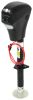
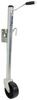
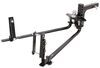
Replacement cap fits your etrailer or Ram marine swivel jack. Designed for MJ-1000B Series jacks.
Features:
Videos are provided as a guide only. Refer to manufacturer installation instructions and specs for complete information.
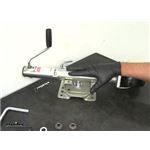
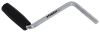
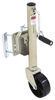
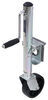
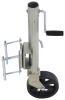
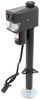
Today, we're going to be taking a look at the rebuild process for the etrailer, or Ram brand 1,000-pound lift capacity marine jacks. Now, there are a couple of different components for the jack that we have available here at etrailer, just depending on what your needs are. Here, we've got part number MJ-1000B-HD. That's going to be the handle and the handle pin. The cap replacement is going to be part number MJ-1000B-CP. We've got the internal bearing.
This is what's going to reduce the friction between the screw and the top plate on the jack. We'll show you how that goes. This is part number MJ-1000B-BR. Then, we've got our gear kit. Now, our gear kit's going to have a side gear and a base gear.
We've got a replacement handle pin, the base gear pin, and the keeper ring that's going to go around that handle gear to keep our pin in place. Now, for the gear kit, that's going to be part number MJ-1000B-GR. Now, we'll start by removing the cap, which we'll have to remove this little Phillips screw that's here on the side. We'll pull out on this upper edge, then lift up. You can see there's a little tab that goes in that hole there. If you're just replacing your cap, if the jack's working fine, but you want to keep it working that way, we'll just pop that back on, put your screw back in place, and you're job's going to be done.
Now, we're going a few steps further here. You'll see inside the jack, there's going to be a lot of grease and stuff in there. I want to get that cleaned out. At least we'll be able to see our pin location there. What you're looking for to find your handle pin.
It's going to be that little indention, this little half-round indention. There's going to be one on each side. Next is going to be the removal of that snap ring. It fits right in that groove, all the way around our handle gear. It's easier to see here rather than on the jack, but I just want to start at one end and pop it over to the back side, and then work around. It's going to then be between the outer housing of the jack and the gear. You see there's where the end of it is, so we try to get our pick in there. You could also use a small screwdriver, then we'll lift out on that, enough to get it, like we said, up on that back side. We should be able to turn our handle. We pop that off. We'll see now, it's just going to hang out there a minute while we get our pin out. Once we get that grease out of the way, you'll see the end of our pin is right there. We're going to take a 5/32 punch and drive that out toward the bottom. Now, once your pin's fully through, you'll see your handle be where it will float, so now we just want to lift up on that. If we're just doing a handle replacement, we'll slide that back in. We'll put out new pin in. We'll be set, but again, we're going to show you how to rebuild the entire thing here. There's going to be a spacer right here. Pull that out. This gear is kind of sandwiched in there, so we'll lower that down, set it aside. The clip, you see it fell out with this. There's our little spring clip. Then, these are bushings, with a washer on it, where these bushings fit up into those square holes. There's going to be one on each side there. We'll get that set over here to the side. Now, for our base gear, it's just a matter of lifting straight up on that. That's going to come out, all this grease. You'll see below that, there's going to be a little floating pin. You're going to lift upward on that. Then we should be able to bring that out of the very small hole right here, on top of the jack. Then, you also see a thin little washer on the bottom here. Now, these washers are not included, so you want to hang on to these. We can get these put back in. Now, if we pull the innertube on our jack down slightly, we can take out the keeper, and then you'll see inside it there, our bearing stays right underneath that keeper. Now just separate it. Got our bearing there, so we'll pull our old bearing off, put our new bearing in, and slide it right back together. As we slide that together, we want to drop in this top plate. It's going to go through the larger gap, and it's going to come out of the smaller gap there on the bottom. You'll see the screw itself. that comes right through that. Replace that washer back on. We've got our base pin there. That needs to go, again, through that same hole we took it out of. See, that's going to slide in pretty freely. You want to rotate that so it sits side to side, rather than up and down. You want about equal amounts sticking out of each side. Now, you'll see on our base gear here, it's designed to capture that pin, or prevent it from sliding in and out of the screw, so we just want to be sure when, we put that back in place, that we line that up. You can pretty much tell, because typically, the screw comes up here flush with the top of the gear, or pretty close to it. Just like that, you'll see there'll be a little recess, but not a great deal. Now we're ready to slide in the bushing for our handle. Slide our handle in just far enough to get our washer on. Let that rest there for just a second. For my handle gear, I like to get the snap ring started first. I'm going to place it on there, and then kind of work it around about three quarters of the way, or so. It should hold there, that way, once we have our pin in place, we just really have to tamp that down, rather than trying to work it all the way on, and all the way around, which can kind of be a pain. Now, this needs to slide in so it engages that base gear, so then we can slide our handle through it. Then, we've got our spacer to go in. Slide our handle on through there, then what we're looking to do is just line up the hole that's in our handle with our indention that was in our gear. See there You can see right through it. Then we'll take our handle pin, and we'll get that slid in. Then we'll tap that in. That needs to go in far enough so that we can get the snap ring around the outside. Now, we'll grab our pick. Work around to that edge where that ring is, and then just slowly rotate our handle, while applying a little bit of pressure, and it'll snap in just like that for us. Now, to protect the gears in our jack here, we want to fill this up with a nice, high-quality grease. You saw how much was in it before. You want to get at least that much back in there. Then, rotate the assembly to make sure it engages, fully coats our gears. You can see it's right back, really nice, smooth operating. Now, our cap's going to slide down, then push the top in, and then we'll just replace that little screw. That's it, just a couple parts, a few hand tools there, and you can rebuild your jack rather than having to do a complete replacement.
Average Customer Rating: 4.7 out of 5 stars (42 Customer Reviews)
Replacement cap fits your etrailer or Ram marine swivel jack. Designed for MJ-1000B Series jacks.Perfect fit for my Jack. Thanks
Product seems to be of good quality and probably fits a Ram swivel jack perfectly.
However, I purchased it for replacement on another brand. After watching etrailers video with the measurements, I figured it would fit. After cutting off the tab and making a few alterations, I was able to install it on my swivel jack. I am satisfied with the product and would purchase again if for some reason this cap disappears.
Fit perfectly
This was not the correct size for my trailer. There were no size dimensions in the description so I entered my trailer model and year. It was about 1/4 inch or more too short. The notch in the cap does not reach the groove on my jack. The lip in the cap will allow water to run down the inside of the jack.

ETrailer is the way to go for trailer parts and accessories. Easy order, reasonable costs, no muss, no fuss delivery! I highly recommend this business!
Product and Customer Service Excellent! Delivered as promised very timely. Product worked great with a RAM jack. Solved my problem so easily!
Replacement Cap MJ-1000B-CP fit my jack perfect, arrived on time, very good service.
Thanks, Bill Norfleet Dover, TN.
My old one Had a grease fitting, but was able to drill out to make it fit.
Excellent! Perfect replacement. Could not believe that I could find this piece.
Perfect fit. Fast service.

George J.

8/1/2020
Still functioning properly. Obviously made of good quality materials
Works as original, better then duct tapping it.
Product is fine, but it would have been nice if dimensions were listed before ordering to ensure fit.
Exactly the part I needed
Great customer service arrived very quickly and It item fit like a glove....
I ordered it, got confirmation same day and received product the day after that! Excellent!
Quick simple transaction with fast shipping. Thanks for the help!
The cap fit on with not trouble
Great quality and fast delivery. Love it
This cap replaced one lost and fits wel l.
Product was as expected.
it worked
Do you have a question about this Accessories and Part?
Info for this part was:
At etrailer.com we provide the best information available about the products we sell. We take the quality of our information seriously so that you can get the right part the first time. Let us know if anything is missing or if you have any questions.


Heather A.
12/2/2020
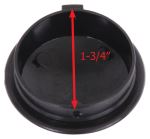
Thank you for your review. The cap is designed to replace the cap for the MJ-1000B series jacks like MJ-1206B. The cap will fit a 1-34 inch tube. We do have many caps available if you let me know which jack you have I am happy to assist.
Helpful Links
p-MJ-1206B.html