
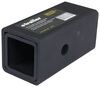
Replacement Cap for etrailer and Ram Square, Sidewind Jacks
(10 reviews)
Price: $4.56
In Stock
Replacement Cap for etrailer and Ram Square, Sidewind Jacks
Item # TJD-7000S-CP
Our Price: $4.56
In Stock


- All Info
- Reviews (10)
- Q & A (0)
- Videos (1)
- Photos
etrailer Accessories and Parts - TJD-7000S-CP
- Camper Jacks
- Trailer Jack
- Caps
- etrailer
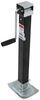
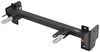
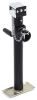
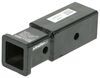
Replacement cap fits your etrailer or Ram square, sidewind jack (TJP-5002S-B or TJD-7000S).
Features:
- Replaces lost or damaged cap from your etrailer or Ram square sidewind jack
- Fits TJP-5002S-B and TJD-7000S
- Bolts included
TJD-7000S-CP Replacement Cap for Ram Sidewind Jack


Video of Replacement Cap for etrailer and Ram Square, Sidewind Jacks


Videos are provided as a guide only. Refer to manufacturer installation instructions and specs for complete information.

Video Transcript for Rebuilding the etrailer and Ram Square Jacks
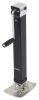
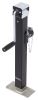
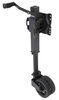
Today we're going to be taking a look at the complete rebuild process for the 5,000 wind A frame style trailer jack. This is going to be a side wind with metal cap. This is part number TJA-5000S-B. There are going to be three kits that you'll need to completely rebuild it or you can use whichever one you need. Starting at the bottom here in the base we've got a bearing. This is part number TJD-7000-BR. That's our friction reducer so this is going to sit on the screw.
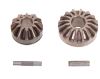
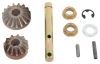
You can see how the inside turns independently from the outside. That sits down on our screw. As that rotates it keeps the friction from building up on the top plate. Next we're going to have the gear kit. We're going to have the side gear, the bottom gear, the handle pin, the base gear pin, and the keeper ring. These are part numbers TJD-7000S-GR.
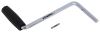
If you just need to do a handle replacement we also have that available. This is TJD-7000S-HD. That's going to be the handle, the end of the handle or the actual part you'll hang on to and the replacement pin. Let's get these moved over to the side for now. Since this is a brand new jack we're going to take apart and rebuild it with the same components so we won't be messing with those too much any more. Let's go over the process.
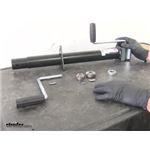
Again, we're looking at a metal cap jack here with side wind. We're going to have two bolts that pass through. Those are what keep that top cap in place. If you'll grab a ten mm socket you'll be able to get these backed off. You're going to be reusing these so you want to set them aside.
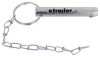
Kind of tap those out, then we'll pull straight up on that cap. We'll want to do what we can to get all the old grease out of here. Good idea to have some grease on hand. That way you can put it back in there when you're done. Just use regular multi-purpose grease is fine. It doesn't necessarily have to be high temp or anything like that. With most of that cleared out you're going to be able to see the small keeper ring that helps to hold our pin in place. It's going to be right here. You see it kind of rotate around there and spin a little bit. What we want to do is just work one side of it off right where it ends, up and then towards the outside of the jack. See how it's now not in the groove any more. It's sitting behind it. Then you work that all the way around and it should come off for you, just like that. Now we'll want to drive that pin. You can see there's that small semi-circle right here. The gear we need to drive that pin out toward the bottom. We're going to use a five 30 second punch. You could go with one a little bit bigger but you don't want to go too much bigger. You're going to see your handle right there will become free. You'll know you've got that pin driven all the way out. That's going to be the one that has the little grooves in it all the way around. At that point we can slide our handle down. As we slide this out this is going to be just a space here that's there so we'll pull that out. Continue to pull the handle out then we'll have our gear. You can see the little snap rings come with it there. Set those aside. Then you've got your washer. This doesn't normally experience any wear. The same as the bushings that we have in each side here. These are just flange bushings so we shouldn't have to worry about replacement of those. Now we can grab that drive gear there on the bottom. We'll lift that up and off. You'll see this little pin here. It just floats side to side. Pull that out. You'll see we've got a washer there that we'll want to remove. Hang on to that. We're going to be reusing it just like our bushings. Here, here, and there's another flange bushing that sits right here on the bottom. You're going to be reusing those so we'll hang on to them. Simply by lifting up on it and there's where we'll find our bearings. You can see how our jack works. Essentially as we raise the jack it's just going to extend this screw that's inside. These screws are nice and heavy duty. Very, very difficult to damage these. That's why these rebuild kits are so popular. You can just rebuild what you've already got. You don't have to worry about completely buying a new jack. You'll take your new bearing. You'll take your old bearing off. You want to take your new bearing drop that down on top. At that point you just line the little indention in the side of the outer tube but with the long channel that's on the inner tube there. Slide those back together. We'll see that screw come out of the top there. We want to use our bushing with the largest opening. You'll see there's a little flat spot there. Match that up with the flat spot that's in the jack itself. We can slide that in position. We'll place the larger of the two washers we removed over. You want to slide that through the screw. You want to have equal amounts sticking over on each side. Now we'll slide the larger gear. You can see right there where that pin wants to go. We'll slide that in just like that. The two flange bushings that go on the outside, again they're going to have a little flat spot there just to help with position. We want to take our gear and the keeper ring. We want to get it slid into place. I like to start that keeper ring while I've got it out here. It seems to help a little bit. You just want to make sure you don't start it to where it blocks that hole. Once we get into position hopefully we can just pull that edge down and around. Because we bring our handle through we want to replace the washer that we removed earlier. I want to get our gear into position and slide our handle through that. It's also going to go through that spacer we removed. Once we have that all the way through we'll be able to align the hole in our handle with the half round hole that's in our gear. That's where we'll put our pin back in. We'll want to drive it in at least as deep as what that groove is, that way our pin can sit around it, our clip can sit around it. It's about equal on both sides. Now it's time to get that little spring clip up into position. That's a rebuilt jack. Now we want to put some grease back in there. Now we'll bring our cap. It's going to slip down and over the top. Our carriage bolts slid back through. They've got a square part just below the head. We want to be sure that goes in the square side. Rotate that and put our nuts back on. Right back, let's check our operation. Make sure it's nice and smooth. You can see periodically we'll want to use that greaser just to insert some grease in there to keep everything running that way. That's all there is to it. Just a few quick steps and a few parts and instead of having to re-buy a completely new jack we can just replace those components and save ourselves some money.
Customer Satisfaction Score:
99% were satisfied with this product
1% of customers were not satisfied
- Product did not meet expectations
Customer Reviews
Replacement Cap for etrailer and Ram Square, Sidewind Jacks - TJD-7000S-CP
Average Customer Rating: 4.9 out of 5 stars (10 Customer Reviews)
Replacement cap fits your etrailer or Ram square, sidewind jack (TJP-5002S-B or TJD-7000S).by: Warren 09/17/2023
product fit perfectly. Great service and fast delivery
by: chutah09/29/2022
It’s hard to order parts for my Jack since I can’t find the brand name on my Jack. I am pleased with your service but wish I could view parts a little better. Thanks.
by: Wordney03/12/2023
perfect fit.
by: Tim 07/09/2021
Great stuff
by: Donald06/06/2019
The description is exactly what I recei ved.
by: Bill07/30/2019
good value for the price
by: Warren 09/09/2022
by: Marc A10/21/2021
by: Pamela 02/06/2023
by: William 03/01/2021
10
10
See what our Experts say about this etrailer Accessories and Parts
- Replacement for Ram Square Direct Weld JackThe replacement cap for the Square Direct Weld Jack w/ Footplate - Drop Leg - Sidewind - 28-7/8" Lift - 7,000 lbs # TJD-7000S is the Replacement Cap for etrailer and Ram Square, Sidewind Jacks # TJD-7000S-CP.
view full answer... - U-Style Trailer Jack Cap Recommendation that Uses 2 ScrewsI believe you are looking for the part # TJD-7000S-CP which is that U-style of jack cap that uses two bolts to secure to the jack body. I attached an install video for this as well.
view full answer... - Replacement Thrust Bearing Options for an Unknown Square Side Crank Camper JackI see that you got the Replacement Cap for etrailer and Ram Square, Sidewind Jacks # TJD-7000S-CP, which indicates that you have a square side crank jack. I have listed the square jack thrust bearings that we have below, along with their OD/ID, we do not have anything that matches perfectly. - Replacement Thrust Bearing Kit for Bulldog Trailer Jacks # BD500224 (ID 0.63" & OD 1.42") - Replacement Bearing for etrailer and Ram Square Jacks # TJD-7000-BR (ID 0.756" & OD 1.519") - Replacement...
view full answer... - Replacement Parts Available for the RAM Trailer Jack Part # TJD-7000SI do have several replacement parts available for the RAM Trailer Jack part # TJD-7000S but not an all inclusive rebuild kit. Instead you will need to select from the components listed below and repair the jack as needed. The most common fault on the above trailer jack is the spider gears and in order to replace them you will want to use part # TJD-7000S-GR. The rest of the replacement parts we have for the jack are listed below. If you can identify what is not working on the jack I would...
view full answer...
Do you have a question about this Accessories and Part?
Info for this part was:

Updated by:
Lindsey S

Updated by:
Wilson B

Updated by:
Mike S

Expert Research:
Jameson C

Video Edited:
Kathleen M

Written by:
Amanda M
At etrailer.com we provide the best information available about the products we sell. We take the quality of our information seriously so that you can get the right part the first time. Let us know if anything is missing or if you have any questions.
Product Experts Available Now!
Call 1-800-940-8924
Thank you! Your comment has been submitted successfully. You should be able to view your question/comment here within a few days.
Error submitting comment. Please try again momentarily.