
Summer Starts Here - Save up to 70%


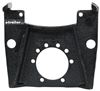
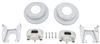
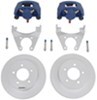
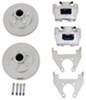
Caliper-mounting bracket is designed for use with 13" rotors or hub-and-rotor assemblies that have an 8 on 6-1/2 bolt pattern and 1/2" wheel bolts. Bracket mounts onto right-hand or left-hand 5-bolt brake flange.
Features:
Specs:
Videos are provided as a guide only. Refer to manufacturer installation instructions and specs for complete information.
Hi there trailer owners. Today we're going to be taking a look at Kodiak's Replacement Caliper Bracket. These brackets are available in a variety of different sizes and finishes, depending on the one that you have installed. You want to make sure you match it up with the appropriate bracket. And the size of the bracket varies depending on your axle size, as well as your rotor size. So you just want to pay attention to those.
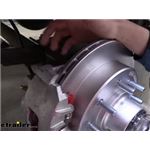
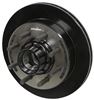
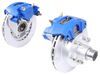
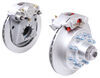
The easiest way to do it is really just to get down here and look at what your bracket looks like. And then you can help match that up with the picture on the website, because there's just so many different options and different axle and rotor sizes out there. They also come in finishes that are going to protect it from the elements, whether it be a Dacromet or an Ecoat.And this is what our new bracket looks like when it's installed. It's a direct replacement for the Kodiak one that was on here originally and is a great option for replacement if your old one got damaged. Maybe the bolts had worked themselves loose and they wallowed out.
Or you had a catastrophic failure with some bearings and it caused your whole wheel to vibrate and it maybe have damaged your bracket. Whatever the scenario may be, where you have damage here, you can just get just the replacement bracket, as long as your caliper and other components seem to be reusable. Maybe you just got to press in new bearings and it didn't destroy the entire rotor. You can get just this bracket here. You can get this replaced.
You do have to remove the entire hub assembly in order to access the hardware. But once you've got it installed, you can then just put everything back together and you're ready to go.And since this is a direct replacement from Kodiak, it's going to have all the exact same features as your other one. You're going to have the same protective coating on it, and it's going to mount up, all your hardware is going to line up. So everything's going to be nice and easy getting it back together.We'll begin our installation by removing the wheels. To do this, you are going to want to lift your trailer up.
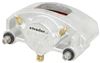
I recommend using your floor jack and lifting up by the frame and you need to have it high enough up that your wheels are going to be off the ground. It's easiest to do this by having four jack stands placed around the vehicle to get the whole thing above the ground. Now due to the tight clearances between the lug nut and the rim here, you may not be able to fit a impacts socket in there. We we're unable to fit one in there, so we're using a chrome socket. So before I lifted it up, I did use a breaker bar to break each one of these loose. So that way we're not going to be putting any stress on the chrome socket when we take it off here.So we're just going to zip them the rest of the way off. Once they're all loose, sometimes you got to give it a little tap to break it loose from the hub. And we'll just take it off and set it aside. Now we can start removing our hub. The cap here on the end just taps off, so we're going to use a rubber mallet. We're just kind of hitting away while pulling away slightly and it'll just come right off of there. Behind that you'll have your nut. There is a locking tab that's going to be located, you'll see there's two little tabs. One of them you need bend down. We're going to take our screwdriver. We'll get in behind the tab. Just bend it over and then just hit it with a screwdriver to knock that flat. Now we can take the nut off. I'm going to use a pair of channel locks. It's not tight on there and just work it off.I'm using the channel locks more just to keep myself clean here so I don't have to touch any of the nasty grease. Down below the hub, I did set down a napkin down there or cloth that I can set all these components on, because they are going to be pretty full of grease. Once the nut's off, we can grab our screwdriver. I like to stick it right here in the notch. And then if we pull out on our hub just a little bit, the outer bearing will come off of there. It'll slide onto our screwdriver and we can just set it down here on our cloth.Now our entire hub will slide off of there and we can just set it aside. We're going to be replacing all the grease. So we're just going to get all that old grease off of there. This is just the common red wheel bearing grease that you see, which we do sell here. We are going to be upgrading it with a marine grease to ensure that no moisture can get in here and cause any issues. In most cases, you don't need the marine grease, but depending on where you use your motor home, often if you're in a lot of areas where you're going to be down in the water, where it's potential that you can get a little bit in there, it's going to be better for it. We notice this guy's from the north where there's a lot of snow. So there's potential for meltage and a lot of other moisture getting down in there. So just to be on the safe side, we're going to use that.So now that we've got it all cleaned up, we're going to remove the five nuts that are holding the backing plate on. We'll remove these nuts using a 15 millimeter socket. You do want to save these nuts, as we're going to be using them to install our new components.On the back side of our brake assembly, we've got our wiring coming out there. We're just going to snip the wires here and then we can slide the whole hub off. And we'll also set this aside. You don't need to worry about the wires. They won't be active anymore. We can now take our caliper bracket and it is labeled outside there so you know which way to put it on. We want to install it with the caliper facing towards the rear. So we're going to slide it on and then line up our holes, see if there's several holes in there. It is only going to line up certain ways, but we know we want the caliper facing towards the rear. So it's going to line up just like that.We'll then just use the nuts that we had removed previously and re-install those. Then we'll just tighten them down. A star pattern can help ensure that it tightens down flush. Once you've got them tightened down, we'll then torque it to the specifications found in our instructions. Once you've got your replacement bracket installed, you can then just re-install your components you had to remove to get to it.And that completes our look at Kodiak's Replacement Caliper Bracket.
Average Customer Rating: 4.9 out of 5 stars (10 Customer Reviews)
Caliper-mounting bracket is designed for use with 13" rotors or hub-and-rotor assemblies that have an 8 on 6-1/2 bolt pattern and 1/2" wheel bolts. Bracket mounts onto right-hand or left-hand 5-bolt brake flange.Thank you for the excellent service
Exact figment from the one that was on my All American boat trailer. Ease of installation. Had me up and going in no time
excellent service and great communicati on
Fast delivery, great communication
Info for this part was:
At etrailer.com we provide the best information available about the products we sell. We take the quality of our information seriously so that you can get the right part the first time. Let us know if anything is missing or if you have any questions.


Thank you! Your comment has been submitted successfully. You should be able to view your question/comment here within a few days.
Error submitting comment. Please try again momentarily.