
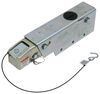
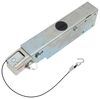
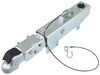
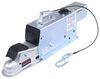
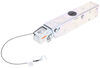
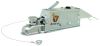
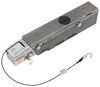
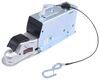
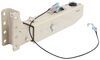
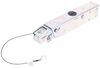
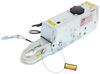
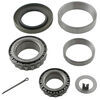
Replacement Master Cylinder w/ Inline Solenoid for Demco Actuators - Disc Brakes
(12 reviews)
Price: $107.14
In Stock
Replacement Master Cylinder w/ Inline Solenoid for Demco Actuators - Disc Brakes
Item # DM5919
Our Price: $107.14
In Stock
Thank you! Your comment has been submitted successfully. You should be able to view your question/comment here within a few days.
Error submitting comment. Please try again momentarily.


- All Info
- Reviews (12)
- Q & A (0)
- Videos (2)
- Photos
Demco Accessories and Parts - DM5919
- Brake Actuator
- Disc Brakes
- Master Cylinder
- Demco
Master cylinder with inline solenoid installs in your Demco actuator and wires into your tow vehicle so that your trailer brakes won't activate when you shift your vehicle into reverse. For use with Demco hydraulic surge-type disc brake actuator.
Features:
- Replacement master cylinder is designed for use with Demco trailer brake actuators with electric reverse lockouts
- Works with DA66B, DA86, DA91, DA10, DA16, and DA20 models designed for disc brakes
- Electric reverse lockout lets you back up without actuating trailer brakes
- Solenoid activates automatically when you shift into reverse
- Inline solenoid configuration
- Made in the USA
5919 Replacement Master Cylinder with Inline Solenoid for Demco Actuators - Disc Brakes
California residents: click here


Video of Replacement Master Cylinder w/ Inline Solenoid for Demco Actuators - Disc Brakes


Videos are provided as a guide only. Refer to manufacturer installation instructions and specs for complete information.


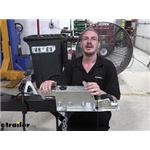
Video Transcript for Demco Actuator Replacement Master Cylinder with Inline Solenoid Installation
Hi there're, trailer owners with surge brakes and the Demco EZ Latch coupler and actuator. Today, we're gonna be showing you how to replace the master cylinder inside the unit, so we'll show you how to take this off. Get the master cylinder removed and the new one installed. There are two versions of the master cylinder, a drum and a disc brake version. Both look identical and install exactly the same. You do wanna make sure you're choosing the right one for your setup though for proper operation.
We'll be showing up the disc brake version today. We're just gonna take a look at it today and show you how to disassemble it. For your typical maintenance, if your master cylinder or something happens to wear out over time, it gets filled up with wrong type of fluid, a lot of moisture gets in there or anything like that and you gotta replace it, we're gonna show you how to be able to service it yourself here. So, the first thing you would wanna do is get the fluid out of the system. So, I actually took the bleeder screw at the back loose, but you could also take it loose right here at the back of the actuator.
It was just easier to drain it into a container towards the rear, a little bit closer to the ground, 'cause you really don't wanna get brake fluid on any painted surface. It is quite corrosive to paints and stuff. Your paint will come off for there, it'll discolor them, so I just try to avoid that. We did place a napkin under here for when we take that loose for any of the fluid that's left in there. When you do drain it, I do recommend that you pop the cap off here.
That'll let it drain a little bit faster. Air can get in this way and let it drain out. So, we've already let ours drain, so we should be pretty dry at this point. So, we're gonna head over to this side and we're gonna get our hoses disconnected here and our wiring disconnected. Then we'll have to take out the bolts here that actually hold the entire coupler onto the trailer because the actuator inside is not just gonna slide out of there.
Now, there are quite a few different versions of this particular surge actuator. You can get it in different weight ratings with different ball sizes. The particular one we're working on here today is gonna be a 7,000-pound version with a two-inch ball. We're also using the one that has the electric lockout for backup. That's nice for these boat trailers, 'cause when you put it in reverse, the reverse signal from your vehicle for the reverse lights will actually activate on the circuit. The other one just goes to ground there and that'll activate the solenoid and prevent it from being able to activate the brakes. That really comes in handy when you go to launch your boat, 'cause if you're trying to back on a ramp and the brakes are applying, it's gonna make a very difficult time. So, I do recommend that. They do offer these also in manual versions with the manual lockouts. You just have to get out and actually pull the lockout to activate it. So, you can get them in two different styles. If you have the style with the electric lockout, you'll have this additional cover here that protects that component. If you have just the regular manual lockout, you won't have this cover on here. The cover does install onto two of the bolts that actually holds the master cylinder into the coupler there, to the coupler assembly. So, we are gonna remove those. You're gonna use a 3/8 socket to take out these two bolts. We're gonna leave the other two in there for now. If you don't have the electric lockout, you can kinda skip this step where you'll have access to the back there. So, we'll just zip these outta here real quick. And then we can get that plate out of the way. And if you do have a manual version or something and you're wanting to upgrade to an electric version, you can actually purchase this kit here at etrailer that comes with the solenoid as well as the cover, so you can add that in line. You would have to bleed your brakes after introducing this component 'cause you're gonna have air in this section, so you have to bleed it all the way back again. We will be covering how to bleed your assemblies, just keep that in mind. So, now we did put a rag under there just in case. We're gonna make sure we hold here 'cause we don't wanna damage our solenoid for the electric lockout. So, we're gonna use a 9/16 to hold and then we're gonna use a 3/8 line wrench to take off our line. If you look at the difference here between the line wrench, you've got a lot more surface area there and it goes almost all the way around. You can't just slide it on like a regular box end wrench slides on. It's designed to be able to slide over a line and get that increased contact, so that way, you don't strip out the nut for your lines, 'cause it is gonna be a softer metal than what a lot of the traditional metals are that you would use for, like the actuator bolts and things, or not the actuator, but the coupler bolts and stuff like that. So, this metal's a lot softer, so a regular wrench, you can strip it out and round that off a lot easier, so you gotta make sure you got one of these. You can purchase line wrenches here at etrailer if you do need some. So, we're just gonna loosen this up. Now, again, we've already drained it at the back at one of the bleeder screws or you can take a line loose at the back, however you wanted to do it. I kinda recommend that, just 'cause you don't want brake fluid to get on any of your components. And it's just easier to keep control of where the brake fluid goes. So, we got our line slid out of there. We're just gonna back that out of our way. I'm gonna tuck it off to the side, so that way, it doesn't potentially drip on the frame. If we can, maybe we'll use, I kinda wanna keep that rag there. There we go, that'll kinda keep it away. So, we're gonna remove our ground wire. You can kinda follow that over. It goes to ground right there. We're gonna use a 5/16 or an eight-millimeter socket to remove this. And this can be different sizes. This is just a self-tapping fastener in there, so it's not uncommon that it could be a 3/8 or a 10-millimeter. So, we'll remove that out of there. Make sure you save your fastener 'cause we are gonna be putting on another one that does have the lockout. And then the other one in here, we're gonna just disconnect. So, we're trying to see where they've been connected and we'll just cut our wire at an appropriate spot. So, we can see that's all there. It looks like this is likely where it was wired in last time, so we'll make sure that we've got enough wire length. We'll probably snip it off here and then we'll clean that up. So, we're just gonna make an incision with our snips here. And it looks like this is also just a redundant ground that's tied into that ground wire. So, we'll be reconnecting to that. So, we're gonna leave ourselves a little bit extra there to be able to make that connection. So, we're gonna snip it probably back there a little bit, just so we can still access it. All right, so we've got our hose off, we got our wires off. We can now pull this whole assembly off. I'm gonna put the calf back on in case there is a little bit trace in there when we flip it over, it's not gonna get all over, 'cause you really don't wanna get this on anything. Try not to get it on your hands. Brake fluid is hygroscopic, which means that it absorbs moisture, so it will dry your hands out really bad. It's bad for painted surfaces and a lot of stuff, so just try to stay away from that and keeping that stuff off on any surface you don't want to potentially get damaged. So, now we're gonna use our gun here to remove the fasteners that are holding the actuator on. We have three here. And on the opposite side, in the same location, you'll also have three. Ours here are gonna be a 3/4 in size for both the nut and the bolt. Some are passing through with the nut on the inside. Some of the bolt is passing from the inside outward with the nut on the outside. So, there's an opening here at the bottom. You can take your wrench and slide it up in there. Sometimes, you can't get on the bolt right away, but as you go to loosen the bolt, you should be able to kinda slip that wrench on there to hold. There we go. And we'll just pull that fastener out of there and we're just gonna repeat this for the remaining fasteners. Make sure you fish all of your hardware out of the frame 'cause we are gonna be re reasoned that to resecure it. So, after we loosen it a few turns with the wrench and it got a little play in it, we are able to get a thin wall socking on there now so we can zip that out with the gun instead of having to waste a bunch of time with the wrench the whole time. And then of course, our last one here should be easy to access, so we'll zip that off of there as well. And then we're gonna head over to the other side and remove the same fasteners over there. So, that last fastener we actually removed, that was sticking from the inside outward, was a carriage bolt inside of a spacer like this. So, you might see that as well. That is nice because you don't actually have to put a wrench on the inside to hold. The spacer grabs on the square there and it just hit inside the frame, so you can just zip that nut off and then pop that bolt in. Now, when you go to pull out that last fastener, you wanna make sure you're supporting your coupler 'cause it's potentially could fall. It's kinda heavy towards this side. So, that last bolt, make sure you're holding that and then we can slide this whole piece off of there and then set that down. So, our actuator's held in by the two remaining fasteners. Or if you didn't have the electric lockout, you would have still two more in there. But since we have those remove, that cover, off of there, so we could easily access these parts. So, we're gonna switch back to our 3/8 socket to remove those two fasteners there. And our actuator, we may have to remove the cap. It looks like it would fit down in there, but it's kinda hanging up just a little bit, so we'll just slide it off there. This will then slide out the back. So, here we've got our original actuator, sitting next to the replacement actuator. And again, there was nothing wrong with this one. We're just showing you how to replace it, in case you needed to. One of the things you will notice is that the new actuator does come with new bolts and we'll show you why here. We'll keep that upright a little bit. These, I slid back in here because this is actually what holds the master cylinder here together, with these two bolts. So, let's take a look inside. You slide off the top. You can see it has have a gasket that seals. It's just a, kind of a cork-style gasket. So, we can go ahead and take our old actuator here. The plunger here, we're actually gonna reuse. That'll slide down into the assembly. So, you can slide that out and that'll slide right into your new one here. So, just line it up, just gently slide it in there. This is just a dust boot that you're sliding it in and then it will go into the cylinder for the master cylinder there, for the actual application plunger. You can go ahead and pull the dust boot off. If you want it to kinda just see on the inside there, there's the bore that the rod will slide in to activate the master cylinder. It does have a snap ring on there, so if you have a leaking seal or something like that, you could disassemble it further to replace it. But honestly, once you get kinda down this far, putting in a new unit's a good idea, maybe I've replaced this top seal if it was seeping around there or something, but I wouldn't do too much more disassembly 'cause this is when you start getting into the actual function of the unit here, as far as applying the pressure and getting proper amount of pressure to your brakes to activate them, so I would avoid messing with that. But this is just the top seal up here. So, if you got a little bit of seeping, leaking a little bit of air, that is replaceable up there by removing the bolts like I showed you. So, we're gonna get this guy set aside now and clean up some of our mess. And before we go to slide it back into the assembly, we do have to remove all the bolts. We're gonna use all the new bolts that it comes with. You do wanna be careful once you've removed these bolts 'cause it is just like the other one. That's what's holding the top cover on there. And I'm keeping downward pressure on the top cover 'cause I really don't want to separate the new unit if I can. Keep those pieces together. Maybe knock any little bit of debris away from there. We don't want anything to go down into the assembly. You saw how small the hole was on the other one, so you wanna make sure to keep any contaminants out of there. So, we're just gonna pinch that to hold it together. You can see the nuts for the bolts, when we screwed it in place, they're down there, in that little slots. They're held in there pretty tightly into that slot. It doesn't feel like it's gonna be able to just fall out of there or anything. I could probably pry it out if I wanted to but we don't really want to. We want those to stay there. So, now we'll slide it into our assembly here. All right. And now, we're gonna reinstall two of the fasteners, the ones towards the coupler end. Always make sure you hand thread your bolts first to make sure that you do get them started in the nut. You don't wanna cross thread it. So, each one, I could feel it started. Now, we'll run them back down. And don't run these down too tight. This is just a plastic assembly. We'll go back and make sure we got proper tension on the bolts. But for now, just run them down until they're snug, just to hold it up in there with minimal play, so that way, everything's kinda lined up. It's not a bad idea, too, just to take two fasteners and slide them in there. But we're not gonna tighten them down. We just wanna make sure that our holes are lined up for us. So, it looks like everything's lined up there, so we'll pull them back out. Now, you're probably wondering how am I gonna access this thing to push on the actuator without hooking it to my trailer. We'll be showing you that. This cover here is gonna be removable. You can kinda see on the sides, you can almost push in a little bit. There are like little tab that you would push in there. Surprisingly strong plastic. There we go. And if you wanted, you couldn't remove that first. It does make it a little bit easier lining this piece up. But you can see, it's got a big U there, so it's pretty easy to get that to line up when you're sliding it together. So, at that point, now we've got the new one installed. The one that we installed is for a drum brake system, that's why we chose this actuator. But the procedures to replace it for a disc brake system, from Demco, is gonna be the exact same as far as sliding it out. You just gotta make sure you have the appropriate actuator for the application. So, if you have drum brakes, make sure you're using a drum brake one. If you have disc brakes, you would wanna use a disc brake one, whichever. So, with our our new component in there, we're gonna lift it back up, slide it back into position and line up all of our fastener holes. We'll then just reinstall our fasteners. I'm gonna probably start with this forward one, just to get something in there to hold it, 'cause we don't want it to fall off on us while we're working. So, one of the things I did notice is I was having a difficult time in getting the bolts to line up. And without these back two ones in there, even that cover off, the new actuator, the gasket hasn't really been crushed yet, so it's kinda sagging it down just a little bit here in the back, making it difficult for the bolts to line up. So, go ahead and run your bolts down just a little bit. Nothing crazy tight. Just enough to draw it up some. Now, we'll grab our fish wire. And this is kinda what a fish wire looks like there. It's a wider gap than what we want for the bolts we're using, but we can make this work. So, you're gonna stick that in the hole that had the carriage bolt, if you are using carriage bolts. And then you're gonna bring that out the front, just like that. I always like to take it at the very end of my fish wire and I'll put a, kind of a 90-degree bend in it there. That just helps to keep it from falling out of the hole while I'm getting the other side threaded in. And if you got one here that you're trying to reuse multiple times, you'll wanna find where the thread starts and then follow that path while kinda pushing in on the wire. And that way, you can get it to kinda just glide right in the path. And you can see there that it's threading right on there for us. You do gotta keep it pressed inward if it's a reuse. 'Cause yeah, you don't get any of this stuff with the new replacement master cylinder there or actuator. And that's on there probably far enough that we can do what we need to do to get it pulled through. So, we're gonna push our bolts up into the frame. Line that up and pull our fish wire. Sometimes, it helps if you grab one of your screwdrivers and kinda use that with a little bit of force on the inside, 'cause this is farther than my fingers can reach, so I can stick this in there. And just kind of assist it 'cause the gravity is taking place and kinda pushing it at an angle. And then when you finally get it lined up there, it will just pull right on through. After you got it pulled through, go ahead and take your fish wire off of there. Try to save it if you can, 'cause we wanna reuse that on the other side. Also, try not to let the bolts, they want to push back into the frame. We'll then put a washer and a nylon locking nut on the outside. So, we're gonna go ahead. And I'm not gonna tighten it all the way down yet because some of the other holes for the other side and stuff may not be lined up very well. And if you snug it all the way down, you're gonna have a more difficult time kinda maneuvering it to get those bolts to line up. We are gonna get the carriage bolt in on the other side first and then we can go back and finish up these bolts. This one here is just kinda hanging out inside there loosely to make sure this actuator can't fall off there while we're working. This actually doesn't even have a nut on it. 'Cause with it's sticking through, sometimes, it kinda gets in the way a little bit of feeding your carriage bolt with the spacer on it. So, being able to move it up and down a little bit is convenient. All right, we got our carriage bolt in on the other side and our nuts started on each one. So, now we'll reinsert these bolts. The one that had the cut washer needs to go down there at the bottom. And then on the inside, we're gonna follow that up with a flat washer and then a nut to secure that on the inside. So, it's a little difficult to see in there, so just make sure you slide your hand in there and slide that washer on first. And then when you're holding the nut in there, it's really difficult to actually turn the nut, so it's easier if you turn the bolt here to get it to thread into the nut. So, you might have to push it out just a little bit and get it hand tight. There we go. And then we'll just move on to this one. I've already got it slid through there with it's washer on it. So, of course, on the inside, it's gonna get a flat washer and a nut as well. And sometimes, it's a little easier if you pull it out just a little bit. It just kinda depends on how your fingers can fit up in there. And you'll probably also want to turn the nut, I mean, turn the bolt to get it thread into this nut as well. All right, so we've got all these hand tight. We're gonna do the other side the same way and get all those hand tight, and then we can come back with our tools to tighten it all down. We'll now go back and torque our bolts to the bolt manufacturer's specification. If you're unsure who manufactured the bolts, there's plenty of charts online where you can look up by bolt diameter, thread pitch and grade. And you can usually find a torque spec based on those parameters that you can utilize to torque these down. Grade 5 bolts are what is recommended for these. So, your inner ones, you're likely gonna need to hold the nut with the wrench while torquing. We'll take our line and reinstall it and start it by hand. Go as far as you can by hand first 'cause again, we don't wanna cross thread anything, especially once you get this far. So, we got that in there now. Now, you need your wrench to hold this 'cause we don't wanna damage the solenoid. So, hold that. And then use your 3/8 wrench to snug it down. And of course, your line wrench. And then what sometimes I'll do is, with this being a flex hose, I'll turn the flex hose to this direction and kinda twist the flex hose beforehand. So, that way, when I go to snug it down, it kinda twists the hose back upright. I'm just gonna loosen it just a hair. Twist our hose just a little bit and snug it down my hand. And we'll put our wrench on there and snug it down with our 3/8 wrench. There we go, and that's decently snug. We'll put maybe a little bit more on it. And you'll notice that the line has a nice gentle curve in there. We're not twisting the hose. The pre-twist we did have allowed it to bend back upright and go down. We'll hook up our lockout solenoid. They do come pre-stripped but you probably wanna strip back just a little bit more. That'll be a difficult amount to be able to attach to. So, one, of course, is gonna go to ground and we've got our ring terminal here that we can reinstall into the location there. And then the other one here, we're gonna clean this up and reattach it back into the trailer there. So, we're gonna just go ahead and strip these back just a little bit more. Now, they're either both yellow because it doesn't matter which one goes where. Just one of them has to go to ground and the other one has to go to the reverse lockout circuit or that would be the reverse light or backup circuit from your vehicle. So, we'll strip that one back and we'll strip this one back just a little bit more. All right. So, we'll go ahead and hook up our ground first since it's right here. We'll strip that one back. Go ahead and take our heat shrink butt connector. Slide it over the end there and crimp it down. And I do recommend a heat shrink butt connector because we're outside the vehicle. It's on a boat trailer, this is definitely gonna be exposed to moisture, so we'll seal up the ends with our heat gun once we've got our connections made. And based on length, I think I'm gonna use the one that's a little bit higher up on top for the ground one. Just to make sure I got enough length of wire to reach down here to our other circuit This one's just a little bit closer. And we'll get the electrical tape off here and get this one cleaned up and we'll get our other one attached the same way back to this circuit. With our heat gun, we'll seal those up. We can now go ahead and reinstall our ground wire. We'll push that wire loom back on there. Line it back up with the hole, reinsert it. And then use our 15/16 or eight-millimeter to run it back down. Make sure it can't rotate, so we got a good ground. And now, we can reinstall the cover onto the back here, covering this stuff up. This does need to be done before you go to fill up the fluid because without these four fasteners tightened down, it can pull in air around that gasket that we kinda saw when we had it disassembled. So, we'll just line that back up there and put our fasteners back down in there. Make sure we start them by hand, and then go ahead and run them on down. And now, we just wanna snug these back up 'cause we didn't have them all the way fully tightened. You don't wanna tighten them very tight 'cause again, it is just a plastic housing. It threads into a metal nut but you don't wanna compress it too far. So, just stay on the lighter side. If you have an inch-pound torque wrench, you would probably wanna use that and keep it fairly low. So, this is a drum brake setup here and you're gonna find your bleeder screw on the wheel cylinder, where you hooked up your line, it should be right next to it. Now, if you we're working on a disc brake setup, I've got a sample caliper here to show you. Typically, something like this. And you'll notice on the disc brake setup, this is where the line would enter and here's the bleeder screws. Now, not all disc brake calipers are gonna have two bleeder screws. But if they do have two bleeder screws, you would always wanna use the top bleeder screw when bleeding your brakes. And the size of the bleeder screw can vary. It looks like this is probably 5/16 for this Kodiak caliper. And over on our drum brake here, I know that that's gonna be a 3/8 in size. So, we're gonna be bleeding drum brakes. But again, the procedure's the same, it's just the location of the bleeder that you need to really pay attention to. And always use the top one. With drum brakes, you shouldn't have multiple. There should just be this one. And when I do this, I always wanna start at the wheel that is farthest from the actuator. So, we're gonna go ahead and start on the passenger's side rear here. That's typically the farthest one. But it just depends on where your actuator's located, if it's in the center, the left or the right. So, we're gonna start on this one though, 'cause this is the typical, usually the farthest rear. For us, it's gonna be the farthest to the rear. So, now we're gonna go ahead and take our little cap off of there. Don't lose your cap. It's nice to have that on there to keep dirt, debris and stuff from filling up in here and clogging up your bleeder screw for future maintenance and things like that. So, we're gonna go ahead and loosen this up. Now, we haven't filled it with fluid yet, but we're gonna do gravity bleeding first to let nature and gravity kinda do most of the work for us here and minimize how much we have to pump our system. So, I'm opening up the bleeder screw. And I went ahead and pulled it open just a couple of threads there. In most cases, you don't need to open it that far when bleeding. But when doing gravity bleeding, a little bit extra opening helps that flow just kinda work naturally better. So, you may also wanna take a rubber hose and place that on there and bring it down to your pan because brake fluid can be pretty bad for painted surfaces, wearing off the paint and stuff. So, we're gonna also grab a little hose and have that go down to our drain pan here, just to minimize exposure of brake fluid on our components. All right, we've slid our hose on there to direct it down into either a container or a pan. We do have a container that we kinda just rigged up here. This is just an old sports drink bottle. So, this works out fairly well for something like this. But again, we have a pan under here as well, just in case the hose does drip a little bit, we're catching it. So, now we're gonna head up to our actuator and we're gonna go ahead and fill it up and then let nature take its course and let gravity do the best it can to start pushing the air from the front, back through our lines and out and getting that fluid there. Now, even though we are gonna be gravity bleeding it, you are still gonna have to do some pumping. Gravity's not gonna do all the work, but it will minimize how much physical labor you have to do. So, here we are at the front now. I went ahead and took the cap off of our actuator. If you look at the top here, you'll notice that it tells you what specification of fluid to use. You can use either DOT 3 or 4 fluid. In this particular setup, we're gonna be using DOT 3 today. Again, you can use either. You do wanna make sure that you're using brake fluid from a new container 'cause brake fluid is hygroscopic, which means it absorbs moisture. So, even an open container that's been sitting for a while can actually draw that moisture out of the air. And the more moisture that is in your brake fluid, the lower the boiling point is in the fluid and we don't want fluid to boil. We're gonna be careful not to spill the fluid and go ahead and fill it up. And since we're gonna be bleeding it, we're gonna get it pretty close to the top 'cause we are gonna be losing fluid as it goes through the system and out towards the container that we have at the back. All right, so we've got it filled up there. We're gonna go ahead and let gravity do it and take its course, so you're probably gonna see some bubbles there as it starts to make its way through the system. Some of the air's gonna come to the top here. Some of the air's gonna get pushed back through that open bleeder screw we have towards the rear. We went in and let it gravity bleed for a while. We ended up not really getting any fluid out the back. Sometimes you do, sometimes you don't. Sometimes, lifting up the front of the trailer to make it the highest point, which it should already be the highest, but sometimes, lifting it up a little higher can help speed up that process or get it started. But in the event that it doesn't, no big deal, you can still pump it manually. So, we've got it all topped up here. After you've got it topped up, it is a good idea to put the cap on. In a lot of cases, you don't want the cap on when bleeding, but we we're trying to minimize how much mess we make here and keep it from kinda squirting back out of there. Our assistant is gonna push in and we're gonna be at the back and we're gonna open up the bleeder screw. So, we're gonna go ahead and head to the back now to the wheel and we'll communicate with our assistant here to press. And what we want to happen is we want our assistant to press it in. We'll open the bleeder screw. Let the fluid come out or air, whatever we get out of it. We'll close it, our assistant will then release. And then he will then press in and we'll just repeat that process over and over. But we never want to have the bleeder screw in the back open when our assistant is releasing 'cause that's gonna draw air back in our bleeder screw. Go ahead and push it in. Our assistant's gonna press. We're gonna open and there's our fluid coming out. I can see a few air bubbles there, so we're gonna go ahead and close it back up. Okay, you can go ahead and release. Our assistant's now released. So, then what we're gonna do is we're gonna now have him press it again and we're gonna open it again and just keep rinsing and repeat until we get a solid stream of fluid out. Every few presses, you may wanna recheck your reservoir and refill the fluid 'cause you don't want it to go empty. If it goes empty up there, it's now drawing in air from the front, and we don't want any air in our system. So, go ahead and press. There you can see all that air shooting out of there, so we're gonna close it. You can go ahead and release. And now that he's released, you can go ahead and press again. And that was a pretty good solid stream we've got there. So, we're gonna double-check our reservoir and probably hit this one one or two more times, then we're gonna head over to the other side and do that one and you just rinse and repeat for however many wheels that you have until you get a solid stream out of each one. And once you've got everything bled, you can go ahead and reinstall your wheels. If you purchased new drums and hubs from us, they do come with new lug nuts for half-inch studs, so you can utilize those as well. We can go ahead now and tighten them down. The new nuts that it comes with is gonna be a 21-millimeter in size. And when tightening them down, you wanna do it in a star pattern. This will ensure the wheel draws in evenly. And the tapered side of the nuts should face the wheel with the flat side facing outward. And once you get this back on the ground, you'll wanna make sure you torque your lug nuts to the manufacturer's specifications. And that completes our look at Demco's replacement drum brake master cylinder..
Customer Satisfaction Score:
96% were satisfied with this product
4% of customers were not satisfied
- Defective
- Wrong item was ordered
Customer Reviews
Replacement Master Cylinder w/ Inline Solenoid for Demco Actuators - Disc Brakes - DM5919
Average Customer Rating: 4.9 out of 5 stars (12 Customer Reviews)
Master cylinder with inline solenoid installs in your Demco actuator and wires into your tow vehicle so that your trailer brakes won't activate when you shift your vehicle into reverse. For use with Demco hydraulic surge-type disc brake actuator.by: Kurt 03/15/2023
This Demco master cylinder works flawlessly. I have been using it for a year now and I am very happy with it. Highly recommend this part.
by: Steven 02/03/2024
Fast shipping. Replacement works perfec tly
by: Richard 07/21/2023
Switched from drums to disc brakes and this unit has worked great so far i have about 1200 miles on the trailer with it and no problems.
by: Eugene 02/10/2023
Works fine. Threads on cap strip easil y.
by: K. Wold06/08/2021
Exact fit and rapid shipping. Shipping cost very reasonable, not outrageous overcharging like some greedy sellers. Friendly and knowledgeable customer service. Will certainly return to purchase again.
by: Earle08/31/2021
Master cylinder arrived as described on their website and bolted right in place of the damaged cylinder.
by: Curt 12/16/2020
Great customer service! It’s nice to deal with people that care about you.
by: Yolanda10/06/2022
by: Sam 09/13/2022
by: Jeff B05/22/2021
Perfect match
by: Stacy 04/13/2021
by: Troy 07/29/2021
12
12
See what our Experts say about this Demco Accessories and Parts
- Replacement Parts Available For a Demco DA10 Surge Brake ActuatorWe do have a large selection on replacement parts for a Demco DA10 surge brake actuator. Replacement Shock # DS12426 Slide Repair Kit # DM5943 Replacement Drum Brake Master Cylinder w/ Bypass Solenoid # DM5920 Replacement Disc Brake Master Cylinder w/ Bypass Electric Lockout # DM5918 Replacement Drum Brake Master Cylinder w/ Inline Solenoid # DM5921 Replacement Disc Brake Master Cylinder w/ Inline Solenoid # DM5919 Reverse Lockout Solenoid # DM11993 Replacement Solenoid Cover # DM11674-95 Replacement...
view full answer... - Switching Master Cylinder in DA66B to Convert to Disc BrakesYes, you can swap out the master cylinder in your DA66B to convert to disc brakes. Since it does not have a reverse lockout, you actually want the # DM5919 instead of the # 5672. The # DM5919 comes with an inline solenoid. You will also need a 5-way for your trailer # HM47910 as well as an adapter for the vehicle side # C57187.
view full answer... - Recommended Replacement Master Cylinder For Demco Hydraulic Brake Actuator DM8605101The Replacement Master Cylinder w/ Inline Solenoid for Demco Actuators - Disc Brakes # DM5919 you were looking at is the correct replacement for the Demco Hydraulic Brake Actuator w/ Electric Lockout - Disc - Zinc - 2" Ball - 6,000 lbs DM8605101 you have. I included videos for each of the products mentioned for you to take a look at.
view full answer... - Is Demco Replacement Master Cylinder Compatible With Kodiak Disc Brake KitYes, the Replacement Master Cylinder w/ Inline Solenoid for Demco Actuators - Disc Brakes # DM5919 is compatible with the Kodiak Disc Brake Kit - 12" Hub/Rotor - 6 on 5-1/2 - Dacromet - 5,200 lbs to 6,000 lbs # K2HR526D.
view full answer...
Do you have a question about this Accessories and Part?
Info for this part was:

Edited by:
Lindsey S

Installed by:
Jeff D

Installed by:
David F

Video Edited:
Chris R

Updated by:
Wilson B

Written by:
Kristina F

Video by:
Schuyler H
At etrailer.com we provide the best information available about the products we sell. We take the quality of our information seriously so that you can get the right part the first time. Let us know if anything is missing or if you have any questions.
Product Experts Available Now!
Call 1-800-940-8924
Kurt B.
3/16/2024
This Demco master cylinder works flawlessly. I have been using it for a year now and I am very happy with it. It was easy to install, easy to bleed, and the reverse lockout solenoid performs perfectly. Highly recommend this part.