
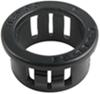
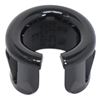
Snap Bushing Grommet - 7/16" ID, 9/16" OD
(28 reviews)
Price: $1.40
In Stock
Thank you! Your comment has been submitted successfully. You should be able to view your question/comment here within a few days.
Error submitting comment. Please try again momentarily.


- All Info
- Reviews (28)
- Q & A (0)
- Videos (1)
- Photos
Spectro Wiring - SWC8055
- Wiring Protection
- Bushing Grommet
- Spectro
- 7/16 Inch Diameter
- Nylon bushing protects wires from raw-edged metal holes
- Snap and locks into holes simply by pushing
- Inside diameter: 7/16"
- Mounting hole diameter: 0.562"
- Overall diamter (w/Lip): 21/32"
- Grommet thickness: 13/32"
- Metal thickness (max): 0.125"
- Max temperature: 257 degrees F
8055 Snap Bushing Grommet - 7/16" ID, 9/16" OD


Video of Snap Bushing Grommet - 7/16" ID, 9/16" OD


Videos are provided as a guide only. Refer to manufacturer installation instructions and specs for complete information.

Video Transcript for Spectro Snap Bushing Grommet Review
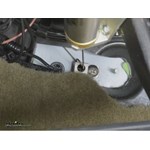
Today we're going to review and install the Spectro Snap Bushing, part number SWC8055. Note, the snap bushing is available in two sizes: the 7/16 inside diameter and a 9/16 inside diameter, part number SWC8057. Here's what our Spectro snap bushing looks like. This is a nylon bushing that will help protect our wiring as it passes through our pre-drilled hole. Typically that hole is drilled into sheet metal like a firewall. The raw edges of the metal can chafe or dig into the wiring or even an air line, and the snap bushing will protect it. Once the snap bushing is slid through your pre-drilled hole, the locks here will help hold it in place and the face of the grommet will be on the other side of the firewall, so we'll have part of the grommet on each side holding it in position. When drilling it out, you're going to open it up to approximately a 9/16 hole.
That makes the inside diameter 7/16 and the outside overall is 21/32. The grommet itself is 13/32 thick. Our grommet is typically used in areas where there's not a lot of heat, but it will hold up to approximately 257 degrees Fahrenheit. Now with the hole drilled out, we'll go ahead and take our snap bushing and install it. Put it in the hole, push it into place, and it locks into position. We're now ready to route our wiring, air line, or whatever you need to route through the protected hole.
There you have it for the Spectro Snap Bushing, part number SWC8055.
Customer Satisfaction Score:
97% were satisfied with this product
3% of customers were not satisfied
- Wrong item was ordered
- Product did not meet expectations
Customer Reviews
Snap Bushing Grommet - 7/16" ID, 9/16" OD - SWC8055
Average Customer Rating: 4.7 out of 5 stars (28 Customer Reviews)
by: David09/11/2023
You sent me the wrong size again
by: Gene R 12/13/2016
Absolutely Superb Service! On the 23rd of September at 10:10 a.m., I ordered a brake controller and several other items from the etrailer.com website. By 12:16 p.m. of the same day, I received a notification from etrailer that the order had shipped. The complete order arrived at about noon on the 26th. Ordering on the website was easy. All items were described very clearly and pictures were provided for them. The service at etrailer is absolutely superb. I would recommend this company, without hesitation, to anyone needing trailer parts or accessories.
by: Scott07/25/2018
The fit was a bit loose in the hole I drilled, but the location wasn't perfectly flat. I used silicone sealant to secure it.
by: Archie Vanderver01/27/2017
Everything I ordered came exactly as it showed them to be but it took one of them 12 days to get here and the other one only 4 days. I don't think that is the fault of etrailer I think it's a problem with the US Postal Service.
by: Den J07/12/2014
We put it on a 2009 Silverado crew cab. Works great but would be better with 3' extra wire. Would have brought wire through the firewall but had to drill a hole in the floor.
by: Leon 10/05/2020
Wish I had gotten a larger one. Had to make an additional hole in the firewall due to the small size.
by: Lee09/22/2016
Timely shipping and part exactly as adv ertised.
by: Kenneth04/02/2018
Prompt shipment...product is good quali ty
by: Tate11/19/2016
I only used one but it worked like I had expected.
by: Kenneth04/02/2018
Prompt shipment...good quality
by: Gerald B06/26/2018
All of my parts worked great.
by: Jason02/08/2018
Works as advertised.
by: Nathan N.07/01/2016
Does the job as intended.
by: Joe Stan07/08/2013
Exactly what I expected. Good Quality
by: MUNSTER06/07/2017
GREAT ITEM, WORKS WELL.
by: Bob Hitchins 12/18/2016
Works as advertised.
by: BT09/12/2014
perfect for routing wires thru firewall
by: Jaime L.02/22/2016
Shipped to me and just what I expected.
by: Ryan11/11/2013
Great service great products, couldn't ask for more. Thanks.
by: James03/12/2020
Products and service that I received was Great!!
by: William07/09/2019
Good fit for what I need
by: Keith 09/26/2022
by: Anthony 08/27/2022
by: Mark01/02/2023
by: Steve 12/20/2021
25
28
Show More Reviews
See what our Experts say about this Spectro Wiring
- Mounting a 7-Way Bracket and Routing Wires Through the Firewall on a 2009 Hyundai Santa FeAs far as mounting the 7-Way bracket that comes with # ETBC7 I recommend adding the no-drill long bracket, # 18136. Attach it to the hitch and the ETBC7 bracket to it. As far as going through the firewall on the vehicle if you are able to route it through one of those spots you mentioned, that would be ideal. You may need to tape the wires to the end of a straightened coat hanger and then push the opposite end through the spot and into the cab. Then you would need to go into the cab and...
view full answer... - How to Install an Aftermarket Brake Controller on a 2015 Chevroet Tahoe with OEM Brake ControllerThat is correct, because your OEM brake controller is not compatible with electric over hydraulic brakes, the Prodigy P3 brake controller, # 90195, and the Plug-In Wiring Adapter, # 3016, will work in your 2015 Tahoe and allow you to use the Titan Disc Brake Kit with Electric-Hydraulic Actuator, # T4843800. Since your Tahoe has the OEM brake controller installed in it there are a couple of more steps you will need to take to make sure you do not get codes on the vehicle's computers and...
view full answer...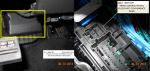
- Installing Hopkins Smart Hitch Backup Camera Without Cutting Through FloorIf you are referring to the Hopkins Smart Hitch Backup Camera and Hitch Aligner System # HM50002, depending on your vehicle, you may be able to go through the firewall which you can drill in order to run the cable from the monitor back to the camera without going through your rubber floor. Anytime wiring passes through the firewall, the opening should have a grommet # SWC8055 and sealant # LT37464 to prevent the metal from wearing away the wire insulation and possibly causing a short...
view full answer... - How to Install a Prodigy P2 90885 Brake Controller in a 2014 Kia Sorento To install the wires of the # ETBC7 that get run to the battery of your 2014 Kia Sorento so that you can install the Prodigy P2 Brake Controller part # 90885 you will need to look for a grommet or knockout in the firewall to route the white brake wire into the cab. If none is available, you can drill a hole on a section of the firewall where there is no obstruction on either side. You will need to drill a hole to install a grommet # SWC8055 large enough for the 3 wires that will pass through. I...
view full answer... - Hole Diameter For Flush Mount Rubber GrommetThe Optronics Flush Mount Rubber Grommet # A11GB and entire light assemblies like # MCL111AB will install just fine in a mounting surface with a 1/4-inch thickness. This grommet whole requirement is ¾” round made specifically for 3/4-inch Uni-Lite marker/clearance and utility lights. The outer diameter is 11/16". If you also need grommets for trailer wiring we offer 7/16-inch inner diameter grommet # SWC8055 and 9/16-inch inner diameter # SWC8057.
view full answer... - Brake Controller Installation Details and Running Wires on a 2002 GMC 2500 PickupThe best practice for running wires through the firewall on your 2002 GMC 2500 HD pickup, is to find an existing opening that has a grommet and use that. You'll also want to make sure that you keep the wiring well away from any moving or hot parts. In the absence of an existing opening, you might have to drill to make your own. In that case, make sure you are aware of what is behind the spot where you plan to drill, so you don't drill through anything important. You will need to use a...
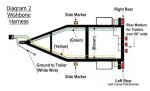
view full answer... - Routing the Wires Through the Firewall When Installing an ETBC-7 Kit on 2004 Honda PilotIf you are unable to locate an existing grommet or knockout in the firewall, you will need to drill a hole in order to route the wires through the firewall of your 2004 Honda Pilot. After drilling the hole you will want to install a grommet like # SWC8055 to prevent the wires from rubbing on the metal. I have attached our ETBC-7 help article and also included a snapshot of this article which illustrates this step. In order to prevent fumes/gases from entering your vehicle, I also recommend...
view full answer...
- Where to Route Backup camera Wire Through Firewall on a 2011 Toyota TundraYou can look for another wiring harness that goes from the interior of the vehicle, through the firewall, and into the engine compartment. That would be the most likely place. It can be tough to get anything to go through those pre-existing locations. If you were to straighten out a wire hanger and work it through you could then tie the wire to the hanger and pull it through. Otherwise you will have to drill a small hole through the firewall. Just be careful not to drill through anything...
view full answer... - Recommended Path to Connect 4-Way Wiring Harness on 2012 Mitsubishi Outlander to 7-Way ETBC7I can help you route your 4-way to the # ETBC7. First thing I would search the cargo area where your wiring harness connector is for a factory grommet to get the 4-pole through. If there is no grommet the best thing to do is to drill a small access hole to run the wires through. I recommend using the snap bushing grommet # SWC8055 and instead of splicing into your vehicles harness (voids the warranty), I recommend making the splice and reconnection in the 4-way to 4-way loop # HM48145....
view full answer...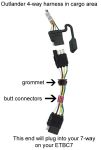
- How to Route Roadmaster Tow Bar Wiring Harness Part # RM-154 in a 2007 Saturn IonThe Roadmaster Tow Bar Wiring Harness Part # RM-154 requires that you locate holes through which you can pass the 4-pole RV connector wiring. It is usually possible to locate rubber grommets that already have wiring passing through them if you remove carpet and trim panels in the rear of the vehicle. The tail light wiring may also provide an access point; you can try removing the driver-side taillight assembly to see if there is a grommet you can use. Once routed to the underside of the...
view full answer... - Running Wires Thru Firewall to Install Optronics Light Kit XIL-OEA0713JKCP on 2013 Nissan FrontierThe best-case scenario would be if you could find an existing grommet that passes through the firewall. There will be one somewhere on the firewall that allows the main wiring harness to pass from the engine compartment to the passenger cab. When you find an existing grommet, use a small knife to cut or poke a small slit in the rubber, being careful not to nick any wiring running nearby. If you cannot find a grommet on the firewall, look under the truck, on the floor pan. If you find a...
view full answer... - Tips for Routing a Trailer Wiring Harness through the Firewall on a 2017 Toyota RAV4If there is already a harness that goes through the firewall and that is easy to get to/work with then you can use that though it may require some persuasion to get the wire through. Otherwise drilling a small hole, running the wire through, and then sealing up the hole with silicone is the way to go. Just be careful not to drill through anything on the other side of the firewall! What I recommend is to drill a hole a little smaller than 9/16 and then put grommet # SWC8055 in the hole....
view full answer... - How to Wire a Trailer for Tail LightsFirst, lets make sure you have all of the parts you need to wire a trailer for lights. If you have an old trailer and want to replace everything, I recommend using a kit like our Optronics Tail Light Kit, # TL29BK and our trailer wiring installation kit # HM51020. We also have an LED kit, # TLL9RK. Step 1 - The trailer connector should extend 2 - 3 feet past the tongue. Attach the ground wire directly to the tongue of the trailer using a self tapping screw # 101131802 and a ring terminal...
view full answer...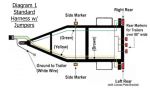
- Will Optronics Flush Mount Rubber Grommet A11GB Fit 1/4-Inch Thick Mounting SurfaceThe Optronics Flush Mount Rubber Grommet # A11GB and entire light assemblies like # MCL111AB will install just fine in a mounting surface with a 1/4-inch thickness. This grommet is made specifically for 3/4-inch Uni-Lite marker/clearance and utility lights. If you also need grommets for trailer wiring we offer 7/16-inch inner diameter grommet # SWC8055 and 9/16-inch inner diameter # SWC8057.
view full answer... - Routing the Monitor Wire Into Cab of Toyota Tundra for Hopkins Smart Hitch Backup CameraWe have not had the chance to install the Hopkins Smart Hitch Backup Camera # HM50002 on a Toyota Tundra, so unfortunately we do not have an installation video. I recommend checking for an existing grommet in the firewall of the cab, likely behind the pedals on the floorboard. Using an existing hole in the firewall will help save time on installation. I have attached an installation video showing the wire being ran through an existing grommet. If you cannot find a manufacturer's grommet...
view full answer... - Wiring Installation Into the Custer Light Mounting Box # AL65-02For the Custer Light Mounting Box - (2) 6-1/2" Long Oval Holes - Diamond Plate Pattern - Aluminum # AL65-02, you will use the PVC Grommet for 6-1/2" Oval Trailer Tail Lights # A70GB with lights like # STL22RB or # STL22AB. These lights use a pigtail like # A47PB or # A45PB. You will need to drill holes in the housing to mount and add a hole for the wiring as well. I recommend using a the Snap Bushing Grommet - 7/16" ID, 9/16" OD # SWC8055 or the Replacement Flush Mount Rubber Grommet...
view full answer...
Do you have a question about this Wiring?
Info for this part was:

Video Edited:
Zack K

Video Edited:
Joshua S

Video Edited:
Kathleen M

Video Edited:
Mike H

Video Edited:
Dustin K

Test Fit:
Nicholas E

Updated by:
Wilson B
At etrailer.com we provide the best information available about the products we sell. We take the quality of our information seriously so that you can get the right part the first time. Let us know if anything is missing or if you have any questions.
Product Experts Available Now!
Call 1-800-940-8924
Jenny N.
9/15/2023
What size grommet did you receive? I am happy to see what is going on.