
Deka Ring Terminal - 12-10 Gauge - 3/8" Ring ID - Nylon Insulation - Yellow - Qty 1
(6 reviews)
Price: $1.62
In Stock
Deka Ring Terminal - 12-10 Gauge - 3/8" Ring ID - Nylon Insulation - Yellow - Qty 1
Item # DW05741-1
Our Price: $1.62
In Stock


Need help with installation?
Locate installers near me- All Info
- Reviews (6)
- Q & A (0)
- Videos (1)
- Photos
Deka Wiring - DW05741-1
- Wire Connectors
- Ring Terminals
- 12-10 Gauge
- Deka
- 3/8 Inch Diameter
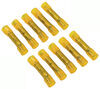
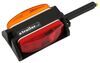
This yellow ring terminal fits 12-10 gauge wire and has an inner ring diameter of 3/8". Insulated with heat-shrinkable nylon for adjustability and durability.
Features:
- Fits 12-10 gauge wire
- 3/8" Ring inner diameter
- Heat-shrinkable nylon insulation allows for adjustability and provides durability
- Yellow
- Quantity: 1
- 1-Year limited warranty
05741 Deka Ring Terminal - 12-10 Gauge - 3/8 Inch Ring Inner Diameter - Nylon Insulation - Yellow - Qty 1


Video of Deka Ring Terminal - 12-10 Gauge - 3/8" Ring ID - Nylon Insulation - Yellow - Qty 1


Videos are provided as a guide only. Refer to manufacturer installation instructions and specs for complete information.

Video Transcript for Review of Deka Wiring - Wire Connectors - Ring Terminal - DW05741-1
Hello everybody, this is Jeff at etrailer.com. Today, I'm gonna take a look at this Deka 12 gauge and 10 gauge ring terminal with the 3/8 inch ring, has the yellow nylon heat shrink insulation, and it is for a quantity of one terminal. Now, this yellow ring terminal will fit onto the end of a 12 to 10 gauge sized wire, has an inner ring diameter of 3/8 of an inch. Now, the ring on this is a 3/8 inch ring, which means the terminal's designed to fit onto 3/8 inch studs or screws. And just to show you, we're gonna go ahead and put a ruler on it just so you can see there's your 3/8 inch inside diameter of the ruler. The insulation on this, you can see it is a heat shrinkable nylon installation.
So it allows for adjustability, provides durability when you're connecting the wire to the terminal. And the yellow color on this heat shrink insulation indicates that it fits 12 to 10 gauge wires. Now, these terminals are also available in other sizes that will fit smaller gauge wires like a 16 to 14 gauge and 22 to 18 gauge wire, and also other stud or screw sizes. In wires, if you're familiar, the larger the gauge number means the smaller the wire size. But that should do it for the review on the Deka 12 gauge and 10 gauge ring terminal with the 3/8 inch ring and the yellow nylon heat shrink insulation.
.
Customer Satisfaction Score:
94% were satisfied with this product
6% of customers were not satisfied
- Wrong item was ordered
Customer Reviews
Deka Ring Terminal - 12-10 Gauge - 3/8" Ring ID - Nylon Insulation - Yellow - Qty 1 - DW05741-1
Average Customer Rating: 4.8 out of 5 stars (6 Customer Reviews)
This yellow ring terminal fits 12-10 gauge wire and has an inner ring diameter of 3/8". Insulated with heat-shrinkable nylon for adjustability and durability.by: Bruce04/29/2017
Order was complete and delivered in a timely manner.
by: Mike m06/10/2019
Works great. Easy to use.
by: Bill 04/11/2024
by: 02/28/2024
by: Michael 05/06/2021
by: Kenneth 02/22/2021
6
6
See what our Experts say about this Deka Wiring
- How to Connect 6V and 12V Batteries for 12V Battery BankYou will make your battery bank larger (run time for your RV longer) if you run the 6V batteries in series and then those to the 12V battery in parallel. You'll need 10 Gauge Wire # DW02508-1 as well as ring terminals like the 1/4" # DW05740-1 or the 3/8" # DW05741-1 to complete this installation.
view full answer...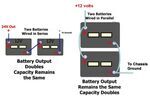
- Will Wiring Two 12 Volt Batteries in Series to Get 24 Volts Harm 12 Volt AccessoriesYes, wiring two 12 volt batteries in series to get 24 volts could be damaging to 12 volt accessories. Generally speaking you will want to wire your two 12 volt batteries in parallel, and wiring batteries in series is often associated with 6 volt batteries in order to produce 12 volts. For wire you can use Ring Terminals # DW05741-1 and 10 gauge # 10-1-1, which is sold by the foot, to connect your batteries.
view full answer...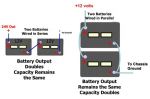
- Repairing Ground Problem on Trailer With Tilting BedYou do indeed have a ground problem, but no worries-we can get you through this! A trailer with a tilting bed will typically use a bolt on each side as a pivot which allows the tilting portion of the trailer to move. When the trailer is new, the pivoting mechanism fits together tightly and everything works great. Over time, this connection gets a little loose, and doesn't provide a consistent ground connection. Since trailers use the frame as the ground circuit instead of a separate wire,...
view full answer... - Why Do Trailer Lights Flicker When Hitting BumpsIn order to fix the issue with your lights flickering you will want to pick a good spot on the trailer frame near the coupler and then run a ground wire from each of the lights as well as the trailer connector to this point. If you need to extend the wires you can use part # DW02359-1 and part # DW05744-5. Once you find a good ground point, sand the surface down, twist the wires together after you have removed part of the jacket, and then attach it to the sanded surface with part # DW05741-1...
view full answer... - 7-Way and Light Kit Recommendation for Boat TrailerThe cleanest way to install the # HM20048 would be to use a junction box like part # 38656. The junction box is weatherproof to protect the wiring connections from the elements. You'd also need some ring terminals, one 10 gauge # DW05741-1 and four 14 gauge, part # DW05702-1. I've linked you to a video showing the junction box being installed. The part # TL16RK is a submersible trailer wiring kit that would work well on your trailer as well.
view full answer... - Wiring Needed To Install A Curt Echo and Curt 7-Way With Backup Alarm On a 2016 Kia SportageThe first step will be completing the installation of the Curt Trailer Connector Adapter with Backup Alarm # C57102 on to your 2016 Kia Sportage. You will need enough 12 Gauge Wire # 12-1-1 to run from the 7-way to where you will be tapping into the battery 12 volt source. This is sold by the foot so remember to account for all the bends along your Sportage to get it to your battery source. A Deka Ring Terminal # DW05741-1 will help you to connect to your power supply. The best way to...
view full answer... - Where Should Ground from 7-Way Connector be InstalledYou will simply want to connect your Ground wire to a clean, bare-metal surface on your vehicle. This can be done with a ring terminal like part # DW05740-1, which has a 1/4" ID, or part # DW05741-1, which has a 3/8" ID. i have attached a video of our Universal Installation Kit # ETBC7 being installed on a 2012 Ford Van where you can see this being done at the 2:00 mark.
view full answer...
- Parts Needed To Install a Curt Echo Wireless Trailer Brake Controller on a 2017 Toyota TacomaThe Curt Echo # C51180 will require you to have the charge line circuit of your 7-way connected to power the Echo. We have actually designed a 7-Way RV Upgrade Kit # ETBC7L that is specifically designed for the Echo so that you will not need the wiring for a brake controller mounted in your cab. Since you already have a 7-way you will only need some 12 Gauge Wire # 12-1-1 (which we do sell by foot), a 30amp Circuit Breaker # 7012A and the Connectors # DW05745-1, # DW05740-1, # DW05741-1...
view full answer... - Recommended LED Light Bar for an Enclosed Snowmobile TrailerI can help you with lighting up your enclosed snowmobile trailer. I would recommend the Optronics Opti-Brite # ILL08COB. This light produces 1400 Lumens so it would be very bright. The dimensions of the lens of this light are 4 by 16-1/2 inches. If you wanted more of a bar light I would recommend the Optronics Thinline Opti-Brite LED # ILL72CB, this light has 27 diodes and puts out 513 effective lumens. This light measures 21-7/8 inches long by 1 inch wide by 5/8 inches thick. Watts...
view full answer...
- Parts Needed to Install Curt Echo In-Line Brake Controller on a 2001 Roadmaster Monaco MotorhomeHey Rick, I definitely get your hesitation on running wiring from the back of your 2001 Roadmaster Monaco, but since you currently only have a 4-Way connector installed we'll have to route wiring at least from your battery back to the wiring connector to power the Curt Echo In-Line # C79DR. There are other brake controller options out there but they either require the 12V power like the Echo In-Line, or they also require routing wiring into the cab of your motorhome so the In-Line will...
view full answer... - Troubleshooting Tekonsha Prodigy P3 Having 0.0 Output When Brake Pedal Is PressedIt sounds like there is a few different issues going on with the Tekonsha Prodigy P3 # 90195 in your vehicle. Starting with the output you should see output on the controller when you are applying the brakes on the vehicle. Since the output goes up with the manual override lever engaged it is likely that the red wire from the back of the controller is not corrected to the correct stop light switch wire. The red wire needs to connect to the cold side of the stop light switch that only...
view full answer... - Parts Needed To Add Curt Echo Trailer Brake Controller To a 2022 Toyota RAV4 With Factory 4-WayAs you already have the Curt Trailer Connector Adapter # C57672 to connect to the 4-way on your 2022 Toyota RAV4, the Curt Echo Wireless Trailer Brake Controller # C51180 only requires an additional charge line to be ran. For this you will need some 10 Gauge Wire # 10-1-1 to run to the battery. This wire is sold per foot so be sure to get enough for routing safely and away from rotating parts or exhaust to prevent damage to the wire. Cable Ties # DW05724-25 will work well to secure the...
view full answer... - Parts Needed To Use Curt Echo Trailer Brake Controller On a 2020 Acura MDX Without a Tow PackageI do see the Receiver # C13146 and 4-Way # 118628 you got from us for your 2020 Acura MDX. Depending on if you got a 7-way like our Kit # ETBC7 which includes the wiring needed for a charge line or just an Adapter # 37185 will decide what all you need to use the Curt Echo # C51180. If you only have the Adapter # 37185 you are going to need enough 10 Gauge Wire # DW02508-1(sold by foot) to run from the battery to the 7-way, Circuit Breaker # 9510, two Ring Terminals # DW05740-1 for connecting...
view full answer... - Parts Needed to Re-Wire Car Hauler Trailer Lights and BrakesWe can help you with selecting parts to re-wire your trailer's lights and brakes. Trailer size affects the number and types of lights required to be DOT-compliant. I linked for you an article that covers the lighting requirements for trailers of various sizes. This will help you determine what is required for your specific trailer. For lighting you might want to consider one of our complete lighting kits. Kit # TL29BK uses standard incandescent light bulbs and kit # TLL9RK uses high-efficiency...
view full answer... - Troubleshooting No Power on a 12v Power Pin on a 7-way Harness on a 2020 Ford F-350The first thing you need to do is check the appropriate fuses on your vehicle for a blown fuse on your 2020 Ford F-350 super duty. If everything looks good with the fuses, I recommend checking for shorts or fraying in the 12v wiring anywhere from the plug to where the harness connects to the front of the vehicle. This can be done at different points of the wiring with a circuit tester # PTW2993. It is also important to check and make sure the ground wires on your harness are mounted to...
view full answer...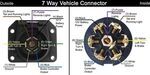
- Getting Power to 12-Volt Accessory Pin on 7-Way Trailer ConnectorTo get power to the pin in the 1:00 position of the # PK12703 7-way trailer connector, you'd run a length of 10 gauge wire # 10-1-1 which is sold by the foot from the terminal for the 1:00 pin on the 7-way to the positive battery terminal, via a # 9510 40 amp circuit breaker. You'd need two # DW05741-1 ring terminals to connect to the breaker and a # 44-5356A ring terminal to connect at the battery.
view full answer...
- Troubleshooting Lack of Power at 7-Way Plug on a 2021 Ford ExplorerIf you have the factory tow package on your 2021 Ford Explorer and a 7-way harness, you do not need to have the trailer connected to the plug in order for you to receive power on the 1 o'clock power pin. If you have the fuses already checked out and they are fully functional, the problem might be with the plug or the 12v power wire itself. To rule out the plug, I recommend making sure there is no corrosion or buiIdup in the plug itself. Any corrosion or buildup can cause a loss of signal....
view full answer...
- Parts Needed For Installing Electric Trailer Brakes On a Utility Trailer With Dexter 3,500LB AxleFirst you will need to verify that your Dexter axle has a Brake Flange # 4-35 to attach the Electric Trailer Brake Kit # AKEBRK-35-SA. The brake kit includes both the left and right side brake assemblies which are self-adjusting for better performance and to save you on having to adjust the brakes every 3,000 miles. Next you will need 2 Easy Grease Trailer Hub and Drum Assemblies # AKHD-545-35-EZ-K to replace your idler hubs. These have your same 5 on 4-1/2" bolt pattern along with the...
view full answer... - Alternate Ways to Install a Ground WireIf you do not have the ability to install standard sheet metal screws, there are a couple things you can do. You can drill holes in the sheet metal for the bolts to go through. You would then use a lock washer and nut on the other side to secure everything. You could also weld the ground on, but this would not be the best solution as electronic components due end up needing to be replaced on occasion. The last option would be to run the ground wire to something that is already bolted...
view full answer... - Troubleshooting Ground Wires Getting Hot On Tilting Snowmobile TrailerIf the ground wires and pins are getting hot, it sounds like either they are not a ground or there is probably a short somewhere in the wiring you will need to find. First you want to check the trailer wiring to make sure the wire coming from the ground pin is attached to a clean bare metal surface. Check the vehicle plug with a circuit tester like part # PTW2993 and make sure it is not getting a feed from the vehicle. Check for corrosion on any of the pins and make sure there are no...
view full answer... - Parts Needed To Provide Power to a Power Tongue JackWe do carry jacks like the Lippert Power Stance Electric Trailer Jack w/ 7-Way Plug # LC89VR that will allow you to connect to the 7-way on your 2018 Ford Expedition Max Platinum to power the jack. You can duplicate a similar connection using a 7-Way Round RV Style Trailer Connector # A7WCB. The Jacketed 2 Wire # 12-2-1 and Heat Shrink Butt Connectors # DW05745-5 work great for connecting the 7-way. The wiring is sold per foot. A Ring Terminal # DW05741-1 will be needed to connect to the...
view full answer... - Wiring Needed To Attach a Charge Line On The Motorhome When Flat Towing a VehicleSince you are running 50' of wiring you will want to use 10 Gauge Wire # 10-1-1 which we sell by the foot. Roadmaster has their Battery Charge Line Kit for Motorhomes # RM-156-75 which only comes with 30' of 12 gauge wire. You can build a similar kit with the wiring, Circuit Breaker # PK54220PL, two 10 gauge Deka Ring Terminals # DW05762-1 to connect to the circuit breaker, a 3/8" Ring Terminal # DW05741-1 for connecting to the battery and some Wire Loom # 7509-1 to protect the wire under...
view full answer... - Does etrailer Axle Teknology 10-Inch Brake Assembly AKEBRK-35L Include Trailer WiringThe etrailer Axle Teknology 10-inch brake assembly # AKEBRK-35L and the matching right-hand unit # AKEBRK-35R come with two wire leads (from the brake magnet) that are just a few inches long. The actual 10-gauge wire you'll use to install the brakes, # 10-1-1, is offered by the foot. Either wire lead from each brake can be used for hot or ground since these are non-polarized. Often parts like junction box # 38656, 7-pole plug # H20046 and ring terminals # DW05741-1 are used to complete...
view full answer... - Brake Controller Power Wire Missing on 2009 GMC SierraIt is possible that the previous owner was not aware of the tow package wiring and connections that need to be made under the hood of your 2009 GMC Sierra. The tow package power wire under the dash essentially goes directly under the hood over by the power distribution box. If it is present then it might be there off to one side. If not then there is no reason why you can't run your own wire from the brake controller to the positive post that the factory wire would normally attach to....
view full answer...
Do you have a question about this Wiring?
Info for this part was:

Installed by:
Jeff D

Written by:
Laura H
At etrailer.com we provide the best information available about the products we sell. We take the quality of our information seriously so that you can get the right part the first time. Let us know if anything is missing or if you have any questions.
Product Experts Available Now!
Call 1-800-940-8924
Thank you! Your comment has been submitted successfully. You should be able to view your question/comment here within a few days.
Error submitting comment. Please try again momentarily.