
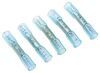
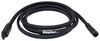
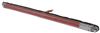
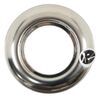
This blue ring terminal fits 16-14 gauge wire and has a 1/4" ring inner diameter. Insulated with heat-shrinkable nylon for adjustability and durability.
Features:
Videos are provided as a guide only. Refer to manufacturer installation instructions and specs for complete information.
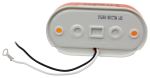
Speaker 1: Today we're going to be taking a look at the Deka quarter-inch heat shrink ring terminal for 16 to 14 gauge wire. That's going to be part number DW05737-1. Our heat shrink ring terminal is going to keep out all of that moisture and debris that could potentially cause corrosion build-up inside the connector. It's going to be especially useful in applications, like this, where it's going to be on the outside of either a vehicle or a trailer, where it's going to be exposed to the elements. It's also going to come in handy if you have a boat trailer, where it's going to be near a lot of water.Because, unlike traditional style ring terminals, it's going to be sealed at the back. Whereas with the other one, it's going to have an opening and potentially having a opening at the front.
Where we're going to have wires really close to that ring. Where it could, again, get that moisture in there and cause a lot of corrosion. A ring terminal is going to work with 14 to 16 gauge wire. And the ring, itself, is going to be a quarter-inch inner diameter. It's going to be perfect for those ground wires with the self-tapping screw, or any other small terminal that you can fit a quarter-inch ring around.The heat shrink is going to be a nylon.
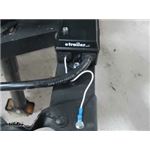
If you just take some heat and apply it to it, it will shrink right around that wire and give it that extra durable coating, but also still be flexible enough that we can move the wire around and not have to worry about it breaking, or moving it around inside the terminal. We're going to be using our ring terminal for our ground wire coming out of our junction box on our trailer. We already have a hole drilled, so we're just going to measure out about how much wire we're going to need. It doesn't hurt to give yourself a little bit of extra. We'll cut off the excess and we'll strip back the end of the wire.We'll take our ring terminal, slide the bare wire in, and crimp it in place.
Just need to apply some heat, so we can shrink down that connector. We're going to be using a heat gun. That way I don't have to worry about it charring or burning the connector or the wires. We'll taking a self-tapping screw, put it loosely in place, and come back with a nut driver and tighten it up.That will finish up your look at the Deka quarter-inch heat shrink ring terminal, part number DW05737-1.
Average Customer Rating: 4.8 out of 5 stars (9 Customer Reviews)
This blue ring terminal fits 16-14 gauge wire and has a 1/4" ring inner diameter. Insulated with heat-shrinkable nylon for adjustability and durability.
Worth the money compared to the cheap hard-plastic versions...especially for marine applications. Suggest to still use shrink tubing on top of the heat shrink on the ring terminal...slide a piece of shrink tubing onto the wire, heat/shrink down the terminal first, then slide down your tubing and shrink on top of everything for a lasting connection.
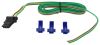
Order was complete and delivered in a timely manner. Only problem (minor) was the 7way pigtail was not wired to color code. Had to use test light to get 3 of the wires in correct location. Could be a problem if someone wasn't comfortable with ringing out wires.
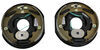
Got my brakes and hubs on and they are great. Best price I could find and glad these guy are doing such a good job. No parts missing... now that's the ticket. Would recommend them any time.
I ordered multiple items from etrailer and the experience was perfect. The products arrived exactly as described with super fast shipping (standard option). The communication was frequent and thorough. This company knows good customer service. I didn't have any issues, but don't have any worries with this company if any come up.
excellent product ,easy to install
Great
Delivered fast and worked perfectly!
great


Do you have a question about this Wiring?
Info for this part was:
At etrailer.com we provide the best information available about the products we sell. We take the quality of our information seriously so that you can get the right part the first time. Let us know if anything is missing or if you have any questions.


Thank you! Your comment has been submitted successfully. You should be able to view your question/comment here within a few days.
Error submitting comment. Please try again momentarily.