
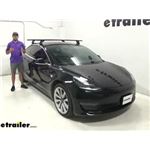
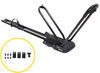
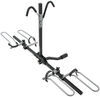
Yakima BaseLine Roof Rack for Naked Roofs - RoundBar Crossbars - Steel - Black - Qty 2
Item # Y36ZB
Our Price: $578.75
Confirmed to Fit
2020 Tesla Model 3
Will this fit?
To see if this custom-fit item will work for you please tell us what vehicle you'll use it with.
In Stock


- All Info
- Reviews (267)
- Q & A (0)
- Videos (5)
- Photos
Yakima Roof Rack - Y36ZB
- Round Bars
- Crossbars
- 58 Inch Bar Space
- Yakima
- Black
- 2 Bars
- Overhang
These multipurpose, galvanized steel crossbars supply the backbone for your aftermarket roof rack system. Works with accessories that clamp around the bars. Pair with Yakima towers, fit kit, and RoundBar SL Adapter to create a complete roof rack.
Features:
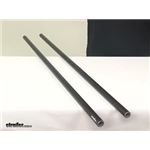
Yakima RoundBars - 58" Long - Black - Qty 2:- Sturdy, round crossbars let you build an aftermarket roof rack for your vehicle
- Pair with Yakima towers, fit kit, and RoundBar SL Adapter to create a complete roof rack
- Accommodate accessories that clamp around the bars
- Constructed from vinyl-coated, galvanized steel
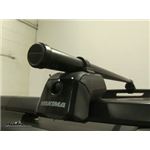
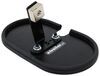
Yakima BaseLine Towers - Qty 4:
- 4 Heavy-duty towers mount Yakima crossbars to your vehicle with a naked roof
- Pair with 2 Yakima crossbars and BaseClips to create a complete roof rack
- Tower pitch can be adjusted 6 degrees forward and 6 degrees backward to level your crossbars
- Pivoting bases can be adjusted during installation to ensure towers are seated correctly
- Safe and easy installation with DropHook system and included torque tool
- DropHook clip holder adjusts on 3 axes for perfect fit on your naked roof
- BaseClips attach to hooks in tower assemblies and tighten for a secure grip
- Torque tool clicks 3 times when clips are secure - eliminates fear of under- or over-tightening
- Lockable with Yakima Same Key System (SKS) lock cores (Y07204 - sold separately)
- Weather-resistant stainless steel, glass-reinforced plastic, and elastomer construction with matte finish
Yakima RoundBar SL Adapter:
- Adapters let you mount your Yakima RoundBars on BaseLine, SkyLine, TimberLine, or RidgeLine towers
- Easy installation - adapters slide onto bars and attach with bolts (included with towers)
- 4 Adapters and 4 RoundBar endcaps included
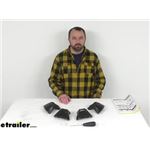
Yakima BaseClip 173:
- Custom-fit mounting clips and pads allow you to mount BaseLine towers on your vehicle with a naked roof
- Padded, stainless steel clips provide secure grip on your door jambs
- Snap onto DropHooks inside towers
- Protect door jambs from scratches and abrasions
- Powder coated for durability and rust resistance
- Molded rubber pads fit the contours of your roof
- Clip onto bottoms of towers
- Protect roof from scratches and abrasions
8000162 Yakima Base Line Towers for CoreBar, JetStream, and RoundBar Cross Bars - Bare Roofs - Qty 4
Replaces 8000146
8000409 Yakima Round Crossbars - Steel - Black - 58" Long - Qty 2
8003536 RoundBar StreamLine Adapter for Yakima Base Line, Sky Line, Timber Line, and Ridge Line Towers - Qty 4
8006173 Custom Base Clips and Pads for Yakima Base Line Towers


Video of Yakima BaseLine Roof Rack for Naked Roofs - RoundBar Crossbars - Steel - Black - Qty 2

Videos are provided as a guide only. Refer to manufacturer installation instructions and specs for complete information.


Video Transcript for Yakima JetStream Crossbars Installation - 2018 Tesla Model 3
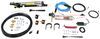
Colin: Hey guys this is Colin here at etrailer. Today we have a 2018 Tesla Model 3. We're going to do a test fit of the Yakima Jetstream roof rack system. This roof rack is going to mount to the naked roof of your Tesla Model 3. It's going to allow you to get your favorite rooftop accessories loaded up on top. Whether you got a bike rack, a kayak carrier, or even a cargo box.
Now up top we're going to have our 60 inch long Jetstream crossbars. These are going to have a nice aerodynamic shape to them. That's going to help cut down on wind noise and drag when compared to your standard square or round bar roof rack systems.We're also going to have a rubber strip up top. It's going to let us know we can utilize T-track accessories. All we got to do is take off the end cap and we have access to that channel.
Now instead of having to pull out the rubber strip and then cut it to length for whatever accessory you're using, all you got to do is push down on it like so. You slide your T-slot all the way to the spot you want it on your roof, tighten it down, replace your end cap, and then you're going to be pretty ready to go.These bars while they're in black now are also available in silver. Just see etrailer if that's something you're interested in. We're going to have the Yakima baseline towers connecting our crossbars to our fit kit. This fit kit is going to be custom fit for the Tesla Model 3.
the pad just matched the contours of the edges of the Tesla, and then the hook is actually going to go under the trim piece right here. It's going to hook right up and under on all four of the hooks. Once you tighten those down and it really is going to have a good hold on your roof.Let's go and take the end cap off of our baseline tower. This is the bolt right here where we used to tighten down our roof rack move. Once we cover it up, we can put our end cap on.
We'll actually see we have some plastic locks right here. We can replace those with Yakima lock cores which are sold separately here at etrailer. That'll provide more security for your roof rack.Now a few measurements for you guys. From the top of our roof to the bottom of our Jetstream crossbars, it's going to be three inches, which is plenty of space to get any of year clamp-on accessories or strap-on accessories under the crossbar without worrying about damaging the glass roof top of your Tesla. Now if we go from the top of the roof to the top of our jet stream bar, that's going to be four inches, which is something to keep in mind that you have added that height to your roof. You shouldn't have too many issues with low clearance situations with the Tesla, but it is something to keep in mind.We're also going to have a weight capacity for this roof rack system of 165 pounds. But be sure to double check with your Tesla's owner's manual and make sure your roof can handle that weight.Now that we've gone over some of those features, let's show you guys how to get this installed. Now we've got everything laid out on our table. We already have it partially assembled. We're going to go to show you how to get the rest of it assembled and it's going to install the exact same way that our front cross bar did.We'll go ahead and flip over our Jetstream bar. We're going to get our fit kit and tower assembled down here. First thing we want to do is pick up this black plastic piece right here. Going to put it in place in that slot. We're going to push down on it. You want to make sure you don't get it on the bolt until you hear those snaps right there. Now we'll take our silver paste and it's going to thread onto the screw that's in there. I'm just going to set it on top of there for now, hold it. I'm going to flip the foot over and the bolt is actually going to be inside that slot. So I'll grab my tightening tool. Begin to tighten that down. You can see that a silver piece going down. You want to keep going until it's in line with the black notches on each side. There we go. Now we'll go ahead and go to the edge of our Jetstream bar. We're just going to feed those notches into the track of our Jetstream bar.Now once you have your tower in the correct spot, you can see the measuring on our jet stream bar, get it in the correct spot at the edge of the foot. We're going to tighten it down, but we need to make sure we adjust it to the correct pitch. What the pitch is, is going to be the bolt in there where we tighten down our silver piece. There's going to be three notches right there. It's going to be labeled A, B, and C from the front of the bar to the back. So this side right here where my hand is, this is the front of our crossbar and we need that bolt at the C notch. So we're going to tilt it forward so that bolt is now in line with that notch. And then we'll tighten it down. Until you hear those audible clicks. That's like that.The second thing we need to do is that just our toe is going to be this notch right here. It's not labeled ABC. This time it's labeled 1, 2 and 3 from the front of the Jetstream bar towards the back. The toe is adjusting the way that pad is going to sit on top of your roof. In our instructions it tells us to adjust the toe to the 2 slot, so we'll have it in the middle and then we'll tighten that down.We're going to take our pad from our fit kit and attach it to this point right here. We need to make sure that the arrow on your pad is facing towards the outside of the book crossbars. You want it facing this way. Go ahead and set that on. We're going to push so we hear it click on. Now we're ready to get it on our roof.Now we're just going to set it in place on our roof in the rough spot that it has to go. We don't need to tighten anything down right now because we need to first measure our crossbar spread to make sure it's sitting in the right spot. Now we're going to get our crossbar spread, which is the front of our back bar to the front of our front bar and you can find this measurement in your instructions. Front to front you want to make sure it's the same on both sides. Once you have one side, go ahead and measure the other side and then double check to make sure that it's even.We'll go ahead and install our hook as well. You can see this small lip right there. It's going to go on that trim. We're just going to push it up and in until it hooks on to that metal piece. Now it needs to be angled down towards it. So we're going to grab our tool and use that bolt right there to do that. We need to loosen it a little bit first though, bring it out a little bit.Now going into that bolt we're going to tighten it and you'll see how it starts to angle down towards the car. Remember, it needs to get under that trim, so it's not quite low enough yet. We'll go ahead and listen to this a little bit more so we can get under. If you've got to kind of wiggle it, you can do so as well. There we go. Now we've got it under like so. Now we can begin tightening it. And hold it there for me to, just make sure it gets under that trim. There we go. Now that we have it a little bit snug, I'm going to go ahead and tighten down this bolt all the way until you hear the clicks and then we'll repeat this process for the other side.Now we have both sides under the trim right there, so now what we can do is begin to tighten it down. We're not going to go too far. We're just going to go a couple of rotations and then making sure that it stays under that lip. We're going to head the other side and do the same thing. You want to go back and forth as much as possible. That's going to prevent from pulling too much on one side and adjusting the rack from the position that you already put it in.Now we've gone back and forth a couple of times on each side. We have the driver's side torque down all the way, so we're just going to finish up over here until we hear those clicks like that. We can now cover up that bolt. And then we'll put our end cap on the end of our tower. Now we're ready to load up our favorite rooftop accessories and then hit the road.Well, thank you all for watching. That's going to do it for our test fit of the Yakima Jetstream roof rack system on our 2018 Tesla Model 3.
Customer Reviews
Yakima BaseLine Roof Rack for Naked Roofs - RoundBar Crossbars - Steel - Black - Qty 2 - Y36ZB
Average Customer Rating: 4.7 out of 5 stars (267 Customer Reviews)
These multipurpose, galvanized steel crossbars supply the backbone for your aftermarket roof rack system. Works with accessories that clamp around the bars. Pair with Yakima towers, fit kit, and RoundBar SL Adapter to create a complete roof rack.by: Charles02/09/2024
Toyota 4Runner
Kimberly has shown that great customer service is not dead! etrailer and Kimberly are great to work with and have earned my business and will always be the 1st and last place I look for my rack+ needs!
As for the application, I needed more space to fit my cargo box on top of my 4Runner TRD Pro’s rack. I came up this this… Thank you!


by: John K08/17/2012
Free delivery that showed up in 3 days!!! Can't beat it. The crossbars with the Control Towers and LandingPad 9 fit perfectly on my Honda Element. Had them installed in about 30 mins. Don't have my cargo box yet and wanted to test strength, so I had my 110lb wife standing on them with no issues (yes, the car was parked). Plan to take a long camping trip next week with a cargo box on top...wife will be in the vehicle:-)

by: TimN03/19/2024
Works perfectly. I am always impressed that Yakima continues to make parts for the "old roundbars" since they have since moved on to the superior JetStream bars.
by: Dave02/11/2024
Love my Yakima roof rack!! It exceeds my expectations.great product. Also thank etrailer for the tec support! great staff always there to help thanks again!!
by: J-fan05/04/2024
Excellent selection of rack parts. Very useful installation videos help when choosing between products. Easy ordering process. Quick delivery.
by: 04/01/2024
necessary for using the widest cross bar option (78"). East to install
by: Paul D.08/19/2012
A great company to do business with, and lots of merchandise in stock. I orderd a roof rack for my truck on Tuesday morning and it was on the porch when I returned from work on Thursday. I will deffinitely order more from etrailer.com


by: Debra09/10/2023
The rack has been so useful since I purchased it. Staff at etrailer.com were exceptionally helpful in getting the best option for my car and answering questions. I recommend this company, for its 110% customer service, excellent prices and timely delivery.
by: Todd06/24/2023
Really easy to install & work as specified. So happy with the customer support/service at etrailer.


by: Tim 10/18/2023
One quick phone call and Gwendolyn figured out exactly what I needed for our new car to use my old Yakima rack.
by: Paul08/16/2023
Ackage came 2 days early the install was somewhat easy (did it by myself)
Did not get to mount anything to it but seems really sturdy. One thing I can say is mark out your mounting points with provided stickers then put up and make adjustments to the roof rack.
by: Pat G08/29/2013
Great first experience dealing with you guys! Shipped fast, and was a faster install. You gave me the right parts and it went together in a flash.
Will definitely be doing business with you all again.


by: Jerry F04/23/2023
I have been using Yakima racks for around 40 years and have never had any problems. However, I am amazed at the price increases over the years. Etrailer prices were by far lower than most. Overall, a very excellent purchase.
by: Jay07/31/2023
Subaru Forester
Kit worked perfectly on my 2021 Subaru Forester. The whole install took 30 minutes. Never been disappointed with etrailer.
by: Roland01/08/2024
Haven’t used them yet but they should work as expected
by: Ian 07/02/2023
Mazda
Solid build quality and easy installation on my '21 Mazda CX-5.
by: Richard R02/20/2023
GMC Canyon
So far so good. Purchased these towers to use on a 2022 GMC Canyon with HD bars that I already had, primarily to carry my canoe. Yakima's fitting instructions worked perfectly and the whole system seems really solid.
by: SueCanoe02/10/2023
I'm happy that this allows me to save money by using my old round bars on my new vehicle, with only the purchase of new "towers" and these adapters.
by: Peter07/29/2023
first try was missing what was needed
Etrailer helped. It was great!
by: Kenneth 03/02/2023
E trailer has me me spoiled yet again! If only I could expect this level of service from other suppliers.
by: Gary 04/01/2023
Works great to use my round bars on the Skyline towers.
by: Stephen F.07/23/2019
Yakima Crossbars were as you would expect - steel bars coated in a soft black coating (be mindful when you are utilizing these with the top mounts as the clamp will eat through the soft coating when you tighten them down). I had issues with my yakima round bar setup as the brackets and tower system were allowing water to leak in. This is in no way reflective of what youll experience but Yakima has superb support. I spoke with them twice on my issue and out of their kindness they shipped me an entire setup to replace my existing one for free.
by: Nick09/21/2017
Product works as advertised thus far. When you buy the yakima towers, you are required to purchase these as well to fit the rounder bars (I feel sure there are other adapters for other bar shapes). These should have come with the towers in my opinion, and I resented having to shell out more $$ to purchase these "must have" adapters to mount my bars. 3 star overall rating based on function, price. Delivery and packaging was top-notch through etrailer.
by: Lawrence B08/17/2017
Toyota Prius
I ordered a Yakima Roof Rack for my Toyota Prius from eTrailer.com. Part of the reason for purchasing from eTrailer.com was the promise that the racks were made specifically for the car and would not dent the roof.
I received the rack on July 31, and installed the racks on my Prius according to instructions included with the racks. Our tandem kayak is 65 lbs . The towers were placed on the outer most part of the roof as indicated by the instructions. Yakima saddles were attached to the crossbars to hold the kayak. Nothing was close or touching the top of the roof. We transported the kayak to a nearby lake, 6 miles, and back. The next day we removed the racks from the roof and noticed 4 dents on the top of the roof. It was obvious that transporting the kayak on the rack caused the dents.
We had to pay $100 to have the dents removed from the Prius roof.
I cannot continue to use this rack that puts dents in the car's roof. I was extremely disappointed in the racks. In reading the Toyota manual and contacting them by phone, there is no mention of using or not using roof racks.
I was shocked to learn from Rachel at eTrailer.com that your company takes absolutely no responsibility for this Yakima product they sell. The best they can do is to pass the buck and refer us to Yakima.
Very disappointed, and out a lot of money for a product that damages your car. Will not recommend or buy here again. eTrailer.com does not even deserve one star in this review.
by: John04/13/2019
Typical Yakima cross bars. Coating is a little too easy to cut or gouge, but probably needs to be that way to get the grip it provides. Good enough solution for me, and allows me to continue to use all the attachments I've accumulated over the years that require a round bar
25
914
Show More Reviews
See what our Experts say about this Yakima Roof Rack
- Roof Rack for 2022 Jeep Wrangler Unlimited for Roof Top TentAll of the roof racks we offer for your 2022 Jeep Wrangler Unlimited with the sky top roof have a 100 lb dynamic (when in use on highway) roof capacity including the Yakima Round Bar Rack # Y00409 and # Y00101 as well as the Rhino Rack roof rack part # RRVA150S-2, # RL210S2, and # RRVA-FK1-2. In general I prefer the Rhino Rack as you get a higher quality roof rack that has aero shaped bars which do better with wind noise as a better price than the similar quality racks that cost a lot more.
view full answer... - What Roof Rack Fits My 2019 Jeep Wrangler Unlimited with Sky One Touch Roof?I have a great solution for you. Unfortunately, I confirmed with Rhino-Rack that the Rhino-Rack Roof Rack Legs - Gutter Mount - 8-1/4inch Tall # RL210S2 and the Rhino-Rack Vortex Aero Crossbars # RRVA150B-2 are not confirmed to fit your 2019 Jeep Wrangler 4-door Unlimited with a Sky One Touch roof. However, we currently do have a confirmed setup that will work from Yakima. For that system, I recommend the following parts for your vehicle: - Round CrossBars for Yakima Roof Rack - 58"...
view full answer... - Parts Needed to Install Yakima Round Bar Roof Rack on 2015 Toyota Tacoma Access CabFor your 2015 Toyota Tacoma Yakima has a round bar roof rack that is a confirmed fit but it uses the Baseline towers and not the Skyline towers so you would need the part # Y00409, # Y28TR, # Y03536, # Y06125, # Y06128. This is a 58 inch bar setup and based on install pictures I've seen of this rack on a similar Tacoma a shorter 48 inch bar would not fit.
view full answer... - Yakima Round Bar Roof Rack for 2023 Chevy TahoeI checked with Yakima and their 58 inch round bar roof rack part numbers # Y00409, # Y00145, # Y03536, # Y44UV is a fit for your 2023 Chevy Tahoe with he factory rack so this would give you what you are looking for.
view full answer... - Recommended Storage Cover For A Little Guy MyPod CamperHello Fredrick. That Little Guy MyPod Camper is pretty neat. It is a bit of a unique shape too. Based on the specs I could find online they are about 11.5' long and a little over 5' tall. Our best option for a cover for this camper is the Classic Accessories PolyPro III Deluxe RV Cover # CA80198. This cover is made for teardrop style trailers up to about 13.5' long. This extra length on the cover should allow plenty of room for your roof rack and vent. The cover also features integrated...
view full answer... - Recommendation Roof Rack For 2014 Ford Fusion with Naked RoofWith a naked roof, I recommend looking at the Yakima roof rack system that is a custom fit for your 2014 Ford Fusion. This system includes: Round CoreBar Crossbars, Item # Y00409 BaseLine Towers, Item # Y28TR RoundBar Adapter, Item # Y03536 Base Clips and Pads, Item # Y06110 & Item # Y06102 If you want securely lock the roof rack then you will need Yakima Same Key System locking cores, Item # Y07204. For a more economical option, I recommend the Inno Roof Rack system. This system...
view full answer... - BaseClips for Yakima Baseline Towers and RoundBar Crossbars on a 2023 Ford MaverickThe correct clip kit for your 2023 Ford Maverick with naked roof to use the Yakima RoundBar Crossbars # Y00409 and the BaseLine Towers for Yakima Crossbars # Y28TR with the RoundBar SL Adapter # Y03536 is the BaseClip Fit Kit for Yakima BaseLine Roof Rack Towers # Y06180.
view full answer... - Recommendations on How to Carry e-Bikes and Tow a Trailer With 2016 Toyota TacomaBecause the tongue weight capacity (maximum amount of weight that can safely be applied to the hitch) is drastically reduced by using an adapter or extender, none of the major bike rack manufacturers recommend using extenders or adapters of any kind. The reason being is that the further the bikes and rack are moved rearward, the more leverage they exert upon the hitch and especially it's attachment points to the vehicle. e-Bikes and the racks that are rated to carry them are heavy by necessity,...
view full answer... - Crossbar Pads For Yakima Round Bar CrossBarsYes, we have the Thule Surf Pad - Crossbar Pad for Square and Round Bars # TH802 that will fit your Round CrossBars # Y00409.
view full answer... - Can Yakima Control Tower with Landing Pad 1 Fit Yakima Roof Rack TracksThe Yakima Control Towers like the part # Y8890027 (QTY 1) can fit the Yakima tracks like you mentioned with the Landing Pad 1 part # Y00221. This would work to use the Yakima Round Bars like # Y00409 which is a pair of 58 inch bars.
view full answer... - Recommended Roof Rack Components To Mount A Yakima ReelDeal To A 2021 Ford F-150 The Yakima ReelDeal Rooftop Fishing Rod Carrier # Y04089 is compatible with round bars so to get them attached to your Yakima Round Bars # Y00409 and onto the naked roof of your 2021 Ford F-150 you'll need the following parts: BaseLine Towers for Yakima Crossbars - Naked Roofs - Qty 4 # Y28TR RoundBar SL Adapter for Yakima BaseLine, SkyLine, TimberLine, and RidgeLine Towers - Qty 4 # Y03536 BaseClip Fit Kit for Yakima BaseLine Roof Rack Towers - Qty 4 # Y27FR
view full answer... - Parts Needed to Install Round Bar Yakima Roof Rack 2019 Ford F-150 Super CrewYakima changed the feet and fit kits of their round bar roof racks so while we can help you reuse your bars you would have to replace everything else. So you already have the part # Y00409 for the bars so everything else you need would be: BaseLine Towers # Y00146 RoundBar SL Adapter # Y03536 BaseClip Fit Kit # Y06122 This is the same current roof rack design that Yakima recommends for a 2012 Ford F-150 so it is very possible what you have now would work on your new truck as well.
view full answer... - Roof Rack for Snowboard Carrier Recomendation 2017 Subaru Legacy with Naked RoofFor your 2017 Subaru Legacy with a naked roof you will first need to install a roof rack with crossbars that run from side to side so that you can mount a snowboard rack. Since you like Yakima their round bar roof rack that consists of part numbers # Y00409, # Y28TR, # Y03536, # Y06145, and # Y06130 would be where you would want to start. Then depending on how many boards you want to carry we have a couple options. We have the part # Y03095 which will carry up to 2 board or the part #...
view full answer... - Yakima Roof Rack Fitment on a 2013 Jeep Grand Cherokee OverlandI can help you find the right Yakima roof rack for your 2013 Jeep Grand Cherokee Overland. If your Overland has the E group package you will see a metal strip in the flush mounted rails, the Yakima kit you will need is the # Y00408 in combination with # Y53TR, # Y03536, and # Y00244. This kit will include the round crossbars, the RailGrab Towers, and the Raised Side Rail adapters. If your Overland doesn't have the E group it will have a black plastic rail and the Yakima kit you will need...
view full answer... - How Can I Use My Old Yakima Crossbars On My 2020 Jeep Grand CherokeeIf you want to use your old Yakima crossbars on your 2020 Jeep Grand Cherokee with flush rails, your options will depend on what crossbars you have and the raised rails on your vehicle. Your first option will work on Jeep Grand Cherokees with the E-Group Package. If you have the old Yakima round bars, they must be at least 50" in length. This rack will consist of the following items: Your Yakima round crossbars SkyLine Towers for Yakima Crossbars - Fixed Mounting Points, Flush Rails,...
view full answer... - Parts Needed to Mount Rhino-Rack Pioneer Platform to Truck Topper with Yakima TracksYou need a complete roof rack wtih crossbars to mount the Rhino-Rack Pioneer Platform, part # RR42115BF, on your ARE topper. Since you already have Yakima tracks you can use four of the Control Towers, part # Y8890027, with two sets of Landing Pad 1, part # Y00221. Then choose the round crossbars at the proper length: 48 inches # Y00408 58 inches # Y00409 66 inches # Y00410 78 inches # Y00411 86 inches # Y00420
view full answer... - Roof Rack Recommendation for a 2009 Ford Flex with Vista RoofYou will need a roof rack on your 2009 Ford Flex to be able to use a roof mounted cargo box. For a Yakima roof rack you will need: Yakima TimberLine Towers, # Y33TR, RoundBar SL Adapter # Y03536, crossbars # Y00409, and 2 sets of Landing Pad 11, # Y00233. For a roof rack you could then use the Yakima SkyBox NX 16 Rooftop Cargo Box # Y95AV which has 16 cubic feet of storage space or for a larger one the Yakima SkyBox 21 Rooftop Cargo Box # Y07337.
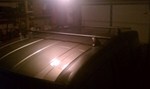
view full answer... - Yakima Raingutter Tower Roof Rack Parts for Truck CanopyI am happy to report that the hole spacing on Yakima Side Loader Mounting Bracket kit # Y08002 is indeed 4-1/8-inches center to center. Please refer to the linked photo. To complete a rack with these mounts you can use the 1A Raingutter Towers # Y00101, Lock Core kit # Y07204 and a set of Yakima round crossbars from the linked page. We have many lengths available, such as 58-inch bar set # Y00409. Other sizes are available too.
view full answer...
- Yakima Roof Rack Towers for a 2020 Ram 2500For your 2020 Ram 2500 Crew Cab, the Yakima round bar you are seeking you need the following: BaseLine Towers for Yakima Crossbars - Naked Roofs - Qty 4 # Y28TR RoundBar SL Adapter for Yakima BaseLine, SkyLine, TimberLine, and RidgeLine Towers - Qty 4 # Y03536 BaseClip Fit Kit for Yakima BaseLine Roof Rack Towers - Qty 2 # Y06135 (x2) If you just need one bar, then use Baseline Tower # 8880618 (x2), the Replacement RoundBar SL Adapter for Yakima StreamLine Towers - Qty 1 # 8880641 (x2),...
view full answer...
- Compatible Rack For 2021 Rubicon With Sky One Touch And Yakima ShowDown Kayak CarrierIf you want to operate your Sky One-Touch Power Roof on your 2021 Jeep Wrangler Rubicon, Thule and Yakima both have a fit. Rhino-Rack does not have an option with the necessary clearance. The Yakima Raingutter Towers are only compatible with their round crossbars. The 58" crossbar length is a good choice because the Yakima ShowDown does require some crossbar to extend beyond the tower. This Yakima rack would consist of the following: Round 58" CrossBars for Yakima Roof Rack System (QTY...
view full answer... - Can Longer Yakima Round Crossbar be Used to Install and Use Thule HullavatorYakima round crossbars are compatible with the Thule Hullavator part # TH898. Since you need a decent amount of overhang of the bars through the feet of the rack going with a longer 58 inch bar like the Yakima bars # Y00409 would be a perfect solution.
view full answer... - Are There Limitations With A Rain Gutter Mounted Roof Rack On My 2019 2 Door WranglerThat may be the case with some rain gutter mounted roof racks, but not the Rhino-Rack SG Roof Rack for Rain Gutters - Vortex Aero Crossbars - Aluminum - Black, part # RRSG60. They crossbars can only be mounted at specific points. It also has a maximum weight limit of 88 lbs. Yakima's rain gutter roof rack for your vehicle has a maximum weight limit of 165 lbs. It will consist of the following: Round 58" CrossBars for Yakima Roof Rack System (QTY 2), part # Y00409 Yakima 1A Raingutter...
view full answer... - What Is The Inside Diameter Of The RoundBar Adapter Kit # Y04093 for Yakima BigCatch Saddles? The RoundBar Adapter Kit # Y04093 is designed to fit the Yakima RoundBar Crossbars # Y00409 which are 1-1/8" in diameter.
view full answer... - Recommended Carrier for Two Kayaks for Yakima Round Crossbars on 2008 Toyota HighlanderBecause of the integral rollers, I really like the Yakima SweetRoll, part # Y04074. During a recent training session conducted here by the folks at Yakima, we got to test the SweetRoll Kayak Carrier. We were all impressed by how much easier the rollers made the task of loading a kayak. Due to the width of two kayaks sitting side by side, you should make sure your round crossbars are long enough. At a minimum, you'd need the # Y00409 58 inch bars. Each carrier includes two tie-down straps...
view full answer... - Yakima Towers & Fit Kit For 2023 Ford F-150 SuperCrew For Yakima Round CrossbarsHi there Dale; yes you can absolutely just get the towers and fit kit for your 2023 Ford F-150 SuperCrew from Yakima to utilize your round crossbars. All you need is the following: - BaseLine Towers for Yakima Crossbars # Y28TR - BaseClip Fit Kit # Y27FR - RoundBar SL Adapter # Y03536
view full answer... - Recommended Roof Rack for a 2023 Kia Sorento w/ a Naked RoofTo attach a roof rack to your 2023 Kia Sorento, with no roof rails, you will want the roof rack by Yakima and it includes the following parts: Yakima HD Crossbars - Aluminum - Black - 55" Long - Qty 2 item # Y01156 BaseLine Towers for Yakima Crossbars - Naked Roofs - Qty 4 item # Y28TR HD Bar SL Adapter for Yakima BaseLine,Towers - Qty 4 item # Y03541 BaseClip Fit Kit for Yakima BaseLine Roof Rack Towers - Qty 2 item # Y06175 BaseClip Fit Kit for Yakima BaseLine Roof Rack Towers -...
view full answer...
- Recommended Kayak Carrier for 2020 Mazda CX-5The only hitch mounted option wouldn't be an actual carrier, but a support like the Malone Axis # MAL32VR. This would require the installation of a trailer hitch like the # 76138 you looked at. More than likely you won't need this to mount your kayaks on your 2020 Mazda CX-5. Your kayaks will fit completely on a roof rack with a kayak carrier like the one seen in the picture below unless they are incredibly long. If that is the case, then by all means you could add the # MAL32VR to help...
view full answer...
- Recommended Roof Rack for a 2023 Mazda CX-5 to Use the Thule Hullavator Pro Kayak CarrierIn order to use the Thule Hullavator Pro # TH898 on your 2023 Mazda CX-5 you will need to have a roof rack with crossbars that extend 4"-8" past the roof rack feet. If you have a roof that has no existing crossbars or rails, I recommend the 2023 Mazda CX-5 Roof Rack by Yakima which consist of the: - Yakima HD Crossbars # Y01156 - BaseLine Towers for Yakima Crossbars # Y28TR - HD Bar SL Adapter # Y03541 - BaseClip Fit Kit # Y06130 - BaseClip Fit Kit # Y06154 If you have flush mounted...
view full answer... - Parts Needed to Install Yakima Roundbar Roof Rack 2021 Ford RangerTo install a Yakima round bar roof rack on your 2021 Ford Ranger Supercrew with a naked roof you'd need the part numbers # Y28TR, # Y03536, # Y06124 since you already have the crossbars. Normally you'd additionally need the part # Y00408.
view full answer... - How Can I Tell if I have Fixed Mounting Points on My 2015 Mazda CX-5 for a Crossbar System?According to the specs I have, you may have fixed mounting points on those rubber strips on your 2015 Mazda CX-5. The way you can tell is if there is a small removable tab on those rails that cover the holes. I went ahead and attached a video of a 2015 Mazda CX-5 with fixed mounting points to give you perspective about what to look for. If you determine that you have fixed mounting points, I recommend the following setup: - Rhino-Rack Vortex Aero Crossbars - Aluminum - Black - 46" #...
view full answer... - Parts Needed to Install Yakima Round Bar Roof Rack on 2015 Toyota Tacoma Access CabFor your 2015 Toyota Tacoma Yakima has a round bar roof rack that is a confirmed fit but it uses the Baseline towers and not the Skyline towers so you would need the part # Y00409, # Y28TR, # Y03536, # Y06125, # Y06128. This is a 58 inch bar setup and based on install pictures I've seen of this rack on a similar Tacoma a shorter 48 inch bar would not fit.
view full answer... - What Kayak Load Assist Can I Use With My Lockrack For My 2016 Subaru WRXI do have a solution for you, but will not involve the Lockrack Loading Bar. You will still have to remove, or adjust the orientation, of the arms for this solution to work, but this method would be your only option. You can use the following items to help you load your kayak with the Lockrack Loading Bar. Yakima BoatLoader EVO Telescoping Load Assist - 28" Extension, part # Y04085. This load assist bar is stored in your crossbar when it is not in use. It has a weight limit of 80 lbs....
view full answer...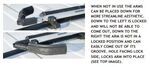
- Square Bar Roof Rack that Fits 2020 Ram 1500 Quad CabThule offers a square bar roof rack that fits your 2020 Ram 1500 quad cab with the part # TH712500, # TH710501, and # TH145199. Then for a square bar roof rack the Thule Portage part # TH819 would work great.
view full answer... - Roof Rack Recommendation for Bike Rack and Cargo Box on 2022 Toyota Corolla Cross with Naked RoofThanks for reaching out! For your application we'll need to stick with the Yakima JetStream system since Thule doesn't have a fit for your 2022 Toyota Corolla Cross naked roof at this time (January 2023). The 50" JetStream crossbars will be a great size for fitting both the Thule FastRide Roof Bike Rack # TH95JV and Thule Force XT Sport Rooftop Cargo Box # TH6356B. Here are the parts you'll need for the complete roof rack system: 50" JetStream Crossbars - Black # Y00425 or Silver # Y00428 BaseLine...
view full answer... - Parts Needed to Swap the Yakima CoreBar Crossbars from an Acura MDX to a 2022 BMW X6Assuming you're wanting to use the Yakima CoreBar Crossbars # Y00421 you're looking at, then yes you're just going to need the BaseClip Fit Kit for Yakima BaseLine Roof Rack Towers # Y06179, BaseClip Fit Kit for Yakima BaseLine Roof Rack Towers # Y06161 as well as the BaseLine Towers for Yakima Crossbars # Y28TR.
view full answer...
- Why Are 2 Different BaseClips Needed for Yakima Roof Rack on 2018 Chevy CruzeThe difference between the BaseClip Fit Kit # Y06110 and BaseClip Fit Kit # Y06126 just has to do with the length and angle of the clamps that fit to the door jambs on your 2018 Chevy Cruze. Yakima does a fantastic job at fine-tuning their fitment which is why they have a wide variety of BaseClip options and those options can vary between the front and back positions on any given vehicle. Here are all of the parts you need to install a Yakima roof rack on your 2018 Cruze: 50" JetStream...
view full answer... - Recommended Roof Rack for a 2014 Honda Civic Si CoupeTo add a roof rack to your 2014 Honda Civic Si Coupe you will want the roof rack by Yakima and it includes the following parts: Yakima JetStream Crossbars - Aluminum - Black - 60" Long - Qty 2 item # Y00426 BaseLine Towers for Yakima Crossbars - Naked Roofs - Qty 4 item # Y28TR BaseClip Fit Kit for Yakima BaseLine Roof Rack Towers - Qty 2 item # Y06125 BaseClip Fit Kit for Yakima BaseLine Roof Rack Towers - Qty 2 item # Y06143 This roof rack attaches to the groves inside your door...
view full answer... - Replacement Parts Available For A Yakima BaseLine Roof RackWe do have a good amount of replacement parts available for both the Yakima Roof Rack set up ( # Y00422, # Y28TR, # Y06150, # Y06148) and the Rhino-Rack Nautic SUP/Kayak Roof Rack # RR570 you purchased, so you definitely can. That said, I have all the Rhino Rack replacement parts listed below and a few of the parts for the Yakima set up. If you do not see what you are looking for, just let me know and I will see if we can get it for you. Rhino Rack: Cam Buckle Cinch Straps # RTD3 M6 x...
view full answer... - Recommended Parts For Carrying 4 Bikes and Camping Gear With a 2023 Honda HR-VThe Draw-Tite Max-Frame Trailer Hitch Receiver # DT57YR is our highest capacity receiver for your 2023 Honda HR-V. This receiver has a maximum tongue weight rating of 300lbs but be sure to verify you do not exceed any weight capacities given by Honda. I recommend pairing this with the Yakima RidgeBack Bike Rack # Y02458 to keep the weight down. This carrier weighs 35lbs and can support 4 bikes up to 40lbs each. You may need an Adapter Bar # Y02531 for any of your bikes with an alternative...
view full answer... - Quietest Cross-Bars For A 2017 Ford F-150 Super Crew CabFor your 2017 Ford F-150 SuperCrew Cab, we have several different options that will suit your needs. To start, we offer the Yakima JetStream Crossbars # Y00426. These bars are the quietest, are 60" long, and is rated for up to 165lbs. To go with those bars you will also need the BaseLine Towers for Yakima Crossbars # Y28TR, and the BaseClip Fit Kit for Yakima BaseLine Roof Rack Towers # Y06122. We always recommend using some type of locking system to keep all of your items safe; The Yakima...
view full answer... - Does Yakima Roof Rack For 2013 Toyota Prius Require Professional InstallI would tell them they could do it and not to bother with spending money to go to a mechanic or the dealer. Do you have a measuring tape of some sort? If so, that's it regarding the needed tools to install the Yakima rack on your 2013 Toyota Prius. So no tools are needed, it's light as a feather, and all you have to do is some measuring to get it installed. I am 1000% confident this is something you can do on on your own in about 30 minutes without any assistance. The correct fit for the...
view full answer... - Roof Rack Recommend for 2016 Honda CR-V to be Transferred to Truck Camper ShellI can definitely help you out with getting the most parts that will transfer over from your 2016 Honda CR-V! The Yakima roof rack is the way to go since it uses the longer 60" bars as they should transfer over to your truck cab nicely. The only problem is that the legs used for the naked roof on your CR-V won't be compatible with a track system so you will need to get new legs and a different fit kit for the tracks on your truck. A lot of truck camper shells do come with a track system...
view full answer... - Thule Kayak Carrier Recommendation for T-Slot Mount on Yakima JetStream Crossbars on 2022 HighlanderIt truly depends on what Thule kayak carrier you wish to use on the Yakima JetStream Crossbars. For example, the Thule DockGlide # TH896 is compatible with the top slots of the JetStream crossbars without any additional nuts. I definitely recommend the DockGlide because it is a saddle-mount style that is much easier to load than the awkward positioning of j-style carriers. In order to have a full JetStream setup of a roof rack on your 2022 Toyota Highlander, it depends on what roof type...
view full answer... - Recommended Roof Rack for a 2024 Acura RDX w/ a Naked Roof Congrats on the new SUV! Yes, we do have a way to attach a roof rack to your 2024 Acura RDX even though you do not have roof rails. It is the roof rack by Yakima and it includes the following parts: Yakima JetStream Crossbars - Aluminum - 60" Long - Qty 2 item # Y00426 for Black or item # Y00429 for Silver BaseLine Towers for Yakima Crossbars - Naked Roofs - Qty 4 item # Y28TR BaseClip Fit Kit for Yakima BaseLine Roof Rack Towers - Qty 2 item # Y06174 BaseClip Fit Kit for Yakima BaseLine...
view full answer... - How To Secure Kayaks On 2020 GMC Sierra 3500 While 5th Wheel TowingGenerally speaking, you'll want the kayak centered in the carrier but you can push it a bit further forward if you have potential clearance issues with say the nose of a trailer. That said, there aren't really specifics on the overhang, you'll just need to use your best judgment. There will however be exact spots the crossbars will be installed as these are the points on the roof that the rack manufacturer deem strongest. The Yakima JetStream Crossbar System composed of part # Y00427, part...
view full answer... - Yakima Roof Rack For A 2022 Acura MDX With Flush Factory Side RailsFor your 2022 Acura MDX, I recommend the Yakima JetStream Crossbars # Y00426. These crossbars are 60" long, and have a maximum capacity of 165-lbs. Next, you'll need towers like the BaseLine Towers for Yakima Crossbars # Y28TR which have maximum capacity of 220-lbs. Following the towers, you'll need the BaseClip Fit Kit for Yakima BaseLine Roof Rack Towers # Y06163 and # Y06178.
view full answer... - Recommendation Roof Rack For 2014 Ford Fusion with Naked RoofWith a naked roof, I recommend looking at the Yakima roof rack system that is a custom fit for your 2014 Ford Fusion. This system includes: Round CoreBar Crossbars, Item # Y00409 BaseLine Towers, Item # Y28TR RoundBar Adapter, Item # Y03536 Base Clips and Pads, Item # Y06110 & Item # Y06102 If you want securely lock the roof rack then you will need Yakima Same Key System locking cores, Item # Y07204. For a more economical option, I recommend the Inno Roof Rack system. This system...
view full answer... - BaseClips for Yakima Baseline Towers and RoundBar Crossbars on a 2023 Ford MaverickThe correct clip kit for your 2023 Ford Maverick with naked roof to use the Yakima RoundBar Crossbars # Y00409 and the BaseLine Towers for Yakima Crossbars # Y28TR with the RoundBar SL Adapter # Y03536 is the BaseClip Fit Kit for Yakima BaseLine Roof Rack Towers # Y06180.
view full answer... - 2019 Ram 1500 Fitment for Yakima HD Tracks and Tonneau CoverAs long as you can fit the 2" wide Yakima 60" HD Tracks # Y74MR so you have no less than 1/8" overhanging the outside of your truck bed side (see attached) you're good to go. This then allows you to use 2 sets of the Landing Pad 26 # Y75ZR and SkyLine Towers # Y53TR for a base system. The 66" Round Crossbars # Y00410 might work but I'm not sure if you'll have the clearance for that since I'm not sure where the Yakima tracks will sit. If they truly can sit in the middle of your rails...
view full answer...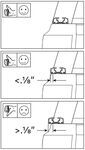
- Yakima Towers & Fit Kit For 2023 Ford F-150 SuperCrew For Yakima Round CrossbarsHi there Dale; yes you can absolutely just get the towers and fit kit for your 2023 Ford F-150 SuperCrew from Yakima to utilize your round crossbars. All you need is the following: - BaseLine Towers for Yakima Crossbars # Y28TR - BaseClip Fit Kit # Y27FR - RoundBar SL Adapter # Y03536
view full answer... - Parts Needed to Install Yakima Roundbar Roof Rack 2021 Ford RangerTo install a Yakima round bar roof rack on your 2021 Ford Ranger Supercrew with a naked roof you'd need the part numbers # Y28TR, # Y03536, # Y06124 since you already have the crossbars. Normally you'd additionally need the part # Y00408.
view full answer... - Towers for Yakima RoundBar on 2024 Honda CR-V HybridThere are towers available that will allow you to install your Yakima RoundBars on your 2024 CR-V Hybrid. You will need the following: -SightLine Towers for Yakima Crossbars - Flush Side Rails - Qty 4 # Y64AR -RoundBar SL Adapter for Yakima BaseLine, SkyLine, TimberLine, and RidgeLine Towers - Qty 4 # Y03536 -SightClip Fit Kit for Yakima SightLine and RidgeLine Roof Rack Towers # Y44UR If you have Yakima Same Key System locks you can transfer them over or you can add new locks using...
view full answer... - Parts Needed to Install Yakima Round Bar Roof Rack on 2015 Toyota Tacoma Access CabFor your 2015 Toyota Tacoma Yakima has a round bar roof rack that is a confirmed fit but it uses the Baseline towers and not the Skyline towers so you would need the part # Y00409, # Y28TR, # Y03536, # Y06125, # Y06128. This is a 58 inch bar setup and based on install pictures I've seen of this rack on a similar Tacoma a shorter 48 inch bar would not fit.
view full answer... - What Yakima Landing Pad Do I Need For My 2021 Subaru OutbackYour 2021 Subaru Outback Wagon needs Yakima Landing Pad 27 for Yakima SkyLine And Control Towers - Qty 4, part # Y46VR. This Landing Pad provides the mounting points for your Yakima Skyline or Control towers. If you are using the SkyLine Towers for Yakima Crossbars - Fixed Mounting Points, Flush Rails, and Track Systems - Qty 4,part # Y53TR, you need to make sure you are using the RoundBar SL Adapter for Yakima BaseLine, SkyLine, TimberLine, and RidgeLine Towers - Qty 4, part # Y03536....
view full answer... - Yakima Round Bar Roof Rack for 2023 Chevy TahoeI checked with Yakima and their 58 inch round bar roof rack part numbers # Y00409, # Y00145, # Y03536, # Y44UV is a fit for your 2023 Chevy Tahoe with he factory rack so this would give you what you are looking for.
view full answer... - Parts Needed to Use Older Yakima Viper Roof Bike Rack on a 2009 Subaru Outback WagonYour older model Yakima Viper Bike Rack (par 8002000) can definitely be mounted to your 2009 Subaru Outback Wagon. We need to go with your option 1 though as the Viper isn't compatible with the Mighty Mounts. A complete Yakima Round Bar Roof Rack uses the following parts: - 48" Round Crossbars # Y00408 - TimberLine Towers # Y33TR - RoundBar SL Adapter # Y03536 - Lock Core Kit # Y07204 (optional) As long as your round crossbars are at least 48" long you'll only need the TimberLine...
view full answer... - Loadstop Compatibility With Yakima CoreBar And Universal Mighty MountsSince the Yakima CoreBar # Y00421 does not have a t-slot to accept the standard load stops like # 753-3761, and due to its shape the LoadStop Brackets for Yakima Round Crossbars # Y05000 won't work either, leaving you with no compatible option. In order to use the load stops # Y05000 with your MightyMounts # Y03590, you'd need a different set of crossbars # Y00408 with the adapter # Y03536. I know it's not ideal, but due to the uniqueness of your crossbars that is your best option.
view full answer... - How to Adapt Yakima Round Crossbars for Thule Hullavator on 2022 Honda CR-V with Flush RailsFrom the looks of your included picture, it looks like you have flush factory rails and Yakima Round crossbars for your 2022 Honda CR-V. In order to use your Yakima RoundBars, you need to first remove the factory crossbars you currently have installed on your CR-V. Then, once those are removed, you can access the fixed mounting points on your vehicle. Additionally, you will need these parts to install the bars if you do not have them already: - SkyLine Towers # Y53TR - Landing Pad 19...
view full answer...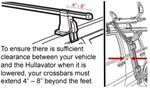

- Recommended Round Bar Roof Rack for a 2024 Honda CRV w/ Flush RailsYes, you can! The SightClip Fit Kit item # Y44UR and the SightLine Towers for Yakima Crossbars item # Y64AR will allow you to install your Yakima Roudbars to your CRV's flush rails. You will also need the RoundBar SL Adapter for Yakima Towers item # Y03536.
view full answer... - Recommendation Roof Rack For 2014 Ford Fusion with Naked RoofWith a naked roof, I recommend looking at the Yakima roof rack system that is a custom fit for your 2014 Ford Fusion. This system includes: Round CoreBar Crossbars, Item # Y00409 BaseLine Towers, Item # Y28TR RoundBar Adapter, Item # Y03536 Base Clips and Pads, Item # Y06110 & Item # Y06102 If you want securely lock the roof rack then you will need Yakima Same Key System locking cores, Item # Y07204. For a more economical option, I recommend the Inno Roof Rack system. This system...
view full answer... - BaseClips for Yakima Baseline Towers and RoundBar Crossbars on a 2023 Ford MaverickThe correct clip kit for your 2023 Ford Maverick with naked roof to use the Yakima RoundBar Crossbars # Y00409 and the BaseLine Towers for Yakima Crossbars # Y28TR with the RoundBar SL Adapter # Y03536 is the BaseClip Fit Kit for Yakima BaseLine Roof Rack Towers # Y06180.
view full answer... - Towers Needed To Install Yakima RoundBar Roof Rails On a 2019 Toyota 4Runner SR5 with Factory Roof RTo mount your current Yakima RoundBar crossbars to your 2019 Toyota 4 Runner you will need the Towers # Y33TR, and Adapters # Y03536. These will contain 4 towers and 4 adapters to mount 2 crossbars.
view full answer... - How to Use Longer Yakima or Thule Crossbars for a 2009 Dodge JourneyIf you have longer bars from Yakima, like the 70" JetStream part # Y00427OR the 70" CoreBar # Y00423, then all you need for your 2009 Dodge Journey are the TimberLine Towers # Y33TR. If you happen to have Yakima round bars then you need the adapter # Y03536 as well. For your Thule bars you will need to use the Evo Raised Rail Feet # TH710401 with the 69" ProBar Evo Crossbars # TH713600 as the aero-style Thule bars have a limited mounting space underneath them and I don't think it will...
view full answer...
- What Crossbar System Do I Need to Mount the Curt Basket # C18115 to My Flush Rails?From your pictures (thanks for including them!), you are definitely correct that your 2019 Toyota RAV4 has flush factory rails. You are also correct in saying that you will need a crossbar system in order to mount the Curt Roof Mounted Cargo Basket - 41-1/2" Long x 37" Wide x 4" Deep # C18115. This basket is a great fit for your vehicle and will give you a maximum weight capacity of 150 pounds to transport your boondocking gear. As far as a waterproof cargo bag for the Curt basket, I...
view full answer...
- How to Attach Yakima Round Crossbars for a Thule Hullavator on a 2006 Toyota Highlander w/ RailsSince you already have the necessary round bars to mount the Thule Hullavator item # TH898 to the roof of your Highlander, you will just need the parts listed below. TimberLine Towers for Yakima Crossbars - Raised, Factory Side Rails - Qty 4 item # Y33TR RoundBar SL Adapter for Yakima BaseLine, SkyLine, TimberLine, and RidgeLine Towers - Qty 4 item # Y03536 The TimberLine Towers are confirmed to mount to the factory roof rails on your 2006 Toyota Highlander. You will need the adapter...
view full answer... - Recommended Yakima Towers for For Round Bars on 2021 Honda Ridgeline With Factory Side RailsYakima recommends using round bars that are at least 58 inches in length for the 2021 Honda Ridgeline, so if the round bars you already have are at least that length, there's no reason why you can't reuse them. The Yakima # Y33TR TimberLine towers are exactly what I'd recommend you use. When the TimberLine towers are combined with the RoundBar SL adapter, part # Y03536, the round bars will work perfectly with the TimberLine towers. Because the round bars cause quite a bit of wind turbulence...
view full answer... - Parts Needed to Use Yakima Round Bars on 2013 Toyota Prius cSometimes we are able to find older Yakima fit info but I checked and they do not have a Q clip setup for the 2013 Toyota Prius c so the only option we have would be a new rack that would allow you to use your round bars. The complete rack for your vehicle consists of: BaseLine Towers for Yakima Crossbars # Y00146 BaseClip Fit Kit # Y06135 BaseClip Fit Kit # Y06179 Round Bar Adapter # Y03536
view full answer... - 2010 Mitsubishi Outlander Roof Rack and Kayak Carrier RecommendationFor a Yakima roof rack to fit your 2010 Mitsubishi Outlander that has factory fixed points for a roof rack you are going to need two sets of the Landing Pad 11 part # Y00233, SkyLine Towers part # Y53TR, RoundBar SL Adapter part # Y03536 and 48 inch crossbars # Y00408. I attached a picture I got from Yakima that shows this rack installed on a similar Outlander as yours. The Rhino-Rack Nautic Roof Kayak Carrier # RR571 will fit this rack well.
view full answer...
- Roof Racks for 2004 Honda Civic 2-Door Coupe for Transporting Surf BoardsWe can help you with a roof rack and surf board carriers for your 2004 Honda Civic 2-door coupe. Roof rack options for your Civic come from Yakima and SeaSucker and are displayed on the page I linked for you. Yakima offers both standard round bar racks and also their quieter Jetstream rack systems. The round bar rack is the lowest-cost setup and is made of parts # Y00408, # Y28TR, # Y03536, # Y06162 and # Y06159. But for only a few more dollars you can get the black Jetstream rack, which...
view full answer... - Recommended Roof Rack Components To Mount A Yakima ReelDeal To A 2021 Ford F-150 The Yakima ReelDeal Rooftop Fishing Rod Carrier # Y04089 is compatible with round bars so to get them attached to your Yakima Round Bars # Y00409 and onto the naked roof of your 2021 Ford F-150 you'll need the following parts: BaseLine Towers for Yakima Crossbars - Naked Roofs - Qty 4 # Y28TR RoundBar SL Adapter for Yakima BaseLine, SkyLine, TimberLine, and RidgeLine Towers - Qty 4 # Y03536 BaseClip Fit Kit for Yakima BaseLine Roof Rack Towers - Qty 4 # Y27FR
view full answer... - Parts Needed to Install Round Bar Yakima Roof Rack 2019 Ford F-150 Super CrewYakima changed the feet and fit kits of their round bar roof racks so while we can help you reuse your bars you would have to replace everything else. So you already have the part # Y00409 for the bars so everything else you need would be: BaseLine Towers # Y00146 RoundBar SL Adapter # Y03536 BaseClip Fit Kit # Y06122 This is the same current roof rack design that Yakima recommends for a 2012 Ford F-150 so it is very possible what you have now would work on your new truck as well.
view full answer... - Roof Rack for Snowboard Carrier Recomendation 2017 Subaru Legacy with Naked RoofFor your 2017 Subaru Legacy with a naked roof you will first need to install a roof rack with crossbars that run from side to side so that you can mount a snowboard rack. Since you like Yakima their round bar roof rack that consists of part numbers # Y00409, # Y28TR, # Y03536, # Y06145, and # Y06130 would be where you would want to start. Then depending on how many boards you want to carry we have a couple options. We have the part # Y03095 which will carry up to 2 board or the part #...
view full answer... - How to Tell if Thule Hullavator Kayak Carrier Will Fit on a Tesla Model 3Both the current Hullavator Pro # TH898 and the older model, part 897XT that you have, require the crossbars to overhang the feet of the roof rack by 4" - 8" for their to be enough clearance to lower the carrier without making contact with any given vehicle. If you're Tesla Model 3 crossbars have a T-Slot, you still have the T-Slot mounting hardware, and the crossbars can achieve an overhang then you'll be good to go. The nice thing is that you already have this discontinued carrier so...
view full answer... - Can I Carry Four Bikes On A 2020 Tesla Model 3The Stealth Hitches Hidden Rack Receiver # 391TES317, has a maximum tongue weight of 350 lbs, but your car is only rated to carry 200 lbs on its hitch receiver. A Kuat NV 2.0 Base Bike Rack for 4 Bikes # BA22B-BA02B, weighs 82 lbs. This means your bikes could weigh up to the four bike maximum of 118 lbs, That is just under 30 lbs per bike, so e-bikes are definitely out. On the other hand, the Yakima HangOver 4 Bike Rack for Mountain Bikes - 2" Hitches - Tilting, part # Y02484, needs at...
view full answer... - Recommended Roof Rack For a 2023 Tesla Model 3 I recommend using the Yakima JetStream roof rack on your 2023 Tesla Model 3. You will need the following parts. Yakima JetStream Crossbars # Y00426 BaseLine Towers for Yakima Crossbars # Y28TR BaseClip Fit Kit # Y06173 This roof rack gives you aero crossbars to reduce noise and will accept T-Track mounting accessories. The Yakima Same Key System # Y07208 provides you 8 lock cores for use on the roof rack itself and with your Yakima accessories to all be keyed alike.
view full answer... - Parts Needed To Install Yakima Round Bars On A 2023 Tesla Model SWow it must have been your lucky day! We can absolutely provide the rest of the parts you need to install your newly acquired Yakima round bars # Y00409 to your 2023 Tesla Model 3. You will need the following parts; BaseLine Towers # Y28TR Roundbar SL Adapters # Y03536 BaseClip Fit Kit # Y06173 (you will need to order qty 2 of this part) That will be everything you need. The 66" bars might be a bit long for your roof and you will likely have a considerable amount of overhang. Round bars...
view full answer... - Which SeaSucker Roof Rack Fits 2018 Tesla Model 3 and How to Lock to VehicleSeaSucker has a roof rack that fits your 2018 Tesla Model 3 but the rack you mentioned is actually not a roof rack and is for carrying a kayak. Instead we have the # 298-SX6000B which is a fit and is compatible with the Thule cargo box you have as well. To lock this you'd want to use the window cable anchor part # 298-BA0010 with a cable lock like # e98891. The anchor gets shut in the window which gives an attachment point for the cable lock to wrap around. This isn't my favorite choice...
view full answer... - Will Yakima SkyBox 21 Cargo Box Fit 2020 Tesla Model 3I checked with Yakima and can confirm that the Yakima SkyBox 21 Rooftop Cargo Box # Y07337 will fit a 2020 Tesla Model 3. This is true whether you have the factory roof rack or a roof rack from Yakima which fits your Model 3. That rack is made up of the following parts: - Yakima JetStream Crossbars - # Y00426 - BaseLine Towers for Yakima Crossbars # Y28TR - BaseClip Fit Kit # Y06173
view full answer... - How to Fit a Thule Hullavator Pro on a Tesla Model 3The Thule # TH898 Hullavator Pro can be installed on Aero cross bars on a Tesla Model 3 as long as the cross bars extend past the mounting feet by 4 inches to 8 inches, and the cross bars are separated by at least 24". If you do not already have crossbars you can use the Yakima parts # Y00426, # Y28TR, and # Y06173 for 60" JetStream Crossbars. i have attached links to each of these products and and install videos.
view full answer...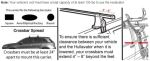
- Recommended Yakima Roof Rack for My 2010 Hyundai Genesis CoupeWhile we do have a great Yakima crossbar system that is confirmed to fit your 2010 Hyundai Genesis Coupe, Rhino-Rack does not have a roof rack option that fits your vehicle. With that being said, I saw that you were looking at the Yakima round crossbar system that includes the 58" Crossbars # Y00409. In order to have a complete setup with these crossbars that fit your roof, you also need the following parts: - RoundBar End Caps # Y8007026 - BaseLine Towers # Y28TR - RoundBar SL Adapters...
view full answer... - Which BaseClip Is Used for Yakima Roof Rack Install on 2018 Tesla Model 3I found the install video you referenced that shows a Yakima roof rack getting installed on a 2018 Tesla Model 3 and the BaseClips used are the part # Y06173.
view full answer... - How to Tell if Thule Hullavator Kayak Carrier Will Fit on a Tesla Model 3Both the current Hullavator Pro # TH898 and the older model, part 897XT that you have, require the crossbars to overhang the feet of the roof rack by 4" - 8" for their to be enough clearance to lower the carrier without making contact with any given vehicle. If you're Tesla Model 3 crossbars have a T-Slot, you still have the T-Slot mounting hardware, and the crossbars can achieve an overhang then you'll be good to go. The nice thing is that you already have this discontinued carrier so...
view full answer... - Can I Carry Four Bikes On A 2020 Tesla Model 3The Stealth Hitches Hidden Rack Receiver # 391TES317, has a maximum tongue weight of 350 lbs, but your car is only rated to carry 200 lbs on its hitch receiver. A Kuat NV 2.0 Base Bike Rack for 4 Bikes # BA22B-BA02B, weighs 82 lbs. This means your bikes could weigh up to the four bike maximum of 118 lbs, That is just under 30 lbs per bike, so e-bikes are definitely out. On the other hand, the Yakima HangOver 4 Bike Rack for Mountain Bikes - 2" Hitches - Tilting, part # Y02484, needs at...
view full answer... - Recommended Roof Rack For a 2023 Tesla Model 3 I recommend using the Yakima JetStream roof rack on your 2023 Tesla Model 3. You will need the following parts. Yakima JetStream Crossbars # Y00426 BaseLine Towers for Yakima Crossbars # Y28TR BaseClip Fit Kit # Y06173 This roof rack gives you aero crossbars to reduce noise and will accept T-Track mounting accessories. The Yakima Same Key System # Y07208 provides you 8 lock cores for use on the roof rack itself and with your Yakima accessories to all be keyed alike.
view full answer... - Parts Needed To Install Yakima Round Bars On A 2023 Tesla Model SWow it must have been your lucky day! We can absolutely provide the rest of the parts you need to install your newly acquired Yakima round bars # Y00409 to your 2023 Tesla Model 3. You will need the following parts; BaseLine Towers # Y28TR Roundbar SL Adapters # Y03536 BaseClip Fit Kit # Y06173 (you will need to order qty 2 of this part) That will be everything you need. The 66" bars might be a bit long for your roof and you will likely have a considerable amount of overhang. Round bars...
view full answer... - Which SeaSucker Roof Rack Fits 2018 Tesla Model 3 and How to Lock to VehicleSeaSucker has a roof rack that fits your 2018 Tesla Model 3 but the rack you mentioned is actually not a roof rack and is for carrying a kayak. Instead we have the # 298-SX6000B which is a fit and is compatible with the Thule cargo box you have as well. To lock this you'd want to use the window cable anchor part # 298-BA0010 with a cable lock like # e98891. The anchor gets shut in the window which gives an attachment point for the cable lock to wrap around. This isn't my favorite choice...
view full answer... - Will Yakima SkyBox 21 Cargo Box Fit 2020 Tesla Model 3I checked with Yakima and can confirm that the Yakima SkyBox 21 Rooftop Cargo Box # Y07337 will fit a 2020 Tesla Model 3. This is true whether you have the factory roof rack or a roof rack from Yakima which fits your Model 3. That rack is made up of the following parts: - Yakima JetStream Crossbars - # Y00426 - BaseLine Towers for Yakima Crossbars # Y28TR - BaseClip Fit Kit # Y06173
view full answer... - How to Fit a Thule Hullavator Pro on a Tesla Model 3The Thule # TH898 Hullavator Pro can be installed on Aero cross bars on a Tesla Model 3 as long as the cross bars extend past the mounting feet by 4 inches to 8 inches, and the cross bars are separated by at least 24". If you do not already have crossbars you can use the Yakima parts # Y00426, # Y28TR, and # Y06173 for 60" JetStream Crossbars. i have attached links to each of these products and and install videos.
view full answer... - Recommended Yakima Roof Rack for My 2010 Hyundai Genesis CoupeWhile we do have a great Yakima crossbar system that is confirmed to fit your 2010 Hyundai Genesis Coupe, Rhino-Rack does not have a roof rack option that fits your vehicle. With that being said, I saw that you were looking at the Yakima round crossbar system that includes the 58" Crossbars # Y00409. In order to have a complete setup with these crossbars that fit your roof, you also need the following parts: - RoundBar End Caps # Y8007026 - BaseLine Towers # Y28TR - RoundBar SL Adapters...
view full answer... - Which BaseClip Is Used for Yakima Roof Rack Install on 2018 Tesla Model 3I found the install video you referenced that shows a Yakima roof rack getting installed on a 2018 Tesla Model 3 and the BaseClips used are the part # Y06173.
view full answer...
Do you have a question about this Roof Rack?
Info for this part was:

Edited by:
Daron K

Written by:
Alex H
At etrailer.com we provide the best information available about the products we sell. We take the quality of our information seriously so that you can get the right part the first time. Let us know if anything is missing or if you have any questions.
Product Experts Available Now!
Call 1-800-940-8924
Thank you! Your comment has been submitted successfully. You should be able to view your question/comment here within a few days.
Error submitting comment. Please try again momentarily.