
To see if this custom-fit item will work for you please tell us what vehicle you'll use it with.
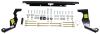
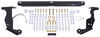
Install your fifth-wheel trailer hitch in half the time with this custom bracket kit. Requires less drilling than universal kits and provides a custom fit for your vehicle. Includes everything you need for installation.
Features:

Videos are provided as a guide only. Refer to manufacturer installation instructions and specs for complete information.
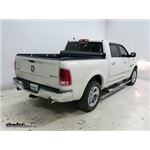
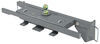
Hey everybody, Ryan here at etrailer. Today, on our 2017 Ram 1500, we're gonna be showing you how to install the Curt Fifth Wheel Rail Kit. But before we get into that, why don't we take a minute check it out and make sure it's gonna work for you. If you're wanting to pull around a fifth wheel trailer you're gonna need a hitch in your truck to allow to do that. And this rail kit is gonna be a great start. So,, this is gonna have custom brackets that will bolt up to your Ram and then bolt up to the in bed rails here.
And these are industry standard. You know, they're gonna work with a lot of different fifth wheel heads. You know, if it we're me, I got these rails I'd probably paired up with the Curt, the Curt or a B&W even. There's several of 'em out there that'll work just fine. Which is gonna kind of bring me to my next point, these are gonna work with all the different types of bed lengths that the Ram has whether it be a short bed, long bed, things like that.
If you have a short bed though, what you need to pay attention to is what type of hitch you plan on setting in here, right Because we have a short bed and our rails are up pretty close to the back of our truck. So,, if we we're to have a fixed hitch back here chances are pretty good. First turn that we make, if our, you know camper leaned over it all it would probably make contact with the cab corners. And so, to combat that with these short beds you wanna make sure to get a sliding type hitch. That way it will, when you make those real tight turns you know you're able to change the center point back to the rear, giving you that extra clearance that you need so you don't have any contact with your cab corner.
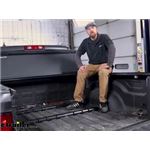
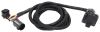
The rails are gonna set up just a little bit past, you know, the bottom of your bed. So,, while they take up a little bit of room, you know, it's not like you're losing full bed access by any means. You know, you still be able to put a lot of stuff back here. That is if you don't have your actual hitch in place. Something that I do always like to recommend when going with the setup, something like this, is to pick up some in-bed wiring, that'll give you a seven-way connector inside of the bed here and make it easy to hook your trailer up in terms of the electrical side of things.
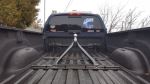
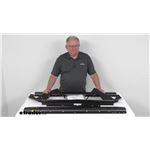
But other than that, at the end of the day I mean not really a whole lot to these, you know it's a rail kit, they're gonna work with tons of different hitches and with this being custom fit to the truck, you know, for me it puts your mind at ease a little bit knowing that it's designed to work with this truck, not some universal setup, you know what I mean. In terms of the installation, definitely time consuming, at least it was for me. Hopefully, you know, figuring out the instructions and stuff on our end will make it a little bit easier for you to follow along if you plan on doing this at home. But be prepared to spend a little bit of time and you know, hopefully everything will go smooth for you. But with that said, let me go ahead and get started on it now. To begin our installation we're gonna be underneath the back of our Ram and what I did was just temporarily lower and remove the spare tire. It will go back up once we're all done, but this opens up a lot more space to work. And while we're right here, I'm also gonna remove our heat shield just so we can see what we're doing a little bit better. To get this off, we're gonna have three 10 millimeter head bolts. (tool operating) Go ahead and set this off to the side for now. We're gonna move to our wheel wells now and remove the liners. So,, there's gonna be several screws that run along the edge and then a couple in the middle and we're gonna pull all those out using an eight millimeter. (tool operating) So, with that last one out you should be able to just kind of grab the liner and just kind of start to peel it back and we'll get it to drop down, we'll set it to the side, and do the same thing to get the one on the driver's side. Okay, and move up to our truck bed and take one of our rails and find the placement for it. And this is gonna be for the back or rear rail. What you're gonna do is refer to your instructions. They give you a diagram and some measurements and you pay attention to that depending on the length of your bed, you know, those measurements are gonna vary. So, I found ours and whenever you measure you wanna measure from the end of the truck bed. You don't wanna measure from your tailgate. All right, so take that measurement and I like to put a couple lines there. That way we are able to find the distance that we need for our back rail. Once you find the distance from this edge of the rail to the end of the truck bed you can make sure it holds true all the way across. And then make sure this is centered. So,, you can just measure from the end of the rail to your wheel well tub there on both sides, make sure that's proper. And then once you find that placement, what I like to do is just take a a pen or something and kind of trace all the way around it just so if we bump this or something, we got the exact placement, it's just a good reference. From there you can then mark the locations that you're gonna need to drill for the hardware. So, if you go 1, 2, 3 in, you're gonna have both of those. So, put a dot in the center. You can use the center punch too, if you got one of these. Moving to the middle, you're gonna have both of 'em there. And then the same deal on the other side, you're gonna be using these holes. Go ahead and move your rail out of the way and then we can drill out our attachment points with the pilot bit. Never a bad idea to check underneath the truck. Make sure nothing important is down there. And we'll go ahead and and get these drilled out. (tool operating) Underneath, if your truck has dual exhaust, you are gonna have to temporarily just take off the driver's side tailpipe. It's not really a big deal. If you come more towards the middle of the truck where it wise off we're gonna have a fastener here that we can remove. Our truck does have aftermarket exhaust but the same concept holds true for those of you that have a factory type exhaust as well. Might look a little different but ideas the same. So, we'll loosen up this band clamp in our case it's a 15 millimeter. (tool operating) Get that loose and then we can work on some of the rubber hangers. Our rubber hangers, there's gonna be I think two of 'em on our truck. You're gonna remove 'em all the same. You can spray these down with soapy waters, some type of lubrication, take a pry bar and just work one end of the hangar off there. In our case, the other one will be right here, looks like OEM exhaust. So, you'll have a another one a little bit further towards the front of the truck, but either way get 'em all off using that same technique. (metal clanking) When you're taking these off it don't really matter what end you take off. Seem like an RKC one up top here goes through these two is a little bit easier actually. The last thing you removed if you kinda work your tailpipe back and forth, we should be able to slide that portion of it out for now. On each side of your truck we're gonna have this sensor here and you can take a trim tool or a flathead screwdriver work that off. We're gonna disconnect these. There's a red tab you can push up on it. Sometimes these are just locked in from all the dust and stuff, so you might have to kind of finesse it a little bit here, push it upward like that. And then there's a center tab you can push down on and separate the two. I do that same thing on the other side of our truck. And then up along this whole crossmember here there's gonna be some wiring and essentially we just need to release all of it. So, find wherever there's a, you know, a plastic keeper holding it in and pry up on it to get it removed. This exhaust hanger bracket is actually bolted to this crossmember and we're gonna have to remove this. Bolt's pretty much impossible to see but relatively easy to get to. Right on top there, you can get it removed using a 13 millimeter. (wrench ratcheting) Once we get that bolt removed we're able to work this around here and drop it down. It feels like there's a tab or something. Yeah, this little tab is kind of bent up inside there too. So, if you kinda rotate it like this you're able to pull us out and get it outta the way. We'll go ahead, grab our C channel here and there is a specific way this is gonna have to go in. So, this side's gonna face towards the back of the truck. This side is gonna face up towards the bed. And this side will face the bottom or towards the ground. We'll take this and work it in and it will take some, you know, you'll have to kind of finesse this in around the exhaust and all the other stuff to get it in here. Just make sure you're not pinching any lines or anything. Go ahead and kind of start to roughly get it into position. That C channel, how it's gonna work, it's gonna sit on top of this crossbar and essentially get pushed all the way towards the back of the truck where it's gonna hit the hat channel or the bed support. And so you might have to take a rubber mallet or something and kind of tap it into place and get it lined up. If you remember those holes that we drilled through the bed, those pilot holes, it's not a bad idea to take a peak at those, make sure that those are lining up with our C channel. And then on each side about, I don't know a third of the way down from the edge there's here to be a big hole in there and you can take the, I believe it's a five eight bolt flat washer, run it up through the factory bracing, up through the C channel and then take a nut and get it started. I'll do the same thing for the other end of our C channel as well. Back up top in the bed you can now come back with the larger drill bit and enlarge all of our pilot holes to the final size. (tool operating) Once the holes are drilled out, not a bad idea to come back with some clear paint or something like that and cover up the bare metal to protect against rust which I have done, give it a minute to dry. And then in the middle for these holes you wanna take these U-shaped spacer blocks, put them in, that way we can kind of fill that void there in the corrugation. We're gonna set our rail roughly into position here and we're gonna take these type of bolts and just drop 'em down through (metal clanking) Underneath the truck, that's where a hardware comes through and we're gonna focus on the stuff on the hardware close to the back of the truck. So, for this one and then the one on the other side you're gonna take the U-shaped spacer block like this slide it in between there to fill that void. You might have to take a screwdriver or something, pry down on the hat channel just give you enough space. And then you can take this spacer block slide that over and they give you these handle nuts. In certain cases they might be applicable, it might keep the handle on. But for these I just cut it off that way I can actually get this started by hand here and keep it in place. For the one here in the center since there is no, you know, gap there you're just gonna take one of the spacer blocks like that and put the handle nut on. On the other side everything is essentially gonna be set up the exact same way. You know, in the middle you just put your spacer block and the nut on the ends. You take your U-shape spacer, slide it in between there, put the flat block on and the nut. So, you wanna get all of 'em started hand tight. What you can do now is take the hitch that you're gonna be using and put it into the rails and this is gonna determine, you know, you put it in the back rail and that's gonna determine the placement for the front rail. So, you lift up, you know, the front of your hitch, slide that front rail to place 'til it clicks in. With that, you wanna wanna make sure the front rail is centered just how we did the back. And once you're happy with it we can then mark out the spots that we're gonna use to attach it. Attachment points are pretty much gonna be identical to the back rail. You know, you'll use these on the ends of the rail and then instead using two bolts in the center you're just gonna use one and you want to put that one, you know, at the point closest to the front of our truck, so right there. So, I got all the holes drilled out, put our rail back in place. I like to leave the base of the fifth wheel in still, just kind of helps keep everything true. But with those drilled out, you know, you can paint 'em up, let 'em dry and then drop in the hardware. The same combinations that we used for the back rail also applies to the rail up here in the front. We can move to our wheel wells now and get our frame plates installed. And so we're gonna be working right here in this area just in front of our rear tire. What you're gonna do is take a pull wire, take the coiled end and feed it through that hole and towards this larger one here and we're trying to get it to come out there. So, grab the coiled end, put on one of these spacer blocks and the carriage bolt. So, we'll just thread it on, feed that hardware into the frame, pull it out and then on that one you're gonna take this larger spacer block, one of those deals. And for this attachment point you're just gonna take the coiled end there, put your spacer block and carriage bolt on it and then put the carriage bolt in first, followed by spacer block, pull that through. And on this one you can take the smaller block that we give you and set it up like this. This support bar here, this is gonna kind of get in the way of us getting the side plate in. So, this bolt up top, (tool operating) pull that out with a 10 millimeter, kind of bend this out of the way, give us a little more working room. And grab our side specific frame bracket. Check your instructions, make sure you got the right one there. (metal clanking) That's gonna slide in like that though. And then our hardware can run the fish wire, slide out through the bracket. (metal clanking) Push this up into place here. The hardware pulled through so we can carefully remove our pull wires. We'll need to use 'em for the other side. And with the pull wire off, you can take a flange nut get that started hand tight. And I'll do the same thing for this bolt here. We're here on the driver's side, essentially set up the exact same way. There's a little piece of rubber that they give you that you can put on one end of it where it kind of sits up against the wires a little bit. So, you can pop that on there and just make sure you don't have anything getting pinched. It is close to several wires so make sure they're all clear Before we get everything tightened up. Now, we can get the hardware for our, you know front rail going. The most difficult ones are gonna be, there's two that go in these hat channels here. So, you can take your handle nut and a spacer block, tape the spacer block to it, and you're gonna have to kind of finesse it and put a bend in the handle. I like to attach it to needle nose vice grips if you got 'em and then have someone up top, you know, turn the bolt and try to get everything lined up and going. So, have little patience here. Once you do one side you'll kind of figure out the technique or the tricks, so to speak, and the other side be a little bit easier. Once all of our hardware is in placed and hand tight then we want to come back and make sure it's all snug. So, you can hold the hardware down here with your wrench and have a friend up top, you know, making sure we get everything snugged down. (tool operating) Once you have these bolts tightened you can come back snug up the ones here in the middle and then the frame plate ones on the side. Once all those are snug, use that same tightening sequence, except this time with the torque wrench, to tighten everything down to the amount specified in your instructions. So, once you have all the hardware torqued down to the specifications, at that point you can go ahead and re-install everything the opposite way that you removed it. You know, your wheel well liners, your exhaust, your heat shields and so on. So, once that's all in place, you should be good to go. And that'll finish up a look at in our installation of the Curt Fifth Wheel Rail Kit on our 2017 Ram 1500.
Average Customer Rating: 4.4 out of 5 stars (18 Customer Reviews)
Install your fifth-wheel trailer hitch in half the time with this custom bracket kit. Requires less drilling than universal kits and provides a custom fit for your vehicle. Includes everything you need for installation.
The Curt Custom 5th Wheel kit specifically for our 2016 RAM 1500 Crew Cab, 5’ 7” bed, was perfect. Professional installation cost $400+. CombinEd with the Reese sidewinder we installed ourselves, we can almost make a 90 degree turn if ever needed. Thanks, JW, Long Island, NY.
In this case... You get what you pay for! This was a high quality product that was specific for my 2017 Ram 1500 6 1/2' bed. This was the only kit I found specific for short(er) bed RAM Trucks. Following the paper instructions along with the video provided by etrailer.com made this install downright easy.
DIY'ers - Remove the spare tire first! I reversed my truck onto Rhino Ramps and had plenty of room to do this job with typical tools and the help of a ratcheting 1/2 inch wrench. Use a punch / drill a pilot hole for your larger bit. Don't worry about the 17/32 drill bit.. a 1/2" bit worked just fine. This will not be a quick job, like the one shown on the video. Allow yourself time to take 4 hours to complete the job. You will have a crap ton of spacers left over.
67" Beds - Follow the video to the T.. The truck in the video is obviously a 67" Bed.
76" Beds - You'll notice when it's time to add the frame brackets that the video has a frame beam but up against the bracket that goes on the frame.. Yours will be further back.. You'll also notice the frame doesn't match.. Don't worry, use the same hole location as instructed on the video. You only have to remove the frame stabilizer on the drivers side..
I followed the install video, but did not try to remove dual exhaust. Remove rear tires, wiggle cross brace in to place from right side of truck. Was worried, mounted close to the front of bed. But really happy, kit was great. Took 6 hours to install, with help from the wife. When hooked up, lots of room to turn. Very happy, thank you
Nice kit use on my 2016 ram 1500 2 guys a case of beer and five hours got it done .
Installation kit is a good quality product. I was a mechanic for over 25 years and found the instructions to be thorough but somewhat difficult to understand. The instructions are vehicle specific but should have more photos showing things like where to drill access holes. It's also a good idea to remove the spare tire for easier access. Instructions say it should take 90 min to install, (maybe my next time), took me about 4 hrs by myself. I like that it is compatible with multiple hitches.
I have enclosed 2 photos showing how I received my order. I did inventory the items and all appear to be there with the one bent nut handle. The 3 star review is directly related to packaging.
Customer and product support is better than great as well as prices, service and available selection. Being new to 5th wheel hitch requirements I was able to get all the info needed on type and additional parts required. Received everything on a timely basis, had it installed locally without any problems what-so-ever. This is a great company by any standard and sure to be the next retailer success. They have covered all the basis in what it takes to be not just a good retailer but truly a great retailer.
Etrailer is the best. Rails and kit arrived quick and in good shape. I have put 2 on Ford's and we're a lot easier because of room to work, Rams are pretty tight. Rails and kit are great quality and cheaper than Reese kits. A lift would have made it easier but not necessarily.
Great product, very easy to install, only thing that could've been better would be two longer handles on the nuts installed inside the bed sill.
Perfect fitment. Quality parts and hardware.
Beef that ram up
Very hard to install and instructions were terrible!
Great product and easy to install

Do you have a question about this Fifth Wheel Installation Kit?
Info for this part was:
At etrailer.com we provide the best information available about the products we sell. We take the quality of our information seriously so that you can get the right part the first time. Let us know if anything is missing or if you have any questions.


Thank you! Your comment has been submitted successfully. You should be able to view your question/comment here within a few days.
Error submitting comment. Please try again momentarily.