


Customers prefer these similar products
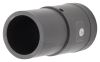
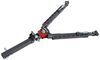
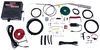
Replace the hardware on your Roadmaster Falcon 2 or BlackHawk tow bar.
Features:

Videos are provided as a guide only. Refer to manufacturer installation instructions and specs for complete information.
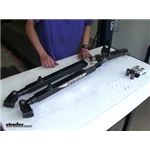
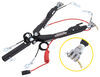
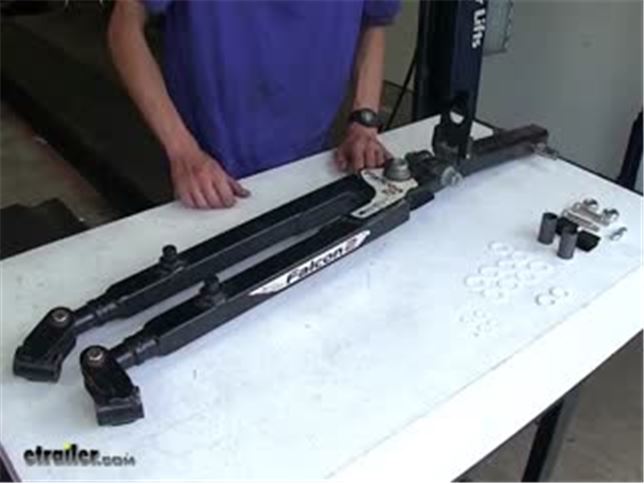
Speaker 1: Today we'll be having a look at and showing you how to install the Roadmaster service kit for the Falcon 2 tow bar. Part Number RM910003-65.Here we are at our motor home. We have our Falcon 2 tow bar on the motor home currently. We're going to see how well it operates and see if there's any room for improvement on it. Now in this particular case, our tow bar does have a lock on it, but our customer did not provide us with the key, so we can't fully insert it into the hitch on our motor home. But we can still show you how well it's going to work.We'll start by grabbing our arms here.
As you can see, in here it's a little squeaky at our pivot point. So pull it all the way out, pull down our latch, fold it down. It's a little squeaky there too. Pull on our arms. They easily lock into place.
We'll how well they retract. They are binding a little bit and feel a little rough and not entirely smooth. So we're having this squeaking issues and feeling a little bit of binding in it and not being 100% smooth, that's one good sign that you're going to need to service your tow bar.Also, we're going to attach this to our baseplate on our tow vehicle on our arms right here. You can see it's a little wobbly. So the bushings inside here could stand to be serviced as well.With our tow bar service, we'll show you how much different it is compared to before.
It now easily pulls up and goes to either side. It'll easily come out of the storage position. Our arms will easily move apart now to connect to your baseplate on your tow vehicle, and our arms now really easily pull out. Before, they we're binding a little bit. Now, it's like we have a brand new tow bar and all of our pivot points move nice and freely with a lot less squeaking and no binding.
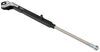
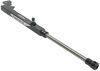
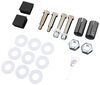
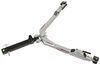
Our arms will also go back in quite a bit easier now. It's a much smoother operation.By simply servicing a few of the acetal bushings and washers, our tow bar is much easier to use now with less binding, a lot less squeaking, and it's like a brand new tow bar again basically. So we can avoid the costly investment of replacing our tow bar because it was difficult to use and spend quite a bit less in order to service the one we already have.Now the acetal washers that we have here, these are unique because they are much more chemical resistant than other plastic washers out there. Also, they won't absorb moisture from the air or rain quite as easily as other forms of washers. This is important because as something absorbs moisture, it will expand. And by expanding, it takes up any of the free play that we have and it won't be easy to remove anymore. Now that we've gone over some features, we'll show you how to get it installed.Here's what our rebuild kit comes with. We have an assortment of different size acetal washers and bushings. Some larger bushings here for our arms, replacement covers for the end of our arms, new bolts and nuts for our pivot point where it attaches to our baseplate, and new nuts for our stinger that already have Loctite installed on them.To begin the replacement process, we're going to start with the bolt on our stinger and the stinger is where it inserts into the receiver on your motor home. Take a 5/8" Allen Key to hold the bolt still and we'll use an an 1-1/8" socket to remove the nut.Here with the nut removed, we can discard this nut because we have new ones. We'll now take off our metal washer. We'll hang on to this because we will reuse this. Now, we'll push our bolt through the stinger a little bit and we can pull the bolt all the way out. We have a metal washer on the bolt, we'll keep that. We'll get some cleaner here and clean out our bolt so we have a clean surface for the pivot arm.Now, we'll take some brake parts cleaner or something similar in nature, spray it on a towel, and we'll just wipe down our bolt. As you can see, it's a little bit cleaner, so it'll be smoother operation for us. So we'll just set this aside for right now.Here, the acetal washers that came out of our stinger. As you can see, there's a little bit of groove action going on here. It's not completely smooth, which will cause a little squeaking and give it a little bit of a bind to it. Here's our new acetal washers. As you see, they are completely smooth. There's no wear pattern at all, so this will give us nice, smooth operation.Now we'll take our stinger bolt, place it back in. We'll place one of our new washers over our bolt, then we'll take our stinger, line it up with the bolt. We'll push the bolt through and before it's all the way through, take another one of our washers, insert it and then push the bolt through the stinger and out the other side. Just like that.Now we'll take our metal washer, reinstall it, and we'll take one of our new nuts, thread it back on and we'll tighten it down. Now we'll make sure that it still moves freely and isn't too loose. That's how we'll ensure the proper tightness on it. Just like this is great. It move nice and freely and our squeaking is greatly reduced.Now for our outer arm bushing, there's something to note. We have a new replacement bushing but if your outer arm has a groove on the end of it, you don't need to worry about replacing the bushing. If your arm has no groove, you'll replace it with the new provided bushing.Now we need to replace the washers and bushings inside of our yoke, which is this bolt right here. So we'll rotate it, get it on its side and we'll remove our nut the same way we did on the stinger. We have a replacement nut for this so we can discard this nut. We'll remove our metal washer here. We will be reusing this so we'll hang on to that.We have one of our acetal washers here. Discard that. You may need to tap your bolt out. Make sure you use a rubber mallet so you don't damage the threads on it since we have to reuse the bolt. Now we'll remove the bolt. The bolt will come out, we'll have our metal washer and we'll clean our bolt again.Now inside, we have six acetal washers. We took note of the order of them, so make sure to put it all back together properly. Now we'll just grab our stinger and pull it away from the tow bar in order to get the washers out. Now that we have all of our old washers out, we'll take our bolt and our metal washer and we'll stick it back through the original location and we'll take our new acetal washers and install them at the same time as we push it through. Having a hook or something to help push them through, to line up with the bolt, will make it easier. We're just putting them back in the same orientation that they we're originally.Here we have our six washers and bushings in place on the inside. Now we can knock our bolt through all the way. Place our final one on and our metal washer. Then we'll install our new nut and tighten it down.Now we'll check our movement on it. Okay, it's moving smoothly with no binding. Now we'll work on replacing our inner bushings. In order to do that, we need to pry off this cover. So you use a flathead screwdriver to get behind it. We can discard these since we have replacement ones. Now we'll make our reference mark where our tow bar arm connects with our inner arm here, so we can line it up appropriately.You can use a felt tipped marker for this or a paint marker. I'll use a paint maker. Okay with that marked, we can now remove our bolt and nut. We use a 1/4" Allen Key to hold the bolt still and a 9/16" socket to remove the nut. We have new nuts so we can discard these. We'll pull out the bolt. We also have new bolts so we can discard the bolts. Inside, we'll have our two washers, which we can discard since we have replacement ones of those as well. Now we can spin our arm pivot point off the inner arm.Now we'll take a towel, stick it over the square end where our cap was. This will just help catch anything that might come out. We'll press our auto-lock button on the arm and then slide the inner arm through. Okay now, we'll just continue pushing out and the reason we have the towel in place is to catch our bullet, which locks the tow bar arm in place. There's a spring underneath that, that we'll remove. Then we can pull the arm out and on the bottom, we have our bushing.As you look at this one, you can see how badly worn it is. So we'll pry that off with a screwdriver. We have a look at it. Compare the new one, you can see how it's worn grooves on the side and this is why we need to rebuild our tow bar. Now we can pull our arm all the way out and we can thoroughly clean it.With our inner arm clean, you can see how shinier it is, so this will slide a lot easier inside of our outer arm. We can reinstall this. We'll place on our new inner bushing. It'll simply just press on to the inner arm. You may need to assist it with a hammer. Just use a rubber mallet and drive it on flat, make sure it's seated all the way around.Take our spring, drop it back inside and we'll get it in position as best as we can. You have to maneuver it a little bit to get it through the outer bushing, which we're not replacing in this particular application because of the design of it. Once we have it in the right position, starting to go through our outer bushing, we can take our bullet. The round part will face up. We'll push down on it and insert it through our outer arm. It'll take a little bit of effort to get through. We'll just use a pry bar and a mallet to tap it in a little bit, making sure we're hitting it on the arm and not the bushing.Now we can take our threaded collar here where our arms attach to, screw it on a little bit. We're going to use that to pull out the arm and it'll lock in place with the bullet. Now we'll continue screwing down our pivot point for our arms until our marks line up. I'm going to see if our bolt passes through, and it does. That's where we need to have it. Place our washer on, stick the arm on, drop our bolt through, then we'll get another washer in underneath before passing it all the way through. Just like that.With our bolt all the way through, we'll install our new nut and now we'll tighten down the hardware. Make sure our arm still moves freely. Right there, that's exactly where we want it. Now we can install our new end cap. It'll simply just press into place in the back of our arm. Use an extension and a hammer, knock it in square.Okay with that on, we can repeat the same process for replacing the bushing on the other arm. That completes our look at and showing you how to install a Roadmaster service kit with a Falcon 2 tow bar. Part number RM910003-65.
Average Customer Rating: 4.8 out of 5 stars (19 Customer Reviews)
Replace the hardware on your Roadmaster Falcon 2 or BlackHawk tow bar.As always perfect product, fast delivery
Received exactly what I ordered. Thanks for your prompt response.
Complete kit. Arrived as scheduled
I have this product 3 star rating only because the nuts that were included had loctite in them and apparently it had hardened to the point that the nuts were unusable! Even with a 1/2 inch ratchet, an impact wrench and a pull bar they were simply not usable. I gave up and used the old nuts with new loctite. The rest of the kit was perfect!
I was very happy to locate this kit at etrailer.com. I also purchased kit RM-91003-50 at the same time. Both kits are required to do a complete rebuild of the towbar. They arrived exactly as promised and I have installed both, which saved me around $500, the cost of a new towbar. Installation was straightforward but you do have to "read between the lines" in the included instructions in order to get it right!
I couldn't be more pleased with etrailer.com. I was able to use PayPal, which eliminates the credit card hassle. I occasionally order from various places online and this was definitely one of my best experiences. I immediately received an order confirmation with a shipping notice several hours later. Great customer service and follow up.
I just love that it is all there! Great service in the shipping and delivery in a very timely manner.
Fast service at the Bests Price

Great product, fit perfectly
Parts are of excellent. Ordering,shipping and service is excellent.
Everything was as advertised. Shipped on time. Good job
A
Can highly recommend your Company.
Service great as always.
Do you have a question about this Accessories and Part?
Info for this part was:
At etrailer.com we provide the best information available about the products we sell. We take the quality of our information seriously so that you can get the right part the first time. Let us know if anything is missing or if you have any questions.


Thank you! Your comment has been submitted successfully. You should be able to view your question/comment here within a few days.
Error submitting comment. Please try again momentarily.