


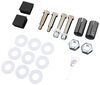
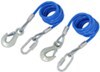
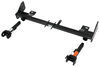
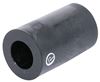
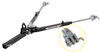
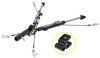
Replace 1 bushing on your Roadmaster StowMaster All-Terrain, Falcon 2, or Falcon All-Terrain tow bar. Installs in the outer arm of the tow bar arm so the inner arm can easily slide in and out.
Features:
Average Customer Rating: 4.8 out of 5 stars (15 Customer Reviews)
Replace 1 bushing on your Roadmaster StowMaster All-Terrain, Falcon 2, or Falcon All-Terrain tow bar. Installs in the outer arm of the tow bar arm so the inner arm can easily slide in and out.
I have had my Roadmaster tow bar for 16 years. It needed to be rebuilt I found the rebuild kit at etrailer, ordered it. Was exactly what I needed
This review is for the RoadMaster RM-910003-85 tow bar repair kit and associated RoadMaster RM-200029-70 Nylatron Nose Cone Bushings. If you don't need the RM-200029-70 bushings, some of this review will not apply.
Let me start off with the usual kudos to etrailer for fast service, and RoadMaster support for advice and ensuring I had the correct parts. The parts made my towbar work properly again, and that is a wonderful thing. Before I did this project, I had to force the inner arms into place (deployed or stowed) with a 3/4" dowel through the swivel ears and lots of effort.
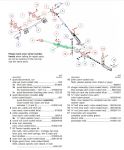
The ugly side of the story... I got the towbar used, with my motorhome, so I don't know how old it is. I know it is the 'newer' type (with a groove, see photo) described in the RoadMaster instructions that came with the kit. The bushings that come with the kit are for the older style towbar, hence the need for the RM-200029-70 bushings. The videos you may find online showing installation of this kit make it look much easier than my experience.
The instructions say to start with replacing the stinger washers and nut. I recommend you do this last. The nut for the stinger bolt and the yoke (pivot) bolt are the same, and if you don't reassemble the arms to the yoke correctly you'll need that second nut. Ask me how I know.
Step two says to determine if the outer arm bushings should be replaced. From my contact with RoadMaster, I knew I needed to replace the bushings, and bought the appropriate RM-200029-70 bushings. I discarded the bushings that came with the kit.
The instructions say to "carefully note the position... as well as the location of the six 1 1/2 inch diameter acetyl washers..." Use your phone and take several color photos, as well as write down the order of every item (bolt, metal washer, acetyl washer, safety plate, arm) as you disassemble it. Again, ask me how I know. This is why you save that second nut.
I didn't have a 5/8" Allen wrench, but a pipe wrench works for the yoke and stinger bolt.
Removing the swivel ears was a piece of cake. The round nuts were another matter entirely. They did not "unthread and remove." To remove them I had to clamp the inner arms in a padded-jaw vise, insert a smaller diameter rod (screwdriver) into the shoulder bolt hole, and pound it back and forth until the round nuts were loose enough to remove. Using said screwdriver for leverage. After using penetrating fluid. Then, after removing the round nuts, use your wire brush and some solvent to thoroughly clean the threads on both the arm and the nut. I spent over three hours trying to remove the round nuts.
If you have the newer style (with groove) towbar, the bushings do not come out "with the straight edge screwdriver and the needle nose pliers". I had to destroy mine to remove them. See the photos. Experience got the second bushing out in about 30 minutes, the first one took two hours. The new bushings have a small hole for an alignment pin, and a raised ring to fit in a groove (see groove in photo). I found the pin (tiny) in the cleaned out arm and snapped it off with a chisel. Not sure what good it would do after pounding the new bushing into place, so I eliminated the possible aggravation. Once you get the hole cleaned out with a wire brush, hammer the new bushing in with a rubber mallet. If you don't have a rubber mallet, use a block of wood and a regular hammer. It's a tight fit. Pound it until it doesn't go any further.
Before you reinsert the inner arm into the outer arm, check the anvil tension. There should be no more than 3/16" between the anvil and the arm, when the anvil is pulled away from the arm. This is so the locking mechanism for the arm works properly, and IS NOT COVERED in the instructions.
The instructions give a good diagram of how the round nuts should thread onto the inner arms. The reference line drawn before removing the round nuts washed off while I was cleaning the threads, but was not an issue. The round nuts go on as far as they can, until the shoulder bolts will not fit through. No photos of this, because FOCUS and I'm not going to take it apart again. Then loosen the round nuts just until the shoulder bolts fit. I checked both nuts on both arms, and installed for the least 'slop' in the round nuts with the bolts installed. RoadMaster states that after installing the swivel ear, "the swivel ear should rotate NO MORE than 10 to 15 degrees in either direction". This is set by the round nut on the arm - just drop the bolt through and check the amount of movement before installing the swivel ear.
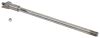
Step 23 - Reassemble the yoke bolt through the tow bar arms. This is where you want those color photos and written order I mentioned earlier. Make sure the safety plates are installed correctly, with the straight side in the slot on the yoke. You may want to line all this up using a 5/8" dowel, then slide the yoke bolt in. When you're sure it's right, install and tighten the nut. Don't do what I did.
If you've done everything correctly, your towbar will be 'tight' and the arms will slide freely, and lock in place. And you will be a happy camper.
As always, etrailer has great service and parts inventory for any rv or trailer project. I needed rebuild parts for a Roadmaster Blackhawk 2 tow bar. They had everything in stock. Ian was great to work with and corrected an order when I had made a mistake when ordering. I have used etrailer many times in the past few years and will not go anywhere else. I especially enjoy their You Tube videos on various installation procedures. Since I am a DIY person, this is important! Everyone should make this their go to place.
I ordered the rebuild kit for my Roadmaster towbar along with new bushings from Kaylyn on 3/12 and received the parts on 3/18. That’s really fast service, and Kaylyn was very sharp about what I needed and only what I needed. Rebuilt the towbar yesterday and now it’s like new and I can collapse it like it was designed to do, previously I could not telescope the drivers side arm so it was difficult to hook up and unhook car. Couldn’t be happier with the price, delivery and professional advice I got with this order. You rock Kaylyn, oh and you too etrailer.
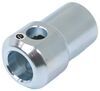
This is the part I originally needed but no one could explain it to me. I ordered a kit to "rebuild" the hitch and of course the sleeve was not the correct one. Finally, I just ordered 2 of these sleeves and they worked. NOTE TO SELLER: Make a kit that includes this sleeve and not the small one that came with the kit I ordered. Sorry, I don't have all the numbers. I know have a bag of parts I don't need but I do have a hitch that works. Oh well, whats $39 bucks anyway?
My Roadmaster All-Terrain was several years old so I decided to rebuild it. These replacement parts were perfect. Everything fit correctly which made the job really easy.
After several days of trying to find right parts for my tow bar arms ,the folks at etrailer saved the day. One year later still going strong.
Looks good. No instructions, but appear to be a straight replacement for split bushings. Quick delivery and well packaged.
Great instructions. Easy step by step.
another good experience with etrailer!
Easy to install
Do you have a question about this Accessories and Part?
Info for this part was:
At etrailer.com we provide the best information available about the products we sell. We take the quality of our information seriously so that you can get the right part the first time. Let us know if anything is missing or if you have any questions.


Thank you! Your comment has been submitted successfully. You should be able to view your question/comment here within a few days.
Error submitting comment. Please try again momentarily.