
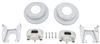
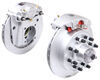
9/16" Wheel bolts are included with this 2-assembly brake kit. Dacromet-plated rotors and stainless steel calipers and mounting brackets fit 7,000-lb axles and 16" and larger wheels. 13" Rotor has 8 on 6-1/2 bolt pattern.
Features:
Specs:
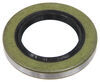
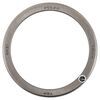
Bearing, Race and Seal Information
More and more people are switching their trailers over to disc brakes, and with good reason. Disc brakes deliver consistent braking - even at highway speeds - unlike drum brakes, which often show a substantial drop in braking torque at higher speeds. In addition, disc brakes offer a substantially shorter stopping distance than drum brakes. Disc brake calipers have only one moving part, rather than the many found in drum brakes. This means that there are fewer parts to maintain, fewer parts to get damaged and fewer parts to have to repair or replace, thus reducing maintenance costs.
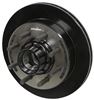
The integral hub-and-rotor is made from cast iron, matching SAE specifications. Cast iron is ideal for high-temperature operations and offers a favorable friction coefficient to ensure adequate stopping power. Kodiak's rotors are vented to effectively dissipate heat, dramatically reducing the incidence of heat-related damage. Furthermore, machined disc brakes minimize the chance of contamination between the hub and rotor, resulting in excellent performance and long life.
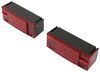
Kodiak calipers are constructed of stainless steel to prevent flexing and rust. Less flex means more braking torque, resulting in smooth, even braking every time. The corrosion-resistant stainless steel piston is 30 percent larger than standard pistons, ensuring shorter stopping distance and increased torque. In addition, the unique low-drag design of Kodiak's calipers allows the piston to retract farther than in most standard models, giving you a cooler-running brake.
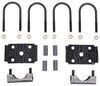
Designed for axles with 5-bolt brake flange configurations, the included mounting brackets are made of heavy-duty, corrosion-resistant stainless steel that is embossed to provide additional threading for guide bolts. The added thread strength ensures a tighter, more secure connection between the caliper and bracket. Another unique feature of Kodiak's brackets is the side-support angle, which guarantees that the load is carried by the bracket, rather than the bolts.

Videos are provided as a guide only. Refer to manufacturer installation instructions and specs for complete information.
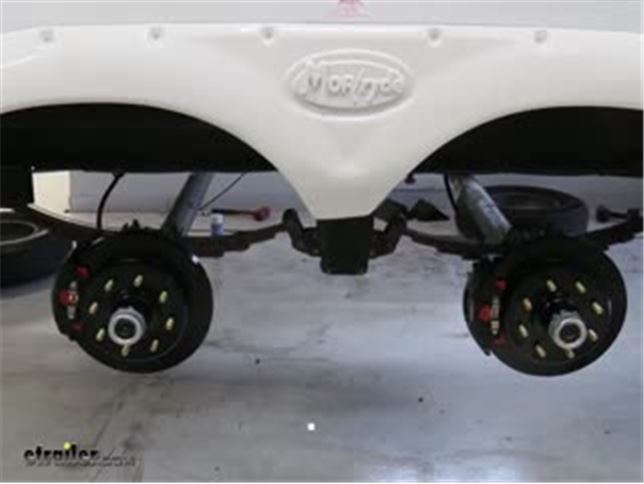
Speaker 1: Today we'll be having a look at the Kodiak line of disc brake kits. Here's what our brakes look like installed. Now the reason you're gonna want these particular brakes over your traditional electric style drum brakes is that having hydraulic disc brakes will give you a much better stopping performance and ability than what you would have with the drum brakes. You'll be able to stop a lot faster, a lot smoother, and a lot safer.We're putting less work on our truck and more work is being performed by out camper, our trailer, or our fifth wheel, whatever we are putting these brakes on. Now one of the reasons that we're going to have enhanced stopping ability is because we have a large diameter rotor which gives us increased surface area for our brake pads to bite onto. By having the large rotor this also helps dissipate heat better.
We also have a vented rotor which will help dissipate the heat better. By having the heat being dissipated we are going to have increased brake life and power as we're stopping because as our brakes get hot they get less effective and you experience what is know as brake fade, the hotter the temperature of the brakes the less effective they are at working properly.Now our pads are applied to our brake rotor by our caliper. We have a single piston here which pushes our inner brake pad against the inside surface of the rotor and pulls the caliper towards the rotor so the outside pad makes contact and our caliper has two slides, one at the top, one on the bottom. As the piston pushes the inner pad against the rotor it pulls the caliper body itself with the outer pad onto the rotor thus clamping it, squeezing our rotor, and slowing it down, bringing our trailer to a stop. This piston is designed to operate off hydraulic pressure of at least 1,500 PSI, just keep that in mind if you're converting an old trailer that has electric drum brakes, you need to purchase an actuator that puts out at least 1,500 PSI.Now just like automotive grade brake pads these brake pads are equipped with a chamfered edge on the end and that chamfered edge will help prevent us having squealing and squeaky noise as the brakes are being applies, it'll also help reduce chattering.
This will give us a smoother and quieter ride.The brake pads themselves are made of a ceramic construction which will help cut down on brake dust and also give us more resistance to heat as we're stopping. Now our caliper, our bracket, and our rotor are available in different finishes, we can get them in an E-coat finishing like this, a dacromet finish, or a raw finish it just depends on what you're looking for. The dacromet and the E-coat will be more resistant to rust and corrosion over the course of time over the raw finish.Now these brakes are a great solution for 7,000 pound axles such as this one. They have an eight by six and a half inch bolt pattern and they are available with half inch or 9-16th inch diameter studs depending on your application.Now what I really like about these brake kits compared to other options out on the market is that by having ourselves a disc brake system we get the comfort and stopping ability that we're used to by driving our normal truck or our street car versus having the drum brakes that we use to have. These give us the stopping ability and the comfort that we're used to seeing in a typical automotive vehicle because it's the same concept, it's a hydraulic disc brake versus an electric drum brake.Now only do these stop better than electric drum brakes but we're also going to see a lower service cost when it comes time to actually needing to service our brakes again.
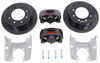
Unlike drum brakes where it's a little bit time consuming in order to replace your shoes in order to replace the brake pads on the system it's a simple matter of just removing two bolts, the caliper slides off, and you can put new pads in, put it back in. It's gonna cost you less money and less time in order to get back on the road.Here's what our kits comes with, we have two of everything you see pictured here. We'll have two rotor hub assemblies, two caliper mounting brackets, two calipers, and two sets of caliper mounting bolts. This is everything that you'll need to put brakes on one axle of your trailer.To begin our install we need to remove our old hub assembly. In this particular case we have electric drum brakes that we're installed so this will be a great upgrade once we replace these.
We'll need to remove our dust cap here, what I like to do is take a flathead screwdriver, go behind the lip, and we'll start to tap it out with a hammer. Now we want to make sure we clean out as much of the old grease from our dust cap as possible. Now we'll clear away the grease from our spindle. Okay with that cleared away we can find our nut retainer from behind all the grease, you'll have a couple different ways of having your spindle nut held in place, ours we have a retainer clip, you could have a cotter pin on yours.For this one we'll use a flathead screwdriver, come behind it, and it comes off. With this removed we can now spin off our nut. We'll set these aside because we will need them later. We'll now remove our washer, just use our flathead screwdriver to help pull it off the spindle. With our washer removed we can now remove our hub assembly. In order to do that just pull it towards you and we can set it aside. Now we'll wipe off all the grease from our spindle and inspect it for any damage such as burring, hot spots, nicks, or wear patterns.Now since our particular axle is an easy lube axle by having the zerk fitting here we're going to flush out all of the old grease from inside of it by using our grease gun. We'll stick it onto the fitting and we'll pump it full of grease until we get clean grease coming out of the spindle. You can see how we flushed out the old grease that way we have fresh, new grease coming out of the port from the spindle, wipe that off, this way we know we don't have any contaminants inside of our axle.Now since we have electric brakes on this trailer we need to remove the wires that go to our magnet. Let's cut those off and make sure we leave slack in case we ever decide to go back to electric brakes that way we can still hook them up and use our existing wiring. Now we can unbolt our backing plate assembly, in order to do that there are five nuts that go around the spindle that hold it in place. Now we can grab the backing plate assembly, pull it off, and discard it. Now that we have our backing plate off and we have most of our brake dust removed we can now really clean off our spindle and get it ready for the install. We'll use some brake parts cleaner, hose it down really good, and wipe it clean.Now we can take our caliper bracket, you'll notice how there's multiple holes around it, this is so we can gain our proper orientation on our axle. These brackets are not side specific, you can put it on either side of your axle, it doesn't matter. The only thing you want to make sure is that this part that says outside faces outside and your caliper attachment points face as close to the back of the axle as possible. We'll slide it on and match up our holes appropriately, as you can see here where we have it it's almost level and it faces towards the back so this is ideal for us. We'll now reinstall the nuts that we're removed, we'll tighten these down, I like to tighten them like a lug nut on a wheel in a crisscross pattern. Now we'll torque them to the appropriate amount.Now to carry on with the installation of our brakes we're ready to grease our wheel bearings and get them installed. Now we have the option of reusing our old ones but since we're putting a whole brand new hub assembly with a rotor on we're going to use new bearings. In our case we're using part number BK3-200. It even comes with new races but since we have brand new races installed on our hub already we're not gonna need the races nor are we gonna need the cotter pin that comes with the kit because we have a clip method of securing our spindle nut.Now we'll take our inner bearing and we'll start to grease it up just by sticking inside a tub of grease and we'll work this grease into our rollers by spinning it as we push it in. You can see we start having the grease come through and covering up our rollers all the way through and it's nice and fluid with no breaks in the grease, that's when we know we're starting to get grease adequately packed inside of our bearings. Wipe some here on the outside edge, we even have it coming through on the other side. Get a nice coating going around the outside of it, we'll wipe some around the inside where it rides against our spindle. Once we have it in the hub we'll rotate it a few times to make sure it spins nice and freely.Now we will install our seal, place it inside, make sure it's sitting as flush as possible, and we can drive it in. Now if you don't have a seal driver what you can use is a block of wood, place it square over the seal, and we can tap it in with a hammer. Once it's sitting flush around the edge of our hub we know we have it properly installed. Now that we have our inner bearing and seal installed we can take some brake parts cleaner, spray it on a towel, and we'll wipe off any oil or grease residue that's on the backside of our rotor assembly.Now we can take our hub assembly and we'll slide it on to the spindle of our axle. Now we can grease our outer bearing the same way we did the inner bearing. Now we can install the outer bearing, we'll slide it into our hub assembly, making sure it goes in properly. Now we'll take our washer, line the notch up with the notch in the axle, push it on, take our nut, thread it onto the spindle. Now we'll start to tighten our nut down, we don't need to have this super tight, just enough that it starts to take all the play out from side to side movement and it is secure. Once it starts to get tight you'll probably have to rotate the hub as we tighten it. We may need to back it off a little bit. Now we will install our nut clip that we removed earlier, that'll keep our nut from backing off.Now we'll take our grease gun, go over the zerk fitting on our axle and we'll pump it full of grease. Now that we see grease coming out of our outer bearing completely we know that the hub and bearings and spindle are completely saturated with grease which is exactly what we're looking for. Now we can reinstall our dust cap, okay with our dust cap back on we'll rotate our hub and rotor assembly and make sure there's no abnormal noises and that it's rotating smoothly and we'll check for any play in it. If we don't feel anything that means everything's good and we can carry on with the rest of the installation.Now we'll take some brake parts cleaner and we'll clean the rotor surface on the outside like we did on the backside. Now we can take our caliper, we already have our two bolts and our slides and we'll install it onto our bracket. We'll screw the bolts into our bracket, we'll tighten the bolts down with a wrench, there are 13 millimeter heads on them. On the backside of our caliper right in the center we'll find the port where our brake line screws into. We'll remove the red plastic plug from the fitting just by unscrewing it, take our brake hose, place it inside the fitting, thread it in a few turns by hand first, and then we'll use a line wrench to tighten it down. You use a line wrench on brake line fittings or brakes hoses because it won't strip off the end of the nut and you'll be able to get a good grip on it to sufficiently tighten it down. We don't need to over tighten these, just enough so it's tight and won't leak. Now that we have this all installed we'll repeat the same process for the other side of the axle.Now we need to begin the process of bleeding our brakes. When we bleed the brakes we'll make sure we're using the top bleeder screw, not the one on the bottom, and we'll be using the smaller section here which is a 5-16ths nut. We'll use a line wrench on this so we don't strip it and we'll have an assistant apply the brake controller on our towing vehicle or pull the brake away switch for our braking system. Go ahead open the bleeder and we're looking for a solid stream of fluid with no air bubbles. Once we have no air bubbles we'll close the bleeder and release the brake away switch and we'll move on to the next one.That completes our look at the Kodiak line of disc brake kits.
Do you have a question about this Accessories and Part?
Info for this part was:
At etrailer.com we provide the best information available about the products we sell. We take the quality of our information seriously so that you can get the right part the first time. Let us know if anything is missing or if you have any questions.


Thank you! Your comment has been submitted successfully. You should be able to view your question/comment here within a few days.
Error submitting comment. Please try again momentarily.