
Thank you! Your comment has been submitted successfully. You should be able to view your question/comment here within a few days.
Error submitting comment. Please try again momentarily.


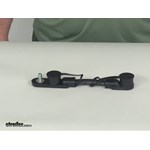
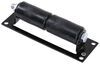
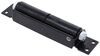
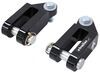
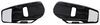
This black 2/0 gauge harness assembly connects multiple battery clusters. Overmolding protects your wiring and attached protective caps seal your connections. Made with 2/0 gauge PVC starter cable. Fits Group 31 batteries with up to 3/8" studs.
Features:
Specs:
California residents: click here
Videos are provided as a guide only. Refer to manufacturer installation instructions and specs for complete information.
Hi there RV and trailer owners. Today, we're gonna be taking a look at and showing you how to install Deka's Overmolded Parallel Battery Cables. These battery cables are a zero to two gauge wire, which is going to ensure that you're gonna be able to draw as much power out of these batteries as possible. If you've got a real big load, you'll be able to get that maximum potential out of this to be able to do so. Smaller cables may limit the output of your batteries and under certain heavy load conditions, it might limit it. And it might not be enough to power, whatever you're doing.
So, this will ensure that we can get the max potential out of it. These are also overmolded to protect us against the elements and things from falling down and hitting on them and causing any kind of short. They're also color coded to make things easy for identifying the circuit. So, you'll easily know that this is our positive side cause it's red and this is our negative side, cause it's black. That's really nice, especially if you're having to charge up your trailer or anything like that.
If you maybe you're telling one of your children or something, "Hey, go hook it up and charge it." And they may be a little bit unfamiliar. This makes things a little bit easier from the easy identify which one is the appropriate one. The cables are about seven inches in length. So, as ideal for a parallel circuit like this, where your batteries are sitting right next to each other. Cause you can see it's a nice clean look and it's just the right length that is almost perfect.
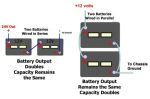
That has just a slight amount of excess cable there. That's nice to allow us to easily get everything connected. We're not trying to stretch and pull our batteries real close. And the extra post located on the end, gives us an easily identifiable attachment point, to hook our trailer up to our battery bank. Now these cables are designed for parallel circuits but we do have cables that are available here at etrailer, that are four year series circuits.
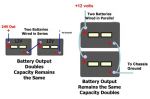
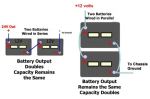
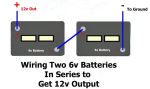
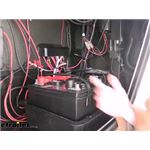
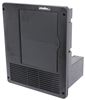
So, for you guys out there that are wanting to run six full batteries for that increased capacity we have those available as well. And a lot of times you're gonna be hooking those up in potentially a series parallel circuit. So, you might need a couple of other sets. For your series circuits, If you've got posts like this, that you can attach to, we've got plenty of cables that just have a nice generic end that makes it easy. We've also got these in varying lengths. So, depending on your array of batteries and how they're set up and where their positive and negative posts are you can ensure that you can reach those. The other ones we've got available have top post styles where you'll have a negative on one side and a positive on the other. They are different sizes for your top posts. So, it is important you've got the appropriate cable to hook up those batteries without damaging the ends. If you damage the ends, then you're likely, gonna have an issue later on down the road. Especially, if you have to service the batteries where you take them out once you've stretched that end and you go to put the next battery in. You know, a lot of times, they break at that point. So, having that appropriate cable is gonna make sure you can easily service and do everything you need to do with your trailer without running into issues down the road. We'll begin our installation by first locating our batteries In many of your trailers and campers you're gonna find it in the front compartment. And on your RVs, it's usually, in a side compartment or potentially underneath your steps. Once you've located your batteries, we can go ahead and remove our old cables and install our new ones. So, we've got our batteries located in our front compartment here. We did remove the top cover of the battery, so we could access them. It was just four screws and then the cover comes off. So, we're gonna go ahead and I'll remove our old cables. We're gonna start on the negative side. We're gonna remove the one that our trailer's connected to over here. So, we're just gonna remove the nut. Ours is a 9/16 size but it may vary on your particular batteries it depends on what sizes came with them. So, we'll disconnect the negative from our trailer. That way our trailer is no longer gonna draw any juice from our battery. And we can go ahead and I'll disconnect the rest of the negative cable. And then, we'll remove the positive next, making sure that we remove the positive cable from our trailer here. And we'll remove it from the positive on our other battery as well. And then, we'll just set those aside. We can not take our overmolded battery cables and we're gonna put them in place. I went ahead and pulled the caps off of them. So, that way we could slide these over. Your post over here on the sides where you're actually gonna be connecting your trailer to. So, you wanna make sure you get this oriented in a way it's gonna make it easy to connect them. Now, if we look at our batteries here. If we we're to put it off like this, this would likely, interfere with our battery box lid here. So, we wanna try to avoid that. So, we're gonna put it facing the other way. Cause you can see over here on this side we're not hanging off on the side of the battery. Now, we can go ahead and reattach it. So, we're just gonna use the factory nuts. I always like to start my bolts by hand because I don't like to strip things out. So, might be a good idea to you. There you go. You just need to get a couple of threads on there and that's good enough started. Sometimes, I just take the socket off of the tool and use that in my hand so I can try get it started without stripping it, or without cross threading it. Cause you'll be able to feel it if you're doing it by hand They are a little bit more difficult to install because of the overmolding. But that does help keep your components safe from shorts occurring. Ours is in a battery box here. So, the likelihood of a short is reduced. But if you've got batteries that are exposed, maybe you lost your lid or you just got hold downs that keeps your batteries in place This would definitely be an ideal upgrade to prevent any shorts from happening. Also, helps keep moisture and dirt out to keep corrosion from occurring. So, now we're just gonna go ahead and connect to those. And then, we'll repeat this process with our negative cable. You can see here, this one is black while that one's red. So that way, it's easily identifiable whether this is the positive or negative circuit from our batteries. So, now we can start hooking up our trailer to the batteries now. So, we're going to start with our positive cable. It's gonna slide over the post on the end there. And then, you do get new hardware included with it. So, we're gonna put on the lock washer and the nut. And we can go ahead and snug that down. The ones that come included are also going to be a 9/16 in size. Once we've got that snugged down, we'll do the same thing with our negative cable here. And we'll use the included hardware once again to secure that. Ang now that we've got our batteries hooked up you can see here on our power panel for our solar system that it's come to life and it started charging our batteries because we're now powering it up and we're gonna get that benefit from the sun today. Then we can put all the caps on since all of our connections have been made. So, it'll help protect all of our circuits again from any kind of moisture, dirt, debris, and also from anything coming on there that could potentially short them. Our connections are now made to our trailer. So, we're ready to hook up and hit the road. Our installation is basically, complete. If you had a battery cover or anything like that, you'd make sure that you put that back on before returning your trailer to service. And that completes our look at Deka's Overmolded Parallel Battery Cables..
Average Customer Rating: 5.0 out of 5 stars (6 Customer Reviews)
This black 2/0 gauge harness assembly connects multiple battery clusters. Overmolding protects your wiring and attached protective caps seal your connections. Made with 2/0 gauge PVC starter cable. Fits Group 31 batteries with up to 3/8" studs.
Bought these when I upgraded from 3 to 4 batteries in my semi truck. Pretty stout made & easy to add accessories directly to the batteries.
These are the good heavy gauge harnesses. I will buy more of these at ETrailer, as I build my battery bank. The price was as good as any. Thanks.
Perfect fit, really makes it nice when putting 2 deep cycle batteries together for emergency backup power, very clean installation.
Looks like a very well made Cable Assembly - rapid delivery - Thanks!
Built well


Do you have a question about this Accessories and Part?
Info for this part was:
At etrailer.com we provide the best information available about the products we sell. We take the quality of our information seriously so that you can get the right part the first time. Let us know if anything is missing or if you have any questions.


Bernie
8/29/2023
Been a year, still working good on same truck